LAMP之编译安装搭建
lamp编译搭建
1、lamp简介:
LAMP指的Linux(操作系统)、ApacheHTTP 服务器,MySQL(有时也指MariaDB,数据库软件) 和PHP(有时也是指Perl或Python) 的第一个字母,一般用来建立web应用平台。
2、搭建环境:
系统:centos6.5-x86_64
iptables关闭、selinux关闭、自带httpd服务关闭;
程序:
mysql-5.5.33-linux2.6-x86_64.tar
php-5.4.19.tar
httpd-2.4.6.tar
安装顺序:
mysql二进制安装
httpd编译安装
php编译安装
依赖程序:
apr-1.4.6.tar
apr-util-1.5.2.tar :httpd在编译安装时,需要借助这两个环境;
phpMyAdmin-4.0.5-all-languages :web方式管理mysql;
xcache-3.0.3.tar :php加速器;
编译过程中,可能因为系统原因,需要额外安装编译环境,根据配置过程中报错信息直接yum安装即可;
3、安装:
1、二进制方式安装mysql:
[root@localhost ~]# date 032811292015.50
2015年 03月 28日 星期六 11:29:50 CST :调整主机时间到当前;
[root@localhost ~]# groupadd -r mysql
[root@localhost ~]# useradd -g mysql -r -s /sbin/nologin mysql
[root@localhost ~]# id mysql
uid=496(mysql) gid=493(mysql) 组=493(mysql)
[root@localhost ~]# :创建mysql系统用户;
[root@localhost chen]# tar xf mysql-5.5.33-linux2.6-x86_64.tar.gz
[root@localhost chen]# mv mysql-5.5.33-linux2.6-x86_64 /usr/local/
[root@localhost chen]# cd /usr/local/
[root@localhost local]# ln -sv mysql-5.5.33-linux2.6-x86_64 mysql
"mysql" -> "mysql-5.5.33-linux2.6-x86_64" :解压后,创建链接文件到mysql;
[root@localhost local]# mkdir -pv /data/mydata
mkdir: 已创建目录 "/data"
mkdir: 已创建目录 "/data/mydata"
[root@localhost local]# cd /data
[root@localhost data]# chown -R mysql:mysql mydata/
[root@localhost data]# :为mysql创建数据库目录。生产环境中,数据库目录应该放到逻辑卷中,方便磁盘容量扩容。注意权限;
[root@localhost /]# cd /usr/local/mysql
[root@localhost mysql]# scripts/mysql_install_db --datadir=/data/mydata/ --user=mysql
Installing MySQL system tables...
OK
Filling help tables...
OK
[root@localhost mysql]# ll /data/mydata/
总用量 12
drwx------ 2 mysql root 4096 3月 28 11:41 mysql
drwx------ 2 mysql mysql 4096 3月 28 11:41 performance_schema
drwx------ 2 mysql root 4096 3月 28 11:41 test
[root@localhost mysql]# :初始化数据库,指定数据库目录和操作者;
[root@localhost mysql]# cp support-files/mysql.server /etc/rc.d/init.d/mysqld
[root@localhost mysql]# chkconfig --add mysqld
[root@localhost mysql]# chkconfig mysqld on
[root@localhost mysql]# cp support-files/my-large.cnf /etc/my.cnf
[root@localhost mysql]# vim /etc/my.cnf
thread_concurrency = 2
datadir = /data/mydata :为mysql提供服务脚本和主配置文件。并更改这两项,关键是数据库目录的路径;
[root@localhost mysql]# service mysqld start
Starting MySQL.... [确定]
[root@localhost mysql]# service mysqld status
MySQL running (2277) [确定]
[root@localhost mysql]#
[root@localhost mysql]# ss -tnl | grep 3306
LISTEN 0 50 *:3306 *:*
[root@localhost mysql]#: 启动mysqld服务;
[root@localhost mysql]# mysql
mysql> use mysql
mysql> show databases;
+--------------------+
| Database |
+--------------------+
| information_schema |
| mysql |
| performance_schema |
| test |
+--------------------+
4 rows in set (0.00 sec)
mysql> select user,host,password from user; :查看mysql用户表。root没有密码;
+------+-----------------------+----------+
| user | host | password |
+------+-----------------------+----------+
| root | localhost | |
| root | localhost.localdomain | |
| root | 127.0.0.1 | |
| root | ::1 | |
| | localhost | |
| | localhost.localdomain | |
+------+-----------------------+----------+
6 rows in set (0.00 sec)
mysql> drop user ''@'localhost';
Query OK, 0 rows affected (0.00 sec)
mysql> drop user ''@'localhost.localdomain'; :删除有漏洞的两个用户记录;
Query OK, 0 rows affected (0.00 sec)
mysql> update user set password=password('password') where user='root'; :
Query OK, 4 rows affected (0.01 sec)
Rows matched: 4 Changed: 4 Warnings: 0
mysql> flush privileges; :给root添加登录mysql时的密码;
mysql> select user,host,password from user;
+------+-----------------------+-------------------------------------------+
| user | host | password |
+------+-----------------------+-------------------------------------------+
| root | localhost | *2470C0C06DEE42FD1618BB99005ADCA2EC9D1E19 |
| root | localhost.localdomain | *2470C0C06DEE42FD1618BB99005ADCA2EC9D1E19 |
| root | 127.0.0.1 | *2470C0C06DEE42FD1618BB99005ADCA2EC9D1E19 |
| root | ::1 | *2470C0C06DEE42FD1618BB99005ADCA2EC9D1E19 |
+------+-----------------------+-------------------------------------------+
4 rows in set (0.00 sec)
[root@localhost mysql]# mysql
ERROR 1045 (28000): Access denied for user 'root'@'localhost' (using password: NO)
[root@localhost mysql]# mysql -uroot -p -hlocalhost
Enter password:
Welcome to the MySQL monitor. Commands end with ; or \g. :再次以root登录发现不输入密码是不行的;
[root@localhost ~]# ln -sv /usr/local/mysql/include/ /usr/include/mysql
"/usr/include/mysql" -> "/usr/local/mysql/include/"
[root@localhost ~]# vim /etc/ld.so.conf.d/mysql.conf
/usr/local/mysql/lib
[root@localhost ~]# vim /etc/man.config
MANPATH /usr/local/mysql/man
:导出头文件和库文件,以及man帮助;
ok!mysql安装完毕。
2、编译安装httpd
[root@localhost chen]# yum -y install gcc pcre automake :yum安装gcc pcre编译环境;
[root@localhost chen]# tar xf apr-1.4.6.tar.bz2
[root@localhost chen]# cd apr-1.4.6
[root@localhost apr-1.4.6]# ./configure --prefix=/usr/local/apr
[root@localhost apr-1.4.6]# make && make install
[root@localhost chen]# tar xf apr-util-1.5.2.tar.bz2
[root@localhost chen]# cd apr-util-1.5.2
[root@localhost apr-util-1.5.2]# ./configure --prefix=/usr/local/apr-util --with-apr=/usr/local/apr
[root@localhost apr-util-1.5.2]# make && make install :编译安装apr和arp-util;
[root@localhost chen]# yum -y install openssl-devel :安装httpd依赖的开发包;
[root@localhost chen]# tar xf httpd-2.4.6.tar.bz2
[root@localhost chen]# cd httpd-2.4.6
[root@localhost httpd-2.4.6]# ./configure --prefix=/usr/local/apache --sysconfdir=/etc/httpd24 --enable-so --enable-cgi --with-zlib --with-pcre --enable-rewrite --with-apr=/usr/local/apr --with-apr-util=/usr/local/apr-util --enable-modules=most --enable-mpms-shared=all --with-mpm=event
[root@localhost httpd-2.4.6]# make && make install :编译配置并安装;
[root@localhost init.d]# cp httpd httpd24
[root@localhost init.d]# vim httpd24
apachectl=/usr/local/apache/bin/apachectl
httpd=${HTTPD-/usr/local/apache/bin/httpd}
:copy 一个httpd服务脚本(系统自带httpd服务里有),并修改如上参数位置到httpd编译安装包的位置里;
[root@localhost init.d]# chkconfig --add httpd24
[root@localhost init.d]# chkconfig httpd24 on
[root@localhost init.d]# vim /etc/profile.d/httpd24.sh
export PATH=/usr/local/apache/bin:$PATH :配置服务启动级别和命令路径;
[root@localhost init.d]# vim /etc/httpd24/httpd.conf
PidFile "/var/run/httpd/httpd.pid" :编辑httpd24的配置文件,指定pid文件位置;
[root@localhost run]# service httpd24 start
[root@localhost var]# ss -tnl | grep 80
LISTEN 0 128 :::80 :::*
[root@localhost var]# service httpd24 status
httpd (pid 17892) 正在运行...
[root@localhost var]# :启动httpd24服务;
[root@localhost var]# ln -sv /usr/local/apache/include/ /usr/include/httpd24
"/usr/include/httpd24" -> "/usr/local/apache/include/"
[root@localhost var]# vim /etc/ld.so.conf.d/httpd24.conf
/usr/local/apache/lib
[root@localhost var]# vim /etc/man.config
MANPATH /usr/local/apache/man :输出头文件、库文件和man帮助文件;
ok,httpd编译安装完成;
3、编译安装php:
yum -y groupinstall Desktop Platform Devellopment bzip2 bzip2-devel libxml2-devel libmcrypt-devel
:安装之前需要安装编译环境;
[root@localhost chen]#rpm -ivh epel-release-6-8.noarch
[root@localhost chen]#yum -y install php-mcrypt libmcrypt-devel :利用epel源去安装php-mcrypt扩展模块;
[root@localhost chen]# wget ftp://mcrypt.hellug.gr/pub/crypto/mcrypt/attic/libmcrypt/libmcrypt-2.5.7.tar.gz
[root@localhost chen]# tar xf libmcrypt-2.5.7.tar.gz
[root@localhost chen]# cd libmcrypt-2.5.7
[root@localhost libmcrypt-2.5.7]# ./configure --prefix=/usr/local/libmcrypt
[root@localhost libmcrypt-2.5.7]# make && make install :编译安装libmcryp,php需要它;
[root@localhost chen]# tar xf php-5.4.19.tar.bz2
[root@localhost chen]# cd php-5.4.19
[root@localhost php-5.4.19]# ./configure --prefix=/usr/local/php --with-mysql=/usr/local/mysql --with-openssl --with-mysqli=/usr/local/mysql/bin/mysql_config --enable-mbstring --with-freetype-dir --with-jpeg-dir --with-png-dir --with-zlib --with-libxml-dir=/usr --enable-xml --enable-sockets --with-apxs2=/usr/local/apache/bin/apxs --with-mcrypt --with-config-file-path=/etc --with-config-file-scan-dir=/etc/php.d --with-bz2 --enable-maintainer-zts
[root@localhost php-5.4.19]# make && make install :编译配置,并安装php(较慢..);
[root@localhost php-5.4.19]# cp php.ini-production /etc/php.ini :为php提供一个ini文件;
[root@localhost php-5.4.19]# vim /etc/httpd24/httpd.conf
ADDType application/x-httpd-php .php
ADDType application/x-httpd-php-source .phps
DirectoryIndexindex.php index.html
:修改httpd24的主配置文件,添加ADDType,修改文档根目录,提供测试页面index.php;
LoadModule php5_module modules/libphp5.so :查看这两个模块是否被php装载进来;
[root@localhost php-5.4.19]# service httpd24 restart
[root@localhost ~]# cd /usr/local/apache/htdocs/
[root@localhost htdocs]# ls
index.html
[root@localhost htdocs]# mv index.html index.php
[root@localhost htdocs]# vim index.php :自定义一个关于php成功与否的测试页面;
<?php
$link = mysql_connect('127.0.0.1','root','password');
if ($link)
echo"Success!!!"
else
echo"Failure...."
mysql_close();
?>
[root@localhost htdocs]# service mysqld restart
[root@localhost htdocs]# service httpd24 restart :重启一下mysql和httpd服务;

测试一下,成功。说明lamp搭建成功!!!
4、简单优化:(测试LAMP环境)
安装phpMyAdmin,web管理mysql;
安装xcache为php加速;
1、安装phpMyAdmin:
[root@localhost chen]# unzip phpMyAdmin-4.0.5-all-languages.zip
[root@localhost chen]# cp -r phpMyAdmin-4.0.5-all-languages /usr/local/apache/htdocs/pma

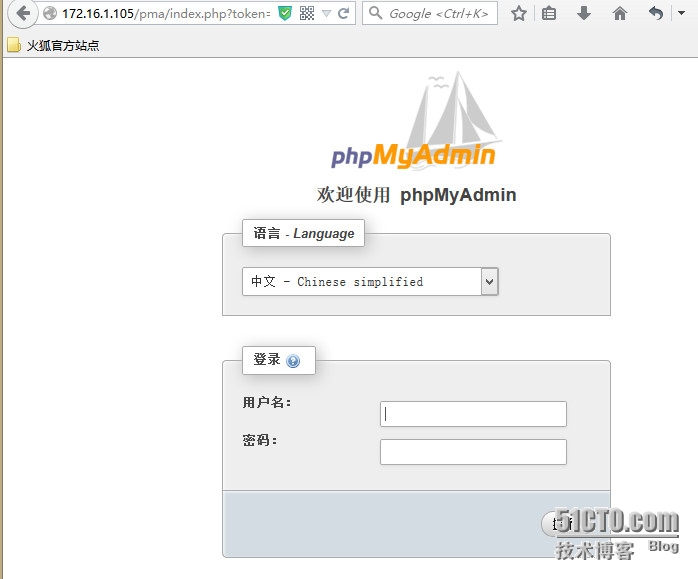
http://172.16.1.105/pma :可以访问phpMyAdmin了。成功!!;
2、编译安装xcache:
[root@localhost chen]# yum -y install m4 autoconf :安装编译环境;
[root@localhost chen]# tar xf xcache-3.0.3.tar.bz2
[root@localhost chen]# cd xcache-3.0.3
[root@localhost xcache-3.0.3]# /usr/local/php/bin/phpize :执行后会生成configure文件;
[root@localhost xcache-3.0.3]# ./configure --enable-xcache --with-php-config=/usr/local/php/bin/php-config
[root@localhost xcache-3.0.3]# make && make install :编译安装配置;
[root@localhost xcache-3.0.3]# mkdir /etc/php.d
[root@localhost xcache-3.0.3]# cp xcache.ini /etc/php.d
[root@localhost xcache-3.0.3]# vim /etc/php.d/xcache.ini
extension = /usr/local/php/lib/extensions/no-debug-zts-20100525/xcache.so :修改此项;
[root@localhost xcache-3.0.3]# vim /usr/local/apache/htdocs/index.php
<?php
$link = mysql_connect('127.0.0.1','root','password');
if ($link)
echo "Success !!!";
else
echo "Failure ...";
mysql_close();
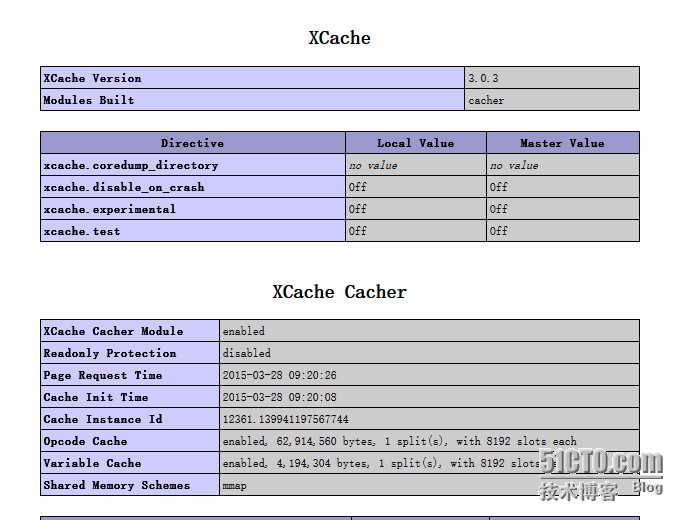
phpinfo(); :添加一个php测试函数;
?>
[root@localhost xcache-3.0.3]# service httpd24 restart

:ok,发现xcache被php所识别,说明xcache安装成功了!
结束!