Linux6.4通过PXE网络装机
搭建PXE远程安装服务器
准备RHEL6安装源
[root@localhost ~]# mkdir/var/ftp/rhel6
[root@localhost ~]# cp -rf/media/* /var/ftp/rhel6/
[root@localhost ~]# service vsftpdrestart
安装并启用TFTP服务
TFTP服务由tftp-server软件包提供,默认xinetd超级服务机型管理,。
配置文件:/etc/xinetd.d/tftp。配置时只要将" disable= yes "改为" disable= no ",
启动xinetd服务即可
service tftp
{
socket_type = dgram
protocol = udp //tftp采用UDP传输协议
wait = yes
user = root
server =/usr/sbin/in.tftpd
server_args = -s /var/lib/tftpboot //指定TFTP根目录
disable = no
per_source = 11
cps = 100 2
flags = IPv4
}
[root@localhost ~]# chkconfigxinetd on
[root@localhost ~]# service xinetdrestart
准备Linux内核、初始化镜像文件
从RHEL6系统光盘中获取vmlinuz和initrd.img,位于文件夹images/pxeboot/中,将这两个文件复制到tftp根目录下。
[root@localhost ~]# mkdir/var/lib/tftpboot
[root@localhost ~]# cd/var/ftp/rhel6/images/pxeboot/
[root@localhost pxeboot]# cp */var/lib/tftpboot/
[root@localhost pxeboot]# ls/var/lib/tftpboot/
initrd.img pxelinux.0 README TRANS.TBL vmlinuz
准备PXE引导程序,启动菜单文件
用于PXE网络安装的引导程序pxelinux.0,由软件包syslinux提供。安装好软件包syslinux,将文件pxelinux.0也复制到tftp服务的根目录下。
[root@localhost ~]# yum -y installsyslinux
[root@localhost ~]# cp /usr/share/syslinux/pxelinux.0/var/lib/tftpboot/
默认的启动菜单文件为default,应放置在tftp根目录的pxelinux.cfg子目录中
[root@localhost ~]# mkdir/var/lib/tftpboot/pxelinux.cfg
[root@localhost ~]# cp/var/ftp/rhel6/isolinux/isolinux.cfg /var/lib/tftpboot/pxelinux.cfg/default
[root@localhost ~]# vi/var/lib/tftpboot/pxelinux.cfg/default
default linux
#prompt 1
timeout 600
display boot.msg
menu background splash.jpg
menu title Welcome to Red HatEnterprise Linux 6.4!
menu color border 0 #ffffffff#00000000
menu color sel 7 #ffffffff#ff000000
menu color title 0 #ffffffff#00000000
menu color tabmsg 0 #ffffffff#00000000
menu color unsel 0 #ffffffff#00000000
menu color hotsel 0 #ff000000#ffffffff
menu color hotkey 7 #ffffffff#ff000000
menu color scrollbar 0 #ffffffff#00000000
label auto
menu label ^Install or upgrade an existing system
menu default
kernel vmlinuz
append initrd=initrd.img
label linux text
menu label Install system with ^text
kernel vmlinuz
append text initrd=initrd.img devfs=nomount ramdisk_size=8192
label vesa
menu label Install system with ^basic video driver
kernel vmlinuz
append initrd=initrd.img xdriver=vesa nomodeset
label rescue
menu label ^Rescue installed system
kernel vmlinuz
append initrd=initrd.img rescue
label local
menu label Boot from ^local drive
localboot 0xffff
label memtest86
menu label ^Memory test
kernel memtest
append �C
prompt用来设置是否等待用户选择,label用来定义并分隔启动项,kernel和apend用来定音引导参数。引导入口的个数既内容根据需要自定义。
安装并启用DHCP服务
[root@localhost ~]# yum -y installdhcp
[root@localhost ~]# cp/usr/share/doc/dhcp-3.0.5/dhcpd.conf.sample /etc/
[root@localhost ~]# mv/etc/dhcpd.conf /etc/dhcpd.conf.bak
[root@localhost ~]# mv/etc/dhcpd.conf.sample /etc/dhcpd.conf
[root@localhost ~]# vi/etc/dhcpd.conf
ddns-update-style interim;
ignore client-updates;
subnet 192.168.2.0 netmask255.255.255.0 {
# --- default gateway
option routers 192.168.2.100;
option subnet-mask 255.255.255.0;
option nis-domain "domain.org";
option domain-name "domain.org";
option domain-name-servers 202.106.0.20;
option time-offset -18000; # Eastern Standard Time
# option ntp-servers 192.168.2.1;
# option netbios-name-servers 192.168.2.1;
# --- Selects point-to-point node(default is hybrid). Don't change this unless
# -- you understand Netbios verywell
# option netbios-node-type 2;
range dynamic-bootp 192.168.2.128192.168.2.254;
default-lease-time 21600;
max-lease-time 43200;
next-server 192.168.2.100; //指定TFTP服务器地址
filename "pxelinux.0"; //指定PXE引导程序
# we want the nameserver to appearat a fixed address
host ns {
next-server marvin.redhat.com;
hardware ethernet12:34:56:78:AB:CD;
fixed-address 207.175.42.254;
}
}
[root@localhost ~]# service dhcpdstart 启动dhcpd 服务
netx-server用来指定TFTP服务器的地址。
filename用来指定引导文件的文件名。
验证PXE网络安装
在提示字符串“boot:”后直接按Enter键(或执行auto),将会进入默认的图形安装口;若执行“linux text”则进入文本安装入口;若执行“linux rescue”则进入授权模式。

依次选择语言:

键盘类型:

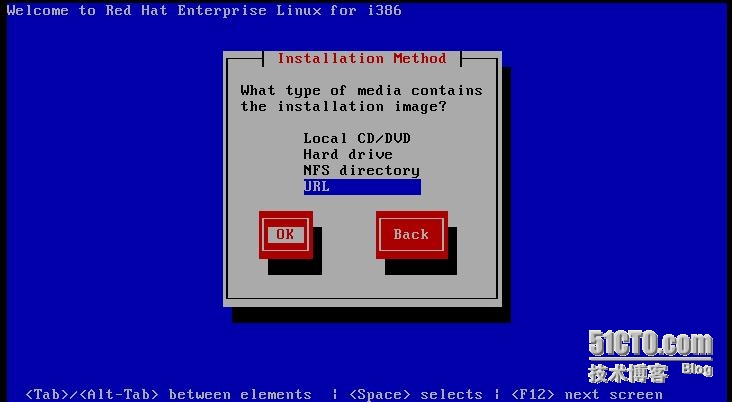
用户指定的安装介质(URL)

提示TCP/IP协议时,IPv4设置可以接受默认的DHCP获取方式,二IPv6支持应该取消如下图:

指定的对话框中指定RHEL6安装源的URL路径,如下图:


之后进入正常的安装界面
实现Kickstart无人值守安装
准备应答文件
在RHEL6系统中安装system-config-kickstart工具以后,即可通过图形化自动想到工具来配置安装应答文件。RHEL6安装后自动创建应答文件(/root/anaconda-kscfg),根据需要适当修订后使用。
配置安装文件应答参数
[root@localhost ~]# yum -y installsystem-config-kickstart //安装system-config-kickstart服务
[root@localhost ~]# system-config-kickstart //通过system-config-kickstart打开配置
或者
通过桌面菜单“应用程序”è“系统管理”è“Kickstart”即可打开Kickstart配置
基本信息
设置语言为“中文简体”,时区设置为“Asia/Shanghai”,将根口令设置为“redhat”,并“安装后重新引导系统”。

安装方法:正确指定RHEL6安装源
引导装在程序选项不做选择,默认设置即可。
分区信息:
设置500M的/boot分区、2G的/home分区、1G的交换分区、剩下所有设置为根分区。

网络配置:添加一个设备“eth0”,将网络类型设置为“DHCP”。
防火墙设置:禁用防火墙和SELinux。

软件包选择
根据实际需要选择安装的软件包分组。例如可选“基本”、“万维网服务器”、“X窗口服务器”“字体”,“桌面”及“开发工具”、“中文支持”等。如下图所示:


安装脚本
在“预安装脚本”、“安装后脚本”对话框周,可以分别添加在安装前、安装后自动运行的可执行语句。此项设置服务器的自动化变得更加容易,例如可以使客户及完成安装后自动设置YUM服务:如下图所示:
 其它信息
其它信息
若没有特殊需求,在“引导装在程序”、“验证”、“显示配置”、“预安装脚本”、“安装后脚本”等对话框周,只要保持默认设置即可。
保存自动应答文件
单机Kickstart配置程序的“文件”è“保存”菜单,指定目标文件夹、文件名,将配置好的应答参数保存为文本文件,例如/root/ks.cfg。以后若要修改此应答配置可以在Kickstart配置程序中打开进行调整,或者直接用vi等文本工具修改。
[root@localhost ~]# cp /root/ks.cfg/var/ftp/rhel6/ks.cfg
[root@localhost ~]# grep -v "^#"ks.cfg
#platform=x86, AMD64, or Intel EM64T
#version=DEVEL
# Firewall configuration
firewall --disabled
# Install OS instead of upgrade
install
# Use network installation
url--url="ftp://192.168.2.100/rhel6"
key --skip
# Root password
rootpw --iscrypted$1$yh2v.jkn$MkuI3hFzGDQz5p5rnfAT9/
# System authorization information
auth --useshadow --passalgo=sha512
# Use graphical install
graphical
firstboot --disable
# System keyboard
keyboard us
# System language
lang en_US
# SELinux configuration
selinux --disabled
# Installation logging level
logging --level=info
# System timezone
timezone Asia/Shanghai
# Network information
network --bootproto=dhcp --device=eth0 --onboot=on
# System bootloader configuration
bootloader --append="crashkernel=autorhgb quiet" --location=mbr --driveorder="sda"
# Clear the Master Boot Record
zerombr
# Partition clearing information
clearpart --all
# Disk partitioning information
part /boot --fstype="ext4"--size=500
part /home --fstype="ext4"--size=2048
part swap --fstype="swap"--size=1024
part / --fstype="ext4" --grow--size=1
%post --interpreter=/bin/bash
rm -rf /etc/yum.repos.d/*
echo '[rhel6]
name=rhel6
baseurl=ftp://192.168.2.100/rhel6
#baseurl=ftp://ftp.redhat.com/pub/redhat/linux/enterprise/$releasever/en/os/SRPMS/
enabled=1
gpgcheck=1
gpgkey=file:///etc/pki/rpm-gpg/RPM-GPG-KEY-redhat-release
' > /etc/yum.repos.d/rhel6.repo
%end
%packages
@base
@basic-desktop
@chinese-support
@client-mgmt-tools
@core
@debugging
@desktop-debugging
@desktop-platform
@directory-client
@fonts
@general-desktop
@graphical-admin-tools
@input-methods
@internet-browser
@java-platform
@legacy-x
@network-file-system-client
@perl-runtime
@print-client
@remote-desktop-clients
@server-platform
@server-policy
@x11
abrt-gui
certmonger
device-mapper-persistent-data
genisoimage
krb5-workstation
libXmu
mtools
oddjob
pam_krb5
pax
perl-DBD-SQLite
python-dmidecode
samba-winbind
sgpio
wodim
%end
实现批量自动装机
有了自动安装应答文件,只需要放置在PXE安装服务器的FTP目录下,并适当修改引导修改引导菜单,就可以实现给予网络的批量自动装机了。

启动自动应答文件
在PXE远程服务器中,将上一节建立的应答文件复制到/var/ftp/rhel6/目录下,使客户能通过ftp://192.168.2.1/rhel6/ks.cfg访问。然后编辑引导配置文件default,添加ks引导参数以指定ks.cfg应答文件的URL路径。
[root@localhost ~]# cp /root/ks.cfg/var/ftp/rhel6/ks.cfg
[root@localhost ~]# vi/var/lib/tftpboot/pxelinux.cfg/default
default auto
prompt 0
label auto
kernel vmlinuz
append ks=ftp://192.168.2.100/rhel6/ks.cfginitrd=initrd.img devfs=nomount ramdisk_size=8192验证无人值守安装
启动自动应答文件后,每次客户机以PXE方式引导时,将自动下载ks.cfg应答配置文件,然后根据其中设置安装RHEL6系统,而无需手工干预,这样可以同时为多台客户机安装系统。
客户机安装完成后,检查yum仓库配置,可以发现已经按照“安装后脚本”的设置自动建立了/etc/yum.repos.d/rhel6.repo。