如何自定义StoreFront的访问页面 - Part3
通过前面两个章节,我们已经了解到了如何通过StoreFront自带的管理控制台以及CSS完成对登录页面以及内容页面的自定义。本章节将介绍如何创建一些细化的设定,完成例如登录提示等功能。
很多时候用户在登陆页面上需要做一些登录提醒,例如,登录限制说明,或者一些公司通告等!
仍然是访问StoreFront服务器上的C:\inetpub\wwwroot\Citrix\<storename>Web\custom 文件夹,
编辑scripts.js文件,
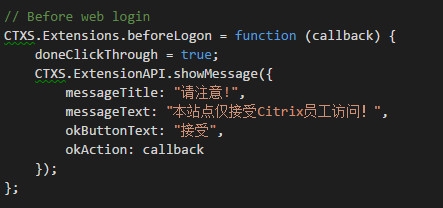
取消var 之前的/* 和 /* End of sample之前 */,使得在这组注释符号之间的内容生效。


编辑messgeTitle/messageText/okButton/Text信息,输入你期望的内容,并保存。

在StoreFront主机的cmd窗口中运行IISREST,是配置生效。(更改scripts.js需要充值IIS,修改style.css不需要)
在此登录StoreWeb站点,则会弹出此对话框。

完成这个之后,我们考虑为内容页面增加页脚。
继续编辑script.js,增加如下内容:对于文字内容请自行修改。
/* footer */
$('#customBottom').html("仅接受Citrix员工访问!");

编辑style.css,增加如下内容:可以根据需要修改字体颜色、大小、位置。
#customBottom
{
text-align:center;
font-size:10px;
color:white;
background:Gray;
position:static;
}

运行IISRESET,登录至内容页面,则可以看到在最底部会有一行对应的文字。

在此之后,我们可以创建一个滚动进度条,这样方便给出一些内容提醒,比如:系统需要做运维了之类。
定位到C:\inetpub\wwwroot\Citrix\<storename>Web 文件夹,编辑receiver.html
找到此行:
<div id=”pluginTop”><div id=”customTop”></div></div>
修改为:
<div id=”pluginTop”><div id=”customTop”><div class=”StoreMarquee”><span></span></div></div></div>
编辑style.css,增加如下内容:
/* StoreFront messaging begin */
#customTop {
height:30px;
background:Gray;
}
.StoreMarquee {
width: 0 auto;
margin: 0 auto;
white-space: nowrap;
overflow: hidden;
box-sizing: border-box;
}
.StoreMarquee span {
font-family:'Arial Black', sans-serif;
font-size:1.8em; /*修改字体大小*/
font-weight:bold;
color:White;
display: inline-block;
padding-left: 100%; /* show the marquee just outside the paragraph */
animation: StoreMarquee 15s linear infinite;
-moz-animation: StoreMarquee 15s linear infinite;
-webkit-animation: StoreMarquee 15s linear infinite;
}
/* Make it move */
@keyframes StoreMarquee {
0% { transform: translate(0, 0); }
100% { transform: translate(-100%, 0); }
}
@-moz-keyframes StoreMarquee {
0% { -moz-transform: translate(0, 0); }
100% { -moz-transform: translate(-100%, 0); }
}
@-webkit-keyframes StoreMarquee {
0% { -webkit-transform: translate(0, 0); }
100% { -webkit-transform: translate(-100%, 0); }
}
.StoreMarquee span:after {
Content: '欢迎访问Citrix上海演示中心!'; /*需要显示的内容*/
display: inline;
}
/* StoreFront messaging end */
保存,并运行IISREST,登录StoreWeb的内容页面,可以看到有一行滚动的字体在显示。

StoreFront的提示部分的内容介绍到这。