两大实战----Linux下的Nagios监控外部服务器的私有信息
两大实战----Linux下的Nagios监控外部服务器的私有信息
实验环境
PC端
服务端:xuegod63.cn IP:192.168.1.63
客户端:xuegod64.cn IP:192.168.1.64
Mysql端:xuegod62.cn IP:192.168.1.62
需要的软件
nrpe-2.12.tar.gz
nagios-plugins-1.4.16.tar.gz
实验目标
实��1:监控服务器上的私有信息。 如:硬盘
实��2:配置nagios邮件+短信提醒
实验步骤
注:
本次的实验环境要在上一篇《《两大实战---Linux下使用Nagios监控NFS和mysql等服务器运行状态》》中的环境前提下
nagios+ nrpe 工作运行机制:
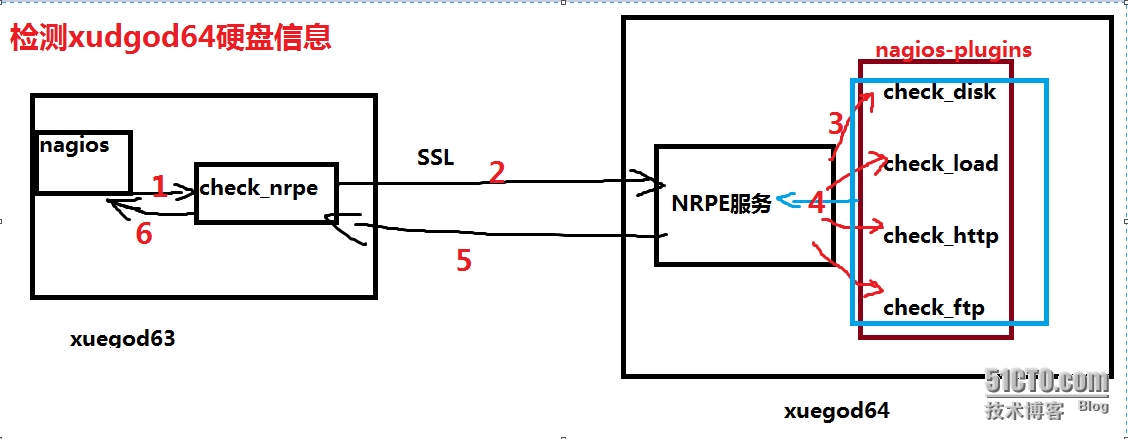
工作运行机制解析
1:nagios给check_nrpe下达指令,需要寻找某个数据。
2:check_nrpe通过插件与NRPE服务端通信
3:NRPE服务端的在收到check_nrpe发来的指令之后,就会在自身上寻找它要找的数据。
4:在NRPE服务端找到nagios需要的数据之后就会放回给check_nrpe。
5:在这返回的过程中,为了保持数据传输的安全性,这里使用SSL.
6: check_nrpe在收到NRPE服务端发来的数据之后,就会将此数据发给nagios了
安装SSL
[root@xuegod63 ~]# yum install opensslopenssl-devel -y
[root@xuegod64 ~]# yum install opensslopenssl-devel -y
实战1:----监控服务器上的私有信息--硬盘
开始配置:xuegod63
安装:nrpe
如果没有nagios用户就创建一下:
[root@xuegod63 nrpe-2.12]# id nagios
uid=500(nagios) gid=500(nagios) 组=500(nagios),501(nagcmd)
#这里是在两个实战中就创建好的用户与组,如果你没有创建的话,请看上一篇博客
解压文件包并查看
[root@xuegod63 ~]#tar zxvf nrpe-2.12.tar.gz
[root@xuegod63 ~]#cd nrpe-2.12
[root@xuegod63 nrpe-2.12]# ls
Changelog docs LEGAL SECURITY
config.guess include Makefile.in src
config.sub init-script.debian.in nrpe.spec subst.in
configure init-script.in README update-version
configure.in init-script.suse.in README.SSL
contrib install-sh sample-config
#以上都是解压出的文件,里面有他的安装脚本,配置文件,以及启动文件
执行三步走--./configure make all make install
执行第一步--./configure
[root@xuegod63 nrpe-2.12]# ./configure
……….
*** Configuration summary for nrpe 2.1203-10-2008 ***:
General Options:
-------------------------
NRPEport: 5666 #NRPE的端口是5666
NRPEuser: Nagios #NRPE的用户是nagios
NRPEgroup: Nagios #NRPE的组是nagios
Nagios user: Nagios #nagios的用户是nagios
Nagios group: Nagios #nagios的组是nagios
Review the options above for accuracy. If they look okay,
type 'make all' to compile the NRPE daemon and client.
#这里表示如果以上步骤你都做好了,那么以下执行“make all”步骤,这里也就是和其他服务器搭建的三步骤处是不同的。
执行第二步―make all
[root@xuegod63 nrpe-2.12]# make all
*** Compile finished ***
If the NRPE daemon and client compiledwithout any errors, you
can continue with the installation orupgrade process.
Read the PDF documentation (NRPE.pdf) forinformation on the next
steps you should take to complete theinstallation or upgrade.
#出现以上信息,表示你执行安装步骤是正确的,可以执行下一步工作。
执行第三步---make install
[root@xuegod63 nrpe-2.12]# make install
cd ./src/ && makeinstall
make[1]: Entering directory`/root/nrpe-2.12/src' #
#这里告诉了我们,要切换到/src目录下,执行“makeinstall”,这里的切换是后台切换的,
make install-plugin# 安装插件
make[2]:Entering directory `/root/nrpe-2.12/src'
/usr/bin/install-c -m 775 -o nagios -g nagios -d /usr/local/nagios/libexec
/usr/bin/install -c-m 775 -o nagios -g nagios check_nrpe /usr/local/nagios/libexec
make[2]:Leaving directory `/root/nripe-2.12/src'
#在这里中“libexec”下专门放插件的,因此,在这里直接将“check_nrpe”的插件放在了“/usr/local/nagios“下的”/libexec”目录下了。在这里的“check_nrpe”的作用就是让nagios通过check_nrpe与“NRPE“的服务器上来通信的。
make install-daemon
make[2]:Entering directory `/root/nrpe-2.12/src'
/usr/bin/install-c -m 775 -o nagios -g nagios -d /usr/local/nagios/bin
/usr/bin/install -c-m 775 -o nagios -g nagios nrpe /usr/local/nagios/bin
#在这里中,在“/usr/bin/install“下安装并创建了一个”/bin“的目录,在目录/bin下中,是将“nrpe”放在了“/bin“目录下的,相当于给我们生成了一个”nrpe”的服务。
#以上两个make install 中是安装插件的,如果你想要安装过程中显示的干净一点的话,你可以直接执行以上两个安装命令。
[root@xuegod63 nrpe-2.12]# ls ./src/
check_nrpe Makefile nrpe snprintf.c
check_nrpe.c Makefile.in nrpe.c utils.c
#以上的信息就是后台切换的安装后的文件
[root@xuegod63 nrpe-2.12]# ll/usr/local/nagios/libexec/check_nrpe
-rwxrwxr-x 1 nagios nagios 70476 9月 22 18:54 /usr/local/nagios/libexec/check_nrpe
配置nagios服务器,监控xuegod64服务器上的硬盘信息。当硬盘空间小20的时候警告。小10的时候报个危急。
使用nagios流程:
1、指定主配置文件中要加载的配置文件(此配置文件中定义了要监控的主机,服务)。
2、定义主机,主组(不是必须)
3、定义服务,
4、定监控的命令
5、检查nagios配置文件
6、重启nagios服务
添加在主配置文件中添加配置文件:
[root@xuegod63 nrpe-2.12]# cd/usr/local/nagios/etc/
root@xuegod63etc]# vim nagios.cfg #添加以一下内容
cfg_file=/usr/local/nagios/etc/objects/hosts.cfg
cfg_file=/usr/local/nagios/etc/objects/service.cfg

定义主机-----这里我故意有了个错误哦
[root@xuegod63 etc]# vim objects/hosts.cfg
[root@xuegod63 etc]# cat objects/hosts.cfg
define host{
uselinux-server
host_name xuegod64.cn
alias mysql服务器
address 192.168.1.64
icon_image server.gif
statusmap_image server.gd2
2d_coords 500,200
3d_coords 500,200,100
}
define host{
uselinux-server
host_name xuegod64.cn
alias ftp服务器
address 192.168.1.64
icon_imageserver.gif
statusmap_image server.gd2
2d_coords 500,200
3d_coords 500,200,100
}
#看到错误了吗? 在以上定义的两台主机中,主机名都是xuegod64.cn。
定义服务:-----这里我又故意留了个错误哦
[root@xuegod63 etc]# vimobjects/service.cfg #注意保留xuegod62.cn服务的定议;在文件的最后添加以下内容,
[root@xuegod63 etc]# catobjects/service.cfg
###################check_mysql#############################
define service{
use local-service
host_name xuegod64.cn
service_groups mysql服务组
service_description mysql服务
check_command check_mysql
}
##########################check_mysql_groups#########################
define servicegroup{
servicegroup_name mysql服务组
alias mysql服务器
members xuegod64.cn,mysql服务
}
#以上是上两个实战留下的定义。
以下为新定义的内容
# SERVICE DEFINITIONS
############################################
# Define a service to check the diskspace of the root partition
# on the localmachine. Warning if < 20% free, critical if < 10% free space onpartition.
define service{
use local-service
host_name xuegod64.cn
service_description Root Partition
check_command check_nrpe!check_sda2
}
#Define a service to check the number of currently running procs
# on the local machine. Warning if > 250 processes,critical if
# > 400 users.
define service{
use local-service
host_name xuegod64.cn
service_description Total Processes
check_commandcheck_nrpe!check_total_procs
# Define a service to check the load on the local machine.
define service{
use local-service
host_name xuegod64.cn
service_description Current Load
check_command check_nrpe!check_load
}
定监控的命令
root@xuegod63objects]# vim commands.cfg #添加以下红色标记内容
# 'check_nrpe' commanddefinition
define command{
command_name check_nrpe
command_line$USER1$/check_nrpe -H $HOSTADDRESS$ -c $ARG1$
}
#这里定义了一个命令的使用“check_nrpe“,只有在这里将此命令进行定义了之后,此命令在后期是才能够是使用的,在上一实战中,我们也定义了一些其他的命令,此命令的定义的模板,在nagios的模板中是由的。
到这,xuegod63, nagios配置结束
配置文件出现错误
检查配置文件是否正确
Processing object config file'/usr/local/nagios/etc/objects/templates.cfg'...
Processing object config file'/usr/local/nagios/etc/objects/hosts.cfg'...
Warning: Duplicate definition found forhost 'xuegod64.cn'(config file '/usr/local/nagios/etc/objects/hosts.cfg', starting online 12)
Error: Could not add object property infile '/usr/local/nagios/etc/objects/hosts.cfg'on line 14.
Error processing object config files!
***> One or more problems wasencountered while processing the config files...
Check your configuration file(s) to ensure that they contain valid
directives and data defintions. If you are upgrading from a previous
version of Nagios, you should be aware that some variables/definitions
对配置文件进行排错
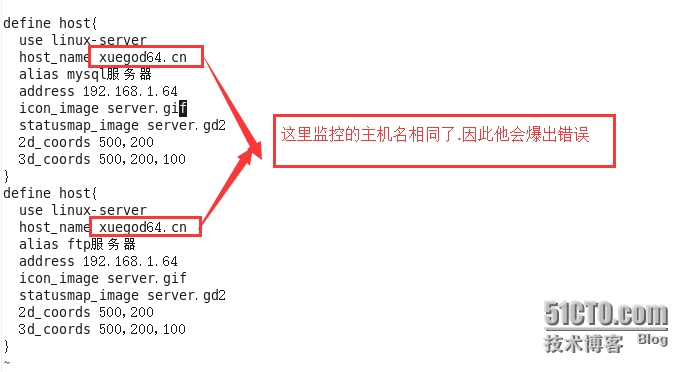
#将那监控的主机名修改为62,IP地址也要修改为192.168.1.62
再次报错了
[root@xuegod63 nagios]# ./bin/nagios -v./etc/nagios.cfg
Checking hosts...
Warning: Host 'xuegod62.cn' has no services associated with it!
Checked2 hosts.
Total Warnings: 1
Total Errors: 0
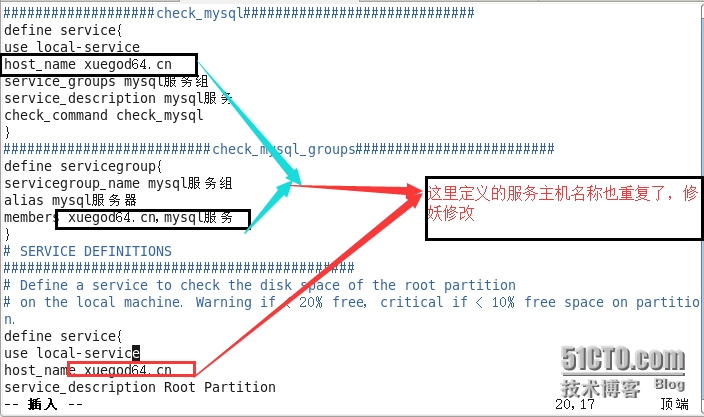
#在这里,我们还是把xuegod64.cn修改成xuegod62.cn
怎么又一次报错了
[root@xuegod63 nagios]# ./bin/nagios -v./etc/nagios.cfg
Error: Unexpected start of objectdefinition in file '/usr/local/nagios/etc/objects/service.cfg' online 34. Make sure youclose preceding objects before starting a new one.
Error processing object config files!
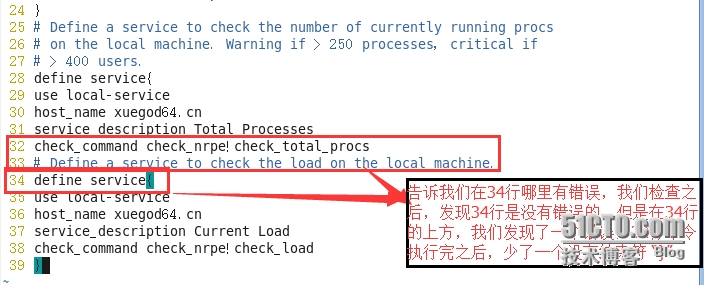
#在32之后添加结束符“}”
再一次检查配置文件是否正确
[root@xuegod63 nagios]# ./bin/nagios -v./etc/nagios.cfg
……….
………
Checking obsessive compulsive processorcommands...
Checking misc settings...
Total Warnings: 0
Total Errors: 0
#现在正确了,配置文件具有0个警报和0个错误。
配置要监控的服务器xuegod64
将63上的文件拷贝到64上
[root@xuegod63 ~]# scp nrpe-2.12.tar.gz 192.168.1.64:/root
[email protected]'s password: 123456
nrpe-2.12.tar.gz 100% 396KB 396.2KB/s 00:00
[root@xuegod63 ~]# scp nagios-plugins-1.4.16.tar.gz 192.168.1.64:/root
[email protected]'s password: 123456
nagios-plugins-1.4.16.tar.gz 100% 2038KB 2.0MB/s 00:00
创建用户:
[root@xuegod64 ~]# useradd nagios
[root@xuegod64 ~]# groupadd nagcmd
[root@xuegod64 ~]# usermod -G nagcmd nagios
安装:nagios-plugins,获得检测服务器的脚本:
[[email protected]]# tar zxvf nagios-plugins-1.4.16.tar.gz
[[email protected]]#cd nagios-plugins-1.4.16
[[email protected]]# pwd
/root/nagios-plugins-1.4.16
执行三步走并验证命令是否正确
[[email protected]]# ./configure
[[email protected]]#make
[root@xuegod64 nagios-plugins-1.4.16]#make install
[root@xuegod64 nagios-plugins-1.4.16]# echo$?
0
安装:nrpe ,最后以守护进程的方式运行
root@xuegod64~]#tar zxvf nrpe-2.12.tar.gz
[root@xuegod64~]# cd nrpe-2.12
执行三步走并验证命令是否正确
[root@xuegod64 nrpe-2.12]# ./configure
[root@xuegod64 nrpe-2.12]# make all
[root@xuegod64 nrpe-2.12]# make install
[root@xuegod64 nrpe-2.12]# echo $?
0
执行三步走也可以怎么执行
root@xuegod64 ~]#./configure &&make all && make install
[root@xuegod64 nrpe-2.12]# ls/usr/local/nagios/bin/nrpe
/usr/local/nagios/bin/nrpe
生成配置文件
# 生成nrpe配置文件
[root@xuegod64 nrpe-2.12]# makeinstall-daemon-config
/usr/bin/install -c -m 775 -o nagios -gnagios -d /usr/local/nagios/etc
/usr/bin/install -c -m 644 -o nagios -g nagiossample-config/nrpe.cfg /usr/local/nagios/etc
[root@xuegod64 nrpe-2.12]# ls/usr/local/nagios/etc/nrpe.cfg
/usr/local/nagios/etc/nrpe.cfg
# 让xinetd服务可以管理nrpe服务,生成xinetd下nrpe配置文件
[root@xuegod64 nrpe-2.12]# make install-xinetd
/usr/bin/install -c -m 644sample-config/nrpe.xinetd /etc/xinetd.d/nrpe
[root@xuegod64 nrpe-2.12]# ls/etc/xinetd.d/nrpe
/etc/xinetd.d/nrpe
安装xined
[root@xuegod64 nrpe-2.12]# rpm -ivh/mnt/Packages/xinetd-2.3.14-39.el6_4.i686.rpm
Preparing... ########################################### [100%]
1:xinetd ########################################### [100%]
修改配置文件
[root@xuegod64 nrpe-2.12]#vim/etc/xinetd.d/nrpe #修改红色标记内容,添加一个IP地址
[root@xuegod64 nrpe-2.12]# cat !$
cat /etc/xinetd.d/nrpe
# default: on
# description: NRPE (Nagios Remote PluginExecutor)
servicenrpe
{
flags = REUSE
socket_type = stream
port = 5666
wait = no
user = nagios
group = nagios
server = /usr/local/nagios/bin/nrpe
server_args = -c /usr/local/nagios/etc/nrpe.cfg --inetd
log_on_failure + =USERID
disable = no
only_from = 192.168.1.63
启劢xinetd,查看5666端口:--出现错误
[root@xuegod64 nrpe-2.12]#/etc/init.d/xinetd restart
停止 xinetd: [失败]
正在启动 xinetd: [确定]
[root@xuegod64 nrpe-2.12]# netstat -antup |grep 5666
[root@xuegod64 ~]# ps -axu | grep nrpe
Warning: bad syntax, perhaps a bogus '-'?See /usr/share/doc/procps-3.2.8/FAQ
root 27126 0.0 0.0 5980 744 pts/2 S+ 21:23 0:00 grep nrpe
[root@xuegod64 ~]# vim /etc/services

#发现查不到端口。
注:
#在这里中我们可以看到,我们已经启动了xinetd服务,在过滤此端口的时候,并没有过滤出来,表示了此服务并没有开启。
可是这有事为什么呢?我们的配置文件都是正确的啊
我们要是不知道他的运行机制,我们还真不知道他错在哪里了 ,因为我们的配置文件没有错误,因此我们要更加学习了
解决上述问题:
添加rnpe对应端口:---在文件最后,添加以下内容

重启xinetd服务并过滤其端口
[root@xuegod64 nrpe-2.12]# /etc/init.d/xinetdrestart
停止 xinetd: [确定]
正在启动 xinetd: [确定]
[root@xuegod64 nrpe-2.12]# netstat -antup |grep 5666
tcp 0 0 :::5666 :::* LISTEN 27166/xinetd
#这样我们就过滤出他的端口了,表示此服务已经被开启了
/etc/services文件的作用:
作用1:
xinet.d来启劢服务时他就会在/etc/services找相应服务对应的端口来启劢服务。找不到对应端口,将丌启劢服务。
作用2:
显示对应端口对应的协议名。
例如 iptables -L 丌加-n参数, 查看时,把 80转 -> www http
作用3:
查看常用端口
定义nrpe命令:
[root@xuegod64nagios]# cd etc/
[root@xuegod64etc]# ls
nrpe.cfg
[root@xuegod64etc]# vim nrpe.cfg
# The following examples use hardcodedcommand arguments...
command[check_users]=/usr/local/nagios/libexec/check_users-w 5 -c 10
command[check_load]=/usr/local/nagios/libexec/check_load-w 15,10,5 -c 30,25,20
command[check_hda1]=/usr/local/nagios/libexec/check_disk-w 20% -c 10% -p /dev/hda1
command[check_zombie_procs]=/usr/local/nagios/libexec/check_procs-w 5 -c 10 -s Z
command[check_total_procs]=/usr/local/nagios/libexec/check_procs-w 150 -c 200
在这里的后面添加一下内容
command[check_sda1]=/usr/local/nagios/libexec/check_disk-w 38% -c 35% -p /dev/sda1
command[check_sda2]=/usr/local/nagios/libexec/check_disk-w 42% -c 43% -p /dev/sda2
command[check_swap]=/usr/local/nagios/libexec/check_swap-w 20% -c 10%
说明: check_sda2 中-w 42% -c 43% 故意把报警值参数调大一些,方便测试。
启劢NRPE服务:
[root@xuegod64 etc]# service xinetd restart
停止 xinetd: [确定]
正在启动 xinetd: [确定]
[root@xuegod64 etc]# netstat -antup | grep5666
tcp 0 0 :::5666 :::* LISTEN 27214/xinetd
[root@xuegod64 etc]#
测试:
[root@xuegod63 nagios]# /usr/local/nagios/libexec/check_nrpe -H 192.168.1.64
NRPE v2.12
#显示“NRPE v2.12“,这就表示正常。
如果出现以一下错误,说明没有允许192.168.1.63 访问我们的xuegod64服务器
模拟错误
如果在后面添加
[root@xuegod64 ~]# vim /etc/xinetd.d/nrpe

出现错误
[root@xuegod63 nagios]#/usr/local/nagios/libexec/check_nrpe -H192.168.1.64
CHECK_NRPE: Error - Could not complete SSL handshake.
#就一出现以下错误
注:
将上述模拟的错误修改回来
浏览器上测试:
重启服务
[root@xuegod63 nagios]# /etc/init.d/nagiosrestart
Running configuration check...done.
Stopping nagios: done.
Starting nagios: done.
浏览器查看
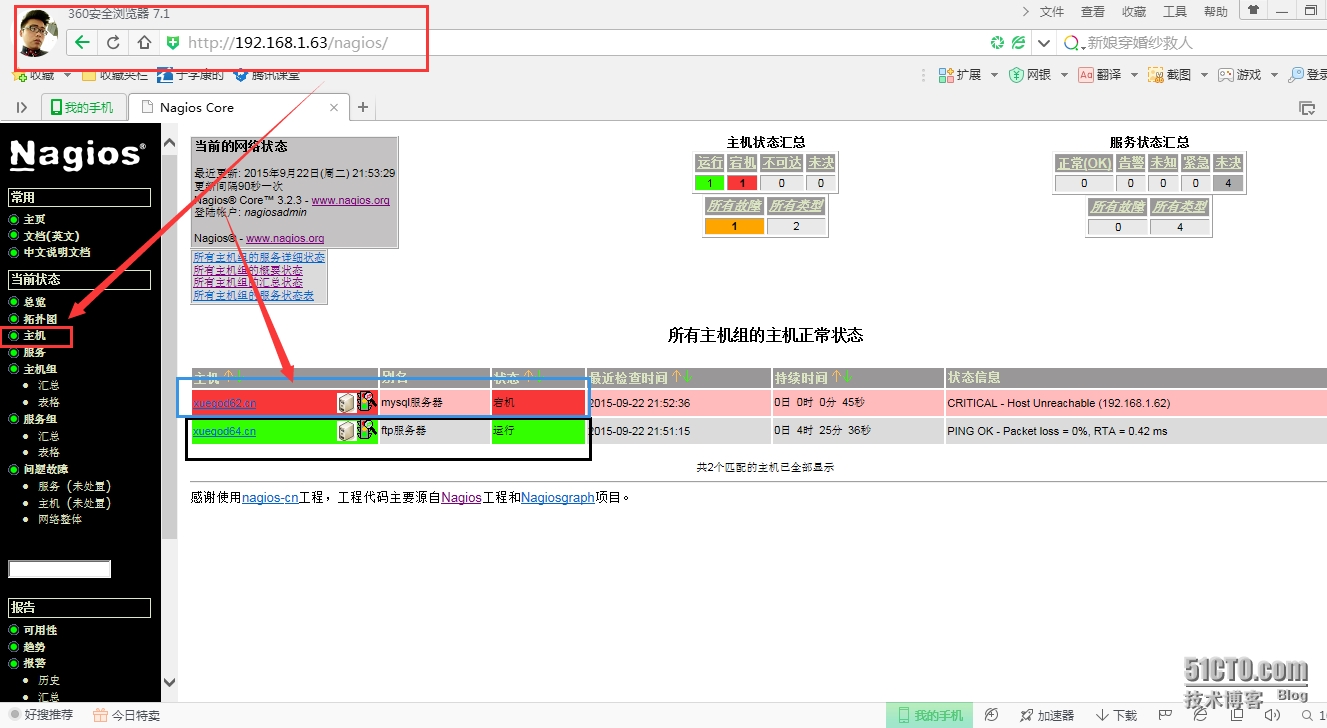
#看到mysql服务是关闭的
看到ftp服务器的运行状态是运行的
点击服务
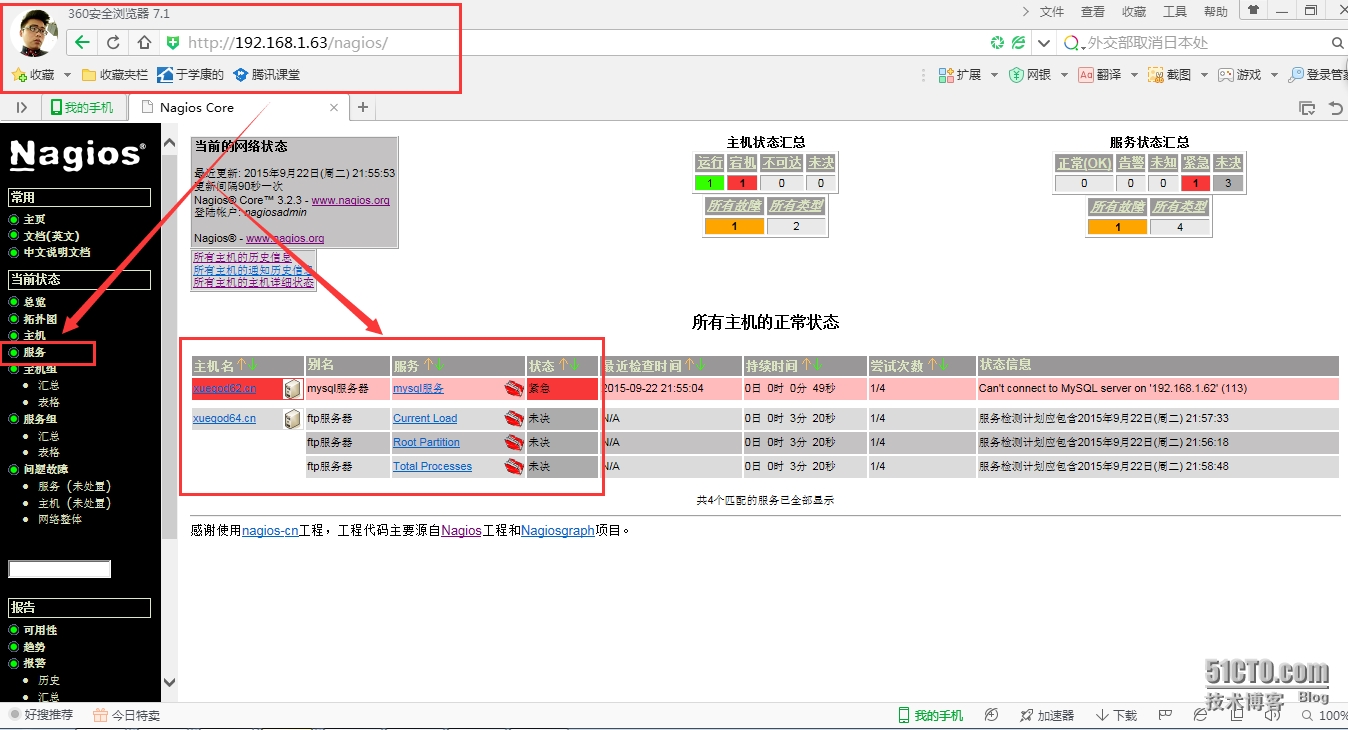
#看到全部都是未决
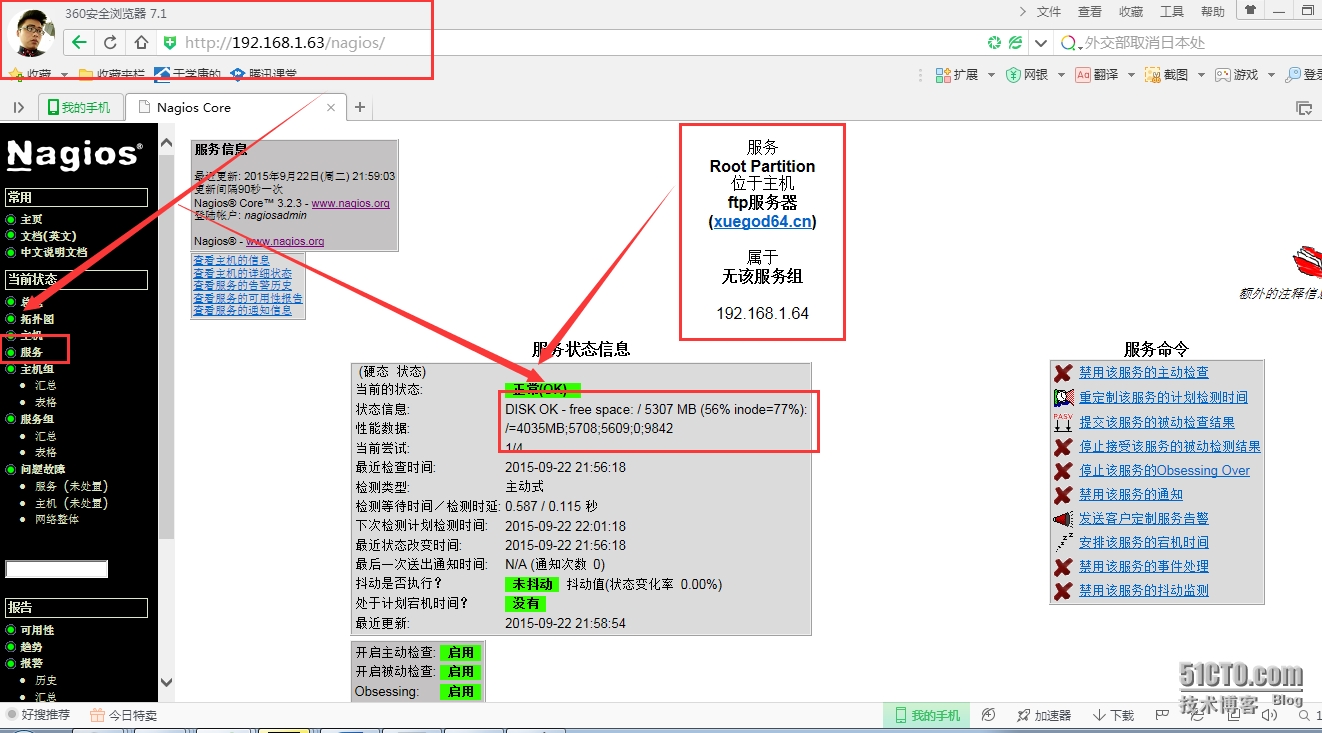
#这里告诉了我们它用了多少,剩下了多少,状态已经运行了
查看磁盘的利用率
[root@xuegod64 ~]# df -h
Filesystem Size Used Avail Use% Mounted on
/dev/sda2 9.7G 4.1G 5.1G 45% /
tmpfs 1.8G 224K 1.8G 1% /dev/shm
/dev/sda1 194M 28M 157M 15% /boot
/dev/sr0 3.1G 3.1G 0 100% /mnt
#这里利用了45%
增加其磁盘的利用率
[root@xuegod64 etc]# dd if=/dev/zeroof=a.txt count=100 bs=40M
^C记录了17+0 的读入
记录了17+0 的写出
713031680字节(713 MB)已复制,42.6015 秒,16.7 MB/秒
[root@xuegod64 etc]# df -h
Filesystem Size Used Avail Use% Mounted on
/dev/sda2 9.7G 4.8G 4.5G 52% /
tmpfs 1.8G 224K 1.8G 1% /dev/shm
/dev/sda1 194M 28M 157M 15% /boot
/dev/sr0 3.1G 3.1G 0 100% /mnt
#这个时候磁盘的利用率已经变为了52%
经过上述的配置后,重新测试,你就会发现服务器的运行状态出现了紧急状态
实战2:---配置nagios邮件+短信提醒
概述
139邮件报警和短信报警
1、首先要去注册139邮箱,然后收到邮件时,手机就会收到邮件通知短信。
2、安装sendmail ,默认nagios使用sendmail发送邮件
准备环境:
已经成功配置好: 实��1-3 。 即安装好nagios并监控了服务器。 这里的第一个实战中mysql服务器在第三个实战中被我们给修改了,我们再把他搭建好,在xuegod62上
安装sendmail
[root@xuegod63 nagios]# yum install -ysendmail
重启服务并设置开机自动启动
[root@xuegod63 nagios]#/etc/init.d/sendmail start
正在启动 sendmail:
[确定]
启动 sm-client: [确定]
[root@xuegod63 nagios]# chkconfig sendmailon
配置nagios,添加联系人
修改配置文件:contacts.cfg 只需要修改邮箱即可,如果有多个联系人可以用逗号隔开
[root@xuegod63 nagios]# cd/usr/local/nagios/etc/objects
修改配置文件
[root@xuegod63 objects]# vim contacts.cfg
改:
35 #emailnagios@localhost ; <<***** CHANG
E THIS TO YOUREMAIL ADDRESS ******
为: email [email protected]; <<***** CHANG
E THIS TO YOUREMAIL ADDRESS ******
重启nagios服务并设置开机自启动
[root@xuegod63 objects]# /etc/init.d/nagiosrestart
Running configuration check...done.
Stopping nagios: done.
Starting nagios: done.
[root@xuegod63 objects]# chkconfig nagioson
重启Apache服务并设置开机自启动
[root@xuegod63 objects]# /etc/init.d/httpdrestart
停止 httpd: [确定]
正在启动 httpd:httpd: Could not reliably determine the server's fully qualifieddomain name, using 202.102.110.203 for ServerName
[确定]
[root@xuegod63 objects]# chkconfig httpd on
浏览器测试
注:
为了便于测试,我们直接将64上的mysql服务器给stop了
关闭mysql服务
[root@xuegod64 ~]# /etc/init.d/mysqld stop
停止 mysqld: [确定]
测试
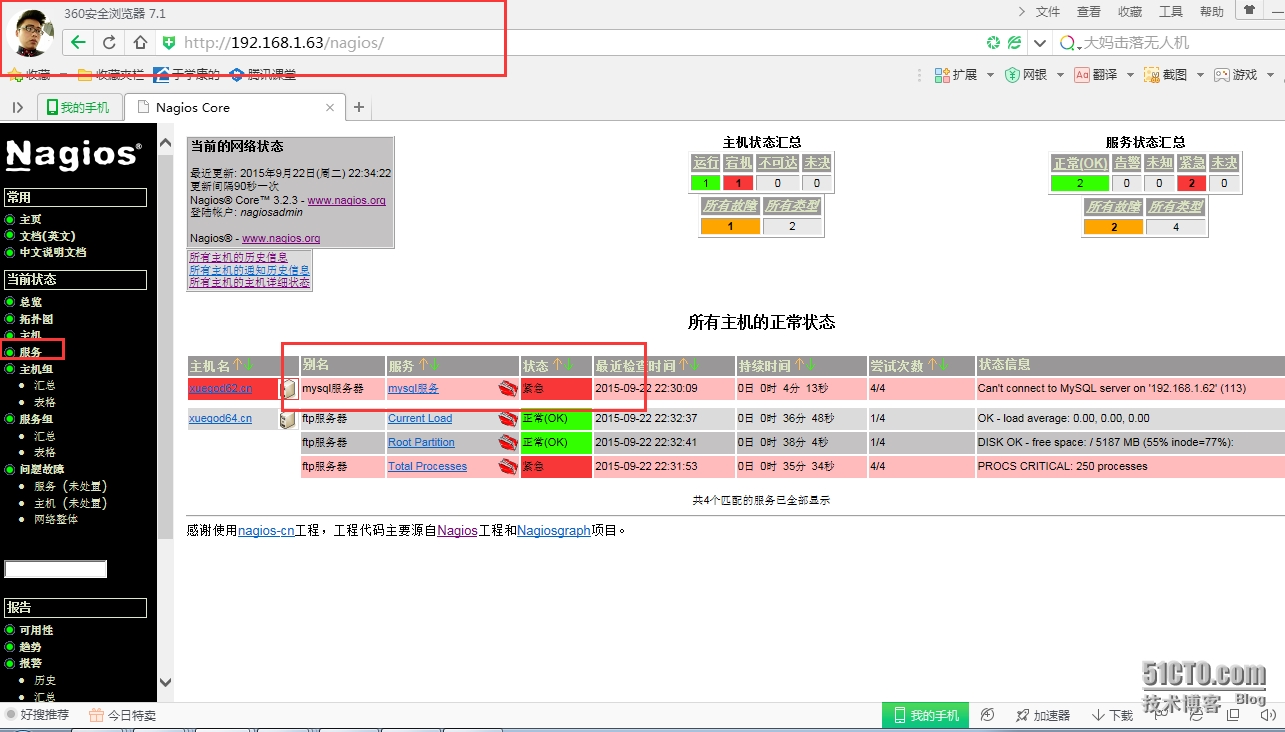
#在这里我们看到了上述中,mysql服务器出现了紧急状态
大概等待5分钟左右,我们的邮箱和收集就会收到一个信息
信息如下
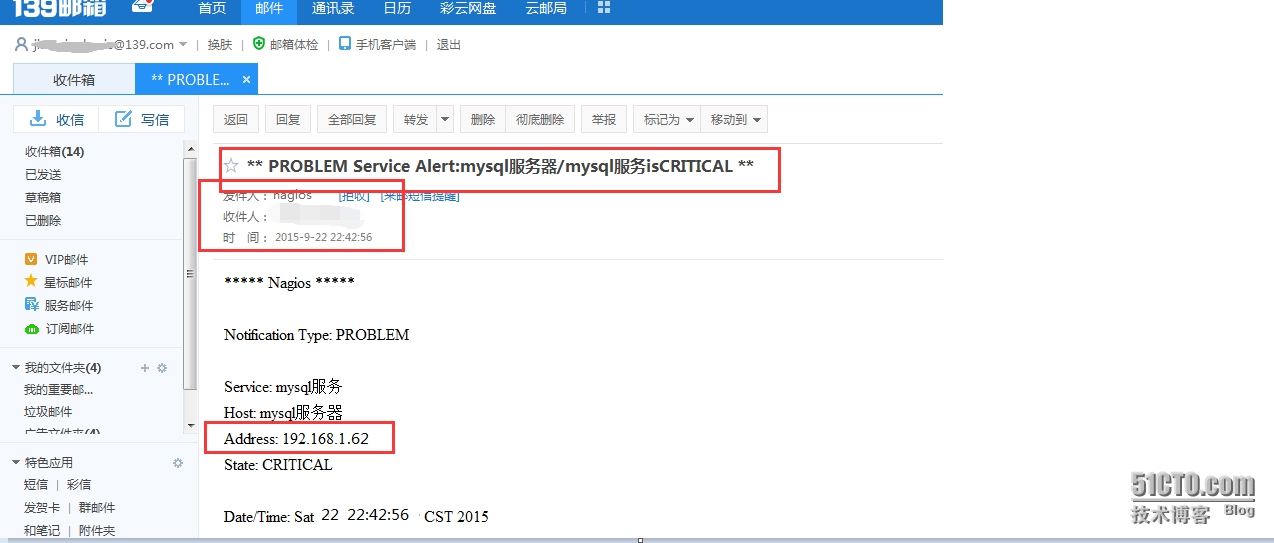
收到邮件后,同时会收到短信提醒:
短信也将收到。
发件人:nagios
主题:** PROBLEMService Alert:mysql服务器/mysql服务isACRITICL **
查看详细情况,访问链接:http://xxxxx
139邮箱登录地址: mail.139.com 戒 mail.10086.cn
实验总结
Nagios监控了服务器的私有信息,这使得我们更加的好管理服务器,对于服务器出现了什么问题,会更容易的找出问题的根源。这里也不仅仅是做监控的作用,在公司中也会有使用此服务器的其他公司要求你给他查看服务器的运行状况,那么这个时候,我们只需要给他设置一个账户即可。
做上述的两个实验当中,要注意到自身的环境问题。另一个需要注意的问题就是要仔细。
外注:
由于本人正在学习linux,并且是一名学生,没有工作经验,不能够给你提供不同的思路,和方案,本人表示抱歉。同时也希望给位大大看到本人的博客之后,发下有不足,错误之处,欢迎大家指教,我一定会第一时间内进行修改,并学习。
本文出自 “末班车” 博客,谢绝转载!