利用Cobbler批量布署CentOS
利用Cobbler批量布署CentOS
原创作品,允许转载,转载时请务必以超链接形式标明文章 原始出处 、作者信息和本声明。否则将追究法律责任。http://kerry.blog.51cto.com/172631/648430
从事网游运维的兄弟们应该深有感触,往往在开新服的时候需要大批量的布署新的服务器,时间紧迫而且量大,装系统、初始化,枯燥而又乏味,有时还容易出错,为了解放我们的双手,所以要实现自动化,Red Hat 最新发布了网络安装服务器套件 Cobbler(补鞋匠)集成了PXE、DHCP、DNS、Kickstart服务管理和yum仓库管理工具,相对之前的 Kickstart 更加快捷、方便的批量布署red hat、centos类系统
1、安装rpmforce源
CentOS 5.5默认的Repository里找不到Cobbler,先安装rpmforce这个Repository
cd /opt
wget http://pkgs.repoforge.org/rpmforge-release/rpmforge-release-0.5.2-2.el5.rf.i386.rpm
rpm -ivh rpmforge-release-0.5.2-2.el6.rf.i686.rpm
2、安装相关软件
yum -y install cobbler dhcp httpd xinetd tftp-server
3、检查cobbler配置
cobbler check

根椐提示修改配置文件
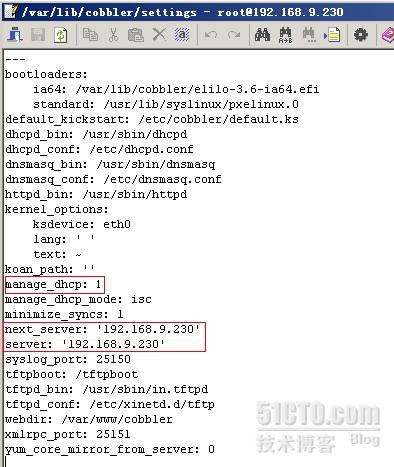
/var/lib/cobbler/settings 中的 server 和 next_server 对应的127.0.0.1修改为本服务器的 IP 地址,
manage_dhcp 设为 1,以便管理 DHCP

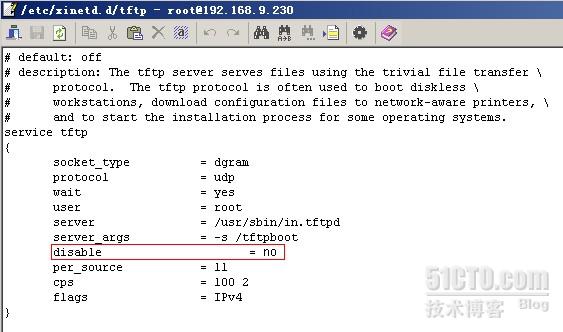
将 /etc/xinetd.d/tftp 中 disable = no

4、导入精简后的ISO
mkdir -p /mnt/iso
mount -o loop /data/KerryOS-1.0-i386.iso /mnt/iso
cobbler import --mirror=/mnt/iso --name=kerryOS-1.0-i386
查看导入结果
cobbler distro list

5、修改 DHCP 和 Kickstart 配置模板
#修改DHCP配置模板
vi /etc/dhcpd.conf
vi /etc/cobbler/dhcp.template
ddns-update-style interim;
allow booting;
allow bootp;
ignore client-updates;
set vendorclass = option vendor-class-identifier;
subnet 192.168.9.0 netmask 255.255.255.0 {
option routers 192.168.9.1; #路由器地址
option subnet-mask 255.255.255.0; #子网掩码选项
option domain-name-servers 192.168.9.1; #DNS地址
range dynamic-bootp 192.168.9.200 192.168.9.254; #动态IP范围
filename "/pxelinux.0";
default-lease-time 21600; #缺省租约时间
max-lease-time 43200; #最大租约时间
next-server 192.168.9.230; #指定引导服务器
}
#修改 Kickstart 配置模板
mv /var/www/cobbler/kickstarts/kerryOS-1.0-i386/ks.cfg /var/www/cobbler/kickstarts/kerryOS-1.0-i386/ks.cfg.bak
mv /var/www/cobbler/kickstarts/kerryOS-1.0-xen-i386/ks.cfg /var/www/cobbler/kickstarts/kerryOS-1.0-xen-i386/ks.cfg.bak
vi /etc/cobbler/default.ks
vi /var/www/cobbler/kickstarts/kerryOS-1.0-i386/ks.cfg
vi /var/www/cobbler/kickstarts/kerryOS-1.0-xen-i386/ks.cfg
# Kickstart file automatically generated by anaconda.
#Install OS instead of upgrade
install
#Use text mode install
text
#Use CDROM installation media
cdrom
lang en_US.UTF-8
keyboard us
#Skip the X Configuration
skipx
#Use network installation
url --url=http://192.168.9.230/cobbler/ks_mirror/kerryOS-1.0-i386
#Network information
#network --device eth0 --bootproto static --ip 192.168.9.226 --netmask 255.255.255.0 --gateway 192.168.9.1 --nameserver 192.168.9.1 --noipv6 --onboot=yes --hostname kerry-web-001
network --device eth0 --bootproto dhcp --noipv6 --hostname kerry-web-001
#root -- 1q2w3e
rootpw --iscrypted $1$n07CbCot$GP.VBeICPHj.QkJb5Y2C2.
firewall --disabled
#System authorization information
authconfig --enableshadow --enablemd5
selinux --disabled
timezone --utc Asia/Shanghai
#System bootloader configuration
bootloader --location=mbr
#Clear the Master Boot Record
zerombr yes
# Set the Mouse
mouse generic3ps/2
# The following is the partition information you requested
# Note that any partitions you deleted are not expressed
# here so unless you clear all partitions first, this is
# not guaranteed to work
#Partition clearing information
clearpart --all --initlabel
part /boot --fstype ext3 --size=200 --asprimary
part / --fstype ext3 --size=10000
part swap --size=2048
part /data --fstype ext3 --size=1 --grow
#--- Reboot the host after installation is done
reboot
%packages
%packages
@base
@core
@development-libs
@development-tools
@editors
@text-internet
keyutils
trousers
fipscheck
device-mapper-multipath
imake
%post --nochroot
# Mount CDROM
mkdir -p /mnt/cdrom
mount -r -t iso9660 /tmp/cdrom /mnt/cdrom
cp /mnt/cdrom/ipmod /mnt/sysimage/root/ipmod > /dev/null
umount /mnt/cdrom
%post
#vim syntax on
sed -i "8 s/^/alias vi='vim'/" /root/.bashrc 2>/dev/null
echo 'syntax on' > /root/.vimrc 2>/dev/null
#init_ssh
ssh_cf="/etc/ssh/sshd_config"
sed -i -e '74 s/^/#/' -i -e '76 s/^/#/' $ssh_cf
sed -i "s/#UseDNS yes/UseDNS no/" $ssh_cf
#client
sed -i -e '44 s/^/#/' -i -e '48 s/^/#/' $ssh_cf
# Remove the ISO File translation files
find / -name TRANS.TBL -exec rm {} \; /dev/null 2>/dev/null
# Remove some unneeded services
#--------------------------------------------------------------------------------
cat << EOF
+--------------------------------------------------------------+
| === Welcome to Tunoff services === |
+--------------------------------------------------------------+
EOF
#---------------------------------------------------------------------------------
for i in `ls /etc/rc3.d/S*`
do
CURSRV=`echo $i|cut -c 15-`
echo $CURSRV
case $CURSRV in
crond | irqbalance | microcode_ctl | network | random | sshd | syslog | local )
echo "Base services, Skip!"
;;
*)
echo "change $CURSRV to off"
chkconfig --level 235 $CURSRV off
service $CURSRV stop
;;
esac
done
# file descriptors
ulimit -HSn 65535
echo -ne "
* soft nofile 65536
* hard nofile 65536
" >>/etc/security/limits.conf
#set sysctl
true > /etc/sysctl.conf
cat >> /etc/sysctl.conf << EOF
net.ipv4.ip_forward = 0
net.ipv4.conf.default.rp_filter = 1
net.ipv4.conf.default.accept_source_route = 0
kernel.sysrq = 0
kernel.core_uses_pid = 1
net.ipv4.tcp_syncookies = 1
kernel.msgmnb = 65536
kernel.msgmax = 65536
kernel.shmmax = 68719476736
kernel.shmall = 4294967296
net.ipv4.tcp_max_tw_buckets = 6000
net.ipv4.tcp_sack = 1
net.ipv4.tcp_window_scaling = 1
net.ipv4.tcp_rmem = 4096 87380 4194304
net.ipv4.tcp_wmem = 4096 16384 4194304
net.core.wmem_default = 8388608
net.core.rmem_default = 8388608
net.core.rmem_max = 16777216
net.core.wmem_max = 16777216
net.core.netdev_max_backlog = 262144
net.core.somaxconn = 262144
net.ipv4.tcp_max_orphans = 3276800
net.ipv4.tcp_max_syn_backlog = 262144
net.ipv4.tcp_timestamps = 0
net.ipv4.tcp_synack_retries = 1
net.ipv4.tcp_syn_retries = 1
net.ipv4.tcp_tw_recycle = 1
net.ipv4.tcp_tw_reuse = 1
net.ipv4.tcp_mem = 94500000 915000000 927000000
net.ipv4.tcp_fin_timeout = 1
net.ipv4.tcp_keepalive_time = 1200
net.ipv4.ip_local_port_range = 1024 65535
EOF
/sbin/sysctl -p
#close ctrl+alt+del
sed -i "s/ca::ctrlaltdel:\/sbin\/shutdown -t3 -r now/#ca::ctrlaltdel:\/sbin\/shutdown -t3 -r now/" /etc/inittab
#set purview
chmod 600 /etc/passwd
chmod 600 /etc/shadow
chmod 600 /etc/group
chmod 600 /etc/gshadow
6、生成并同步所有配置
cobbler sync
7、启动相关的服务
/etc/init.d/httpd start
/etc/init.d/xinetd start
/etc/init.d/dhcpd start
/etc/init.d/cobblerd start
chkconfig --level 35 httpd on
chkconfig --level 35 xinetd on
chkconfig --level 35 dhcpd on
chkconfig --level 35 cobblerd on
#记得关闭防火墙
/etc/init.d/iptables stop
chkconfig --level 35 iptables off
8、相关配置文件及目录
cobbler相关配置文件: /etc/cobbler
cobbler数据存储目录: /var/www/cobbler
dhcp配置文件: /etc/dhcpd.conf
dhcp租期缓存文件: /var/lib/dhcpd/dhcpd.leases
pxe配置文件: /tftpboot/pxelinux.cfg/default
ks模板文件: /var/lib/cobbler/kickstarts_*.ks
9、客户端通过PXE安装系统
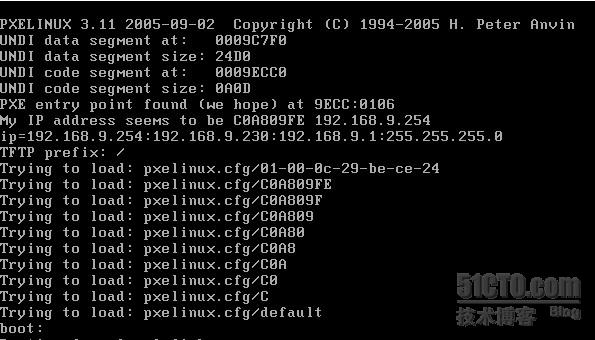
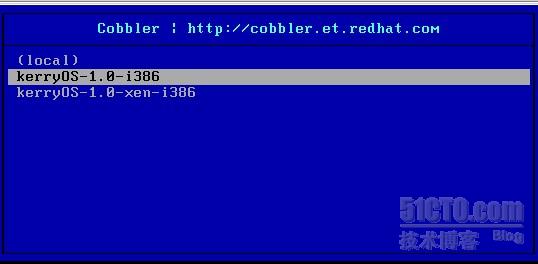
启动另一台新服务器,通过 PXE 启动进入,提示"boot:"时输入"menu"即可进入蓝色的 Cobbler 安装界面,选择安装项,自动完成系统安装。


10、重装系统
CentOS 5.5默认的Repository里找不到koan,先安装rpmforce这个Repository
cd /opt
wget http://pkgs.repoforge.org/rpmforge-release/rpmforge-release-0.5.2-2.el5.rf.i386.rpm
rpm -ivh rpmforge-release-0.5.2-2.el6.rf.i686.rpm
#在要重装的机器安装koan
yum -y install koan
#查看cobbler服务器有哪些安装盘
koan --list-profiles --server=192.168.9.230

#选择要重装的系统并重启
koan --replace-self --server=192.168.9.230 --profile=kerryOS-1.0-i386
reboot
11、服务控制脚本
vi /etc/init.d/cobbler_all
#!/bin/sh
case $1 in
start)
/etc/init.d/httpd start
/etc/init.d/xinetd start
/etc/init.d/dhcpd start
/etc/init.d/cobblerd start
;;
stop)
/etc/init.d/httpd stop
/etc/init.d/xinetd stop
/etc/init.d/dhcpd stop
/etc/init.d/cobblerd stop
;;
status)
/etc/init.d/httpd status
/etc/init.d/xinetd status
/etc/init.d/dhcpd status
/etc/init.d/cobblerd status
;;
sync)
cobbler sync
;;
*)
echo "Input error,please in put 'start|stop|status|sync'!";
exit 2>&1 >/dev/null &
;;
esac
chmod +x /etc/init.d/cobbler_all
/etc/init.d/cobbler_all start|stop|startus|sync