Nginx web服务器 安装 配置PHP SSL 反向代理 负载均衡 web缓存 URL 重写 写分离
【Nginx web服务器】
安装
为nginx提供SysV init脚本
优先级
让Nginx支持站点用户认证访问
Nginx SSL 配置
打开防火墙443 端口
基于主机名的 虚拟主机
源码安装 PHP
Nginx反向代理
Nginx负载均衡
Nginx web缓存
Nginx URL 重写
Nginx读写分离
[其他文档]Nginx 安装配置
http://www.runoob.com/linux/nginx-install-setup.html
【Nginx web服务器】
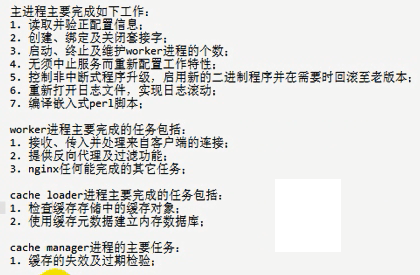
支持5万高并发,实际3万
负载均衡 LVS
反向代理
200第一次连接
302 缓存里面来的
[root@localhost home]# du -sh nginx-1.4.7
5.2M nginx-1.4.7
【准备安装】
模块需求:
yum -y install openssl-devel
yum -y install pcre-devel
[root@localhost nginx-1.4.7]# groupadd -r -g 108 nginx
[root@localhost nginx-1.4.7]# useradd -r -g 108 -u 108 nginx
【nginx-1.4.7.tar.gz】
./configure \
 ./configure \
  --prefix=/usr \
 --sbin-path=/usr/sbin/nginx \
 --conf-path=/etc/nginx/nginx.conf \
 --error-log-path=/var/log/nginx/error.log \
 --http-log-path=/var/log/nginx/access.log \
 --pid-path=/var/run/nginx/nginx.pid \
 --lock-path=/var/lock/nginx.lock \
  --user=nginx \
  --group=nginx \
  --with-http_ssl_module \
  --with-http_flv_module \
 --with-http_stub_status_module \
 --with-http_gzip_static_module \
 --http-client-body-temp-path=/var/tmp/nginx/client/ \
 --http-proxy-temp-path=/var/tmp/nginx/proxy/ \
 --http-fastcgi-temp-path=/var/tmp/nginx/fcgi/ \
 --http-uwsgi-temp-path=/var/tmp/nginx/uwsgi \
 --http-scgi-temp-path=/var/tmp/nginx/scgi \
  --with-pcre
  --with-file-aio

# make && makeinstall
------------------------------------------------------------
3、为nginx提供SysV init脚本:
新建文件/etc/rc.d/init.d/nginx,内容如下:
#!/bin/sh
#
# nginx - this script startsand stops the nginx daemon
#
# chkconfig:   - 85 15
# description:  Nginx is an HTTP(S) server, HTTP(S) reverse \
#               proxy and IMAP/POP3 proxy server
# processname: nginx
# config:      /etc/nginx/nginx.conf
# config:      /etc/sysconfig/nginx
# pidfile:     /var/run/nginx.pid

# Source function library.
. /etc/rc.d/init.d/functions

# Source networkingconfiguration.
. /etc/sysconfig/network

# Check that networking isup.
[ "$NETWORKING" ="no" ] && exit 0

nginx="/usr/sbin/nginx"
prog=$(basename $nginx)

NGINX_CONF_FILE="/etc/nginx/nginx.conf"

[ -f /etc/sysconfig/nginx ]&& . /etc/sysconfig/nginx

lockfile=/var/lock/subsys/nginx

make_dirs() {
   # make required directories
   user=`nginx -V 2>&1 | grep"configure arguments:" | sed 's/[^*]*--user=\([^ ]*\).*/\1/g' -`
   options=`$nginx -V 2>&1 | grep'configure arguments:'`
   for opt in $options; do
       if [ `echo $opt | grep '.*-temp-path'`]; then
           value=`echo $opt | cut -d "=" -f2`
           if [ ! -d "$value" ]; then
               # echo "creating"$value
               mkdir -p $value && chown-R $user $value
           fi
       fi
   done
}

start() {
    [ -x $nginx ] || exit 5
    [ -f $NGINX_CONF_FILE ] || exit 6
    make_dirs
    echo -n $"Starting $prog: "
    daemon $nginx -c $NGINX_CONF_FILE
    retval=$?
    echo
    [ $retval -eq 0 ] && touch$lockfile
    return $retval
}

stop() {
    echo -n $"Stopping $prog: "
    killproc $prog -QUIT
    retval=$?
    echo
    [ $retval -eq 0 ] && rm -f$lockfile
    return $retval
}

restart() {
    configtest || return $?
    stop
    sleep 1
    start
}

reload() {
    configtest || return $?
    echo -n $"Reloading $prog: "
    killproc $nginx -HUP
    RETVAL=$?
    echo
}

force_reload() {
    restart
}

configtest() {
  $nginx -t -c $NGINX_CONF_FILE
}

rh_status() {
    status $prog
}

rh_status_q() {
    rh_status >/dev/null 2>&1
}

case "$1" in
    start)
        rh_status_q && exit 0
        $1
        ;;
    stop)
        rh_status_q || exit 0
        $1
        ;;
    restart|configtest)
        $1
        ;;
    reload)
        rh_status_q || exit 7
        $1
        ;;
    force-reload)
        force_reload
        ;;
    status)
        rh_status
        ;;
    condrestart|try-restart)
        rh_status_q || exit 0
            ;;
    *)
        echo $"Usage: $0{start|stop|status|restart|condrestart|try-restart|reload|force-reload|configtest}"
        exit 2
esac
优先级【官方文档】
Let’s illustrate the above by an example:
location = / {
    [ configuration A ]
}

location / {
    [ configuration B ]
}

location /documents/ {
    [ configuration C ]
}

location ^~ /images/ {
    [ configuration D ]
}

location ~* \.(gif|jpg|jpeg)$ {
    [ configuration E ]
}
The “/” request will match configuration A, the “/index.html” request will match configuration B, the“/documents/document.html” request willmatch configuration C, the “/images/1.gif” request will match configuration D, and the “/documents/1.jpg” request willmatch configuration E.
--------------------------------
[root@localhost /]# chkconfig --add nginx
[root@localhost /]# chkconfig --list nginx
默认页面文件 /usr/html
配置文件 /etc/nginx/
vim "nginx.conf"
worker_processes 2;线程数,CPU密集型就是填CPU个数,我的2个或者4个
events {
   worker_connections  1024;乘以worker_processes是最大连接数
}

location / {
            root  html;     root   /web/htdocs;相对文件的根,我的修改
            index  index.html index.htm;    主页面是谁的
        }
servicenginx restart
开启iptables 端口
vim /web/htdocs/index.html
浏览器测试
自定义location
    location / {
            root   /web/htdocs;
            index  index.html index.htm;
        }
        location /bbs/ {
            root/web;
           index index.html index.htm;
         }
这个配置的意义是,在/web/下面找bbs/
浏览器直接输入http://172.16.0.102/bbs/ 有效果!
自定义404出错页面
error_page 404 /404.html; 去注释启用
vim /web/htdocs/404.html 自定义的错误页面
servicenginx reload
浏览器随意访问一个不存在的页面
【也可以自定义 location的 404】
【拒绝172.16.0.101来访bbs】
先试试实验室能不能访问
location /bbs/ {
root /web;
indexindex.html index.htm;
deny 172.16.0.101;
}
servicenginx reload 再测试http://172.16.0.102/bbs/OK
【只允许172.16.0.101来访bbs】
location /bbs/ {
root /web;
indexindex.html index.htm;
allow 172.16.0.100;
denyall;
}
servicenginx reload 再测试http://172.16.0.102/bbs/OK
【让Nginx支持站点用户认证访问】
yum -y install httpd
[root@localhost ~]# chkconfig --list httpd
httpd 0:off 1:off 2:off 3:off 4:off 5:off 6:off
确保开机不会自动启动
htpasswd -c -m/etc/nginx/.users tom 第一次才-c参数
htpasswd -m /etc/nginx/.users jerry
【站点状态显示】http://172.16.0.102/status
在任意位置写
location /status {
stub_status on;
}
service nginx restart OK
Active connections: 3
server accepts handled requests
9 9 173
Reading: 0 Writing: 1 Waiting: 2
Reading正在读取其首部请求的个数
Wrting 正在读取主体,处理内容 向客户发起响应
Waiting 长连接的保持连接个数
【vim 笔记:ctrl + V 可视化】
在选定行的vim行前面加上// ,一般在语言中表示注释
(1)control+v选定列(vim)
(2)按I插入//
(3)按esc
取消语法高亮 :setnohlsearch
【Nginx SSL 配置】去除注释再修改
server {
         listen       443;
         server_name  localhost;

         ssl                  on;
ssl_certificate      /etc/nginx/ssl/nginx.crt;
        ssl_certificate_key  /etc/nginx/ssl/nginx.key;
        ssl_session_timeout  5m;

        ssl_protocols  SSLv2 SSLv3 TLSv1;
         ssl_ciphers  HIGH:!aNULL:!MD5;
         ssl_prefer_server_ciphers   on;

         location / {
             root   /web/htdocs;;
             index  index.html index.htm;
         }
     }
------------------------------------
【https 网站】
vim /etc/pki/tls/openssl.cnf
[root@localhost ~]# cd/etc/pki/CA/
[root@localhost CA]# (umask 077;opensslgenrsa 2048 > private/cakey.pem)
openssl req -new -x509 -keyprivate/cakey.pem -out cacert.pem
Country Name (2 letter code) [XX]:CN
State or Province Name (full name) []:HA
Locality Name (eg, city) [Default City]:ZZ
Organization Name (eg, company) [Default Company Ltd]:MageEdu
Organizational Unit Name (eg, section) []:Tech
Common Name (eg, your name or your server's hostname) []:ca.magedu.com
Email Address []:[email protected]
[root@localhost CA]# touch serial
[root@localhost CA]# echo 01 > serial
[root@localhost CA]# touch index.txt
cd /etc/nginx/ssl
(umask 077:openssl genrsa 1024 > nginx.key )
openssl req -new -keynginx.key -out nginx.csr
Country Name (2 letter code) [XX]:CN
State or Province Name (full name) []:HA
Locality Name (eg, city) [Default City]:ZZ
Organization Name (eg, company) [Default Company Ltd]:MageEdu
Organizational Unit Name (eg, section) []:Tech
Common Name (eg, your name or your server's hostname) []:www.magedu.com
【签证】
[root@localhost ssl]# openssl ca -in nginx.csr -out nginx.crt -days 3650
Using configuration from/etc/pki/tls/openssl.cnf
Check that the request matches the signature
Signature ok
Certificate Details:
       Serial Number: 1 (0x1)
       Validity
           Not Before: May  9 09:05:28 2015GMT
           Not After : May  6 09:05:28 2025GMT
       Subject:
           countryName               = CN
           stateOrProvinceName       = HA
           organizationName          =MageEdu
            organizationalUnitName    = Tech
           commonName                =www.magedu.com
       X509v3 extensions:
           X509v3 Basic Constraints:
               CA:FALSE
           Netscape Comment:
               OpenSSL Generated Certificate
           X509v3 Subject Key Identifier:
               BD:44:8D:2F:1C:44:42:E1:D6:00:58:77:96:7D:BF:F1:DF:01:71:3D
           X509v3 Authority Key Identifier:
               keyid:B5:A2:E5:3A:C1:E6:E9:FD:39:C9:3C:1E:D7:BA:1F:D4:60:C0:9C:B6

Certificate is to be certified until May  6 09:05:28 2025 GMT (3650 days)
Sign the certificate? [y/n]:y


1 out of 1 certificate requests certified,commit? [y/n]y
Write out database with 1 new entries
Data Base Updated
【签证OK】
重启Nginx service nginx reload
------------------------------------------------------------------
看看443 端口有没有被监听
[root@localhost htdocs]# netstat �Ctnlp


打开防火墙443 端口
iptables -A INPUT -p tcp --dport 443 -m state --state NEW -jACCEPT
访问:https://172.16.0.102/
*********************SSL 实验完成 *****************************
【基于主机名的 虚拟主机】
修改配置文件
server {
        listen       80;
     server_name  www.a.com;

        #charset koi8-r;

        #access_log  logs/host.access.log  main;

        location / {
            root   /web/a.com;
            index  index.html index.htm;
        }
************在范围内新增以下 ************
【参考】 # deny access to.htaccess files, if Apache's document root
100 #concurs with nginx's one
101 #
102 #location ~ /\.ht {
103 # deny all;
104 #}
105 }
server {
listen 80;
server_name www.b.org;
location / {
root /web/b.org;
index index.html index.htm;
}
}
# another virtual host using mix of IP-, name-, andport-based configuration
【编辑win7 host文件】 C:\Windows\System32\drivers\etc
172.16.0.102 www.a.com
172.16.0.102 www.b.org
【访问测试】
www.a.com
www.b.org
但是访问http://172.16.0.102/会显示
welcome to www.a.com
/web/a.com.index.html
************************实验结束******************************************
【安装二进制mysql-5.6.10-linux-glibc2.5-x86_64.tar.gz必须是这个版本 其他版本自测】
【安装mysql-5.6.10-linux-glibc2.5-x86_64.tar.gz】
tar xf mysql-5.6.10-linux-glibc2.5-x86_64.tar.gz
【查看文件夹大小】
du -sh mysql-5.6.11
cd mysql-5.6.11
【创建mysql 用户,组】
groupadd -r -g 306 mysql
useradd -r -g 306 -u 306 mysql
mkdir -pv /mydata/data
chown -R mysql:mysql /mydata/data
ln -sv mysql-5.6.11/ mysql
chown root:mysql ./*
出错的就根据提示yum 安装
yum -y install glibc.i686
yum -y install libstdc++.i686tar xfmysql-5.6.11.tar.gz
yum -y install libaio.i686mv mysql-5.6.11 /usr/local/
【必须在解压的文件夹里面初始化】
[root@localhost mysql]# scripts/mysql_install_db--user=mysql --datadir=/mydata/data/
*************初始化信息**********************
WARNING: Found existingconfig file ./my.cnf on the system.
Because this file might be inuse, it was not replaced,
but was used in bootstrap(unless you used --defaults-file)
and when you later start theserver.
The new default config filewas created as ./my-new.cnf,
please compare it with yourfile and take the changes you need.
************初始化完成***************************
[root@localhost mysql]# vim my.cnf
sql_mode=NO_ENGINE_SUBSTITUTION,STRICT_TRANS_TABLES
datadir = /mydata/data
innodb_file_per_table = ON
log-bin = master-bin
******************************************
如果提示:can not connect to local MySQL serverthrough socket ‘/tmp/mysql.sock’
就再添加一行
socket = /tmp/mysql.sock
******************************************
[root@localhost mysql]#cp support-files/mysql.server /etc/init.d/mysqld
[root@localhost mysql]# chkconfig --add mysqld
[root@localhost mysql]# service mysqld start
【启动mysql】
[root@localhost mysql]# bin/mysql
【导出所有lib库】
[root@localhost local]# vim /etc/ld.so.conf.d/mysql.conf
/usr/local/mysql/lib
[root@localhost local]# ldconfig -v
[root@localhost local]# ln -sv /usr/local/mysql/include//usr/include/mysql
**************MySQL安装完成*********************
【源码安装 PHP】
[root@localhost local]# tar xf php-5.4.41.tar.gz
./configure --prefix=/usr/local/php--with-mysql=/usr/local/mysql --with-openssl --enable-fpm --enable-sockets--enable-sysvshm --with-mysqli=/usr/local/mysql/bin/mysql_config --enable-mbstring--with-freetype-dir --with-jpeg-dir --with-png-dir --with-zlib-dir --with-libxml-dir=/usr--enable-xml --with-config-file-path=/etc --with-config-file-scan-dir=/etc/php.d--with-bz2 --with-curl
***** 报错configure:error: xml2-config not found. Please check your libxml2 installation.
******安装[root@localhostdata]# yum install libxml2-devel
***** 报错configure:error: Please reinstall the BZip2 distribution
******安装[root@localhostdata]# yum install bzip2-devel
***** 报错configure:error: Please reinstall the libcurl distribution
******安装[root@localhostdata]# yum install -y libcurl-devel
成功!Thank youfor using PHP.
边编译边安装[root@localhost local]# make &&make install
【配置PHP】
[root@localhost php-5.4.41]# cp php.ini-production /etc/php.ini
[root@localhost php-5.4.41]# cd /usr/local/php/etc/
[root@localhost etc]# cp php-fpm.conf.default php-fpm.conf
[root@localhost etc]# vim php-fpm.conf
最大子进程pm.max_children = 150àpm.max_children = 150
启动时启动个数pm.start_servers = 2à pm.start_servers = 5
空闲进程pm.min_spare_servers = 1 àpm.min_spare_servers = 5
[[email protected]]# cp /usr/local/php-5.4.41/sapi/fpm/init.d.php-fpm /etc/init.d/php-fpm
[root@localhost php-5.4.41]# chmod +x /etc/init.d/php-fpm
[root@localhost php-5.4.41]# chkconfig --add php-fpm
********安装视频上的 我启动失败了 *******************
我只好 [root@localhostetc]# cp php-fpm.conf.default php-fpm.conf
【重启php-fpm】
[root@localhost init.d]# service php-fpm restart
Starting php-fpm done
【查看监听端口】
[root@localhost init.d]# netstat -tnlp
tcp 0 0 127.0.0.1:9000 0.0.0.0:* LISTEN 6649/php-fpm
【php-fpm启动的进程】
[root@localhost etc]# ps �Caux
[root@localhost etc]# vim /etc/nginx/nginx.conf
location ~ \.php$ {
root /web/htdocs;
fastcgi_pass 127.0.0.1:9000;
fastcgi_index index.php;
fastcgi_param SCRIPT_FILENAME /scripts$fastcgi_script_name;
include fastcgi_params;
}
【配置fastcgi_params】
[root@localhost etc]# vim /etc/nginx/fastcgi_params 删除全部内容
fastcgi_param GATEWAY_INTERFACE CGI/1.1;
fastcgi_param SERVER_SOFTWARE nginx;
fastcgi_param QUERY_STRING $query_string;
fastcgi_param REQUEST_METHOD $request_method;
fastcgi_param CONTENT_TYPE $content_type;
fastcgi_param CONTENT_LENGTH $content_length;
fastcgi_param SCRIPT_FILENAME $document_root$fastcgi_script_name;
fastcgi_param SCRIPT_NAME $fastcgi_script_name;
fastcgi_param REQUEST_URI $request_uri;
fastcgi_param DOCUMENT_URI $document_uri;
fastcgi_param DOCUMENT_ROOT $document_root;
fastcgi_param SERVER_PROTOCOL $server_protocol;
fastcgi_param REMOTE_ADDR $remote_addr;
fastcgi_param REMOTE_PORT $remote_port;
fastcgi_param SERVER_ADDR $server_addr;
fastcgi_param SERVER_PORT $server_port;
fastcgi_param SERVER_NAME $server_name;
【验证Nginx 语法】
[root@localhost etc]# nginx -t
nginx: the configuration file /etc/nginx/nginx.conf syntax is ok
nginx: configuration file /etc/nginx/nginx.conf test issuccessful
[root@localhost etc]# service nginx reload
【去除iptables干扰】
[root@localhost htdocs]# service iptables stop
【设置首页】
vim /web/htdocs/index.php
<h1> welcome to nginx </h1>
<?php
phpinfo();
?>
【修改配置vim /etc/nginx/nginx.conf】
我把把其他的虚拟主机全部删除,注释SSL,只修改为以下
*************************************************************
server {
listen 80;
server_name www.a.com;
location / {
root /web/htdocs;
index index.php;
}
***********************往下翻*********************************
location ~ \.php$ {
root /web/htdocs;
fastcgi_pass 127.0.0.1:9000;
fastcgi_index index.php;
fastcgi_param SCRIPT_FILENAME /scripts$fastcgi_script_name;
include fastcgi_params;
}
***************************************************************
【测试 OK】
http://172.16.0.102/

【Nginx反向代理】
【1将请求转发到后端】 172.16.0.102
【保存当前的配置文件】
[root@localhost /]# mv/etc/nginx/nginx.conf /etc/nginx/nginx.conf.201505271338
【复制一个默认的配置文件】
[root@localhost nginx]# cp nginx.conf.default nginx.conf
【重启Nginx】
[root@localhost ~]# service nginx restart
【Nginx的默认配置文件的主页在/usr/html/index.html】
vim /usr/html/LCL/index.html
在浏览器里面http://172.16.0.102/LCL/ 测试OK
【再找一个LINUX做Apache的httpd服务器,172.16.0.104】
****yum 安装 httpd
****启动httpd
****开启iptables端口
****访问测试
****创建文件夹 mkdir-pv /var/www/html/HTTPD
****[root@localhost LCL]# vim index.html
****访问测试 http://172.16.0.104/HTTPD/
****测试成功
【配置172.16.0.102 vim nginx.conf,只是添加以下信息】
访问172.16.0.102/LCL会显示172.16.0.102/HTTPD的内容
#error_page 404 /404.html;
location /LCL{
proxy_passhttp://172.16.0.104/HTTPD;
}
# redirect server error pages to the static page/50x.html
注意文件路径的斜线对应
【测试 OK】
【如果想用正则表达式的 只能这样】
【查httpd日志,会显示反向代理的服务器IP,而不是客户的IP】
【看172.16.0.104的日志】tai/var/log/httpd/access_log
172.16.0.102 - -[27/May/2015:22:38:01 +0800] "GET /HTTPD/ HTTP/1.0" 200 37 "-""Mozilla/5.0 (Windows NT 6.1; WOW64) AppleWebKit/537.36 (KHTML, likeGecko) Maxthon/4.4.3.4000 Chrome/30.0.1599.101 Safari/537.36"
【修改反向代理的配置172.16.0.102】vim/etc/nginx/nginx.conf
location /LCL {
proxy_passhttp://172.16.0.104/HTTPD;
proxy_set_header X-Real-IP $remote_addr;
}
【修改172.16.0.104的日志格式】vim /etc/httpd/conf/httpd.conf
#LogFormat "%h %l %u %t \"%r\" %>s%b \"%{Referer}i\" \"%{User-Agent}i\"" combined
LogFormat "%{X-Real-IP}i %l %u %t \"%r\" %>s %b \"%{Referer}i\"\"%{User-Agent}i\"" combined
【重启httpd 服务】servicehttpd restart
【看日志,已经发生改变了】172.16.0.100是我win7浏览器的访问记录
172.16.0.100 - - [27/May/2015:23:05:11 +0800] "GET /HTTPD/HTTP/1.0" 200 37 "-" "Mozilla/5.0 (Windows NT 6.1; WOW64)AppleWebKit/537.36 (KHTML, like Gecko) Maxthon/4.4.3.4000 Chrome/30.0.1599.101Safari/537.36"
【将整个172.16.0.102网站内所有代理为172.16.0.104网站】 vim /etc/nginx/nginx.conf
注释前面的location 字段内容!!!!
location / {
proxy_passhttp://172.16.0.104/;
proxy_set_header X-Real-IP $remote_addr;
}
【Nginx负载均衡】
【再找一个LINUX做Apache的httpd服务器,172.16.0.105】
****yum 安装 httpd
****启动httpd
****开启iptables端口
****访问测试
****cd /var/www/html vimindex.html做一个区别网页
****访问测试 http://172.16.0.105
****测试成功
【配置Nginx172.16.0.105 vim/etc/nginx/nginx.conf】
定义在server外
upstream webserver {
server 172.16.0.104weight=1;#权重都为1
server 172.16.0.105weight=1;
}
修改代理的组
location / {
proxy_passhttp://webserver/; 定义webserver组
proxy_set_header X-Real-IP $remote_addr;
}
【语法检测 nginx �Ct weight 右端不能有空格】
【打开浏览器,访问172.16.0.102,按住F5不放手,
会出现负载均衡效果,循环显示172.16.0.105和172.16.0.105的网页首页】
【健康状态检查】
一台出现故障,就不再使用这台
upstream webserver {
server 172.16.0.104weight=1 max_fails=2 fail_timeout=2;
server 172.16.0.105weight=1 max_fails=2 fail_timeout=2;
}
对其中任意一台服务器操作
service httpd stop 访问测试只有一台是正常的
service httpd restart 恢复两台的访问
【当后台服务器宕机,提示出错页面】基于上面的配置
[root@localhost errorpages]# vim /etc/nginx/nginx.conf
新增一些信息
upstream webserver {
server 172.16.0.104weight=1 max_fails=2 fail_timeout=2;
server 172.16.0.105weight=1 max_fails=2 fail_timeout=2;
server 127.0.0.1:8080 backup;
}
[root@localhost /]# vim/etc/nginx/nginx.conf
在原来的server下面再写一条server 不是嵌套在里面的
server{
listen 8080;
server_name localhost;
root /web/errorpages;
index index.html;
}
vim /web/errorpages/index.html 写点什么东西
nginx -t
service nginx reload
访问 http://172.16.0.102:8080/ OK
http://172.16.0.102/ 负载均衡 正常
service httpd stop 停掉一台 还可以继续使用
service httpd stop 再停一台
就显示/web/errorpages/index.html的内容了
重启这两台的服务 又可以继续显示负载均衡的效果
【测试OK】
【始终记录客户机与某一个服务器的匹配】但是负载均衡的意义就没有了
upstream webserver {
# ip_hash;
server 172.16.0.104weight=1 max_fails=2 fail_timeout=2;
server 172.16.0.105weight=1 max_fails=2 fail_timeout=2;
#server 127.0.0.1:8080backup;
【Nginx web缓存】
[root@localhost errorpages]# vim /etc/nginx/nginx.conf
不能定义在server里面
缓存目录 /nginx/cache/first
两个文件夹一级一个字符,二级两个字符 levels=1:2
缓存大小20m 最大1G
*****************************************************************
proxy_cache_path /nginx/cache/first levels=1:2 keys_zone first:20mmax_size=1g;
server {
listen 80;
server_name localhost;
#charset koi8-r;
#access_log logs/host.access.log main;
add_header X-Via$server_addr;
add_header X-Cache$upstream_cache_status;
# location / {
# root html;
# index index.html index.htm;
# }
#error_page 404 /404.html;
location / {
proxy_passhttp://webserver/;
proxy_set_header X-Real-IP $remote_addr;
proxy_cache first;
proxy_cache_valid 200 10m;
}
******************************************************************
【谁给我们提供缓存IP】add_header X-Via $server_addr;
【显示是否命中缓存】add_header X-Cache $upstream_cache_status;
nginx �Ct 提示目录不存在
mkdir -pv /nginx/cache/first
nginx �Ct OK
【关闭Nginx,删除/nginx/cache/first里面所有的文件】
【启动Nginx】
火狐浏览器,打开F12【网络】、【消息头】
【第一次 刷新 MISS没有命中】
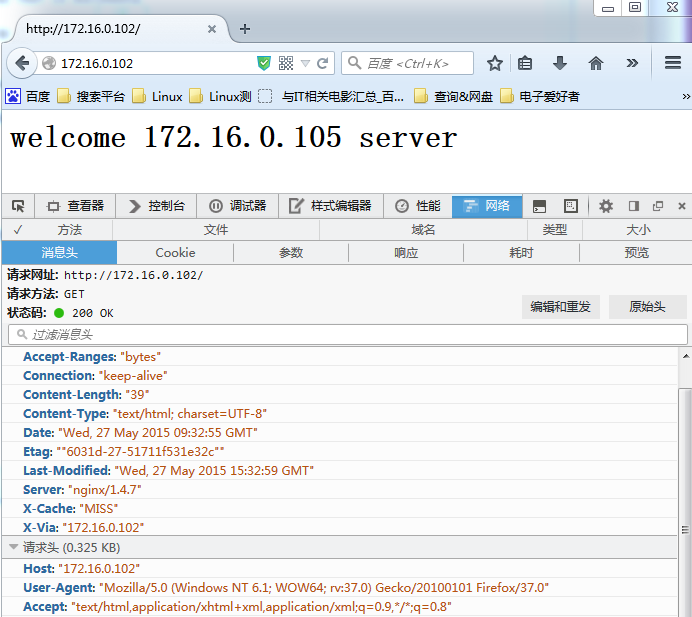
【第二次刷新 X -Cache “HIT” 命中缓存!】
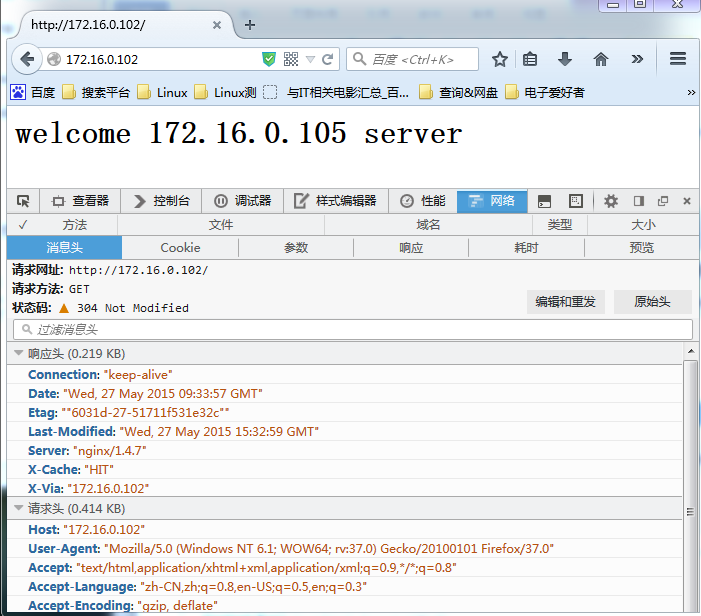
【也可以把上面的两行 改写一行】
# add_header X-Via $server_addr;
add_headerX-Cache "$upstream_cache_status from $server_addr";
效果是一样的

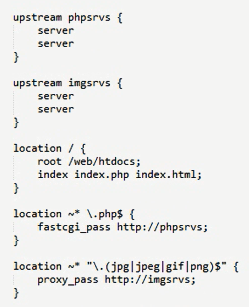
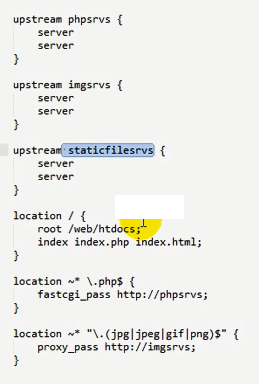
其他缓存
***********************

***********************
****************************************************************************************
【Nginx URL 重写】
[root@localhost nginx]# mvnginx.conf nginx.conf.201505272129
[root@localhost nginx]# cpnginx.conf.default nginx.conf
[root@localhost nginx]# vimnginx.conf
location / {
root html;
index index.html index.htm;
rewrite ^/bbs(.*)$http://172.16.0.104/LCL/$1;
}
紫色为添加的
[root@localhost nginx]# nginx-t
[root@localhost nginx]#service nginx reload
/var/www/html/LCL index.html
【测试172.16.0.102】

【测试
http://172.16.0.102/bbs】
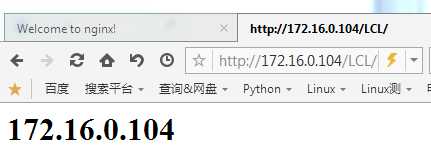
【可以看出 地址直接跳转了】
*
【把上面紫色的改为 隐式重定向 这样客户端就看不出来了,但访问是本地的,实际访问并不是bbs,而是LCL】
rewrite ^/bbs(.*)$ /LCL/$1;

【Nginx读写分离】
【172.16.0.105】
[root@localhost html]# vim /etc/httpd/conf/httpd.conf
确保这两个模块启用
LoadModule dav_modulemodules/mod_dav.so
LoadModule dav_fs_modulemodules/mod_dav_fs.so
在<Directory "/var/www/html">下面写一句保存退出
dav on
[root@localhost html]# service httpd restart
赋予权限
[root@localhost html]# setfacl -m u:apache:rwx /var/www/html/
【172.16.0.102上传】 curl -T /etc/fstab http://172.16.0.105
<p>Resource /fstab has beencreated.</p>
<address>Apache/2.2.15 (CentOS) Serverat 172.16.0.105 Port 80</address>.
【访问测试 OK】http://172.16.0.105/fstab
【只让172.16.0.105可以写】
172.16.0.102 vim /etc/nginx/nginx.conf
#access_log logs/host.access.log main;
location / {
root html;
index index.html index.htm;
rewrite ^/bbs(.*)$ /LCL/$1; 都去掉
}
#error_page 404 /404.html;
――――――改为 注意等号两边的空格
location / {
proxy_passhttp://172.16.0.104/;
if ($request_method ="PUT") {
proxy_pass http://172.16.0.105;
}
}
[root@localhost html]# nginx �Ct
[root@localhost html]# service nginx reload
【访问测试 172.16.0.102】[root@localhost html]# curl http://172.16.0.102 随意
【上传测试】[root@localhost html]# curl -T/etc/passwd http://172.16.0.102
<p>Resource /passwd has beencreated.</p>
<address>Apache/2.2.15 (CentOS) Server at 172.16.0.105 Port80</address>
【延伸 】定义两个upstream组 一个读 一个写