Linux HA集群之Heartbeat
大纲
一、什么是高可用集群
二、什么是高可用性
三、高可用集群相关概念
四、Heartbeat v1版示例
一、什么是高可用集群
高可用集群,英文原文为High Availability Cluster,简称HA Cluster,简单的说,集群(cluster)就是一组计算机,它们作为一个整体向用户提供一组网络资源。这些单个的计算机系统 就是集群的节点(node)。高可用性集群(HA cluster)是指如单系统一样地运行并支持(计算机)持续正常运行的一个主机群。
高可用集群的出现是为了使集群的整体服务尽可能可用,从而减少由计算机硬件和软件易错性所带来的损 失。如果某个节点失效,它的备援节点将在几 秒钟的时间内接管它的职责。因此,对于用户而言,集群永远不会停机。高可用集群软件的主要作用就是实现故障检查和业务切换的自动化。
只有两个节点的高可用集群又称为双机热备,即使用两台服务器互相备份。当一台服务器出现故障时,可由另一台服务器承担服务任务,从而在不需要人工干预的 情况下,自动保证系统能持续对外提供服务。双机热备只是高可用集群的一种,高可用集群系统更可以支持两个以上的节点,提供比双机热备更多、更高级的功能, 更能满足用户不断出现的需求变化。
二、什么是高可用性
计算机系统的可靠性用平均无故障时间(MTBF)来度量,即计算机系统平均能够正常运行多长时间,才发生一次故障。系统的可靠性越高,平均无故障时间越长。可维护性用平均维修时间(MTTR)来度量,即系统发生故障后维修和重新恢复正常运行平均花费的时间。系统的可维护性越好,平均维修时间越短。计算机系统的可用性定义为:MTBF/(MTBF+MTTR) * 100%。由此可见,计算机系统的可用性定义为系统保持正常运行时间的百分比。计算公式为

MTBF = mean time between failuresv
MTTR = mean time to repairv
A = probability system will provide service ata random time (ranging from 0 to 1)
描述可用性的一种常用的方法是使用“9”,如三个 9 表示 99.9% 可用性。但是,有时会误解用 9 度量的含义。需要进行算术运算才能知道三个 9(99.9% 可用性)表示一年大约有 8.5 小时的服务中断期。四个 9 (99.99%) 是更高一级的可用性,表示一年大约有 1 小时的服务中断期。五个 9 (99.999%) 表示每年仅有大约 5 分钟的中断期。
三、高可用集群相关概念

1、高可用集群架构层次
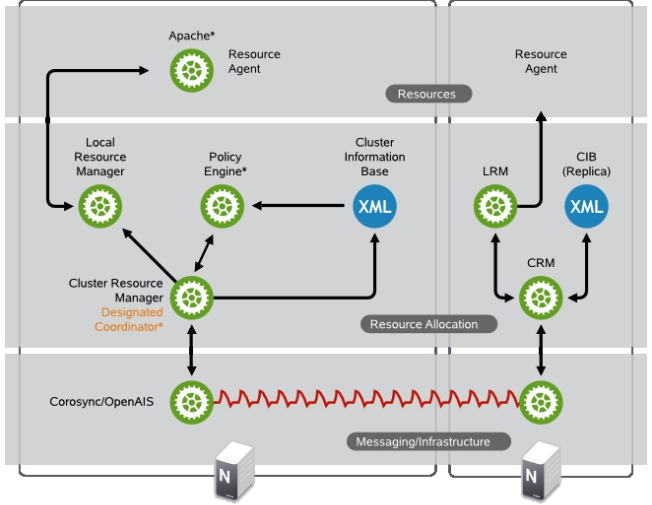
Messaging Layer
Cluster Resource Manager
Resource Agent
(1)、Messaging Layer
各节点之间传递各自的心跳信息和集群食物决策信息
(2)、Cluster Resource Manager
群集资源管理器 (CRM)
在资源分配层中执行的每个操作都要经过群集资源管理器。如果资源分配层的其他组件(或更高层中的组件)需要通讯,则它们通过本地 CRM 进行。在每个节点上,CRM 都会维护群集信息库 (CIB)。
群集信息库 (CIB)
群集信息库是整个群集配置和当前状态在内存中的 XML 表示。它包含所有群集选项、节点、资源、约束及其之间的关系的定义。CIB 还将更新同步到所有群集节点。群集中有一个主 CIB,由指定协调器 (DC)进行维护。所有其他节点都包含 CIB 复本。
指定协调器 (DC)
群集中的一个 CRM 会选为 DC。DC 是群集中唯一可以决定需要在整个群集执行更改(例如节点屏蔽或资源移动)的实体。DC 同时也是用于保存 CIB 主副本的节点。所有其他节点都从当前 DC 获取他们的配置和资源分配信息。DC 是在成员资格更改后从群集的所有节点中选出的。
策略引擎 (PE)
只要指定协调程序需要进行群集范围的更改(对新 CIB 作出反应),策略引擎就会根据群集的当前状态和配置计算其下一个状态。PE 还生成一个转换图,包含用于达到下一个群集状态的(资源)操作和依赖性的列表。PE 始终在 DC 上运行。
本地资源管理器 (LRM)
LRM 代表 CRM 调用本地资源代理。因此它可以执行启动/停止/监视操作并将结果报告给 CRM。LRM 是其本地节点上所有资源相关信息的权威来源。
(3)、Resource Agent
最高层是资源层。资源层包括一个或多个资源代理 (RA)。资源代理是已写入的用来启动、停止和监视某种服务(资源)的程序(通常是外壳脚本)。资源代理仅由 LRM 调用。第三方可将他们自己的代理放在文件系统中定义的位置,这样就为各自的软件提供了现成群集集成。
2、集群的工作模型
A/P:两个节点,主备模型
N-M N>M,N个节点,M个服务
N-N:N个节点,N个服务
A/A:双主模型
3、资源约束类型
location constraint:位置约束,资源更倾向于那个节点上
coloation constraint:排列约束,资源运行在同一节点的倾向性
order constraint:顺序约束,资源的启动次序及关闭次序
4、集群的处理策略(某节点不是集群成员,如何处理运行于当前节点的资源)
stopped:停止
ignore:忽略
freeze:不连接新的请求,冻结
suicide:将服务器kill,即自杀式行为
5、资源类型(Resource Type)
primitive:主资源,只能运行于一个节点
group:组资源,资源容器
clone:克隆资源,同时运行于多个节点上的资源,如STONITH和dlm(分布式锁管理器)
master/slave:主从资源,一种特殊的克隆资源,只能运行于2个节点,并且有主从关系
6、RA类别
heartbeat legacy:传统的heartbeat类别
LSB:LSB风格的脚本,如/etc/rc.d/init.d目录下的脚本
OCF:Open Cluster Framework,遵循此种规范的各vendor都可以提供
STONITH:爆头设备,Shoot The Other Node In The Head的简写
7、隔离级别
节点级别:STONTIH
资源级别:FC SAN Switch
8、资源粘性
资源对某节点的依赖程度,通过score定义,INF表示正无穷,-INF表示负无穷
四、Heartbeat v1版示例
系统环境
CentOS6.5 x86_64
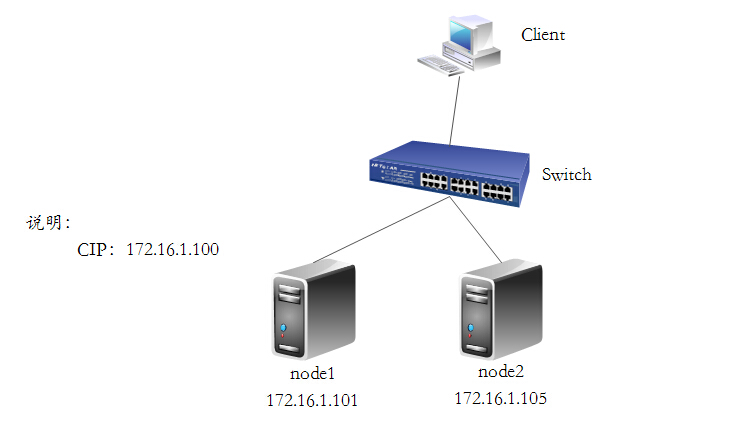
node1.soysauce.com node1 172.16.1.103
node2.soysauce.com node2 172.16.1.104
拓扑图

1、准备工作
(1)、时间同步
[root@node1 ~]# ntpdate s2c.time.edu.cn
[root@node2 ~]# ntpdate s2c.time.edu.cn

可根据需要定义至crontab任务中
(2)、主机名称要与uname -n,并通过/etc/hosts解析
node1
[root@node1 ~]# hostname node1.network.com
[root@node1 ~]# uname -n
node1.network.com
[root@node1 ~]# sed -i 's@\(HOSTNAME=\).*@\1node1.network.com@g'  /etc/sysconfig/network

node2
[root@node2 ~]# hostname node2.network.com
[root@node2 ~]# uname -n
node2.network.com
[root@node2 ~]# sed -i 's@\(HOSTNAME=\).*@\1node2.network.com@g'  /etc/sysconfig/network

node1添加hosts解析
[root@node1 ~]# vim /etc/hosts
[root@node1 ~]# cat /etc/hosts
127.0.0.1   localhost localhost.localdomain localhost4 localhost4.localdomain4
::1         localhost localhost.localdomain localhost6 localhost6.localdomain6
#	CentOS5.8
172.16.1.101	CentOS5.8
172.16.1.102	CentOS6.5
172.16.1.103	node1.network.com node1
172.16.1.104	node2.network.com node2

拷贝此hosts文件至node2
[root@node1 ~]# scp /etc/hosts root@node2:/etc/
The authenticity of host 'node2 (172.16.1.104)' can't be established.
RSA key fingerprint is 1e:87:cd:f0:95:ff:a8:ef:19:bc:c6:e7:0a:87:6b:fa.
Are you sure you want to continue connecting (yes/no)? yes
Warning: Permanently added 'node2' (RSA) to the list of known hosts.
root@node2's password:
hosts                                                                  100%  292     0.3KB/s   00:00
(3)、ssh互信通信
node1
[root@node1 ~]# ssh-keygen -t rsa -f ~/.ssh/id_rsa -P ''
Generating public/private rsa key pair.
Your identification has been saved in /root/.ssh/id_rsa.
Your public key has been saved in /root/.ssh/id_rsa.pub.
The key fingerprint is:
3d:85:a6:fe:42:9c:be:98:a5:d6:47:6c:e6:f7:f1:a3 root@node1
[root@node1 ~]# ssh-copy-id -i ~/.ssh/id_rsa.pub root@node2
The authenticity of host 'node2 (172.16.1.104)' can't be established.
RSA key fingerprint is 13:42:92:7b:ff:61:d8:f3:7c:97:5f:22:f6:71:b3:24.
Are you sure you want to continue connecting (yes/no)? yes
Warning: Permanently added 'node2,172.16.1.104' (RSA) to the list of known hosts.
root@node2's password:
hosts                                                                  100%  292     0.3KB/s   00:00
[root@node1 ~]# ssh root@node2 'ifconfig'
eth0      Link encap:Ethernet  HWaddr 00:0C:29:3A:AC:CC
          inet addr:172.16.1.104  Bcast:255.255.255.255  Mask:255.255.255.0
          inet6 addr: fe80::20c:29ff:fe3a:accc/64 Scope:Link
          UP BROADCAST RUNNING MULTICAST  MTU:1500  Metric:1
          RX packets:138231 errors:0 dropped:0 overruns:0 frame:0
          TX packets:172956 errors:0 dropped:0 overruns:0 carrier:0
          collisions:0 txqueuelen:1000
          RX bytes:15715088 (14.9 MiB)  TX bytes:21064792 (20.0 MiB)

lo        Link encap:Local Loopback
          inet addr:127.0.0.1  Mask:255.0.0.0
          inet6 addr: ::1/128 Scope:Host
          UP LOOPBACK RUNNING  MTU:16436  Metric:1
          RX packets:4810 errors:0 dropped:0 overruns:0 frame:0
          TX packets:4810 errors:0 dropped:0 overruns:0 carrier:0
          collisions:0 txqueuelen:0
          RX bytes:476915 (465.7 KiB)  TX bytes:476915 (465.7 KiB)

lo:0      Link encap:Local Loopback
          inet addr:172.16.1.110  Mask:255.255.255.255
          UP LOOPBACK RUNNING  MTU:16436  Metric:1

同理node2也需要做同样的双击互信,一样的操作,此处不再演示
2、安装heartbeat与httpd
node1
[root@node1 ~]# yum install -y heartbeat httpd
node2
[root@node2 ~]# yum install -y heartbeat httpd
3、配置密钥文件authkeys
[root@node1 ~]# cd /etc/ha.d/
[root@node1 ha.d]# cp /usr/share/doc/heartbeat-3.0.4/{authkeys,ha.cf,haresources} .
[root@node1 ha.d]# ls
authkeys  ha.cf  harc  haresources  rc.d  README.config  resource.d  shellfuncs
[root@node1 ha.d]# vim authkeys
[root@node1 ha.d]# tail -2 authkeys
auth 2
2 sha1  8e3a2cf5ae9eddff                # 这里使用sha1认证,可自行定义
[root@node1 ha.d]# chmod 600 authkeys
[root@node1 ha.d]# ll authkeys
-rw------- 1 root root 690 Jan  6 14:28 authkeys        # 保证权限为600
4、配置主配置文件ha.cf
[root@node1 ha.d]# vim ha.cf
[root@node1 ha.d]# grep "^[^#]" ha.cf             # 参数可自行根据需要调整
logfile	/var/log/heartbeat.log
keepalive 1
deadtime 10
warntime 3
udpport	694
mcast eth0 225.0.100.1 694 1 0
auto_failback on
node node1.network.com                # 注意此处的主机名一定要与uname -n结果保持一致
node node2.network.com
ping  172.16.1.1
compression	bz2
compression_threshold 2

ha.cf配置文件部分参数详解:

	autojoin    none
		#集群中的节点不会自动加入
	logfile /var/log/ha-log
		#指名heartbaet的日志存放位置
	keepalive 2
		#指定心跳使用间隔时间为2秒(即每两秒钟在eth1上发送一次广播)
	deadtime 30
		#指定备用节点在30秒内没有收到主节点的心跳信号后,则立即接管主节点的服务资源
	warntime 10
		#指定心跳延迟的时间为十秒。当10秒钟内备份节点不能接收到主节点的心跳信号时
		就会往日志中写入一个警告日志,但此时不会切换服务
	initdead 120
		#在某些系统上,系统启动或重启之后需要经过一段时间网络才能正常工作,
		该选项用于解决这种情况产生的时间间隔。取值至少为deadtime的两倍。

	udpport 694
		#设置广播通信使用的端口,694为默认使用的端口号。
	baud    19200
		#设置串行通信的波特率
	bcast   eth0
		# Linux  指明心跳使用以太网广播方式,并且是在eth0接口上进行广播。
	#mcast eth0 225.0.0.1 694 1 0
		#采用网卡eth0的Udp多播来组织心跳,一般在备用节点不止一台时使用。
		Bcast、ucast和mcast分别代表广播、单播和多播,是组织心跳的三种方式,任选其一即可。
	#ucast eth0 192.168.1.2
		#采用网卡eth0的udp单播来组织心跳,后面跟的IP地址应为双机对方的IP地址
	auto_failback on
		#用来定义当主节点恢复后,是否将服务自动切回,heartbeat的两台主机分别为主节点和备份节点。
		主节点在正常情况下占用资源并运行所有的服务,遇到故障时把资源交给备份节点并由备份节点运行服务。
		在该选项设为on的情况下,一旦主节点恢复运行,则自动获取资源并取代备份节点,
		如果该选项设置为off,那么当主节点恢复后,将变为备份节点,而原来的备份节点成为主节点
	#stonith baytech /etc/ha.d/conf/stonith.baytech
		# stonith的主要作用是使出现问题的节点从集群环境中脱离,进而释放集群资源,
		避免两个节点争用一个资源的情形发生。保证共享数据的安全性和完整性。
	#watchdog /dev/watchdog
		#该选项是可选配置,是通过Heartbeat来监控系统的运行状态。
		使用该特性,需要在内核中载入"softdog"内核模块,用来生成实际的设备文件,如果系统中没有这个内核模块,就需要指定此模块,重新编译内核。
		编译完成输入"insmod softdog"加载该模块。然后输入"grep misc /proc/devices"(应为10),
		输入"cat /proc/misc |grep watchdog"(应为130)。最后,生成设备文件:"mknod /dev/watchdog c 10 130" 。即可使用此功能
	node node1.magedu.com
		#主节点主机名,可以通过命令“uanme �Cn”查看。
	node node2.magedu.com
		#备用节点主机名
	ping 192.168.12.237
		#选择ping的节点,ping 节点选择的越好,HA集群就越强壮,可以选择固定的路由器作为ping节点,
		但是最好不要选择集群中的成员作为ping节点,ping节点仅仅用来测试网络连接
	ping_group group1 192.168.12.120 192.168.12.237
		#类似于ping  ping一组ip地址
	apiauth pingd  gid=haclient uid=hacluster
	respawn hacluster /usr/local/ha/lib/heartbeat/pingd -m 100 -d 5s
		#该选项是可选配置,列出与heartbeat一起启动和关闭的进程,该进程一般是和heartbeat集成的插件,这些进程遇到故障可以自动重新启动。
		最常用的进程是pingd,此进程用于检测和监控网卡状态,需要配合ping语句指定的ping node来检测网络的连通性。其中hacluster表示启动pingd进程的身份。

	#下面的配置是关键,也就是激活crm管理,开始使用v2 style格式
	crm respawn
		#注意,还可以使用crm yes的写法,但这样写的话,如果后面的cib.xml配置有问题
		#会导致heartbeat直接重启该服务器,所以,测试时建议使用respawn的写法
	#下面是对传输的数据进行压缩,是可选项
	compression     bz2
	compression_threshold 2

	注意,v2 style不支持ipfail功能,须使用pingd代替
5、编辑资源配置文件haresources
[root@node1 ha.d]# vim haresources
[root@node1 ha.d]# grep "^[^#]" haresources
node1.network.com	IPaddr2::172.16.1.110/16/eth0   httpd
6、配置httpd服务,测试没问题之后再禁止其开机自启动
node1
[root@node1 ha.d]# echo "<h1>node1.network.com</h1>" > /var/www/html/index.html
[root@node1 ha.d]# service httpd start
Starting httpd:                                            [  OK  ]
[root@node1 ha.d]# curl http://172.16.1.103
<h1>node1.network.com</h1>
[root@node1 ha.d]# service httpd stop
Stopping httpd:                                            [  OK  ]
[root@node1 ha.d]# chkconfig httpd off
node2
[root@node2 ha.d]# echo "<h1>node2.network.com</h1>" > /var/www/html/index.html
[root@node2 ha.d]# service httpd start
Starting httpd:                                            [  OK  ]
[root@node2 ha.d]# curl http://172.16.1.104
<h1>node2.network.com</h1>
[root@node2 ha.d]# service httpd stop
Stopping httpd:                                            [  OK  ]
[root@node2 ha.d]# chkconfig httpd off
7、将刚才配置的三个文件同步至node2
[root@node1 ha.d]# scp authkeys ha.cf haresources root@node2:/etc/ha.d/
authkeys                                                                                        100%  690     0.7KB/s   00:00
ha.cf                                                                                           100%   10KB  10.3KB/s   00:00
haresources                                                                                     100% 6049     5.9KB/s   00:00
8、启动heartbeat服务,测试能否正常提供服务
[root@node1 ha.d]# service heartbeat start
Starting High-Availability services: INFO:  Resource is stopped
Done.

[root@node1 ha.d]# ssh root@node2 'service heartbeat start'
Starting High-Availability services: 2016/01/06_14:47:31 INFO:  Resource is stopped
Done.

[root@node1 ha.d]# ss -tnl | grep "80"                # 80端口已然启动
LISTEN     0      128                      :::80                      :::*
此时可以看到资源已然运行在我们定义的主节点上

此时模拟node1节点故障,看资源是否会转移至node2节点
[root@node1 ha.d]# /usr/share/heartbeat/hb_standby
Going standby [all].

此时可以看到资源已成功从node1转移至node2,此时再让node1上线
[root@node1 ha.d]# /usr/share/heartbeat/hb_takeover

因为我们在主配置文件中定义了auto_failback on,所以会实现故障转回功能,若不想自动转回,则设置此参数为off即可
9、添加NFS,使两个node共享此NFS所提供的页面文件
(1)、首先配置NFS
[root@Director ~]# mkdir /www/web -pv
mkdir: created directory `/www'
mkdir: created directory `/www/web'
[root@Director ~]# echo "<h1>NFS Server</h1>" >> /www/web/index.html
[root@Director ~]# vim /etc/exports
[root@Director ~]# cat /etc/exports
/www/web	172.16.0.0/16(ro)
[root@Director ha.d]# service rpcbind start
Starting rpcbind:                                          [  OK  ]
[root@Director ha.d]# service nfs start
Starting NFS services:                                     [  OK  ]
Starting NFS quotas:                                       [  OK  ]
Starting NFS mountd:                                       [  OK  ]
Starting NFS daemon:                                       [  OK  ]
Starting RPC idmapd:                                       [  OK  ]
(2)、在node1节点上配置haresources文件,定义NFS资源,再同步此文件至node2
[root@node1 ha.d]# service heartbeat start
[root@node1 ha.d]# ssh node2 'service heartbeat start'
[root@node1 ha.d]# showmount -e 172.16.1.102
Export list for 172.16.1.102:
/www/web 172.16.0.0/16
[root@node1 ha.d]# vim haresources
[root@node1 ha.d]# grep "^[^#]" haresources
node1.network.com	IPaddr2::172.16.1.110/16/eth0 Filesystem::CentOS6.5:/www/web::/var/www/html::nfs  httpd
[root@node1 ha.d]# scp haresources node2:/etc/ha.d/
haresources                                               100% 6101     6.0KB/s   00:00
(3)、启动heartbeat服务
[root@node1 ha.d]# service heartbeat start
[root@node1 ha.d]# ssh node2 'service heartbeat start'
[root@node1 ha.d]# ip addr show
1: lo: <LOOPBACK,UP,LOWER_UP> mtu 16436 qdisc noqueue state UNKNOWN
    link/loopback 00:00:00:00:00:00 brd 00:00:00:00:00:00
    inet 127.0.0.1/8 scope host lo
    inet6 ::1/128 scope host
       valid_lft forever preferred_lft forever
2: eth0: <BROADCAST,MULTICAST,UP,LOWER_UP> mtu 1500 qdisc pfifo_fast state UP qlen 1000
    link/ether 00:0c:29:5c:4e:8f brd ff:ff:ff:ff:ff:ff
    inet 172.16.1.103/24 brd 255.255.255.255 scope global eth0
    inet 172.16.1.110/16 scope global eth0
    inet6 fe80::20c:29ff:fe5c:4e8f/64 scope link
       valid_lft forever preferred_lft forever
[root@node1 ha.d]# mount
/dev/mapper/vg_centos6-lv_root on / type ext4 (rw)
proc on /proc type proc (rw)
sysfs on /sys type sysfs (rw)
devpts on /dev/pts type devpts (rw,gid=5,mode=620)
tmpfs on /dev/shm type tmpfs (rw)
/dev/sda1 on /boot type ext4 (rw)
none on /proc/sys/fs/binfmt_misc type binfmt_misc (rw)
sunrpc on /var/lib/nfs/rpc_pipefs type rpc_pipefs (rw)
nfsd on /proc/fs/nfsd type nfsd (rw)
172.16.1.102:/www/web on /var/www/html type nfs (rw,vers=4,addr=172.16.1.102,clientaddr=172.16.1.103)
[root@node1 ha.d]# ss -tnl
State      Recv-Q Send-Q                                 Local Address:Port                                   Peer Address:Port
LISTEN     0      128                                               :::111                                              :::*
LISTEN     0      128                                                *:111                                               *:*
LISTEN     0      128                                               :::80                                               :::*
LISTEN     0      128                                               :::33969                                            :::*
LISTEN     0      128                                               :::22                                               :::*
LISTEN     0      128                                                *:22                                                *:*
LISTEN     0      64                                                 *:32838                                             *:*
LISTEN     0      64                                                :::52455                                            :::*
LISTEN     0      128                                                *:38442
(4)、测试是否能访问到NFS所共享的页面

此时让node1节点下线
[root@node1 ha.d]# /usr/share/heartbeat/hb_standby
Going standby [all].

可以看到,仍然可以访问,但此时所有资源已经转移到了node2上面
[root@node2 ha.d]# ip addr show
1: lo: <LOOPBACK,UP,LOWER_UP> mtu 16436 qdisc noqueue state UNKNOWN
    link/loopback 00:00:00:00:00:00 brd 00:00:00:00:00:00
    inet 127.0.0.1/8 scope host lo
    inet6 ::1/128 scope host
       valid_lft forever preferred_lft forever
2: eth0: <BROADCAST,MULTICAST,UP,LOWER_UP> mtu 1500 qdisc pfifo_fast state UP qlen 1000
    link/ether 00:0c:29:3a:ac:cc brd ff:ff:ff:ff:ff:ff
    inet 172.16.1.104/24 brd 255.255.255.255 scope global eth0
    inet 172.16.1.110/16 scope global eth0
    inet6 fe80::20c:29ff:fe3a:accc/64 scope link
       valid_lft forever preferred_lft forever
[root@node2 ha.d]# ss -tnl | grep "80"
LISTEN     0      128                      :::80                      :::*
[root@node2 ha.d]# mount | grep "nfs"
sunrpc on /var/lib/nfs/rpc_pipefs type rpc_pipefs (rw)
172.16.1.102:/www/web on /var/www/html type nfs (rw,vers=4,addr=172.16.1.102,clientaddr=172.16.1.104)
到此为止一个简单的 Heartbeat + NFS + httpd的高可用服务搭建完成