图解安装FreeBSD6.2桌面系统初学者笔记(二)
二 安装图形界面
1 FreeBSD
基本配置
(1)
更改
Root
密码
# passwd
Changing local password for root
New Password:
(2)
设定时区
# sysinstall
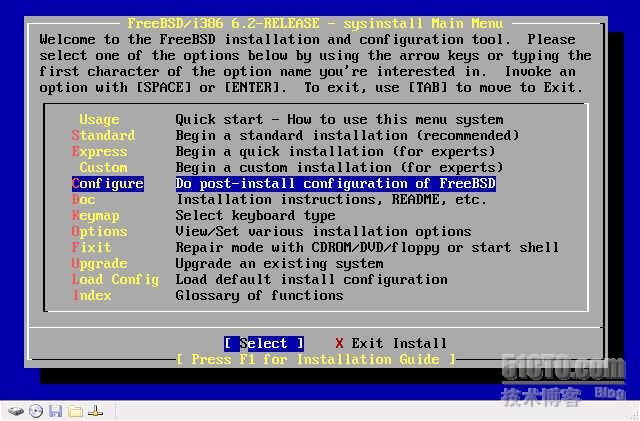
在“
sysinstall Main Menu
”中选择“
Configure
”。如图2.1。
图 2.1
在“
FreeBSD Configuration Menu
”中选择“
Time Zone
”。如图2.2。

图 2.2
在“
Select local or UTC (Greenwich Mean Time) clock
”中选择“
No
”。如图2.3。―
>
选择“
5 Asia
”――
>
“选择
9 China
”。

图 2.3
在“
China Time Zones
”中选择“
1 east China �C Beijing, Guangdong,Shanghai,etc.
”。如图2.4。

图 2.4
(3)
设定鼠标
在“
FreeBSD Configuration Menu
”中选择“
Mouse
”。选择“
2 Enable
”。
(4)
设定网络
在“
FreeBSD Configuration Menu
”中选择“
Networking
”。选择“
Interfaces
”。如图2.5。

图 2.5
在“
Network interface information required
”中,选择“
de0
”。如图2.6。

图 2.6
在“
Do you want to try IPv6 configuration of the interface
”中,选择“
No
”。如图2.7。

图 2.7
在“
Do you want to try DHCP configuration of the interface
”中,选择“
Yes
”。如图2.8。

图 2.8
出现如图2.9所示的“
Network Configuration
”选择“
OK
”。

图 2.9
2 Xorg
的安装与配置
(1)
安装
Xorg
方法
1
:通过
FreeBSD
光盘安装
# sysinstall
在“
sysinstall Main Menu
”中选择“
Configure
”。如图2.10。

图 2.10
在“
Configuration Menu
”中选择“
Distributions
”。如图2.11。

图 2.11
然后选择“
X.Org
”。如图2.12。

图 2.12
进入
X.Org
的菜单选项,把
Basic, Server, Font
中的内容全选中,然后按“
OK
”退出。如图2.13。

图 2.13
最后,“
OK
”确认,从“
Distributions
”退回“
Configuration
”过程中会安装刚才选中的软件包。
方法
2
:编译安装
# cd /usr/ports/X11/xorg
# make install clean
方法
3
:从
Package
安装
# pkg_add �Cr xorg
(2)
配置
Xorg
第一步:在
/root
下生成
xorg.conf.new
文件
# Xorg �Cconfigure
执行这条命令将在
root
用户的根目录下生成一个基本的
Xorg
的配置文件
xorg.conf.new
。
第二步:测试配置文件,以确认
Xorg
能够正常工作。
# Xorg �Cconfigure xorg.conf.new
如果能显示黑灰色的格子和“
X
”鼠标指针,说明配置成功,按
Ctrl+Alt+Backspace
键退出测试界面。
如果配置不成功,按照下面的说明对
xorg.conf.new
文件进行调整。
第三步:调整
xorg.conf.new
配置文件
#
根据自已显示器情况调整刷新率,
分辨率及色深。
Section "Monitor"
Identifier "Monitor0"
HorizSync 31.5 - 37.9 # 根据自已显示器情况而定
VertRefresh 50.0 - 90.0 # 根据自已显示器情况而定
EndSection
HorizSync 31.5 - 37.9 # 根据自已显示器情况而定
VertRefresh 50.0 - 90.0 # 根据自已显示器情况而定
EndSection
Section "Screen"
Identifier "Screen0"
Device "Card0"
Monitor "Monitor0"
DefaultDepth 16 # 根据自已显示器情况而定
SubSection "Display"
Viewport 0 0
Depth 16 # 根据自已显示器情况而定
Modes "1024*768" # 根据自已显示器情况而定
EndSubSection
EndSection
Identifier "Screen0"
Device "Card0"
Monitor "Monitor0"
DefaultDepth 16 # 根据自已显示器情况而定
SubSection "Display"
Viewport 0 0
Depth 16 # 根据自已显示器情况而定
Modes "1024*768" # 根据自已显示器情况而定
EndSubSection
EndSection
#鼠标中键滚轮支持
Section “InputDevice”
Identifier “Mouse 0”
Driver “mouse”
Option “Protocol” “auto”
Option “Device” “/dev/sysmouse”
Option “ZAxisMapping” “ 4 5 6 7” #
没有这一行请加上
EndSection
第四步:配置修改存盘后再进行测试,如没问题后,将
xorg.conf.new
更名
xorg.conf
拷贝到
/etc/X11
目录。
# cp /root/xorg.conf.new /etc/X11/xorg.conf
如仍有问题可查看
/var/log/xorg.0.log
,然后根据提示修改。
