Peer Code Reviews Made Easy with Eclipse Plug-In
欢迎关注我的社交账号:
博客园地址: http://www.cnblogs.com/jiangxinnju/p/4781259.html
GitHub地址: https://github.com/jiangxincode
知乎地址: https://www.zhihu.com/people/jiangxinnju
- Origin Article: Peer Code Reviews Made Easy with Eclipse Plug-In
- Origin Author: John Ferguson Smart
- Origin Website: http://www.devx.com/enterprise/Article/31658
Frontend: Code reviews are a cost-efficient way to detect defects early and improve both the quality of your code and the skills of your team. Jupiter is an innovative Eclipse plug-in designed to make collaborative code reviews much easier.
code reviews are possibility the single most efficient way to reduce defects and improve code quality. Simply put, code reviews involve manually inspecting source code for defects, often using a checklist of common errors to help focus the search. In addition, they are an effective way of improving your team's development skills.
To be effective, all code review techniques need an underlying process that all team members must understand well and adopt. In general, if you want to introduce a new development process or best practice into an organization, it should be as simple as possible. As Einstein once said, "Things should be made as simple as possible—but no simpler."
Heeding Einstein's advice, Jupiter, a collaborative Eclipse code review tool, uses a simple, lightweight code review process that is easy to learn and adopt. The result of a research project by the Collaborative Software Development Laboratory at the University of Hawaii, the Jupiter plug-in stores code reviews in an XML file format and maintains them in the project configuration management system alongside the source code.
This article walks you through a Jupiter install and the stages of a Jupiter code review process.
Installing Jupiter
The easiest way to install Jupiter is to use the Remote Update site. Launch Eclipse and perform the following instructions:
- Open the Help->Software Updates->Find and Install menu.
- Click Next, and choose New Remote Site.
- Enter the remote site URL (http://csdl.ics.hawaii.edu/Tools/Jupiter/Update2), and the site name (e.g., "Jupiter") (see Figure 1).
- Make sure you have the Jupiter site checked in the "Sites to include in search" window, and click Finish. Then just go through the installation screens to install the plug-in.

Figure 1. Installing from the Remote Site
The Jupiter Code Review Process
The code review process implemented in Jupiter is relatively simple, and it should suffice for most projects. In Jupiter, you conduct a code review in the following four stages:
- Configuration: The review initiator sets up the review, defining a unique "Review ID" and specifying the files to be reviewed, who will review the code, and what issues can be raised. Depending on your organization, the review initiator could be the author, the team leader, or someone in QA.
- Individual review: Each reviewer examines the code individually, using a review checklist and raising issues as they encounter them.
- Team review: The review team (including the author) meet to discuss issues and decide on actions to take.
- Rework: The developer goes through the raised issues and fixes them.
For completeness, you should also add a preliminary phase, the personal code review, where the developer reviews his or her own code. Let's look at each of these stages in more detail.
Personal Code Review
Personal code reviews are a highly effective practice that plays an important part in the Software Engineering Institute's Personal Software Process. A personal code review simply involves reading through the code and using the review checklist to look for errors.
Using a review checklist is an important part of the review process. Reviews are much more efficient when you have precise goals in mind. With a review checklist, you actively hunt specific bugs; whereas without one, you just wander through the code hoping to come across one.
A review checklist contains defects or categories of defects that are known to have caused problems in the past. If you are already using tools like Checkstyle and PMD, you don't need to add any coding standards or duplicate any best practices that those other tools already have verified. Keep it short and simple to begin with, and then add new items as you come across them. And don't forget to get everyone involved.
One notable difference between the approach described here and the personal review process recommended in the Personal Software Process is that, in the latter, the individual review comes before compiling the code. One of the main arguments for this is that reviews conducted before compilation tend to be more thorough. Another reason probably is that if you let the tools find all the compilation errors, as well as the coding standards violations and other best practices errors, you will have a harder time tracking the number of issues raised.
However, knowing how hard it is to put any sort of rigorous software development process into place, I believe in getting the most leverage out of your available tools and reserving human involvement for work that only humans can do. Indeed, if you want to introduce a new process into an organization, you should put as few obstacles as possible in the way and make the process as painless as possible.
The following is a simple strategy for performing a personal code:
- Obtain the code review checklist and display the class to be reviewed.
- Run through the defect categories in the checklist. For each category, go through the code and make sure it isn't an issue. If it is, either fix it (if it will take less than 30 seconds) or note it for later. Check off each item you finish.
- Once finished, fix any outstanding issues.
Once this is done, the peer review process can begin.
Phase 1: Configuration
Tools and processes are all well and good, but in practice, someone has to get the ball rolling. That person is the review initiator. Many people can play this role. It could be the owner of the code, the team leader or project manager, the chief architect, or even a QA person. It's up to you to decide what suits your organization best.
Keep in mind that many developers will consider code reviews a bit of a chore—at best, and they will not come forth and volunteer their code for a code review. Others will delay the process as long as possible, waiting for their code to be as perfect as possible (for example, after the delivery date when they have more time), or just hoping that people will forget about them. If this is the case, then the team leader or architect should take responsibility for initiating code reviews.
A couple of other considerations may also weigh in favor of a centralized approach:
- Initiating a review involves assigning team members as reviewers.
- Initiating a review involves deciding which types of issues will be evaluated.
Although the special DEFAULT review entry can define default values for these fields, many organizations will prefer to have these activities done centrally by one person (e.g., the project manager, the architect, or the lead developer).
On the other hand, for some projects, it may be more appropriate to have individual developers commit their own code. The advantages of this approach include the following:
- When you notify reviewers that some code is ready to be reviewed, you should include a brief description of the purpose of the code (for new code) or the justification for the change (for changes to existing code). This is often best done by the developer.
- For any non-trivial classes, unit tests and unit test results should be submitted for review at the same time as the classes. Again, the developer is probably the best person to do this.
This approach works well if a single person is responsible for committing code to the next release version candidate. In open source projects, this person is often called the committer. In this sort of project organization, developers may commit their code to configuration management whenever necessary, but the committer is responsible for committing reviewed code to the release candidate code (which is often a new branch in the configuration management system). This also gives developers a good reason to have their code reviewed: if it isn't reviewed, it won't make it into the release version!
In any case, whatever strategy you adopt, it is important to agree on who initiates code reviews and who participates. You need to put this down in writing and to make sure everyone knows and understands the process.
To initiate a review, open the project properties and go to the Review entry. Click on New... to create a new review entry (see Figure 2). Each review entry corresponds to a real physical code review. You need to specify an identifier (unique to this project) and a short description. The identifier becomes the name of the .jupiter file, so remember to put something compatible with a file name structure.
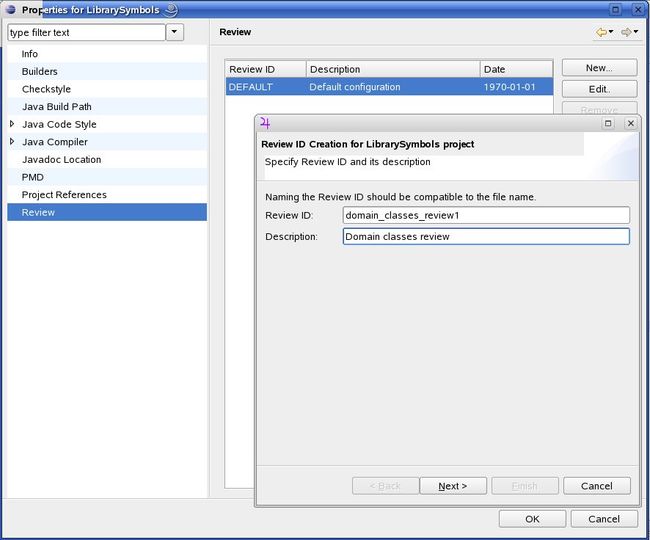
Figure 2. Creating a New Review
Now, specify the source code files you want to review (see Figure 3). Typically, a code review will concentrate on one class, though it may include some other related or dependent classes as well.
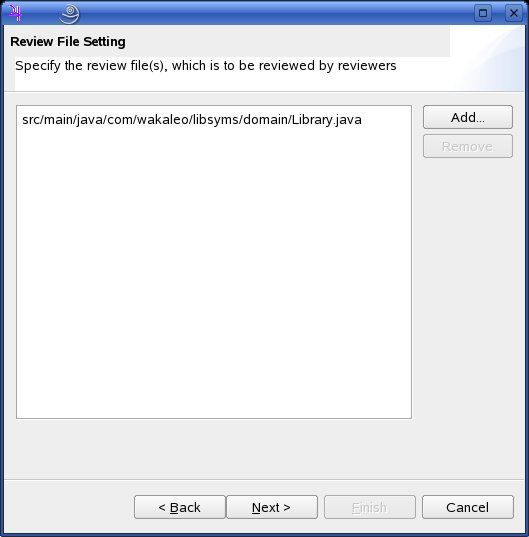
Figure 3. Specifying the Source Code Files to Be Reviewed
The following screens enable you to select the review team (see Figure 4) and the code author. Jupiter stores the comments of each team member in a separate file under configuration management, so you should use filename-compatible names (such as logins) for your team members. To make life easier, you should put the whole team into the DEFAULT review item; new reviews will then display this list by default.

Figure 4. Naming the Review Team
In the following screens, you can specify issue types, severities, and so on. You usually leave these screens as-is: any modification of these lists should be done in the special DEFAULT review.
Next, you have to define a place in your source code directories where the review XML files will be stored. This is a directory relative to your project root directory.
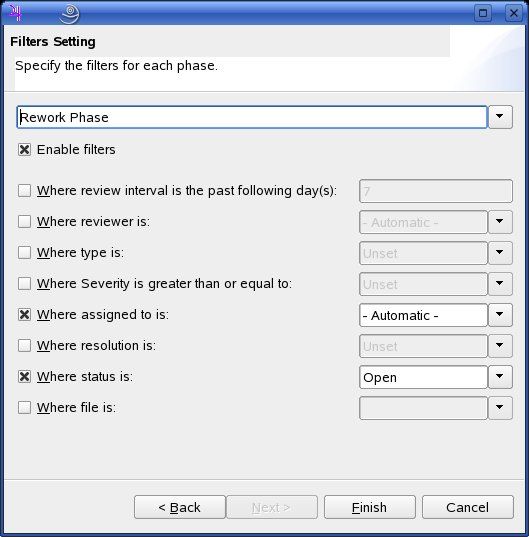
Finally, you can set up filters for different situations (see Figure 5). Each phase has its own filter, which you can customize to let people concentrate better on the work to be done during that phase.
The filter feature is best illustrated by discussing the default filter for each review phase, which works quite well:
- Individual Phase: The default filter for this phase is 'Reviewer:automatic', which means that individual reviewers will see only their own review issues.
- Team Phase: The default filter for this phase is 'Resolution:unset', which simply means that during the team review, reviewers will see all the issues that have not been resolved. In Jupiter-speak, the 'resolution' of an issue is when the review team decides on which action to take, either "Valid needs fixing" (the issue is a real issue, which needs to be fixed) or "Invalid won't fix" (the issue is not a valid issue, so no corrective action will be taken).
- Rework Phase: The default filters for this phase are 'Assigned to:automatic' and 'Status:open'. When the reviewers decide on an action, the task is assigned to a team member (usually the author). These filters display only the issues that have been assigned to the current user and that are still open.
All of the fields described here take their default values from the special DEFAULT review item. So it is worthwhile to set up the DEFAULT review item with sensible project-wide values.
Once the review is set up, commit the .jupiter files to configuration management. Now you need to let all the reviewers know about it. A simple and efficient way to do this is to use a mailing list or a shared IMAP mailbox. You should define a suitable standard template for review notifications in your organization and project. A review notification format might include the following information:
- A standard subject field, including the project name, the designated reviewers, and possibly a component name
- A description of the code to be reviewed: what does it do, what does it fix, and so on (You may want to refer to requirements documents such as use cases.)
- A change log
- New and deleted files, if any
- Any affected components not included in the review
- Unit test classes and unit test results
Once everyone is notified, the actual review process can begin.
Phase 2: Individual Reviews
The second phase, and the first phase of actual peer reviewing, is the individual code review. This is the phase where each reviewer examines the code on their own, at their own pace, and at their own convenience. This aspect of individual reviews makes it particularly appealing for developers who suffer from an acute allergy to meetings.
The work involved in an individual code review is basically the same as that for a personal code review, except that the reviewer just raises the issues and does not fix the defects. Again, the use of a review checklist is very handy.
In Jupiter, raising issues is straightforward. Make sure you have checked out the latest code from the configuration management system. Then select the Jupiter Perspective, and then select Individual Phase (see Figure 6).

Figure 6. Starting the Individual Review
This will open a window allowing you to choose the project, review, and user that you want to use for this review phase (see Figure 7).
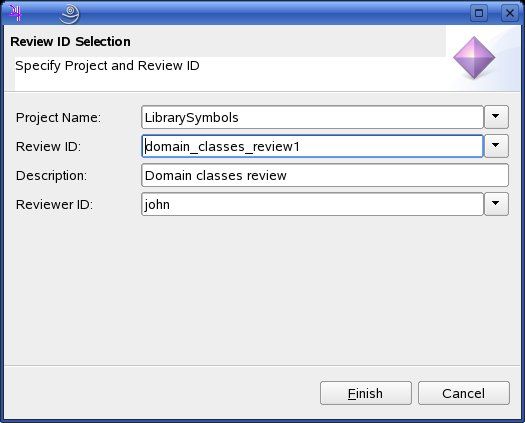
Figure 7. Selecting the Review
Now you can start the review. Go through the code looking for defects or issues. If you find something, place the cursor on or simply select the suspicious-looking code, and select Add Review Issue... in the contextual menu. Next, specify the type and severity, and provide a summary and a description for this issue in the 'Review Editor' window (see Figure 8). Don't worry too much about the type: it's just a tentative best guess for the moment, and you can change it during the Team Review phase.
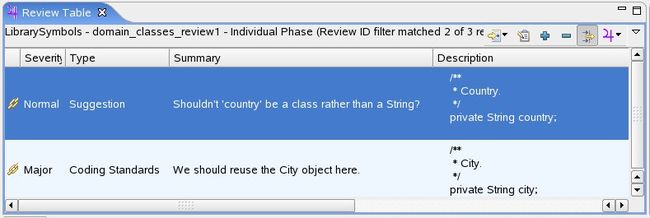
The issue will also appear in the Review Table panel (see Figure 9), along with the other current issues. This table lets you add, delete, or edit issues, sort issues by severity, type, and so on, and also jump directly to an issue in the source code.
In the source code window, recorded issues are marked by a purple marker (see Figure 10). If you move the cursor over them, the issue summary will appear.
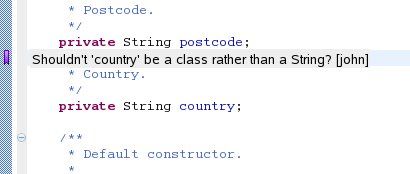
Figure 10. The Issue in the Source Code
The review issues are stored in XML format as .review files in the review directory. To share your issues with other users, you have to commit these files to configuration management.
When each reviewer has finished their individual reviews, it's time for a little get-together: the team review.
Phase 3: Team Reviews
The team review phase involves getting the review team (including the author) together to discuss the issues raised during the individual reviews. Typically, the team will work on one workstation, using an overhead projector to display the screen in a meeting, for example, or just working around the same machine if the review team is small enough. The team review involves going through all the issues raised and making a joint decision on the action to take.
To start a team review, just select the Team Phase item in the Jupiter menu (see Figure 11). You then select the project, review, and reviewer ID in the Review ID Selection, as you did for the Individual Review Phase (see Figure 7).
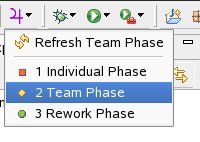
Figure 11. Initiating a Team Review
Now the Review Table will display all the issues raised by the individual reviewers (see Figure 12). The details of the selected issue are displayed in the Review Editor (see Figure 13).
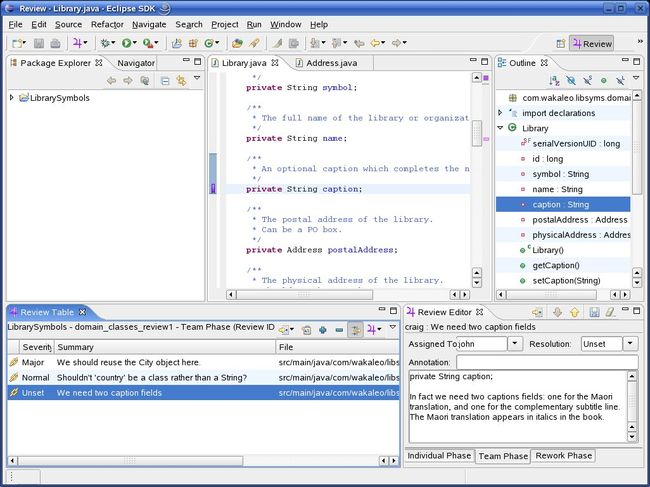
Figure 12. Conducting a Team Review
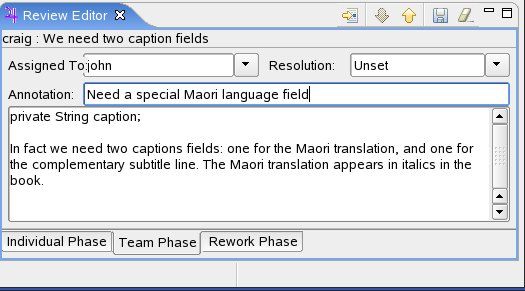
Figure 13. The Team Review Editor Window
You should go through each issue, discuss it with the review team members, and come to an agreement on the following:
- What should be done about this issue? Is it really an issue? This is recorded in the Resolution field, which can be one of the following:
- Valid needs fixing (a real issue that needs to be fixed)
- Valid fix later (a real issue that you won't fix right away)
- Valid duplicate (such a real issue that it's already been mentioned)
- Valid won't fix (a real issue that you don't want to fix)
- Invalid won't fix ("it ain't broke, don't fix it!")
- Unsure validity (needs further investigation)
- Who should this issue be assigned to (the Assigned To field)? By default, this is the code author, but it can be changed if someone with specialist knowledge has to intervene, for example.
- What needs to go in the annotation field, which can be used to note any complementary information that came out of the review discussion?
- What is the type and severity of each issue? Check the type and severity fields in the Individual Phase tab, and make sure everyone agrees with them.
At the end of the team review, the updated review files are committed to the configuration management system, so that all team members can recuperate the changes and get to work on the corrections. This is done in the next phase, Rework.
The team review phase may not suit all organizations. In practice, team review meetings may be difficult to organize for all but the most strategic classes. You'll often find the bulk of the added value during the individual review phase, and the team review phase may be harder to justify. And while it is not too difficult to convince developers to perform individual code reviews, team reviews can be much harder to put into place.
Indeed, open source projects manage quite well by skipping the team review phase and going directly to the rework phase. In open source projects, physical meetings are often impractical simply because team members tend to be distributed all over the world. In practice, they combine the individual and team reviews into one phase, with a single reviewer.
Another possibility is to maintain teams of several reviewers but combine the individual and team phases. In this approach, each reviewer fills in both the Individual phase and Team phase tabs in the Review Editor. This allows several reviewers to review the same code, but avoids the overhead of organizing a review meeting for each and every code review.
Phase 4: Rework Phase
The rework phase is the phase where the developer goes through the raised issues and fixes the code accordingly. During the rework phase, Jupiter displays the list of issues that have been assigned to you, so that you can go through them and correct them one by one.
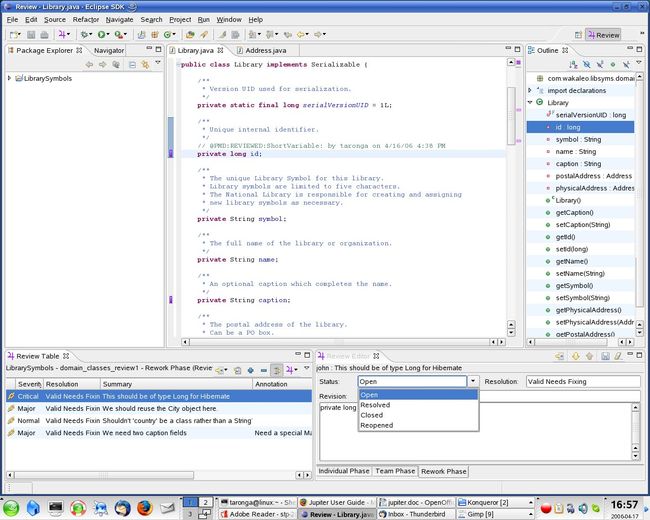
To start the rework phase, select Rework Phase in the Jupiter menu (see Figure 14). As for the other phases, you have to select the project and review you want to work on, and specify your user ID. The Review Table will contain a list of issues, which have been assigned to you.
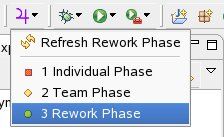
Figure 14. Initiating the Rework Phase
The details of the currently selected issue are displayed in the Review Editor (see Figure 15). When you fix a defect, you update the issue status field to Resolved. You may also want to add some details of your fix in the Revision field. When you've finished, you can move on to the next issue. Resolved issues will automatically disappear from the Review Table.
Once the rework is finished, the reviewers should verify the corrections. If they are satisfied, they can approve the correction and close it (Closed status). If not, they can re-open it for further work (Reopened status). Jupiter makes it easy to see the state of all review issues by letting you turn off the filter on the Review Table (see Figure 16).

Figure 16. Deactivating the Filter in the Review Table
Automate the Peer Code Review Process
Jupiter is an innovative and flexible tool that helps automate peer code reviews and track issues. Tools like Jupiter are never sufficient in themselves to improve code quality: you also need a defined development process and—more importantly—team and management buy-in. Nevertheless, Jupiter is a valuable process stream-liner. If you practice code reviews, or if you would like to, you should definitely try it out.
