Python的hashlib提供了常见的摘要算法,如MD5,SHA1等等。
什么是摘要算法呢?摘要算法又称哈希算法、散列算法。它通过一个函数,把任意长度的数据转换为一个长度固定的数据串(通常用16进制的字符串表示)用于加密相关的操作,代替了md5模块和sha模块,主要提供 SHA1, SHA224, SHA256, SHA384, SHA512 ,MD5 算法
1)MD5算法
|
1
2
3
4
5
|
>>>
import
hashlib
>>>
hash
=
hashlib.md5()
>>>
hash
.update(
'liuyao199539'
.encode(
'utf-8'
))
>>>
hash
.hexdigest()
'69ce9b5f54ba01b6d31256596e3fbb5c'
|
1.首先从python直接导入hashlib模块
2.调用hashlib里的md5()生成一个md5 hash对象
3.生成hash对象后,就可以用update方法对字符串进行md5加密的更新处理
4.继续调用update方法会在前面加密的基础上更新加密
5.在3.x几的版本上update里面需要加.encode('utf-8'),而2.x的版本不需要
2)sha1算法
|
1
2
3
4
5
|
>>>
import
hashlib
>>> sha_1
=
hashlib.sha1()
>>> sha_1.update(
'liuyao'
.encode(
'utf-8'
))
>>> sha_1.hexdigest()
'dd34a806b733f6d02244f39bcc1af87819fcaa82'
|
3)sha256算法
|
1
2
3
4
5
|
>>>
import
hashlib
>>> sha_256
=
hashlib.sha256()
>>> sha_256.update(
'liuyao'
.encode(
'utf-8'
))
>>> sha_256.hexdigest()
'5ad988b8fa43131f33f4bb867207eac4a1fcf56ff529110e2d93f2cc7cfab038'
|
4)sha384算法
|
1
2
3
4
5
|
>>>
import
hashlib
>>> sha_384
=
hashlib.sha384()
>>> sha_384.update(
'liuyao'
.encode(
'utf-8'
))
>>> sha_384.hexdigest()
'03ca6dcd5f83276b96020f3227d8ebce4eebb85de716f37b38bd9ca3922520efc67db8efa34eba09bd01752b0313dba3'
|
5)sha512算法
|
1
2
3
4
5
|
>>>
import
hashlib
>>> sha_512
=
hashlib.sha512()
>>> sha_512.update(
'liuyao'
.encode(
'utf-8'
))
>>> sha_512.hexdigest()
'65cac3a90932e7e033a59294d27bfc09d9e47790c31698ecbfdd5857ff63b7342d0e438a1c996b5925047195932bc5b0a6611b9f2292a2f41e3ea950c4c4952b'
|
6)对加密算法中添加自定义key再来做加密,防止被撞库破解
|
1
2
3
4
|
>>> md5_key
=
hashlib.md5(
'jwhfjsdjbwehjfgb'
.encode(
'utf--8'
))
>>> md5_key.update(
'liuyao'
.encode(
'utf-8'
))
>>> md5_key.hexdigest()
'609b558ec8d8e795deec3a94f578b020'
|
注: hmac 模块,它内部对我们创建 key 和 内容 再进行处理然后再加密
|
1
2
3
4
|
import
hmac
hm
=
hmac.new(
'liuyao'
.encode(
'utf-8'
))
hm.update(
'hellowo'
.encode(
'utf-8'
))
print
(hm.hexdigest())
|
4.configparser模块(在2.x版本为:ConfigParser)
用于对特定的配置文件进行操作
配置文件的格式是: []包含的叫section, section 下有option=value这样的键值
用法:
读取配置方法
|
1
2
3
4
5
6
|
-
read(filename) 直接读取ini文件内容
-
sections() 得到所有的section,并以列表的形式返回
-
options(section) 得到该section的所有option
-
items(section) 得到该section的所有键值对
-
get(section,option) 得到section中option的值,返回为string类型
-
getint(section,option) 得到section中option的值,返回为
int
类型
|
写入配置方法
|
1
2
|
-
add_section(section) 添加一个新的section
-
set
( section, option, value) 对section中的option进行设置
|
需要调用write将内容写入配置文件。
案例:
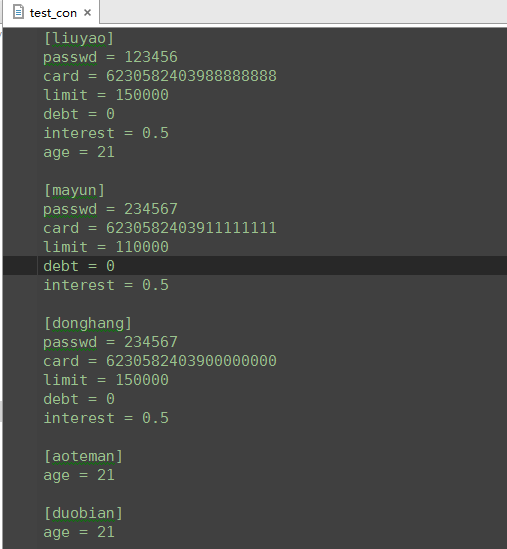
测试配置文件:
[liuyao]
passwd = 123456
card = 6230582403988888888
limit = 150000
debt = 0
interest = 0.5
[mayun]
passwd = 234567
card = 6230582403911111111
limit = 150000
debt = 0
interest = 0.5
[donghang]
passwd = 234567
card = 6230582403900000000
limit = 150000
debt = 0
interest = 0.5
方法:
#!/usr/bin/env python
import configparser
#生成config对象
config = configparser.ConfigParser()
#用config对象读取配置文件
config.read('test_con')
#以列表形式返回所有的section
sections = config.sections()
print ('sections',sections)
#得到指定section的所有option
options = config.options("liuyao")
print ('options',options)
#得到指定section的所有键值对
kvs = config.items("liuyao")
print ('kvs',kvs)
#指定section,option读取值
str_val = config.get("liuyao", "card")
int_val = config.getint("liuyao", "limit")
print ('liuyao 的 card',str_val)
print ('liuyao 的 limit',int_val)
#修改写入配置文件
#更新指定section,option的值
config.set("mayun", "limit", "110000")
int_val = config.getint("mayun", "limit")
print ('mayun 的 limit',int_val)
#写入指定section增加新option和值
config.set("liuyao", "age", "21")
int_val = config.getint("liuyao", "age")
print ('liuyao 的 age',int_val)
#增加新的section
config.add_section('duobian')
config.set('duobian', 'age', '21')
#写回配置文件
config.write(open("test_con",'w')
输出结果:
|
1
2
3
4
5
6
7
|
sections [
'liuyao'
,
'mayun'
,
'donghang'
,
'aoteman'
]
options [
'passwd'
,
'card'
,
'limit'
,
'debt'
,
'interest'
,
'age'
]
kvs [(
'passwd'
,
'123456'
), (
'card'
,
'6230582403988888888'
), (
'limit'
,
'150000'
), (
'debt'
,
'0'
), (
'interest'
,
'0.5'
), (
'age'
,
'21'
)]
liuyao 的 card
6230582403988888888
liuyao 的 limit
150000
mayun 的 limit
110000
liuyao 的 age
21
|
配置文件:
5.Subprocess模块
subprocess最早是在2.4版本中引入的。
subprocess模块用来生成子进程,并可以通过管道连接它们的输入/输出/错误,以及获得它们的返回值。
它用来代替多个旧模块和函数:
os.system
os.spawn*
os.popen*
popen2.*
commands.*
运行python的时候,我们都是在创建并运行一个进程。像Linux进程那样,一个进程可以fork一个子进程,并让这个子进程exec另外一个程序。在Python中,我们通过标准库中的subprocess包来fork一个子进程,并运行一个外部的程序。subprocess包中定义有数个创建子进程的函数,这些函数分别以不同的方式创建子进程,所以我们可以根据需要来从中选取一个使用。另外subprocess还提供了一些管理标准流(standard stream)和管道(pipe)的工具,从而在进程间使用文本通信。
使用:
1)call
执行命令,返回状态码 shell = True ,允许 shell 命令是字符串形式
|
1
2
3
4
5
6
7
8
9
10
|
>>>
import
subprocess
>>> ret
=
subprocess.call([
'ls'
,
'-l'
],shell
=
False
)
total
201056
-
rw
-
r
-
-
r
-
-
1
root root
22
Jan
15
11
:
55
1
drwxr
-
xr
-
x
5
root root
4096
Jan
8
16
:
33
ansible
-
rw
-
r
-
-
r
-
-
1
root root
6830
Jan
15
09
:
41
dict_shop.py
drwxr
-
xr
-
x
4
root root
4096
Jan
13
16
:
05
Docker
drwxr
-
xr
-
x
2
root root
4096
Dec
22
14
:
53
DockerNginx
drwxr
-
xr
-
x
2
root root
4096
Jan
21
17
:
30
Dockerssh
-
rw
-
r
-
-
r
-
-
1
root root
396
Dec
25
17
:
30
id_rsa.pub
|
2)check_call
执行命令,如果执行状态码是 0 ,则返回0,否则抛异常
|
1
2
3
4
5
6
7
8
|
>>> subprocess.check_call([
"ls"
,
"-l"
])
total
201056
-
rw
-
r
-
-
r
-
-
1
root root
22
Jan
15
11
:
55
1
drwxr
-
xr
-
x
5
root root
4096
Jan
8
16
:
33
ansible
-
rw
-
r
-
-
r
-
-
1
root root
6830
Jan
15
09
:
41
dict_shop.py
>>> subprocess.check_call(
"exit 1"
, shell
=
True
)
Traceback (most recent call last):
File
"<stdin>"
, line
1
,
in
<module>
|
3.check_output
执行命令,如果状态码是 0 ,则返回执行结果,否则抛异常
|
1
2
|
subprocess.check_output([
"echo"
,
"Hello World!"
])
subprocess.check_output(
"exit 1"
, shell
=
True
)
|
4.subprocess.Popen(...)
用于执行复杂的系统命令
参数:
-
args:shell命令,可以是字符串或者序列类型(如:list,元组)
-
bufsize:指定缓冲。0 无缓冲,1 行缓冲,其他 缓冲区大小,负值 系统缓冲
-
stdin, stdout, stderr:分别表示程序的标准输入、输出、错误句柄
-
preexec_fn:只在Unix平台下有效,用于指定一个可执行对象(callable object),它将在子进程运行之前被调用
-
close_sfs:在windows平台下,如果close_fds被设置为True,则新创建的子进程将不会继承父进程的输入、输出、错误管道。
所以不能将close_fds设置为True同时重定向子进程的标准输入、输出与错误(stdin, stdout, stderr)。 -
shell:同上
-
cwd:用于设置子进程的当前目录
-
env:用于指定子进程的环境变量。如果env = None,子进程的环境变量将从父进程中继承。
-
universal_newlines:不同系统的换行符不同,True -> 同意使用 \n
-
startupinfo与createionflags只在windows下有效
将被传递给底层的CreateProcess()函数,用于设置子进程的一些属性,如:主窗口的外观,进程的优先级等等
例:
|
1
2
3
|
import
subprocess
res = subprocess.Popen([
"mkdir"
,
"sub"
])
res2 = subprocess.Popen(
"mkdir sub_1"
, shell=True)
|
终端输入的命令分为两种:
-
输入即可得到输出,如:ifconfig
-
输入进行某环境,依赖再输入,如:python
|
1
|
>>> obj
=
subprocess.Popen(
"mkdir cwd"
, shell
=
True
, cwd
=
'/home/'
,)
|
|
1
2
3
4
5
6
7
8
9
10
11
12
13
14
15
16
|
import
subprocess
obj
=
subprocess.Popen([
"python"
], stdin
=
subprocess.PIPE, stdout
=
subprocess.PIPE, stderr
=
subprocess.PIPE)
obj.stdin.write(
'print 1 \n '
)
obj.stdin.write(
'print 2 \n '
)
obj.stdin.write(
'print 3 \n '
)
obj.stdin.write(
'print 4 \n '
)
obj.stdin.close()
cmd_out
=
obj.stdout.read()
obj.stdout.close()
cmd_error
=
obj.stderr.read()
obj.stderr.close()
print
cmd_out
print
cmd_error
|
|
1
2
3
4
5
6
7
8
9
10
|
import
subprocess
obj = subprocess.Popen([
"python"
], stdin=subprocess.PIPE, stdout=subprocess.PIPE, stderr=subprocess.PIPE)
obj.stdin.write(
'print 1 \n '
)
obj.stdin.write(
'print 2 \n '
)
obj.stdin.write(
'print 3 \n '
)
obj.stdin.write(
'print 4 \n '
)
out_error_list = obj.communicate()
print out_error_list
|
|
1
2
3
4
5
|
import
subprocess
obj
=
subprocess.Popen([
"python"
], stdin
=
subprocess.PIPE, stdout
=
subprocess.PIPE, stderr
=
subprocess.PIPE)
out_error_list
=
obj.communicate(
'print "hello"'
)
print
out_error_list
|
7.时间模块
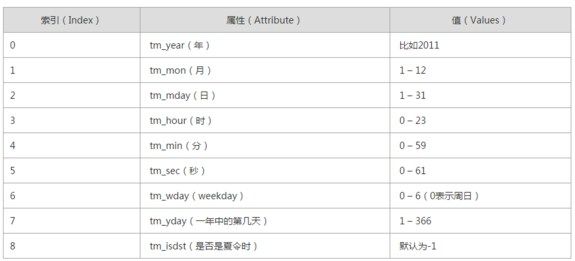
1)time模块
time.time()函数返回从1970年1月1日以来的秒数,这是一个浮点数
|
1
2
3
|
>>>
import
time
>>> time.time()
1453684281.110071
|
|
1
2
3
4
5
6
7
8
9
10
11
|
print(time.clock()) #返回处理器时间,
3.3
开始已废弃
print(time.process_time()) #返回处理器时间,
3.3
开始已废弃
print(time.time()) #返回当前系统时间戳
print(time.ctime()) #输出Tue Jan
26
18
:
23
:
48
2016
,当前系统时间
print(time.ctime(time.time()-
86640
)) #将时间戳转为字符串格式
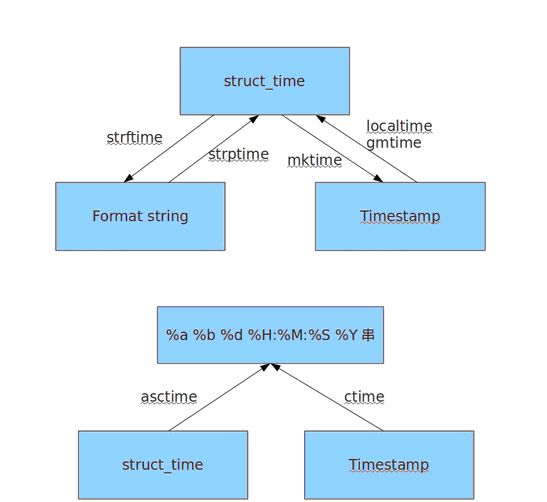
print(time.gmtime(time.time()-
86640
)) #将时间戳转换成struct_time格式
print(time.localtime(time.time()-
86640
)) #将时间戳转换成struct_time格式,但返回 的本地时间
print(time.mktime(time.localtime())) #与time.localtime()功能相反,将struct_time格式转回成时间戳格式
#time.sleep(
4
) #sleep
print(time.strftime(
"%Y-%m-%d %H:%M:%S"
,time.gmtime()) ) #将struct_time格式转成指定的字符串格式
print(time.strptime(
"2016-01-28"
,
"%Y-%m-%d"
) ) #将字符串格式转换成struct_time格式
|
2)datetime模块
|
1
2
3
4
5
6
7
8
9
10
11
12
13
14
15
|
print(datetime.date.today())
#输出格式 2016-01-26
print
(datetime.date.fromtimestamp(time.time()
-
864400
) )
#2016-01-16 将时间戳转成日期格式
current_time
=
datetime.datetime.now()
#
print
(current_time)
#输出2016-01-26 19:04:30.335935
print
(current_time.timetuple())
#返回struct_time格式
#datetime.replace([year[, month[, day[, hour[, minute[, second[, microsecond[, tzinfo]]]]]]]])
print
(current_time.replace(
2014
,
9
,
12
))
#输出2014-09-12 19:06:24.074900,返回当前时间,但指定的值将被替换
str_to_date
=
datetime.datetime.strptime(
"21/11/06 16:30"
,
"%d/%m/%y %H:%M"
)
#将字符串转换成日期格式
new_date
=
datetime.datetime.now()
+
datetime.timedelta(days
=
10
)
#比现在加10天
new_date
=
datetime.datetime.now()
+
datetime.timedelta(days
=
-
10
)
#比现在减10天
new_date
=
datetime.datetime.now()
+
datetime.timedelta(hours
=
-
10
)
#比现在减10小时
new_date
=
datetime.datetime.now()
+
datetime.timedelta(seconds
=
120
)
#比现在+120s
print
(new_date)
|
8.Logging日志模块


