KVM虚拟化笔记(十)------kvm虚拟机扩充磁盘空间
kvm的磁盘格式分为:raw磁盘格式和qcow2磁盘格式,扩充的思路如下:
raw磁盘格式扩展思路如下:
方法(1)新添加一块raw格式的磁盘添加到kvm虚拟机,然后通过逻辑卷的管理方式进行管理,依此进行扩展磁盘空间。
方法(2)直接通过dd命令扩展现有虚拟机磁盘大小,扩展之后,原磁盘大小增大,进入虚拟机系统后,直接通过fdisk分区新添加的空间,然后将该分区并入lvm逻辑卷中,扩大磁盘空间。
qcow2磁盘格式扩展思路如下:
方法(1)可以采用raw磁盘格式磁盘的扩展方式一致的方式进行。
方法(2)qcow2格式磁盘,直接通过qemu-img 直接扩展qcow2磁盘, 新添加一块raw格式的磁盘加入到KVM虚拟机,然后通过虚拟机系统lvm逻辑卷管理方式进行管理,扩展磁盘空间。
(一)下面将开始通过qcow2格式添加磁盘,有两种方法进行扩展磁盘空间。
方法一:添加一块qcow2磁盘加入到虚拟机中
1,查看现有虚拟机磁盘格式
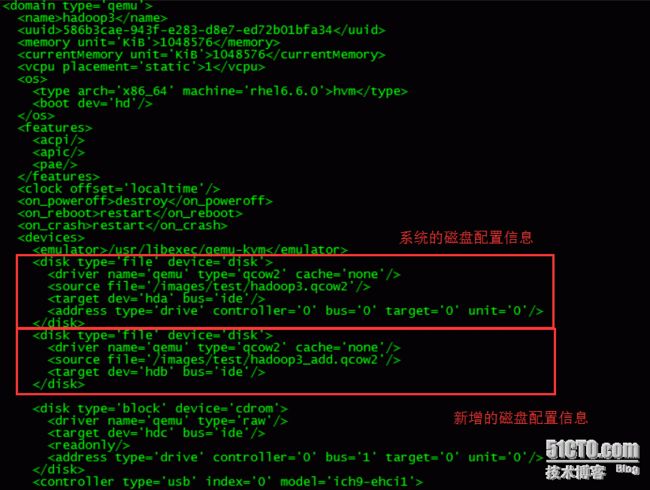
[root@KVM ~]# virsh edit hadoop3
[root@KVM test]# qemu-img info hadoop3.qcow2
image: hadoop3.qcow2
file format: qcow2
virtual size: 10G (10737418240 bytes)
disk size: 881M
cluster_size: 65536
Snapshot list:
ID        TAG                 VM SIZE                DATE       VM CLOCK
2         1454577442                0 2016-02-04 17:17:22   00:00:00.000
[root@KVM test]#
2,添加一块新的磁盘
[root@KVM test]# qemu-img create -f qcow2 hadoop3_add.qcow2 10G
在配置文件中加入如下内容:
[root@KVM qemu]# virsh edit hadoop3
 <disk type='file' device='disk'>
      <driver name='qemu' type='qcow2' cache='none'/>
      <source file='/images/test/hadoop3_add.qcow2'/>
      <target dev='hdb' bus='ide'/>
    </disk>
4,启动虚拟机并配置磁盘,配置磁盘可通过lvm的方式进行在线扩展
[root@KVM test]# virsh start hadoop3
Domain hadoop3 started
[root@KVM test]#
配置lvm扩展磁盘的步骤:
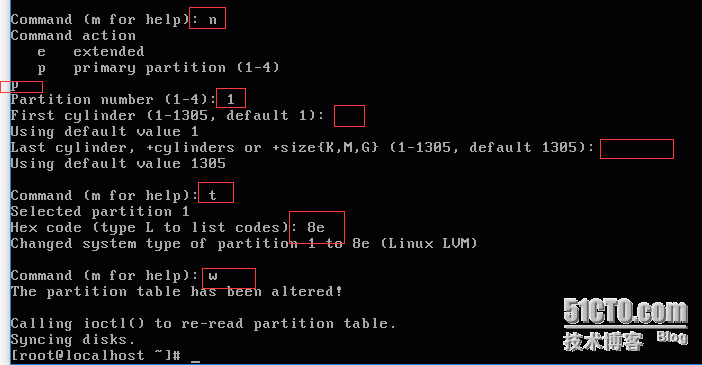
(1)分区
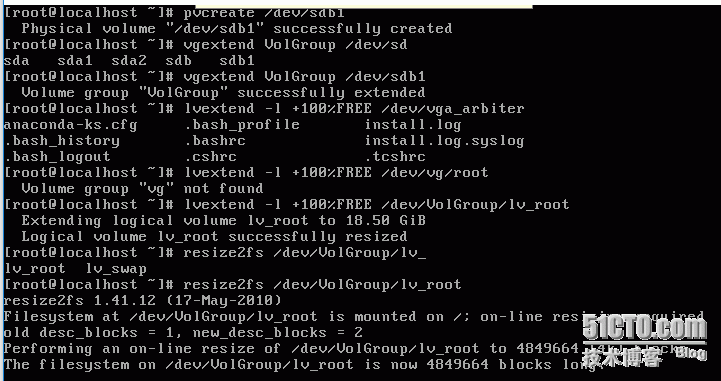
(2)扩展lvm逻辑卷
方式二:直接扩展qcow2磁盘
使用新的被关闭的虚拟机进行测试
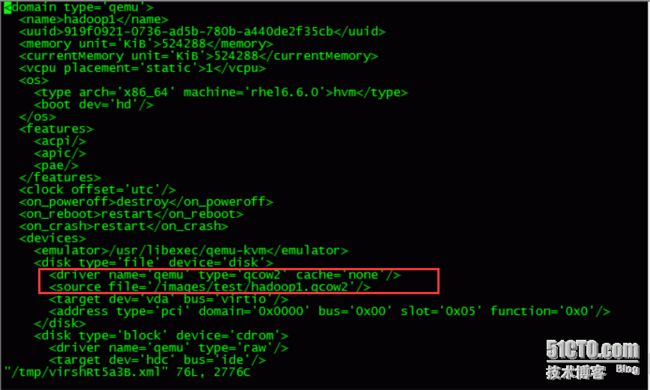
1,查看磁盘
[root@KVM qemu]# virsh edit hadoop1
2,直接扩展qcow2磁盘
[root@KVM test]# qemu-img resize hadoop1.qcow2 +10G
Image resized.
[root@KVM test]# qemu-img info hadoop1.qcow2
image: hadoop1.qcow2
file format: qcow2
virtual size: 20G (21474836480 bytes)          ###扩充了20G
disk size: 1.3G
cluster_size: 65536
经过前后对比,原先10G现在直接扩展了10G,qcow2磁盘格式必须采用此方式进行扩展,不要采用dd方式,dd方式适用于raw格式。
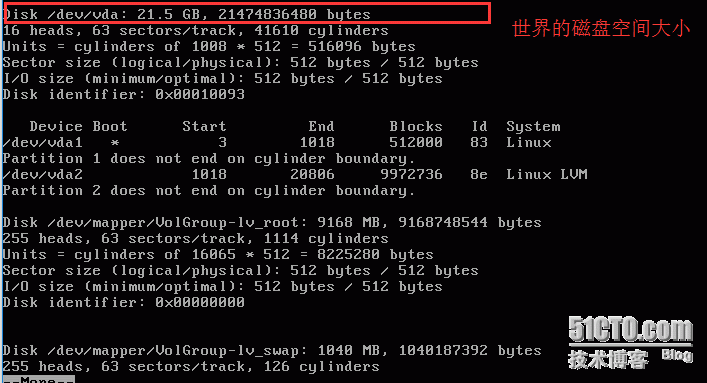
3,进入系统进行查看
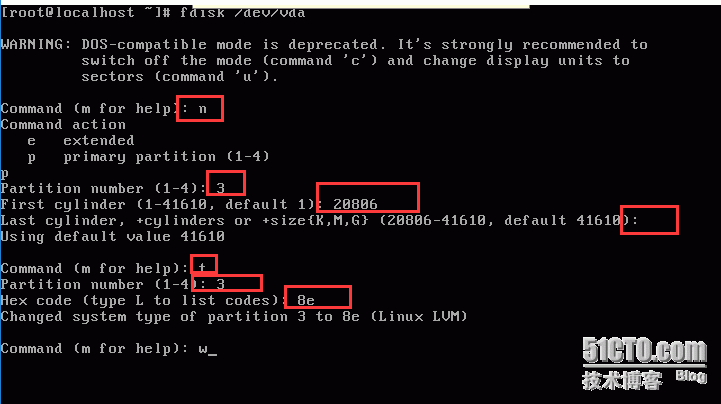
4,开始分区,最后输入w保存
[root@localhost ~]#fdisk /dev/vda
5,重启该虚拟机,接下来开始创建物理卷,加入卷组,扩展逻辑卷(lvm扩充分区)
(二)下面将开始通过raw格式扩充磁盘空间的两种方法:
方法一:添加一个虚拟磁盘文件,然后在虚拟机中加入lvm逻辑卷的方式来增加磁盘空间,步骤如下:
1,通过dd创建一个磁盘文件
[root@KVM test]# dd if=/dev/zero bs=1024M count=4 > /images/test/hadoop4_add.img
4+0 records in
4+0 records out
4294967296 bytes (4.3 GB) copied, 47.6413 s, 90.2 MB/s
[root@KVM test]# qemu-img info hadoop4_add.img
image: hadoop4_add.img
file format: raw
virtual size: 4.0G (4294967296 bytes)
disk size: 4.0G
[root@KVM qemu]# virsh list --all
 Id    Name                           State
----------------------------------------------------
 1     win7                           running
 11    hadoop3                        running
 -     hadoop1                        shut off
 -     hadoop2                        shut off
 -     hadoop4                        shut off
3,修改虚拟机配置文件,把新添加的hdb添加到配置文件中
[root@KVM qemu]# virsh edit hadoop4
<domain type='qemu'>
  <name>hadoop4</name>
  <uuid>586b3cae-943f-d283-d8e7-ed62b01bfa34</uuid>
  <memory unit='KiB'>1048576</memory>
  <currentMemory unit='KiB'>1048576</currentMemory>
  <vcpu placement='static'>1</vcpu>
  <os>
    <type arch='x86_64' machine='rhel6.6.0'>hvm</type>
    <boot dev='hd'/>
  </os>
  <features>
    <acpi/>
    <apic/>
    <pae/>
  </features>
  <clock offset='utc'/>
  <on_poweroff>destroy</on_poweroff>
  <on_reboot>restart</on_reboot>
  <on_crash>restart</on_crash>
  <devices>
    <emulator>/usr/libexec/qemu-kvm</emulator>
    <disk type='file' device='disk'>
      <driver name='qemu' type='raw' cache='none'/>
      <source file='/images/test/hadoop4.img'/>
      <target dev='hda' bus='ide'/>
      <address type='drive' controller='0' bus='0' target='0' unit='0'/>
    </disk>
     <disk type='file' device='disk'>
      <driver name='qemu' type='raw' cache='none'/>
      <source file='/images/test/hadoop4_add.img'/>
      <target dev='hdb' bus='ide'/>
    </disk>
    <disk type='block' device='cdrom'>
"/tmp/virshKw385N.xml" 80L, 2929C written
Domain hadoop4 XML configuration edited.
4,启动虚拟机
[root@KVM qemu]# virsh start hadoop4
Domain hadoop4 started
5,进入该虚拟机,进行查看
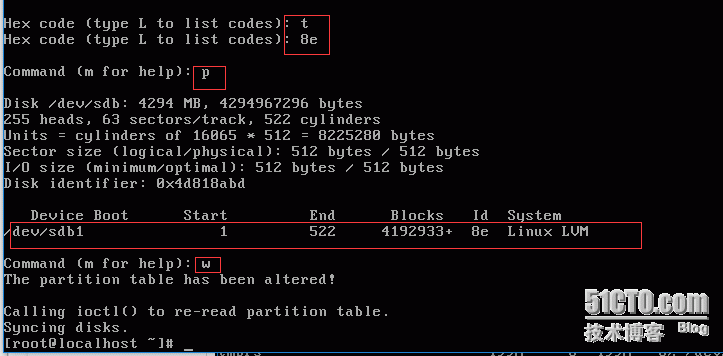
6,开始分区如下图:
7,通过lvm进行逻辑卷的磁盘管理,同上边一样如下图
方法二:直接通过resize来修改磁盘空间的大小,不过此命令只支持raw格式的磁盘,如果是qcow2格式的磁盘需要先使用qemu-img convert进行转换后才能更改其大小。另外使用qemu-img resize filename size来更改大小需要重启kvm虚拟机,才能被系统识别。具体的步骤如下:
1,使用qemu-img resize更改磁盘空间的大小
[root@KVM test]# qemu-img info hadoop2.img
image: hadoop2.img
file format: raw
virtual size: 20G (21474836480 bytes)
disk size: 10G
[root@KVM test]# qemu-img resize hadoop2.img  +10G
Image resized.
[root@KVM test]# qemu-img info hadoop2.img
image: hadoop2.img
file format: raw
virtual size: 30G (32212254720 bytes)
disk size: 10G
[root@KVM test]#
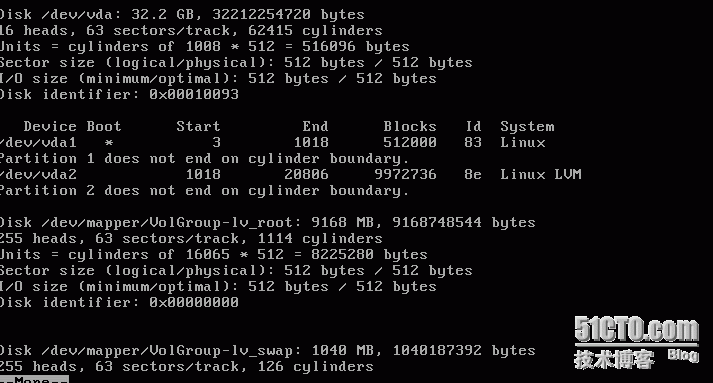
2,重启,查看kvm虚拟机,然后划分区,进行lvm逻辑卷的扩充等等。和上边划分分区和逻辑卷的步骤一样,参考下即可。


