Fastec software instructions
Pallet information status review and check
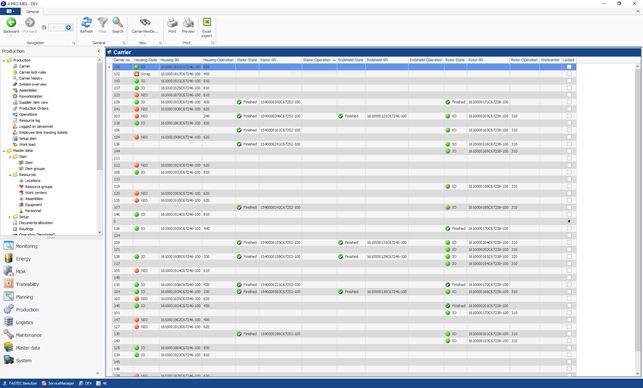
The pallet information view is accessible by choosing "Production" in the lower menu and choosing "Carrier" in the upper navigation menu.
Here you can have a look at the part serial numbers, their belonging part state and the next cell that the part will be operated on sorted by pallet number. You can also check if the pallet is locked.
Clearing pallet information
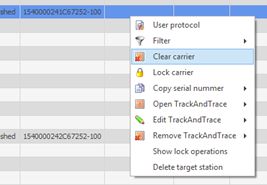 For clearing the complete information of a pallet just choose one or multiple pallet(s) in the pallet information view and choose "Clear carrier" in the context menu.
It's also possible to delete just one part from the pallet by choosing "Remove TrackAndTrace" and selecting the part you want to remove from the pallet.
Modifying pallet information and destination
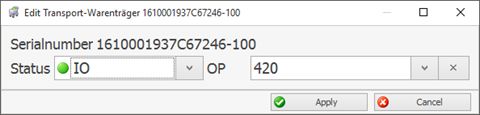
For modifying the pallet information and its destination select a pallet in the pallet information view, choose "Edit TrackAndTrace" in the context menu and choose the part you want to modify. In the following window you can change the part's state (Status) and the destination cell (OP) the part will be operated:
Modifying and updating process parameters
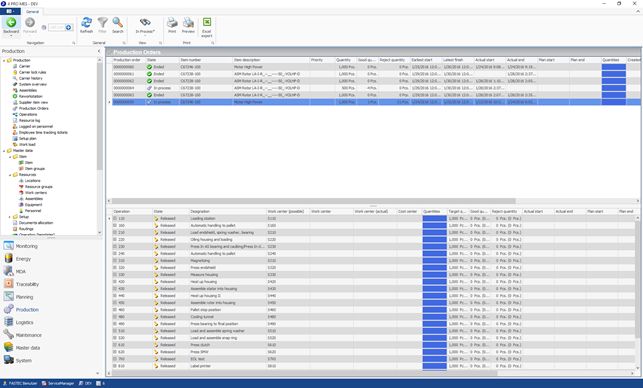
To modify process parameters just open the production order view by choosing "Production" in the lower menu and choosing "Production Orders" in the upper navigation menu.
Here you can see all production orders whether finished or in process. For modifying the current process parameters, you choose a production order that's in state "In process" (Keep in mind that the rotor production line and the main production line both have their own production order).
By choosing the current running production order all processes will be displayed in the bottom of the view. To modify the process parameters, you expand the operation you want to modify:
![]()
Then you right click at the operation with state "Released" and choose "New split version" in the context menu. A prompt will pop up to write down a reason for the new split: Just close it by choosing "Ok".
As you can see a new split version with state "Blocked" was created:

Edit this split operation by choosing "Edit" in the context menu. In the following window choose the "Parameter" tab and you can see the current process parameter values:
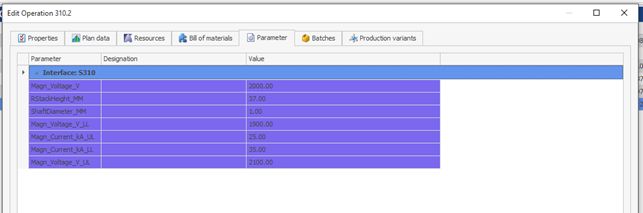
Edit the values by double clicking on them and enter the new value. When you finished entering all values you can apply them by choosing "Apply".
To make sure that the new parameter values will be used in production you choose the split operation you just edited and choose "Release split version" in the context menu. You can see that the old split operation was set to "Declined" and the new one set to "Released".
Change over product variant

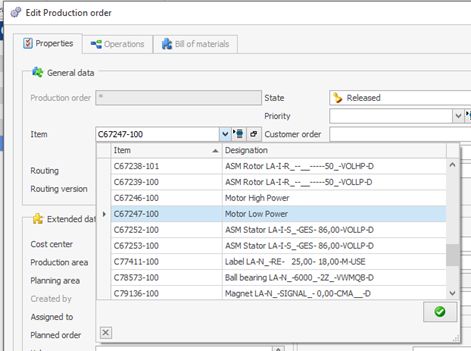
You can change over the product variant by choosing "Production" in the lower menu and "Production Orders" in the upper navigation menu.
Here you can add a new production order by choosing "Add" in the context menu when right clicking the top view. In the window you choose the variant you want to produce (in this example the motor low power variant C67247-100):
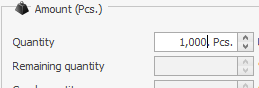
And set the quantity to the amount of parts you want to produce in this order:
Then just create the new production order by choosing "Apply".
If you have a production order for the product variant already you can reuse it also. There would be no need to create a new one for testing purposes.
 You have to set the production order with the current state "In process" to "Ended" by choosing "Set status to" in the context menu and choose the status "Ended".
Then you can set your newly created production order or the one you want to reuse to status "In process".
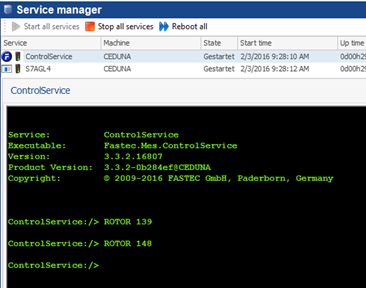
Reopen/Restart Fastec system
 If the main Fastec software just crashed or doesn't run anymore, just restart it by the shortcut on the desktop.
If the line control service isn't running anymore, you can check the control service status by choosing "System" in the lower menu and "Service manager" in the upper navigation menu. If it isn't running or needs a restart just choose "Start all services" or "Reboot all" to start or restart the control service.


Display recent part information
The recent part information is accessible by choosing "Traceability" in the lower menu and "Serial numbers (part history)" in the upper navigation menu.
Every produced part is listed by its current state and its serial number chronologically. You can also see the belonging production order, the time when the part started to be produced and the time the part was completed.
When you expand the part information you can have a look at all operation processes of the part and their belonging process parameters and measured quality data.

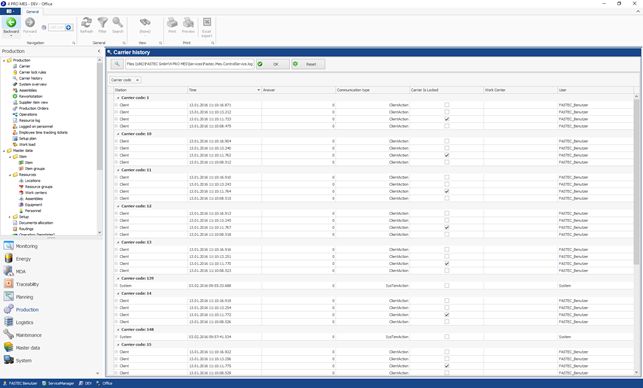
For displaying request and response signals you can have a look at the carrier history by choosing "Production" in the lower menu and "Carrier history" in the upper navigation menu. With the magnifier icon you can load a control service log file for viewing the carrier history. Normally you can find the log file in this path:
C:\Program Files (x86)\FASTEC GmbH\4 PRO MES\Services\Fastec.Mes.ControlService.log
You can group the list by carrier code by dragging the "Carrier code" column into the space above the table.
Put a rotor onto a pallet manually
You can add a rotor by typing "ROTOR" and the pallet number of the pallet you want the rotor to be added to in the line control service console.
Before putting a stator onto a pallet manually you just have to make sure that the stator was already produced by S100 (Just check the serial number part history). It's also recommended to have knowledge in SQL databases.
For getting the TrackAndTrace entry that's necessary to put the part to the pallet just execute the following query with your stator serial number:
SELECT iid
FROM [CS608].[dbo].[d_tnt]
WHERE serial_number = 'YOUR_STATOR_SERIAL_NUMBER'
Example:

For putting the part to the pallet just execute the following query with your pallet number and the iid you've got from the query above:
UPDATE [CS608].[dbo].[d_wh_carrier]
SET cf_tnt_id_stator = 'YOUR_IID'
WHERE code = 'YOUR_PALLET_NUMBER';
Example:

Keep in mind that the stator might has a current destination information that's not suitable to your testing scenario. Just check the pallet information view for this information and set the destination and the state to the values that are needed for your testing purpose (Have a look at the chapter "Modifying pallet information and destination").