插件化开发—动态加载技术加载已安装和未安装的apk
首先引入一个概念,动态加载技术是什么?为什么要引入动态加载?它有什么好处呢?首先要明白这几个问题,我们先从
应用程序入手,大家都知道在Android App中,一个应用程序dex文件的方法数最大不能超过65536个,否则,你的app
将出异常了,那么如果越大的项目那肯定超过了,像美团、支付宝等都是使用动态加载技术,支付宝在去年的一个技
术分享类会议上就推崇让应用程序插件化,而美团也公布了他们的解决方案:Dex自动拆包和动态加载技术。所以使
用动态加载技术解决此类问题。而它的优点可以让应用程序实现插件化、插拔式结构,对后期维护作用那不用说了。
1、什么是动态加载技术?
动态加载技术就是使用类加载器加载相应的apk、dex、jar(必须含有dex文件),再通过反射获得该apk、dex、jar内部的资源(class、图片、color等等)进而供宿主app使用。
2、关于动态加载使用的类加载器
使用动态加载技术时,一般需要用到这两个类加载器:
- PathClassLoader - 只能加载已经安装的apk,即/data/app目录下的apk。
- DexClassLoader - 能加载手机中未安装的apk、jar、dex,只要能在找到对应的路径。
这两个加载器分别对应使用的场景各不同,所以接下来,分别讲解它们各自加载相同的插件apk的使用。
3、使用PathClassLoader加载已安装的apk插件,获取相应的资源供宿主app使用
下面通过一个demo来介绍PathClassLoader的使用:
1、首先我们需要知道一个manifest中的属性:SharedUserId。
该属性是用来干嘛的呢?简单的说,应用从一开始安装在Android系统上时,系统都会给它分配一个linux user id,之
后该应用在今后都将运行在独立的一个进程中,其它应用程序不能访问它的资源,那么如果两个应用的sharedUserId相同,那么它们将共同运行在相同的
linux进程中
,从而便可以数据共享、资源访问了。所以我们在宿主app和插件app的manifest上都定义一个相同的sharedUserId。
2、那么我们将插件apk安装在手机上后,宿主app怎么知道手机内该插件是否是我们应用程序的插件呢?
我们之前是不是定义过插件apk也是使用相同的sharedUserId,那么,我就可以这样思考了,是不是可以得到手机内所有已安装apk的sharedUserId呢,然后通过判断sharedUserId是否和宿主app的相同,如果是,那么该app就是我们的插件app了。确实是这样的思路的,那么有了思路最大的问题就是怎么获取一个应用程序内的sharedUserId了,我们可以通过PackageInfo.sharedUserId来获取,请看代码:
/**
     * 查找手机内所有的插件
     * @return 返回一个插件List
     */
    private List<PluginBean> findAllPlugin() {
        List<PluginBean> plugins = new ArrayList<>();
        PackageManager pm = getPackageManager();
        //通过包管理器查找所有已安装的apk文件
        List<PackageInfo> packageInfos = pm.getInstalledPackages(PackageManager.GET_UNINSTALLED_PACKAGES);
        for (PackageInfo info : packageInfos) {
            //得到当前apk的包名
            String pkgName = info.packageName;
            //得到当前apk的sharedUserId
            String shareUesrId = info.sharedUserId;
            //判断这个apk是否是我们应用程序的插件
            if (shareUesrId != null && shareUesrId.equals("com.sunzxyong.myapp") && !pkgName.equals(this.getPackageName())) {
                String label = pm.getApplicationLabel(info.applicationInfo).toString();//得到插件apk的名称
                PluginBean bean = new PluginBean(label,pkgName);
                plugins.add(bean);
            }
        }
        return plugins;
    }
通过这段代码,我们就可以轻松的获取手机内存在的所有插件,其中PluginBean是定义的一个实体类而已,就不贴它的代码了。
3、如果找到了插件,就把可用的插件显示出来了,如果没有找到,那么就可提示用户先去下载插件什么的。
                List<HashMap<String, String>> datas = new ArrayList<>();
                List<PluginBean> plugins = findAllPlugin();
                if (plugins != null && !plugins.isEmpty()) {
                    for (PluginBean bean : plugins) {
                        HashMap<String, String> map = new HashMap<>();
                        map.put("label", bean.getLabel());
                        datas.add(map);
                    }
                } else {
                    Toast.makeText(this, "没有找到插件,请先下载!", Toast.LENGTH_SHORT).show();
                }
                showEnableAllPluginPopup(datas);
4、如果找到后,那么我们选择对应的插件时,在宿主app中就加载插件内对应的资源,这个才是PathClassLoader的重点。我们首先看看怎么实现的吧:
/**
     * 加载已安装的apk
     * @param packageName 应用的包名
     * @param pluginContext 插件app的上下文
     * @return 对应资源的id
     */
    private int dynamicLoadApk(String packageName, Context pluginContext) throws Exception {
        //第一个参数为包含dex的apk或者jar的路径,第二个参数为父加载器
        PathClassLoader pathClassLoader = new PathClassLoader(pluginContext.getPackageResourcePath(),ClassLoader.getSystemClassLoader());
//        Class<?> clazz = pathClassLoader.loadClass(packageName + ".R$mipmap");//通过使用自身的加载器反射出mipmap类进而使用该类的功能
        //参数:1、类的全名,2、是否初始化类,3、加载时使用的类加载器
        Class<?> clazz = Class.forName(packageName + ".R$mipmap", true, pathClassLoader);
        //使用上述两种方式都可以,这里我们得到R类中的内部类mipmap,通过它得到对应的图片id,进而给我们使用
        Field field = clazz.getDeclaredField("one");
        int resourceId = field.getInt(R.mipmap.class);
        return resourceId;
    }
这个方法就是加载包名为packageName的插件,然后获得插件内名为one.png的图片的资源id,进而供宿主app使用该图片。现在我们一步一步来讲解一下:
- 首先就是new出一个PathClassLoader对象,它的构造方法为:
public PathClassLoader(String dexPath, ClassLoader parent)
中其中第一个参数是通过插件的上下文来获取插件apk的路径,其实获取到的就是/data/app/apkthemeplugin.apk,那么插件的上下文怎么获取呢?在宿主app中我们只有本app的上下文啊,答案就是为插件app创建一个上下文://获取对应插件中的上下文,通过它可得到插件的Resource Context plugnContext = this.createPackageContext(packageName, CONTEXT_IGNORE_SECURITY | CONTEXT_INCLUDE_CODE);通过插件的包名来创建上下文,不过这种方法只适合获取已安装的app上下文。或者不需要通过反射直接通过插件上下文getResource().getxxx(R.*.*);也行,而这里用的是反射方法。
第二个参数是父加载器,都是ClassLoader.getSystemClassLoader()。 - 好了,插件app的类加载器我们创建出来了,接下来就是通过反射获取对应类的资源了,这里我是获取R类中的内部类mipmap类,然后通过反射得到mipmap类中名为one的字段的值,
 ,然后通过
,然后通过plugnContext.getResources().getDrawable(resouceId)
就可以获取对应id的Drawable得到该图片资源进而宿主app的可用它设置背景等。
当然也可以获取到其它的资源或者获取Acitivity类等,这里只是做一个示例。 - 备:关于R类,在AS中的目录为:/build/generated/source/r/debug/<- packageName ->。它的内部类有:
 脑洞大的可以尽可能的利用这些资源吧!!!
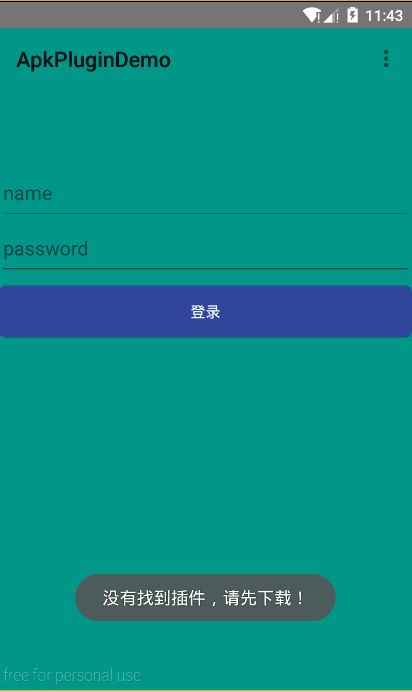
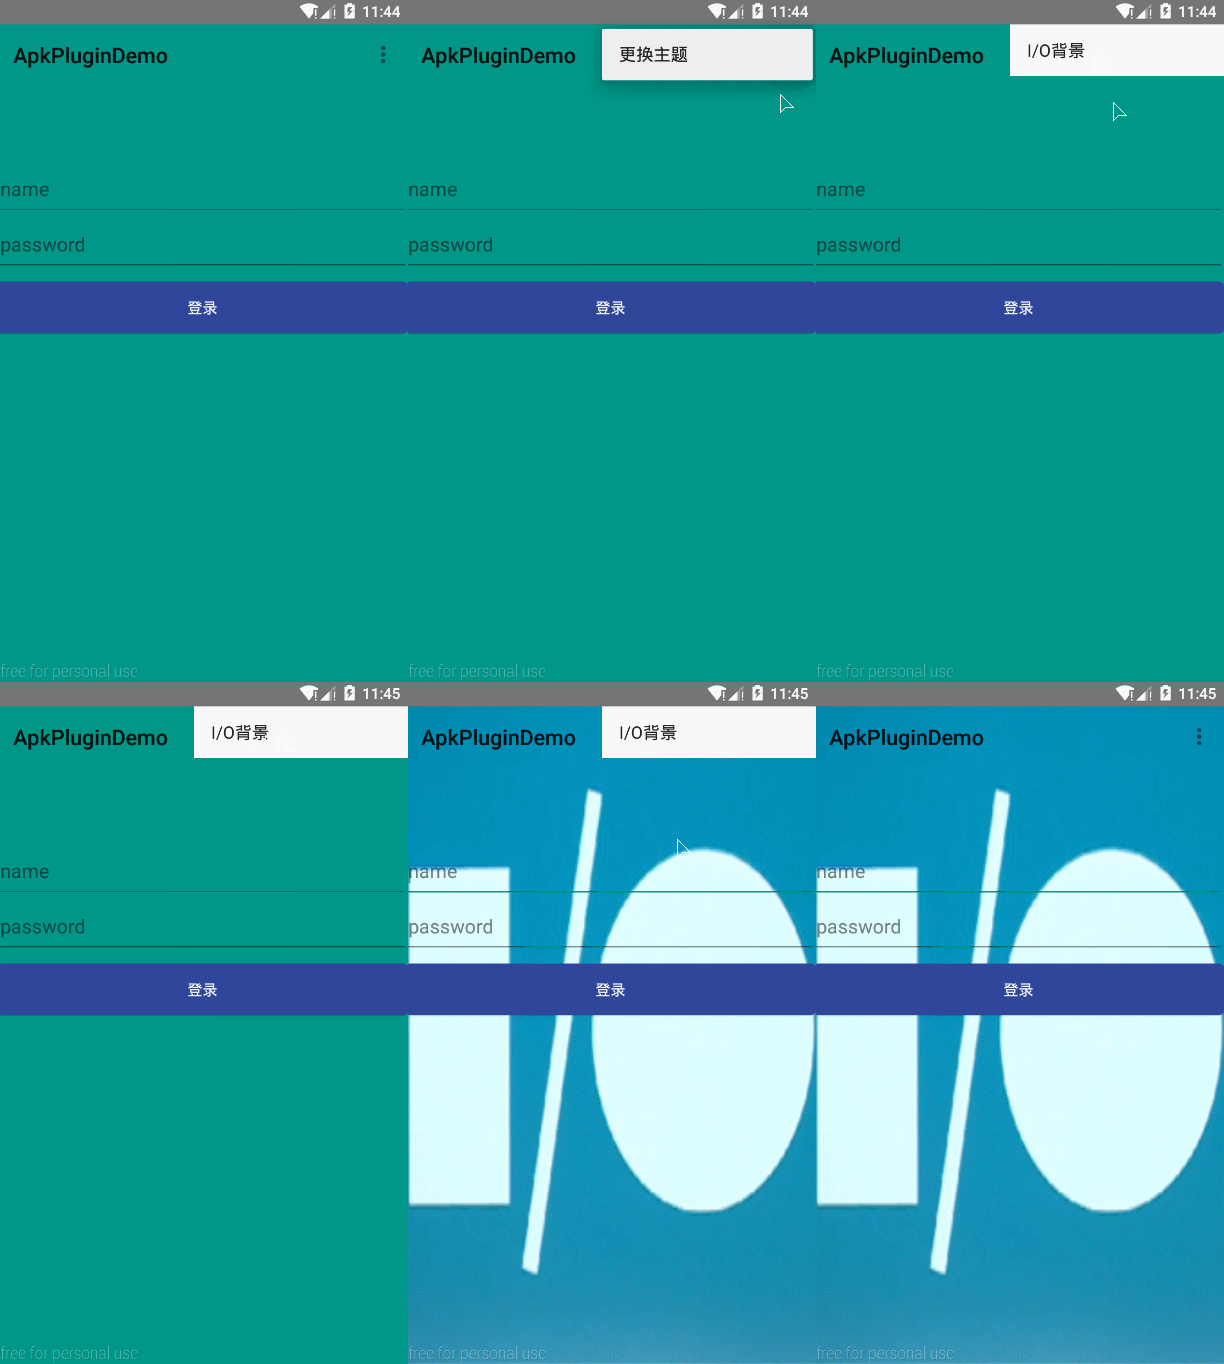
下面演示下该demo效果,在没有插件情况下会提示请先下载插件,有插件时候就选择对应的插件而供宿主app使用,本demo是换背景的功能演示,我来看宿主app中mipmap文件夹下并没有one.png这张图片,截图为证:
在没有安装插件情况下:
安装插件后:
可以看到,宿主app使用了插件中的图片资源。
这时,有的人就会想,这个插件需要下载下来还需要安装到手机中去,这不就是又安装了一个apk啊,只是没显示出来而已,这种方式不太友好,那么,可不可以只下载下来,不用安装,也能供宿主app使用呢?像微信上可以运行没有安装的飞机大战这样的,这当然可以的。这就需要用到另外一个加载器DexClassLoader。
4、DexClassLoader加载未安装的apk,提供资源供宿主app使用
关于动态加载未安装的apk,我先描述下思路:首先我们得到事先知道我们的插件apk存放在哪个目录下,然后分别得到插件apk的信息(名称、包名等),然后显示可用的插件,最后动态加载apk获得资源。
按照上面这个思路,我们需要解决几个问题:
1、怎么得到未安装的apk的信息
2、怎么得到插件的context或者Resource,因为它是未安装的不可能通过createPackageContext(...);方法来构建出一个context,所以这时只有在Resource上下功夫。
现在我们就一一来解答这些问题吧:
1、得到未安装的apk信息可以通过mPackageManager
.getPackageArchiveInfo()方法获得,
public PackageInfo getPackageArchiveInfo(String archiveFilePath, int flags)它的参数刚好是传入一个FilePath,然后返回apk文件的PackageInfo信息:
/**
     * 获取未安装apk的信息
     * @param context
     * @param archiveFilePath apk文件的path
     * @return
     */
    private String[] getUninstallApkInfo(Context context, String archiveFilePath) {
        String[] info = new String[2];
        PackageManager pm = context.getPackageManager();
        PackageInfo pkgInfo = pm.getPackageArchiveInfo(archiveFilePath, PackageManager.GET_ACTIVITIES);
        if (pkgInfo != null) {
            ApplicationInfo appInfo = pkgInfo.applicationInfo;
            String versionName = pkgInfo.versionName;//版本号
            Drawable icon = pm.getApplicationIcon(appInfo);//图标
            String appName = pm.getApplicationLabel(appInfo).toString();//app名称
            String pkgName = appInfo.packageName;//包名
            info[0] = appName;
            info[1] = pkgName;
        }
        return info;
    }
2、得到对应未安装apk的Resource对象,我们需要通过反射来获得:
/**
     * @param apkName
     * @return 得到对应插件的Resource对象
     */
    private Resources getPluginResources(String apkName) {
        try {
            AssetManager assetManager = AssetManager.class.newInstance();
            Method addAssetPath = assetManager.getClass().getMethod("addAssetPath", String.class);//反射调用方法addAssetPath(String path)
            //第二个参数是apk的路径:Environment.getExternalStorageDirectory().getPath()+File.separator+"plugin"+File.separator+"apkplugin.apk"
            addAssetPath.invoke(assetManager, apkDir+File.separator+apkName);//将未安装的Apk文件的添加进AssetManager中,第二个参数为apk文件的路径带apk名
            Resources superRes = this.getResources();
            Resources mResources = new Resources(assetManager, superRes.getDisplayMetrics(),
                    superRes.getConfiguration());
            return mResources;
        } catch (Exception e) {
            e.printStackTrace();
        }
        return null;
    }
通过得到AssetManager中的内部的方法addAssetPath,将未安装的apk路径传入从而添加进assetManager中,然后通过new Resource把assetManager传入构造方法中,进而得到未安装apk对应的Resource对象。
好了!上面两个问题解决了,那么接下来就是加载未安装的apk获得它的内部资源。
/**
     * 加载apk获得内部资源
     * @param apkDir apk目录
     * @param apkName apk名字,带.apk
     * @throws Exception
     */
    private void dynamicLoadApk(String apkDir, String apkName, String apkPackageName) throws Exception {
        File optimizedDirectoryFile = getDir("dex", Context.MODE_PRIVATE);//在应用安装目录下创建一个名为app_dex文件夹目录,如果已经存在则不创建
        Log.v("zxy", optimizedDirectoryFile.getPath().toString());// /data/data/com.example.dynamicloadapk/app_dex
        //参数:1、包含dex的apk文件或jar文件的路径,2、apk、jar解压缩生成dex存储的目录,3、本地library库目录,一般为null,4、父ClassLoader
        DexClassLoader dexClassLoader = new DexClassLoader(apkDir+File.separator+apkName, optimizedDirectoryFile.getPath(), null, ClassLoader.getSystemClassLoader());
        Class<?> clazz = dexClassLoader.loadClass(apkPackageName + ".R$mipmap");//通过使用apk自己的类加载器,反射出R类中相应的内部类进而获取我们需要的资源id
        Field field = clazz.getDeclaredField("one");//得到名为one的这张图片字段
        int resId = field.getInt(R.id.class);//得到图片id
        Resources mResources = getPluginResources(apkName);//得到插件apk中的Resource
        if (mResources != null) {
            //通过插件apk中的Resource得到resId对应的资源
            findViewById(R.id.background).setBackgroundDrawable(mResources.getDrawable(resId));
        }
    }
其中通过new DexClassLoader()来创建未安装apk的类加载器,我们来看看它的参数:
public DexClassLoader(String dexPath, String optimizedDirectory, String libraryPath, ClassLoader parent)
- dexPath - 就是apk文件的路径
- optimizedDirectory - apk解压缩后的存放dex的目录,值得注意的是,在4.1以后该目录不允许在sd卡上,看官方文档:
A class loader that loads classes from .jar and .apk files containing a classes.dex entry. This can be used to execute code not installed as part of an application.

This class loader requires an application-private, writable directory to cache optimized classes. Use Context.getDir(String, int) to create such a directory:

   File dexOutputDir = context.getDir("dex", 0);

Do not cache optimized classes on external storage. External storage does not provide access controls necessary to protect your application from code injection atta
,所以我们用getDir()方法在应用内部创建一个dexOutputDir。 - libraryPath - 本地的library,一般为null
- parent - 父加载器
接下来,就是通过反射的方法,获取出需要的资源。
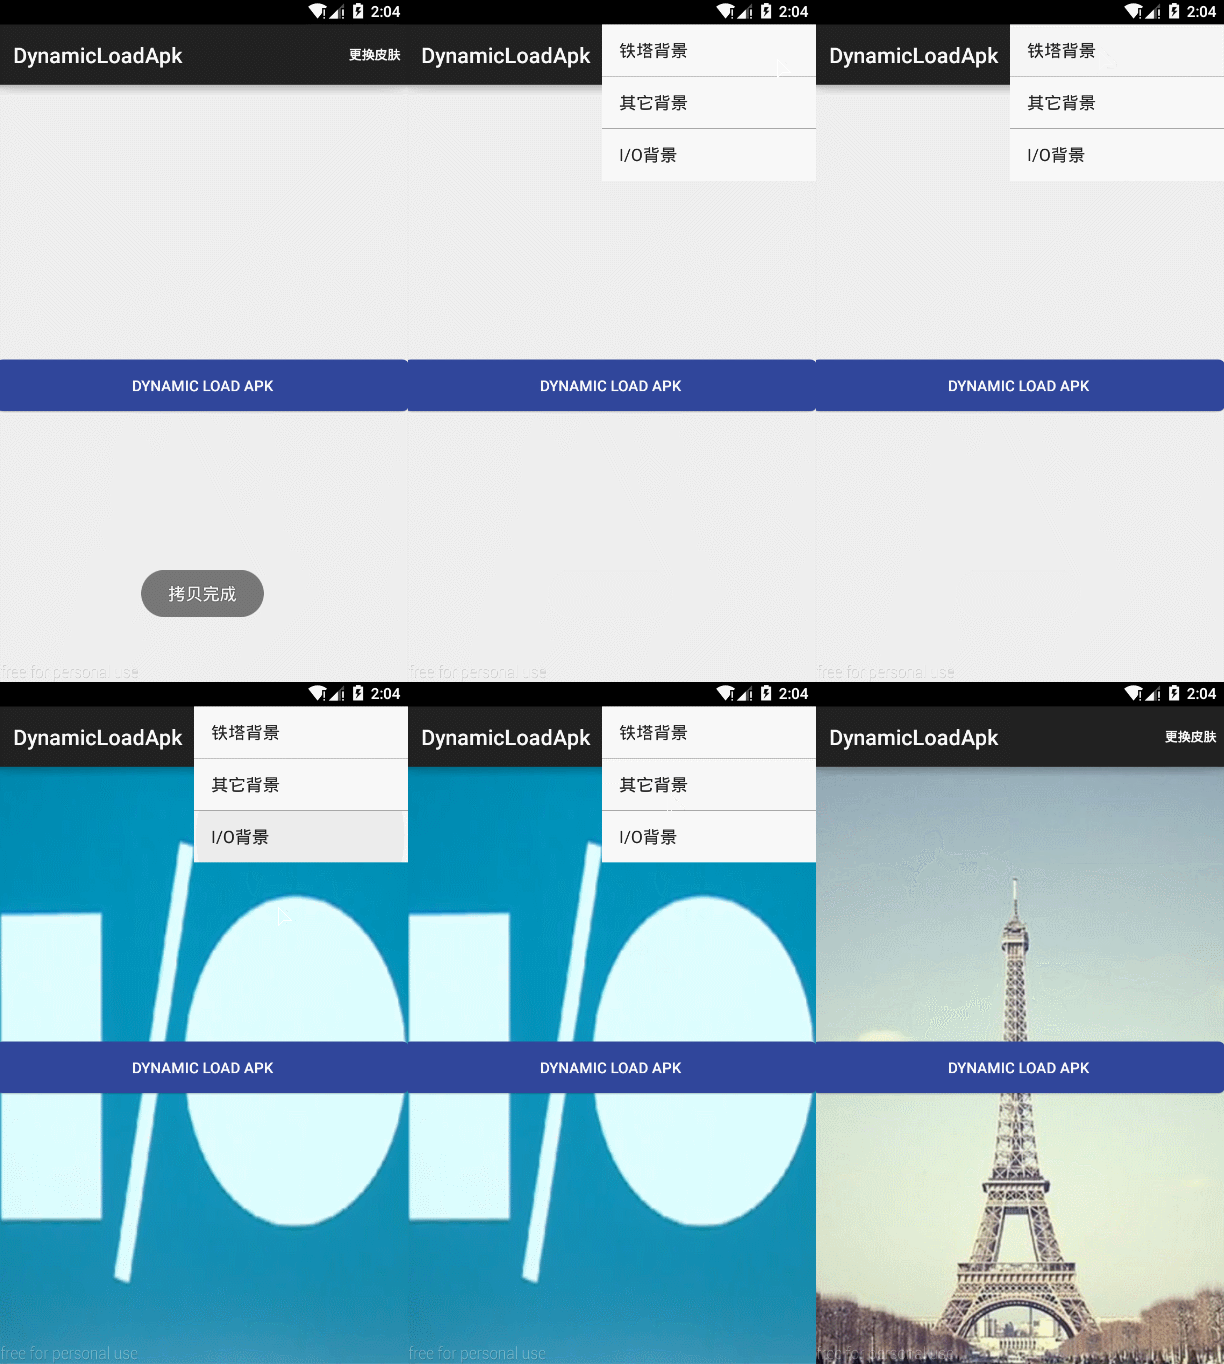
下面我们来看看demo演示的效果,我是把三个apk插件先放在assets目录下,然后copy到sd上来模仿下载过程,然后加载出相应插件的资源:
先只拷贝一个插件:
可以看到正常的获取到了未安装apk的资源。
再看看拷贝了三个插件:
        copyApkFile("apkthemeplugin-1.apk");
        copyApkFile("apkthemeplugin-2.apk");
        copyApkFile("apkthemeplugin-3.apk");

可以看到只要一有插件下载,就能显示出来并使用它。
当然插件化开发并不只是像只有这种换肤那么简单的用途,这只是个demo,学习这种插件化开发思想的。由此可以联想,这种插件化的开发,是不是像QQ里的表情包啊、背景皮肤啊,通过线上下载线下维护的方式,可以在线下载使用相应的皮肤,不使用时候就可以删了,所以插件化开发是插件与宿主app进行解耦了,即使在没有插件情况下,也不会对宿主app有任何影响,而有的话就供用户选择性使用了。
戳这下载Demo


