安卓市场--首页2
在《首页1》这篇文章中,我们讲述了在首页中加入一个自定义的广告栏,下面我们将继续完成首页内容的添加。
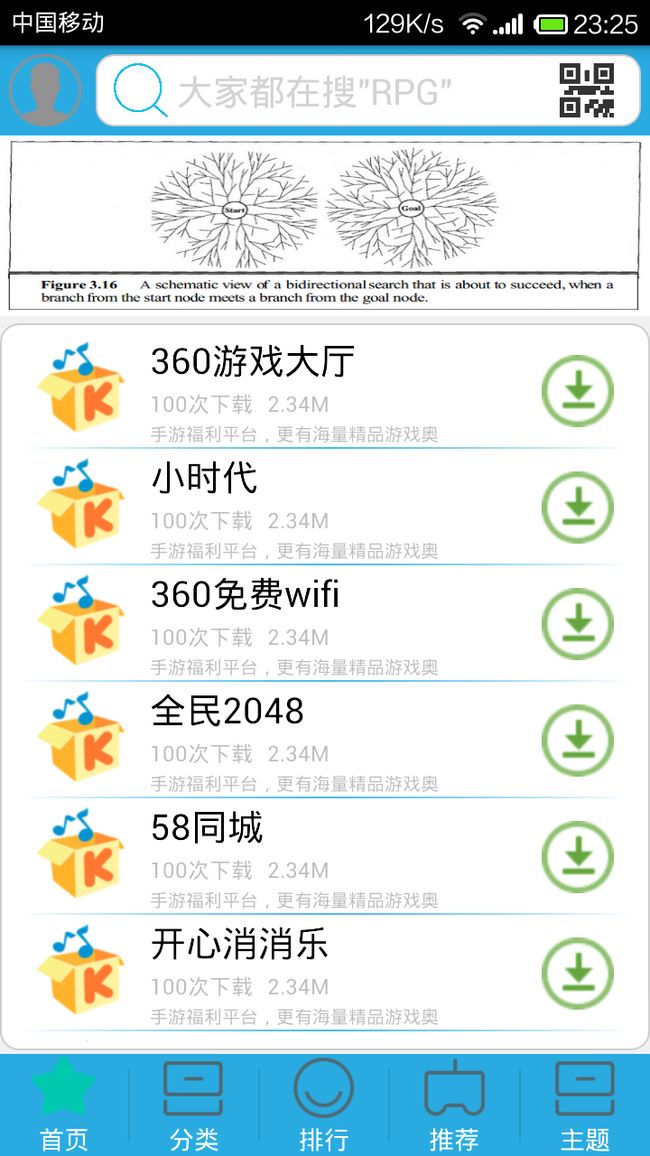
在我们在想法中就是在广告栏下面是一个ListView用于显示比较新的或者是下载量比较高的app。下面我们就来做这一项工作。
1:首先,我们需要在activity_home.xml文件中添加如一个ListView作为显示列表。该ListView的布局就是在广告栏的下面即可。
我们来看一下代码:
    <RelativeLayout android:id="@+id/rl_apps" android:layout_width="match_parent" android:layout_height="wrap_content" android:layout_below="@id/rl_advers">
            <ListView  android:id="@+id/lv_apps" android:layout_width="match_parent" android:layout_height="wrap_content" android:layout_marginBottom="2dp" android:layout_marginTop="4dp" android:background="@drawable/shape_rectangle" android:cacheColorHint="#00000000" android:divider="@drawable/line_bg_blue" android:dividerHeight="1.0dp" android:fadingEdge="vertical" android:listSelector="@drawable/listview_item_bg" android:scrollbarStyle="outsideOverlay" >
            </ListView>
        </RelativeLayout>
其中就几个属性,我来说一下ListView中的一些属性问题。
- 1:cacheColorHint:祛除ListView的拖动背景色。当我们使用自定义的ListView的时候,特别容易出现这个问题。当我们在拖动ListView滑动的时候,背景就会出现黑色。
- 2:divider:指定ListView中的item之间的分割线
- 3:dividerHeight:设置分割线的宽度
- 4:fadingEdge:设置后上面和下面有黑色的阴影
- 5:listSelector:设置ListView中的item被选中之后的图像
- 6:scrollbarStyle:设置滚动条和分割线的覆盖问题
2:在这里我们重点看的就是shape_rectangle样式,这个是我们定义的一个圆角的drawable,其实xml内部节点为shape。这个其实在上面的博客中已经说到了,在这里我在上一次关于这个的代码:
shape_rectangle.xml
    <selector xmlns:android="http://schemas.android.com/apk/res/android">
    <item android:state_pressed="true" android:drawable="@drawable/round_rectangle_bg_pressed" /> <!-- pressed -->
    <item android:state_focused="true" android:drawable="@drawable/round_rectangle_bg_pressed" /> <!-- focused -->
    <item android:state_selected="true" android:drawable="@drawable/round_rectangle_bg_pressed" /> <!-- selected -->
    <item android:drawable="@drawable/round_rectangle_bg" /> <!-- default bg_list_item_normal -->
    </selector>
round_rectangle_bg_pressed.xml
    <?xml version="1.0" encoding="utf-8"?>
    <shape xmlns:android="http://schemas.android.com/apk/res/android" android:shape="rectangle" ><!-- android:shape="" 表示是圆角矩形还是椭圆等等 -->
        <solid android:color="#ffffff"/> <!-- 背景颜色 -->

        <!-- padding 表示内部空间距离背景图片内部边距 的距离 -->
         <padding android:left="10dp" android:top="5dp" android:right="10dp" android:bottom="5dp" />

         <stroke android:width="1dp" android:color="#cecece"/> <!-- 图片边框属性 -->
          <corners android:radius="10dp" /> <!-- 圆角的程度 -->
        <gradient android:startColor="#ffffff" android:centerColor="#ffffff" android:endColor="#ffffff" android:type="linear" android:angle="90" android:centerX="0.5" android:centerY="0.5" />
    </shape>
round_rectangle_bg.xml
    <?xml version="1.0" encoding="utf-8"?>
    <shape xmlns:android="http://schemas.android.com/apk/res/android" android:shape="rectangle" >

        <!-- android:shape="" 表示是圆角矩形还是椭圆等等 -->
        <solid android:color="#ffffff" />
        <!-- 背景颜色 -->


        <!-- padding 表示内部空间距离背景图片内部边距 的距离 -->
        <padding  android:bottom="5dp" android:left="10dp" android:right="10dp" android:top="5dp" />

        <stroke  android:width="1dp" android:color="#cecece" />
        <!-- 图片边框属性 -->
        <corners android:radius="10dp" />
        <!-- 圆角的程度 -->
        <gradient  android:angle="90" android:centerColor="#ffffff" android:centerX="0.5" android:centerY="0.5" android:endColor="#ffffff" android:startColor="#ffffff" android:type="linear" />

    </shape>
好了,到了这一步,我们的ListView也定义好了,下面我们该定义我们的ListView Item和相应的Adapter了。
3:定义ListView Item
在我们的res/layout文件夹下面创建lv_app_item.xml,其中根布局选择RelativeLayout。
我们看一下我们的代码是如何定义的。
    <?xml version="1.0" encoding="utf-8"?>
    <RelativeLayout xmlns:android="http://schemas.android.com/apk/res/android" android:layout_width="match_parent" android:layout_height="match_parent" >

        <RelativeLayout  android:id="@+id/rl_app_item" android:layout_width="wrap_content" android:layout_height="wrap_content" android:layout_marginTop="2dp" android:layout_marginBottom="2dp">

            <!-- <com.android.volley.toolbox.NetworkImageView android:id="@+id/app_image" android:layout_width="60dp" android:layout_height="60dp" android:layout_marginLeft="10dip" android:background="@drawable/noimage" /> -->

            <ImageView  android:id="@+id/app_image" android:layout_width="60dp" android:layout_height="60dp" android:layout_marginLeft="5dip" android:background="@drawable/icon4" />

            <RelativeLayout  android:id="@+id/rl_tv" android:layout_width="wrap_content" android:layout_height="wrap_content" android:layout_marginLeft="8dp" android:layout_toRightOf="@id/app_image" >

                <TextView  android:id="@+id/tv_app_name" android:layout_width="wrap_content" android:layout_height="wrap_content" android:ellipsize="end" android:singleLine="true" android:text="@string/tv_name" android:textColor="@color/black" android:textSize="20sp" />

                <TextView  android:id="@+id/tv_down_count" android:layout_width="wrap_content" android:layout_height="wrap_content" android:layout_below="@id/tv_app_name" android:layout_marginTop="2dp" android:text="6万次下载" android:textSize="12sp" />

                <TextView  android:id="@+id/tv_app_size" android:layout_width="wrap_content" android:layout_height="wrap_content" android:layout_below="@id/tv_app_name" android:layout_marginLeft="8dp" android:layout_marginTop="2dp" android:layout_toRightOf="@id/tv_down_count" android:text="3.62M" android:textSize="12sp" />

                <TextView  android:id="@+id/tv_brief" android:layout_width="wrap_content" android:layout_height="wrap_content" android:layout_below="@id/tv_app_size" android:layout_marginTop="2dp" android:ellipsize="end" android:singleLine="true" android:text="手游福利平台,更有海量精品游戏奥" android:textSize="10sp" >
                </TextView>
            </RelativeLayout>

            <ImageView  android:id="@+id/iv_download" android:layout_width="40dp" android:layout_height="40dp" android:layout_alignParentRight="true" android:layout_centerVertical="true" android:layout_marginRight="5dip" android:background="@drawable/btn_icon_download_ring" />
        </RelativeLayout>

    </RelativeLayout>
我们看一下item的截图:
4:创建JavaBean类,保存app信息
为了能够在Adapter中显示app的信息,我们需要创建一个能够保存每一个app信息的类,我们称之为JavaBean。
在包com.sdu.beans下创建一个名为”AppBriefBean.java”文件,其中包含着app的一些信息以及对应的getters和setters方法。
我们来看一下:
    package com.sdu.beans;

    public class AppBriefBean {

        private String appID; /* app的唯一标识 */
        private String appIconAdd; /* app的图标的地址 */
        private String appName; /* app的名称 */
        private String appDownCount; /* app的下载次数 */
        private String appSize; /* app的大小 */
        private String briefInfo; /* app的简介 */
        private String appAddress; /* app的下载地址 */

        public AppBriefBean(String appID, String appIconAdd, String appName,
                String appDownCount, String appSize, String briefInfo,
                String appAddress) {
            super();
            this.appID = appID;
            this.appIconAdd = appIconAdd;
            this.appName = appName;
            this.appDownCount = appDownCount;
            this.appSize = appSize;
            this.briefInfo = briefInfo;
            this.appAddress = appAddress;
        }

        public String getAppID() {
            return appID;
        }

        public void setAppID(String appID) {
            this.appID = appID;
        }

        public String getAppIconAdd() {
            return appIconAdd;
        }

        public void setAppIconAdd(String appIconAdd) {
            this.appIconAdd = appIconAdd;
        }

        public String getAppName() {
            return appName;
        }

        public void setAppName(String appName) {
            this.appName = appName;
        }

        public String getAppDownCount() {
            return appDownCount;
        }

        public void setAppDownCount(String appDownCount) {
            this.appDownCount = appDownCount;
        }

        public String getAppSize() {
            return appSize;
        }

        public void setAppSize(String appSize) {
            this.appSize = appSize;
        }

        public String getBriefInfo() {
            return briefInfo;
        }

        public void setBriefInfo(String briefInfo) {
            this.briefInfo = briefInfo;
        }

        public String getAppAddress() {
            return appAddress;
        }

        public void setAppAddress(String appAddress) {
            this.appAddress = appAddress;
        }


    }
5:编写Adapter
在包com.sdu.adapters中创建一个明为”AppListAdapter.java”文件,该类继承自BaseAdapter。
按照创建Adapter的流程,首先我们需要有一个容器来保存每一个app的信息,我们这里使用ArrayList.
    /* 储存app信息的数据 */
    private ArrayList<AppBriefBean> appList;
然后再根据LayoutInfalter和Context获取对应的组件进行赋值即可。我们看一下AppListAdapter.java的完整程序。
    package com.sdu.adapters;

    import java.util.ArrayList;

    import com.sdu.androidmarket.R;
    import com.sdu.beans.AppBriefBean;

    import android.content.Context;
    import android.net.Uri;
    import android.view.LayoutInflater;
    import android.view.View;
    import android.view.ViewGroup;
    import android.widget.BaseAdapter;
    import android.widget.ImageView;
    import android.widget.TextView;

    public class AppListAdapter extends BaseAdapter{

        /* 储存app信息的数据 */
        private ArrayList<AppBriefBean> appList;
        private LayoutInflater inflate;

        public AppListAdapter(ArrayList<AppBriefBean> appList,Context context){
            this.appList = appList;
            this.inflate = LayoutInflater.from(context);
        }

        @Override
        public int getCount() {
            // TODO Auto-generated method stub
            return appList == null?0:appList.size();
        }

        @Override
        public Object getItem(int position) {
            // TODO Auto-generated method stub
            return appList.get(position);
        }

        @Override
        public long getItemId(int position) {
            // TODO Auto-generated method stub
            return position;
        }

        @Override
        public View getView(int position, View convertView, ViewGroup parent) {
            // TODO Auto-generated method stub
            Holder holder;

            if(convertView == null){
                holder = new Holder();

                convertView = inflate.inflate(R.layout.lv_app_item, null);
                holder.app_image = (ImageView)convertView.findViewById(R.id.app_image);
                holder.tv_app_name = (TextView)convertView.findViewById(R.id.tv_app_name);
                holder.tv_down_count = (TextView)convertView.findViewById(R.id.tv_down_count);
                holder.tv_app_size = (TextView)convertView.findViewById(R.id.tv_app_size);
                holder.tv_brief = (TextView)convertView.findViewById(R.id.tv_brief);

                convertView.setTag(holder);
            }else{
                holder = (Holder)convertView.getTag();
            }

            if(appList.get(position).getAppIconAdd() == null || appList.get(position).getAppIconAdd().equals("")){

            }else{
                holder.app_image.setImageURI(Uri.parse(appList.get(position).getAppIconAdd()));
            }

            if(appList.get(position).getAppName() != null)
                holder.tv_app_name.setText(appList.get(position).getAppName());

            if(appList.get(position).getAppDownCount() != null)
                holder.tv_down_count.setText(appList.get(position).getAppDownCount()+"次下载");

            if(appList.get(position).getAppSize() != null)
                holder.tv_app_size.setText(appList.get(position).getAppSize());

            if(appList.get(position).getBriefInfo() != null)
                holder.tv_brief.setText(appList.get(position).getBriefInfo());

            return convertView;
        }

        class Holder{
            ImageView app_image;
            TextView tv_app_name;
            TextView tv_down_count;
            TextView tv_app_size;
            TextView tv_brief;
        }

    }
6:初始化ListView(使用测试数据)
好了,Adapter也做好了,现在我们测试一下呗。在HomeActivity中使用测试数据进行对ListView的初始化,我们先来看一下实现代码:
    package com.sdu.activities;

    import java.util.ArrayList;

    import net.tsz.afinal.FinalBitmap;

    import com.sdu.adapters.AppListAdapter;
    import com.sdu.androidmarket.R;
    import com.sdu.beans.AppBriefBean;
    import com.sdu.ui.AdGallery;
    import com.sdu.utils.AppLog;

    import android.content.Intent;
    import android.view.View;
    import android.widget.AdapterView;
    import android.widget.ImageView;
    import android.widget.LinearLayout;
    import android.widget.ListView;
    import android.widget.TextView;
    import android.view.Window;

    public class HomeActivity extends BaseActivity {

        private TextView tv_search;
        private TextView tv_contact;
        private ImageView iv_dia;

        private AdGallery app_advers;
        private LinearLayout ovalLayout; // 圆点容器

        /** 图片id的数组,本地测试用 */
        private int[] imageId = new int[] { R.drawable.test, R.drawable.test,
                R.drawable.test, R.drawable.test };

        /** 图片网络路径数组 */
        private String[] mris = {
                "http://img.my.csdn.net/uploads/201312/14/1386989803_3335.PNG",
                "http://img.my.csdn.net/uploads/201312/14/1386989613_6900.jpg",
                "http://img.my.csdn.net/uploads/201312/14/1386989802_7236.PNG" };

        /* 显示app的ListView */
        private ListView lv_apps;

        /* app ListView的适配器 */
        private AppListAdapter appsAdapter;

        /* 存放数据的array */
        private ArrayList<AppBriefBean> appsList = new ArrayList<AppBriefBean>();


        @Override
        public void initWidget() {
            requestWindowFeature(Window.FEATURE_NO_TITLE);
            setContentView(R.layout.activity_home);

            FinalBitmap.create(this); // android 框架 这里用于加载网络图片

            tv_search = (TextView)findViewById(R.id.tv_search);
            tv_contact = (TextView)findViewById(R.id.tv_contact);
            iv_dia = (ImageView)findViewById(R.id.iv_dia);

            lv_apps = (ListView)findViewById(R.id.lv_apps);

            /**测试一下 */
            appsList.add(new AppBriefBean("1", null, "360游戏大厅", "100", "2.34M", "手游福利平台,更有海量精品游戏奥", null));
            appsList.add(new AppBriefBean("1", null, "小时代", "100", "2.34M", "手游福利平台,更有海量精品游戏奥", null));
            appsList.add(new AppBriefBean("1", null, "360免费wifi", "100", "2.34M", "手游福利平台,更有海量精品游戏奥", null));
            appsList.add(new AppBriefBean("1", null, "全民2048", "100", "2.34M", "手游福利平台,更有海量精品游戏奥", null));
            appsList.add(new AppBriefBean("1", null, "58同城", "100", "2.34M", "手游福利平台,更有海量精品游戏奥", null));
            appsList.add(new AppBriefBean("1", null, "开心消消乐", "100", "2.34M", "手游福利平台,更有海量精品游戏奥", null));
            appsList.add(new AppBriefBean("1", null, "看点", "100", "2.34M", "手游福利平台,更有海量精品游戏奥", null));
            appsList.add(new AppBriefBean("1", null, "神庙逃亡2", "100", "2.34M", "手游福利平台,更有海量精品游戏奥", null));

            appsAdapter = new AppListAdapter(appsList, getApplicationContext());
            lv_apps.setAdapter(appsAdapter);

            tv_search.setOnClickListener(this);
            tv_contact.setOnClickListener(this);
            iv_dia.setOnClickListener(this);


            app_advers = (AdGallery)findViewById(R.id.app_advers);
            ovalLayout = (LinearLayout) findViewById(R.id.ovalLayout);// 获取圆点容器

            // 第二和第三参数 2选1 ,参数2为 图片网络路径数组 ,参数3为图片id的数组,本地测试用 ,2个参数都有优先采用 参数2
            app_advers.start(this, mris, imageId, 3000, ovalLayout,
                            R.drawable.dot_focused, R.drawable.dot_normal);

            app_advers.setAdversOnItemClickListener(new AdGallery.AdversOnItemClickListener() {
                public void onItemClick(int curIndex) {
                    AppLog.error("点击的图片下标为:" + curIndex);
                    // System.out.println(curIndex);
                }
            });

            lv_apps.setOnItemClickListener(new AdapterView.OnItemClickListener() {

                @Override
                public void onItemClick(AdapterView<?> parent, View view,
                        int position, long id) {
                    // TODO Auto-generated method stub

                }
            });
        }

        @Override
        public void widgetClick(View v) {
            Intent intent = null;

            switch(v.getId()){
            case R.id.tv_search:
                intent = new Intent(HomeActivity.this,SearchActivity.class);
                startActivity(intent);
                break;
            case R.id.tv_contact:
                intent = new Intent(HomeActivity.this,MeActivity.class);
                startActivity(intent);
                break;
            case R.id.iv_dia:
                intent = new Intent(HomeActivity.this,DiacodeActivity.class);
                startActivity(intent);
                break;
            }
        }
    }
好了,做到这里,我们的首页就算是完成了,我们来看一下我们的效果截图吧!

