OpenStack for Glance镜像和实例目录解析
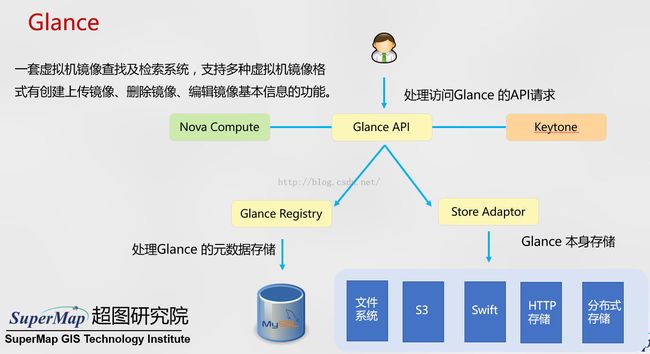
OpenStack是通过Glance组件负责镜像的上传、删除、编辑等相关功能,而且OpenStack支持多种虚拟机镜像格式(AKI、AMI、ARI、ISO、QCOW2、Raw、VDI、VHD、VMDK)。用户可以通过命令行的方式或者直接通过Horizon界面上传相关镜像文件,操作也非常方便。
命令行参考如:
glance image-create --name "cirros-0.3.2-x86_64" --disk-format qcow2
--container-format bare --is-public True --progress < cirros-0.3.2-x86_64-disk.img
目标
本篇文章主要研究一下在OpenStack环境中,镜像上传的存储目录结构,创建实例后的存储目录结构,以及相关的逻辑关系。
测试环境
OpenStack icehouse
- 控制节点(controller)
- 网络节点(network)
- 计算节点(compute)
原理解析
OpenStack的glance组件包括两个服务Glance API和Glance Registry。当用户创建虚拟机请求时,通过Nova组件
发出的镜像请求时,API服务主要处理接收该请求,然后通过Registry服务处理Glance的元数据存储信息,包括镜像
大小、镜像格式、镜像名称等等,同时用户可以自定义镜像或者虚拟机实例的后台存储,默认存储在宿主机的本地文
件系统中,用户可以选择比较丰富的后台存储方案,而今比较火的使用Ceph来实现。
具体实践
1、进入控制节点,查看镜像列表
2、查看默认的镜像存储目录(/etc/glance/glance-api.conf)
root@controller:~# grep ^[a-z] /etc/glance/glance-api.conf
default_store = file
bind_host = 0.0.0.0
bind_port = 9292
log_file = /var/log/glance/api.log
backlog = 4096
workers = 1
registry_host = 0.0.0.0
registry_port = 9191
registry_client_protocol = http
notification_driver = messaging
rpc_backend=rabbit
rabbit_host = 192.168.12.1
rabbit_port = 5672
rabbit_use_ssl = false
rabbit_userid = guest
rabbit_password = mq4smtest
rabbit_virtual_host = /
rabbit_notification_exchange = glance
rabbit_notification_topic = notifications
rabbit_durable_queues = False
qpid_notification_exchange = glance
qpid_notification_topic = notifications
qpid_hostname = localhost
qpid_port = 5672
qpid_username =
qpid_password =
qpid_sasl_mechanisms =
qpid_reconnect_timeout = 0
qpid_reconnect_limit = 0
qpid_reconnect_interval_min = 0
qpid_reconnect_interval_max = 0
qpid_reconnect_interval = 0
qpid_heartbeat = 5
qpid_protocol = tcp
qpid_tcp_nodelay = True
filesystem_store_datadir = /var/lib/glance/images/
swift_store_auth_version = 2
swift_store_auth_address = 127.0.0.1:5000/v2.0/
swift_store_user = jdoe:jdoe
swift_store_key = a86850deb2742ec3cb41518e26aa2d89
swift_store_container = glance
swift_store_create_container_on_put = False
swift_store_large_object_size = 5120
swift_store_large_object_chunk_size = 200
swift_enable_snet = False
s3_store_host = 127.0.0.1:8080/v1.0/
s3_store_access_key = <20-char AWS access key>
s3_store_secret_key = <40-char AWS secret key>
s3_store_bucket = <lowercased 20-char aws access key>glance
s3_store_create_bucket_on_put = False
sheepdog_store_address = localhost
sheepdog_store_port = 7000
sheepdog_store_chunk_size = 64
delayed_delete = False
scrub_time = 43200
scrubber_datadir = /var/lib/glance/scrubber
image_cache_dir = /var/lib/glance/image-cache/
connection = mysql://glancedbadmin:[email protected]/glance
backend = sqlalchemy
auth_uri=http://192.168.12.1:5000
auth_host = 192.168.12.1
auth_port = 35357
auth_protocol = http
admin_tenant_name = service
admin_user = glance
admin_password = glance4smtest
flavor=keystone
我们可以看到这里面内容比较多,但是我们只关系镜像存储即:filesystem_store_datadir = /var/lib/glance/images/
3、接下来进入该目录,查看镜像详细信息
root@controller:/var/lib/glance/images# ll
total 46810148
drwxr-xr-x 2 glance glance       4096 Dec 21 17:36 ./
drwxr-xr-x 4 glance glance       4096 Jun 17  2015 ../
-rw-r----- 1 glance glance  968560640 Nov 23 15:50 01fa9624-d339-486c-a18e-a3cd801ff663
-rw-r----- 1 glance glance 4557045760 Nov 20 14:39 13134458-54de-4969-bc94-7fc3bb01f881
-rw-r----- 1 glance glance 5244256256 Sep 24 15:39 262d7988-9672-4fd1-a88b-42df293d078f
-rw-r----- 1 glance glance 1623392256 Dec  7 16:16 32f643e8-a9f8-4d37-91ca-16d553a7aa6e
-rw-r----- 1 glance glance   19464192 Jun 26  2015 38470ce5-34bb-4ee3-a58d-2c136c8dc88b
-rw-r----- 1 glance glance 1705639936 Dec  7 15:35 41f0fd90-aa87-424e-b087-0d924467513d
-rw-r----- 1 glance glance 4284418560 Dec  7 14:49 4ef781ee-d2b5-4922-8fd0-f12aa81f996f
-rw-r----- 1 glance glance 8041725952 Jul  8 12:23 84691638-6247-402d-80d5-3429c1aa1554
-rw-r----- 1 glance glance 2135359488 Oct 16 16:29 8c50877e-ef0a-4620-9516-33d7096a6bc1
-rw-r----- 1 glance glance 8779983360 Dec  1 14:49 9a79c48f-d155-4daf-8335-b247d5750503
-rw-r----- 1 glance glance  295900672 Sep 24 09:26 b7c95d83-5c4a-419c-9669-2af1329f4eac
-rw-r----- 1 glance glance  990371840 Nov 20 14:31 bcdc62a7-3171-468c-b543-b483be843ed6
-rw-r----- 1 glance glance  482873856 Nov 21 13:24 c6978549-872d-4cfa-b8ae-8f577d99e8db
-rw-r----- 1 glance glance   13167616 Dec 21 17:36 d5aab3ac-74b5-4d53-91ee-92a22b48bb61
-rw-r----- 1 glance glance  790448128 Nov 25 23:42 e026dc51-26a1-46d8-9dff-e81c17789aa0
-rw-r----- 1 glance glance 4470931456 Sep 24 14:40 f8d4714b-2b02-40b9-9123-0eccf859b7f5
-rw-r----- 1 glance glance 3529972224 Dec 18 14:22 f9c15896-3c15-4020-a4ed-c5439df8a767
4、也许我们会对某个镜像的格式、大小感兴趣,随便挑选两个查看一下,使用qemu-img info命令即可
root@controller:/var/lib/glance/images# qemu-img info 84691638-6247-402d-80d5-3429c1aa1554
image: 84691638-6247-402d-80d5-3429c1aa1554
file format: qcow2
virtual size: 25G (26843545600 bytes)
disk size: 7.5G
cluster_size: 65536
Format specific information:
    compat: 1.1
    lazy refcounts: false
我们可以看到,上述命令查看的镜像格式为qcow2,镜像设置的虚拟存储为25GB,本身磁盘大小占用7.5GB ,我们通
过上述列表可以看到该镜像为Win7镜像,不过7.5GB的大小还是比较大,还需要对镜像进行压缩。
root@controller:/var/lib/glance/images# qemu-img info 4ef781ee-d2b5-4922-8fd0-f12aa81f996f
image: 4ef781ee-d2b5-4922-8fd0-f12aa81f996f
file format: vmdk
virtual size: 120G (128849018880 bytes)
disk size: 4.0G
Format specific information:
    cid: 155036437
    parent cid: 4294967295
    create type: streamOptimized
    extents:
        [0]:
            compressed: true
            virtual size: 128849018880
            filename: 4ef781ee-d2b5-4922-8fd0-f12aa81f996f
            cluster size: 65536
            format:
我们有查看了一个镜像信息,这个镜像格式为vmdk,也是通过VMWare Workstation导出的格式,虚拟存储120GB,磁盘大小为4GB,由于该格式为VMware的格式,所以OpenStack内部还是做了一个转换的。
注意:为什么要强调虚拟存储,这是因为我们在制作镜像的时候都会设置一个默认的存储空间,例如上述120GB的虚
拟存储,其实虚拟存储并不是物理上占用这么多空间,但是如果将镜像文件的虚拟存储设置过大,在通过OpenStac
k创建云主机时,就需要选择相应虚拟存储的云主机配置类型,也就是为这个镜像预留120GB的物理空间,这个是需
要用户注意的。
对于镜像的存储并没有什么特别的,用户只需要了解镜像具体的存储目录即可,必要时可以选择不同的后台存储,只
需要配置一下glance-api.conf的相关关键字的值即可。
=============================================================
接下来我们看一下通过镜像创建的虚拟机实例的相关内容。
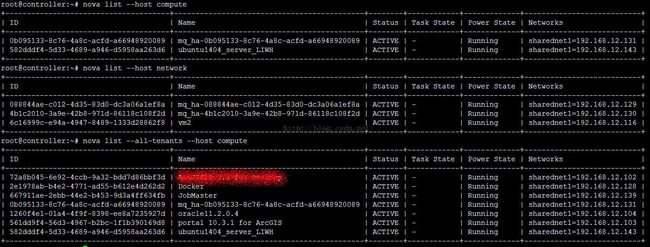
1、查看OpenStack环境下所创建的虚拟机实例的列表
通过nova list可以查看,不过由于用户可能创建多个租户(tenants),如果需要查看所有需要添加--all-tenants参数
,如果需要查看某个计算节点的所有实例,就需要添加--host参数
2、我们以计算节点compute为例,查看一下这些虚拟机实例具体的存储位置/var/lib/nova/instances
root@compute:/var/lib/nova/instances# ll
total 52
drwxr-xr-x 12 nova nova 4096 Dec 28 15:32 ./
drwxr-xr-x 13 nova nova 4096 Dec  2 10:25 ../
drwxr-xr-x  2 nova nova 4096 Dec  7 16:21 0b095133-8c76-4a8c-acfd-a66948920089/
drwxr-xr-x  2 nova nova 4096 Dec  1 15:31 1260f4e1-01a4-4f9f-8398-ee8a7235927d/
drwxr-xr-x  2 nova nova 4096 Dec  7 16:02 2e1978ab-b4e2-4771-ad55-b612e4d262d2/
drwxrwxr-x  2 nova nova 4096 Dec  2 18:06 561dd9f4-56d3-4967-b2bc-1f1b390169d8/
drwxr-xr-x  2 nova nova 4096 Dec 31 14:01 582dddf4-5d33-4689-a946-d5958aa263d6/
drwxr-xr-x  2 nova nova 4096 Dec 18 11:03 667911ae-2ebb-44e2-b453-9d3a4ff634fb/
drwxr-xr-x  2 nova nova 4096 Dec  1 10:52 72a8b045-6e92-4ccb-9a32-bdd7d86bbf3d/
drwxr-xr-x  2 nova nova 4096 Dec 29 15:22 _base/
-rw-r--r--  1 nova nova   30 Dec 31 14:03 compute_nodes
drwxr-xr-x  2 nova nova 4096 Dec 25 11:29 locks/
drwxr-xr-x  2 nova nova 4096 Jun 26  2015 snapshots/
接下来任意选取某个虚拟机实例文件夹,查看一下详细目录
root@compute:/var/lib/nova/instances/2e1978ab-b4e2-4771-ad55-b612e4d262d2# ll
total 1090852
drwxr-xr-x  2 nova         nova       4096 Dec  7 16:02 ./
drwxr-xr-x 12 nova         nova       4096 Dec 28 15:32 ../
-rw-rw----  1 libvirt-qemu kvm           0 Dec 21 08:43 console.log
-rw-r--r--  1 libvirt-qemu kvm  1116864512 Dec 31 14:17 disk
-rw-r--r--  1 nova         nova        162 Dec  7 16:02 disk.info
-rw-r--r--  1 libvirt-qemu kvm      197120 Dec  7 16:02 disk.swap
-rw-r--r--  1 nova         nova       1873 Dec 21 08:43 libvirt.xml
这里面包含一个disk文件,还有一个重要的libvirt.xml,由于OpenStack使用的KVM,一般通过libvirt来对多源
hypervisor进行管理,所以我们创建的虚拟机都可以通过修改libvirt.xml配置文件来查看信息
root@compute:/var/lib/nova/instances/2e1978ab-b4e2-4771-ad55-b612e4d262d2# cat libvirt.xml
<domain type="kvm">
  <uuid>2e1978ab-b4e2-4771-ad55-b612e4d262d2</uuid>
  <name>instance-00000113</name>
  <memory>4194304</memory>
  <vcpu>4</vcpu>
  <sysinfo type="smbios">
    <system>
      <entry name="manufacturer">OpenStack Foundation</entry>
      <entry name="product">OpenStack Nova</entry>
      <entry name="version">2014.1.3</entry>
      <entry name="serial">00efeb7b-3fb8-dc11-aef8-bcee7be344ef</entry>
      <entry name="uuid">2e1978ab-b4e2-4771-ad55-b612e4d262d2</entry>
    </system>
  </sysinfo>
  <os>
    <type>hvm</type>
    <boot dev="hd"/>
    <smbios mode="sysinfo"/>
  </os>
  <features>
    <acpi/>
    <apic/>
  </features>
  <clock offset="utc">
    <timer name="pit" tickpolicy="delay"/>
    <timer name="rtc" tickpolicy="catchup"/>
    <timer name="hpet" present="no"/>
  </clock>
  <cpu mode="host-model" match="exact"/>
  <devices>
    <disk type="file" device="disk">
      <driver name="qemu" type="qcow2" cache="none"/>
      <source file="/var/lib/nova/instances/2e1978ab-b4e2-4771-ad55-b612e4d262d2/disk"/>
      <target bus="virtio" dev="vda"/>
    </disk>
    <disk type="file" device="disk">
      <driver name="qemu" type="qcow2" cache="none"/>
      <source file="/var/lib/nova/instances/2e1978ab-b4e2-4771-ad55-b612e4d262d2/disk.swap"/>
      <target bus="virtio" dev="vdb"/>
    </disk>
    <interface type="bridge">
      <mac address="fa:16:3e:30:ef:bf"/>
      <model type="virtio"/>
      <source bridge="qbr22e7133a-ef"/>
      <target dev="tap22e7133a-ef"/>
    </interface>
    <serial type="file">
      <source path="/var/lib/nova/instances/2e1978ab-b4e2-4771-ad55-b612e4d262d2/console.log"/>
    </serial>
    <serial type="pty"/>
    <input type="tablet" bus="usb"/>
    <graphics type="spice" autoport="yes" keymap="en-us" listen="0.0.0.0"/>
    <video>
      <model type="qxl"/>
    </video>
  </devices>
</domain>
从这个XML我们可以看到相关OpenStack的版本,虚拟机的格式,网络信息,qemu的外设信息等。
接下来我们查看一下某个虚拟机实例的大小(实际占用的物理磁盘大小),由于我们的虚拟机为docker虚拟机,
格式为qcow2,我们直接查看disk文件
root@compute:/var/lib/nova/instances/2e1978ab-b4e2-4771-ad55-b612e4d262d2# qemu-img info disk
image: disk
file format: qcow2
virtual size: 120G (128849018880 bytes)
disk size: 1.0G
cluster_size: 65536
backing file: /var/lib/nova/instances/_base/6ddc6b9b411ee235dd5df14264418b011826b5bb
Format specific information:
    compat: 1.1
    lazy refcounts: false
我们可以看到,disk文件只占用了1GB,但是这个文件还基于一个back file,具体路径为......
继续查看该back file
root@compute:/var/lib/nova/instances/_base# qemu-img info 6ddc6b9b411ee235dd5df14264418b011826b5bb
image: 6ddc6b9b411ee235dd5df14264418b011826b5bb
file format: raw
virtual size: 120G (128849018880 bytes)
disk size: 8.5G
两者的总和8.5GB+1GB才是docker的实际物理占用空间,但是我们也看到了虚拟设置的最大存储空间为120GB。
至于为什么看到相关虚拟机实例的文件并不是一个文件,这是由于qcow2格式决定的,详细可以参考更多的介绍
http://blog.chinaunix.net/xmlrpc.php?r=blog/article&id=4326024&uid=26299634
总结
了解镜像及虚拟机存储目录是非常有必要的,一方面我们可以使用更加高级的存储技术来保证虚拟机的高可用,另外
也可以通过技术手段,利用现有的物理文件对虚拟机进行实例恢复!


