This is another complete Spring MVC tutorial which accepts file on Upload form and copy it to specificfolder on “Submit” event. As usual we have a dependency on Hello World Spring MVC Example.

So, these are the additions / changes we need to perform in this example:
- New file: CrunchifyFileUploadController.java
- New file: CrunchifyFileUpload.java
- New file: uploadfile.jsp
- New file: uploadfilesuccess.jsp
- Modified file: crunchify-servlet.xml
- 2 new jar files:
commons-io-2.4.jarandcommons-fileupload-1.3.jar
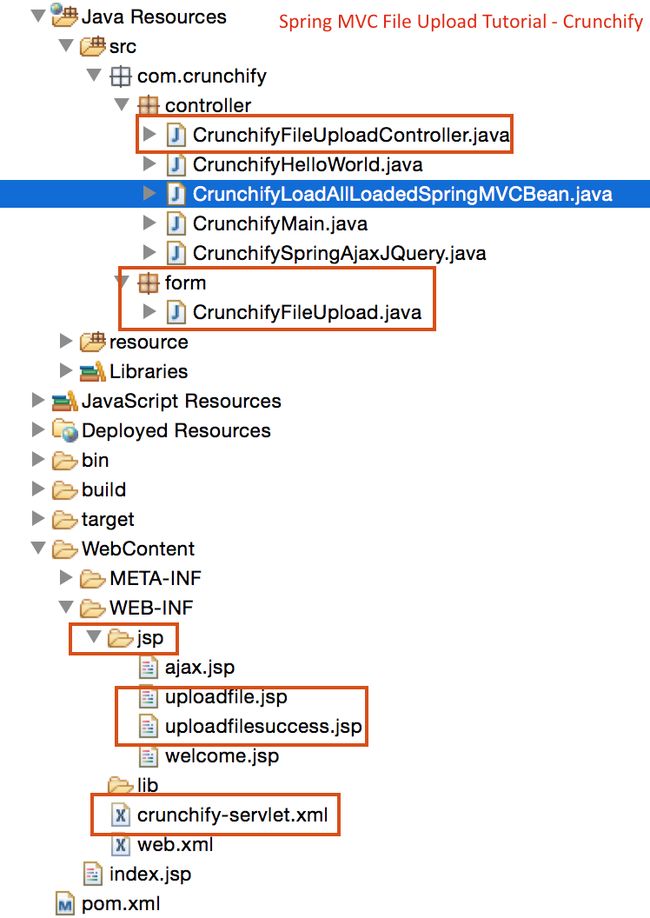
Here is a final project structure so you will get some idea on where to add files.
Now let’s get started:
Step1: Pre-Requisite:
http://crunchify.com/hello-world-example-spring-mvc-3-2-1/ (Deploy this project successfully onTomcat)
Maven Dependencies:
Add below new dependencies to your project’s pom.xml file.
|
1
2
3
4
5
6
7
8
9
10
|
<
dependency
>
<
groupId
>
commons
-
fileupload
<
/
groupId
>
<
artifactId
>
commons
-
fileupload
<
/
artifactId
>
<
version
>
1.2
<
/
version
>
<
/
dependency
>
<
dependency
>
<
groupId
>
commons
-
io
<
/
groupId
>
<
artifactId
>
commons
-
io
<
/
artifactId
>
<
version
>
1.4
<
/
version
>
<
/
dependency
>
|
Step2: SpringController
Create a Spring 3 MVC based controller which handles file upload. There are two methods in thiscontroller:
crunchifyDisplayForm– It simply forwards request to the pageuploadfile.jspcrunchifySave– Fetches the form using@ModelAttributeannotation and get the File content from it. It creates a list of filenames of files being uploaded and pass this list to success page.
|
1
2
3
4
5
6
7
8
9
10
11
12
13
14
15
16
17
18
19
20
21
22
23
24
25
26
27
28
29
30
31
32
33
34
35
36
37
38
39
40
41
42
43
44
45
46
47
48
49
50
51
|
package
com
.
crunchify
.
controller
;
import
com
.
crunchify
.
form
.
CrunchifyFileUpload
;
import
java
.
io
.
File
;
import
java
.
io
.
IOException
;
import
java
.
util
.
ArrayList
;
import
java
.
util
.
List
;
import
org
.
springframework
.
stereotype
.
Controller
;
import
org
.
springframework
.
ui
.
Model
;
import
org
.
springframework
.
web
.
bind
.
annotation
.
ModelAttribute
;
import
org
.
springframework
.
web
.
bind
.
annotation
.
RequestMapping
;
import
org
.
springframework
.
web
.
bind
.
annotation
.
RequestMethod
;
import
org
.
springframework
.
web
.
multipart
.
MultipartFile
;
@Controller
public
class
CrunchifyFileUploadController
{
@RequestMapping
(
value
=
"/upload"
,
method
=
RequestMethod
.
GET
)
public
String
crunchifyDisplayForm
(
)
{
return
"uploadfile"
;
}
@RequestMapping
(
value
=
"/savefiles"
,
method
=
RequestMethod
.
POST
)
public
String
crunchifySave
(
@ModelAttribute
(
"uploadForm"
)
CrunchifyFileUpload
uploadForm
,
Model
map
)
throws
IllegalStateException
,
IOException
{
String
saveDirectory
=
"c:/crunchify/"
;
List
<MultipartFile>
crunchifyFiles
=
uploadForm
.
getFiles
(
)
;
List
<String>
fileNames
=
new
ArrayList
<String>
(
)
;
if
(
null
!=
crunchifyFiles
&&
crunchifyFiles
.
size
(
)
>
0
)
{
for
(
MultipartFile
multipartFile
:
crunchifyFiles
)
{
String
fileName
=
multipartFile
.
getOriginalFilename
(
)
;
if
(
!
""
.
equalsIgnoreCase
(
fileName
)
)
{
// Handle file content - multipartFile.getInputStream()
multipartFile
.
transferTo
(
new
File
(
saveDirectory
+
fileName
)
)
;
fileNames
.
add
(
fileName
)
;
}
}
}
map
.
addAttribute
(
"files"
,
fileNames
)
;
return
"uploadfilesuccess"
;
}
}
|
Step3: Model – Form Object
Create a Java bean which acts as Model/Form object for our Spring application. This bean contains a List of org.springframework.web.multipart.MultipartFile objects. Spring framework provides a useful class MultipartFile which can be used to fetch the file content of uploaded file. Apart from its content, the MultipartFile object also gives you other useful information such as filename, file size etc.
|
1
2
3
4
5
6
7
8
9
10
11
12
13
14
15
16
17
|
package
com
.
crunchify
.
form
;
import
java
.
util
.
List
;
import
org
.
springframework
.
web
.
multipart
.
MultipartFile
;
public
class
CrunchifyFileUpload
{
private
List
<MultipartFile>
crunchifyFiles
;
public
List
<MultipartFile>
getFiles
(
)
{
return
crunchifyFiles
;
}
public
void
setFiles
(
List
<MultipartFile>
files
)
{
this
.
crunchifyFiles
=
files
;
}
}
|
Step4: JSP Views
Now create the view pages for this application. We will need two JSPs, one to display file upload form and another to show result on successful upload.
The uploadfile.jsp displays a form with file input. Apart from this we have added small jquery snippetonclick of Add button. This will add a new file input component at the end of form. This allows user toupload as many files as they want.
Note that we have set enctype=”multipart/form-data” attribute of our <form> tag.
|
1
2
3
4
5
6
7
8
9
10
11
12
13
14
15
16
17
18
19
20
21
22
23
24
25
26
27
28
29
30
31
32
33
34
35
36
37
38
39
40
41
42
43
44
45
46
47
48
49
50
51
52
53
54
55
56
57
58
59
60
61
|
<%
@taglib
uri
=
"http://www.springframework.org/tags/form"
prefix
=
"form"
%>
<
html
>
<
head
>
<
title
>
Crunchify
-
Spring
MVC
Upload
Multiple
Files
Example
<
/
title
>
<script
src
=
"http://ajax.googleapis.com/ajax/libs/jquery/1.8.2/jquery.min.js"
>
</script>
<script>
$
(
document
)
.
ready
(
function
(
)
{
//add more file components if Add is clicked
$
(
'#addFile'
)
.
click
(
function
(
)
{
var
fileIndex
=
$
(
'#fileTable tr'
)
.
children
(
)
.
length
-
1
;
$
(
'#fileTable'
)
.
append
(
'<tr><td>'
+
' <input type="file" name="files['
+
fileIndex
+
']" />'
+
'</td></tr>'
)
;
}
)
;
}
)
;
</script>
<style
type
="text/css">
body
{
background-image
:
url
(
'http://cdn3.crunchify.com/wp-content/uploads/2013/03/Crunchify.bg_.300.png'
)
;
}
</style>
<
/
head
>
<
body
>
<
br
>
<
br
>
<
div
align
=
"center"
>
<
h1
>
Crunchify
-
Spring
MVC
Upload
Multiple
Files
Example
<
/
h1
>
<
form
:
form
method
=
"post"
action
=
"savefiles.html"
modelAttribute
=
"uploadForm"
enctype
=
"multipart/form-data"
>
<
p
>
Select
files
to
upload
.
Press
Add
button
to
add
more
file
inputs
.
<
/
p
>
<
table
id
=
"fileTable"
>
<
tr
>
<
td
>
<
input
name
=
"files[0]"
type
=
"file"
/
>
<
/
td
>
<
/
tr
>
<
tr
>
<
td
>
<
input
name
=
"files[1]"
type
=
"file"
/
>
<
/
td
>
<
/
tr
>
<
/
table
>
<
br
/
>
<
input
type
=
"submit"
value
=
"Upload"
/
>
<
input
id
=
"addFile"
type
=
"button"
value
=
"Add File"
/
>
<
/
form
:
form
>
<
br
/
>
<
/
div
>
<
/
body
>
<
/
html
>
|
|
1
2
3
4
5
6
7
8
9
10
11
12
13
14
15
16
17
18
19
20
21
22
23
24
25
26
27
28
29
30
31
32
33
34
35
36
37
38
|
<%
@taglib
uri
=
"http://java.sun.com/jsp/jstl/core"
prefix
=
"c"
%>
<
html
>
<
head
>
<
title
>
Crunchify
-
Upload
Multiple
Files
Example
<
/
title
>
<style
type
="text/css">
body
{
background-image
:
url
(
'http://cdn3.crunchify.com/wp-content/uploads/2013/03/Crunchify.bg_.300.png'
)
;
}
</style>
<
/
head
>
<
body
>
<
br
>
<
br
>
<
div
align
=
"center"
>
<
h1
>
Crunchify
-
Spring
MVC
Upload
Multiple
Files
Example
<
/
h1
>
<
p
>
Awesome
.
.
Following
files
are
uploaded
successfully
.
<
/
p
>
<
ol
>
<
c
:
forEach
items
=
"${files}"
var
=
"file"
>
-
$
{
file
}
<
br
>
<
/
c
:
forEach
>
<
/
ol
>
<
a
href
=
"http://localhost:8080/CrunchifySpringMVC3.2.1/upload.html"
>
<
input
type
=
"button"
value
=
"Go Back"
/
>
<
/
a
>
<
br
/
>
<
br
/
>
<
br
/
>
<
div
style
=
"font-family: verdana; line-height: 25px; padding: 5px 10px; border-radius: 10px; border: 1px dotted #A4A4A4; width: 50%; font-size: 12px;"
>
Spring
MVC
Upload
Multiple
Files
Example
by
<
a
href
=
'http://crunchify.com'
>
Crunchify
<
/
a
>
.
Click
<
a
href
=
'http://crunchify.com/category/java-web-development-tutorial/'
>
here
<
/
a
>
for
all
Java
,
Spring
MVC
,
Web
Development
examples
.
<
br
>
<
/
div
>
<
/
div
>
<
/
body
>
<
/
html
>
|
Step5: Update Spring Configuration
Add below bean to crunchify-servlet.xml file, just above <beanid="viewResolver" class="org.springframework.web.servlet.view.UrlBasedViewResolver"> line.
|
1
2
|
<
bean
id
=
"multipartResolver"
class
=
"org.springframework.web.multipart.commons.CommonsMultipartResolver"
/
>
|
Step6: Checkout Result
Start tomcat and point your browser to this URL: http://localhost:8080/CrunchifySpringMVC3.2.1/upload.html and you should see screen similar tothis.

After file upload you will see success message like this. You can always beautify your .jsp file the wayyou want.
List of all Spring MVC Examples, Java Examples.