【SSH项目实战】国税协同平台-21.PowerDesigner概念、物理模型
我们之前做的都是先建实体类再去创建表(或者是hibernate自动生成表),有一个概念叫“逆向工程”,就是先创建表,再由表来生成相应的实体类和映射文件。
在讲“逆向工程”之前,我们先学一个数据库模型设计工具,做“PowerDesigner”,是设计实体以及实体之间的关系的,而且可以生成数据库建表语句的工具。
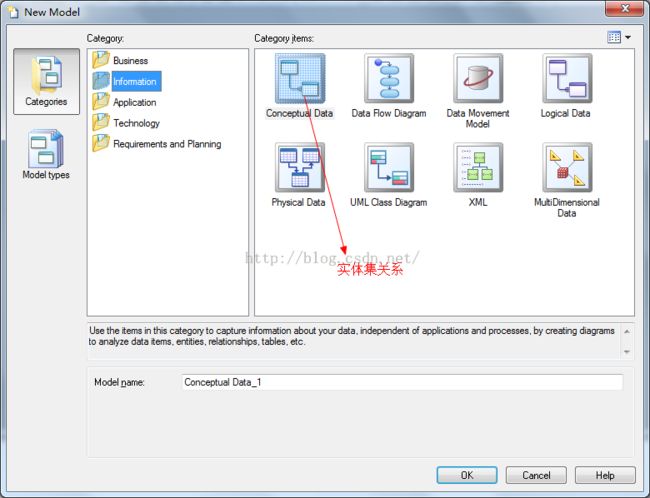
我们打开PowerDesigner,创建一个“概念模型”,实体集关系表:
然后介绍一下侧面的工具:
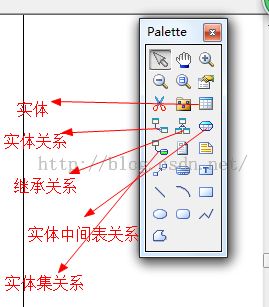
上面常用的就这几个
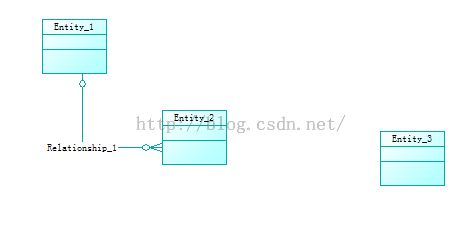
我们创建几个实体和关系:
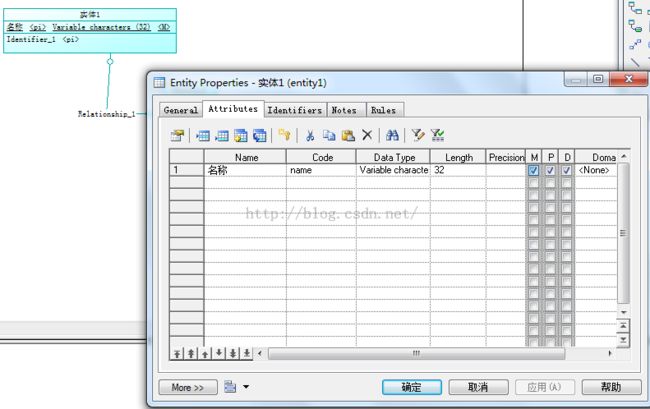
双击某一个实体之后我们可以看到下面的对话框,然后可以修改实体的名字、数据库表的名字

然后我们在Attribute中设置我们的表单的数据,这个可以从我们的需求分析中获取相应的字段来设置到里面:
双击我们的实体集关系,我们可以设置他们的关系:

我们在Cardinalities可以设置他们的关系为“几对几”:

我们下面开设编写一个“人员组织架构”的概念模型,设置实体之间的关系,最后生成sql语句,以此来熟悉PowerDesigner的操作。
我们的人员组织架构详情:
机构(id,名称)
部门(id,名称):一个机构有多个部门
人员(id,名称):一个人员属于一个部门,一个部门下有多个人员
领导:领导也是人员
角色(id,名称):一个角色可以对应多个人员,一个人员有多个角色
权限(id,名称):一个角色可以有多个权限,一个权限对应多个角色
平常开发我们是从需求中分析出这些实体的。
下面我们打开PowerDesigner开始画这些实体:
我们创建了概念模型之后,画出那6个实体,然后逐个写他们的属性值:
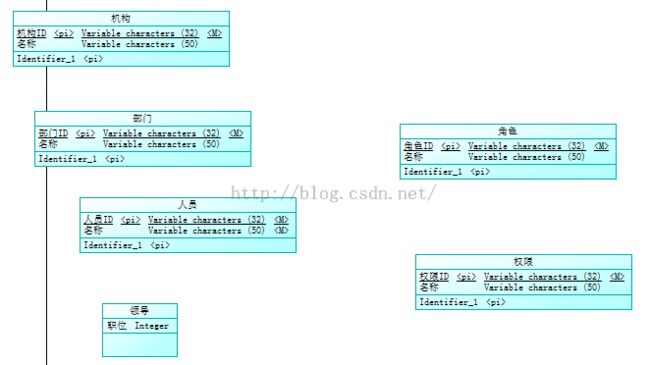
我们实体写完之后要分析他们的关系,并设置关系:
首先是机构和部门,是一对多的关系:
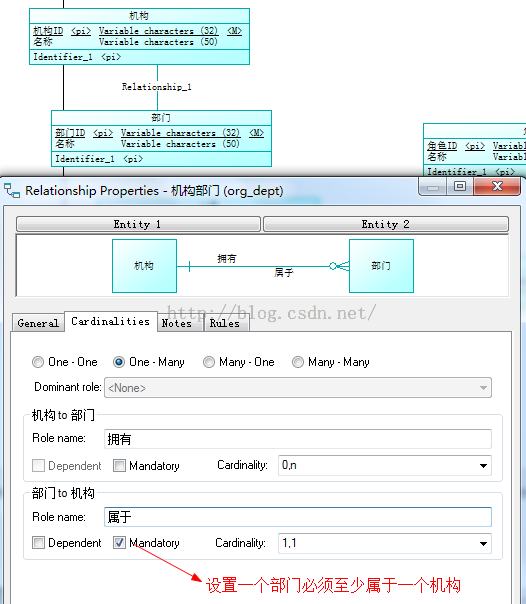
结果:

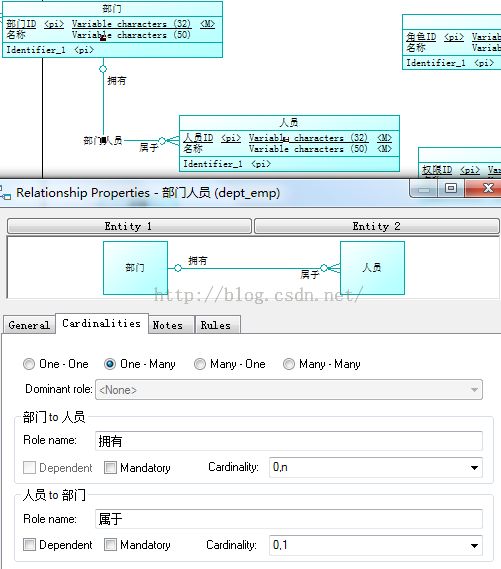
然后是部门和人员的关系:
然后领导和人员的关系(属于继承关系):

然后人员与角色的关系是需要一张中间表的,我们来设置这个中间表:
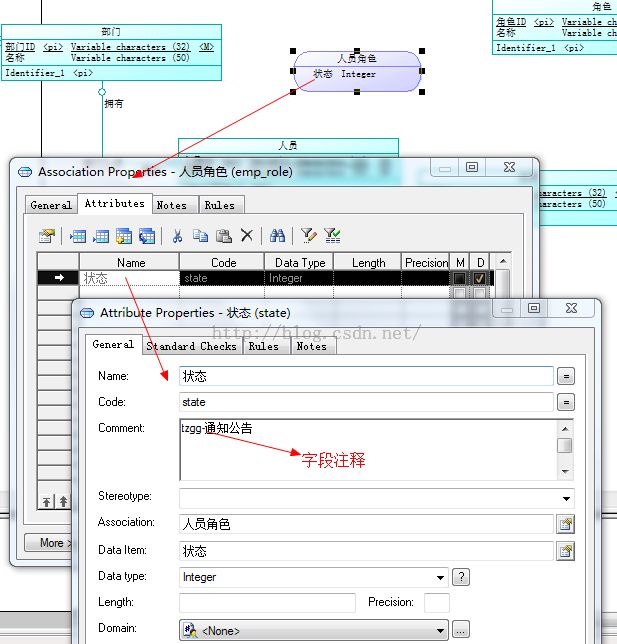
之后连线并设置关系:

最后,我们设置权限和角色的关系:
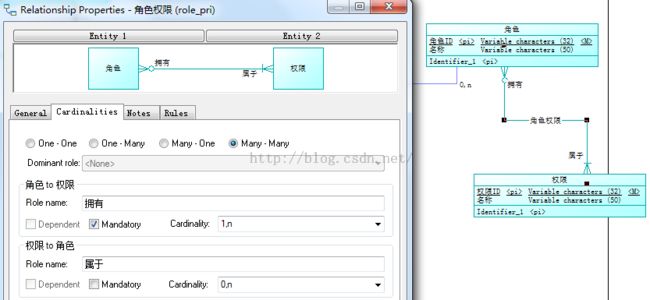
我们的实体和实体之间的关系都设置成功了,我们下面将概念模型生成物理模型:
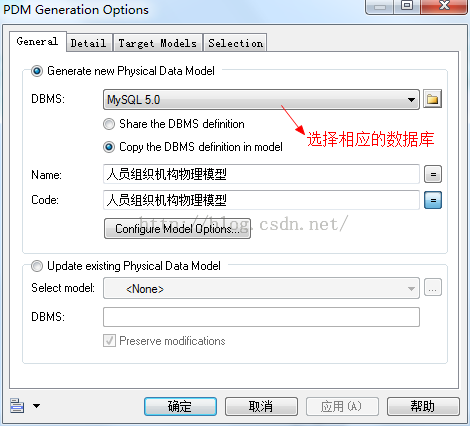
点击工具(Tools)-->Generate Physical Data Model...
然后弹出以下操作框:
我们可以看到重新生成的物理模型:

与之前有何区别呢?这个是实实在在的表关系,可以拿来在数据库建表的。
我们想获取某一个表的建表语句,就可以点击这个实体,然后点击“Preview”,就可以看到建表语句了:
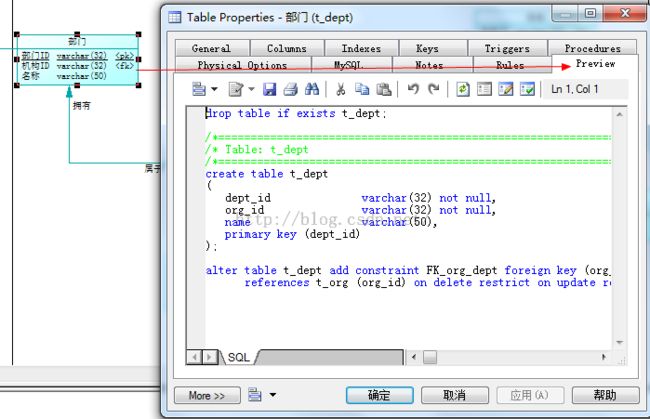
我们下面利用sql语句建表
首先点击PowerDesign的“Database”(数据库)选项,然后选择“Generate Database”,之后出现如下操作框:
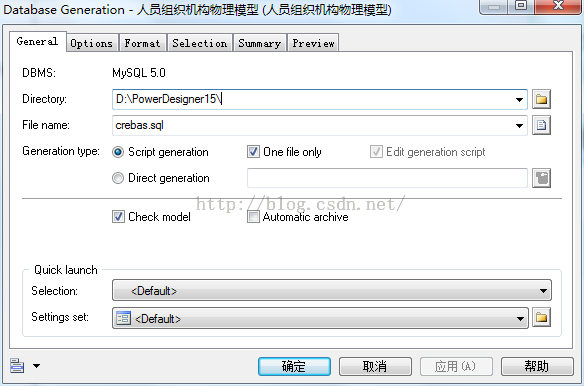
点击确定,在相应文件夹会导出sql文件,我们在D:\PowerDesigner15下找到了crebas.sql文件,内容如下:
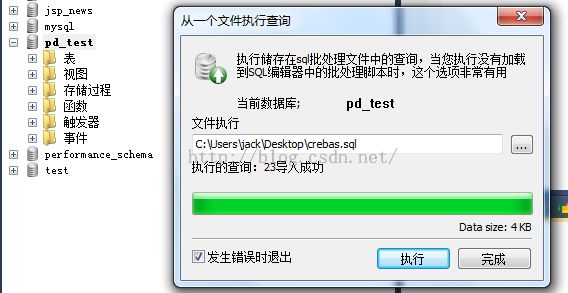
然后我们使用这个sql文件,在Mysql的图形化管理工具Sqlyog建立数据库“pd_test”,并下导入这个sql文件,会成功创建相应表:
表导入成功
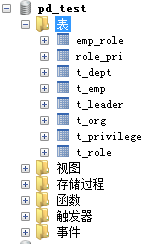
至此我们的PowerDesign使用和导入表成功。
在讲“逆向工程”之前,我们先学一个数据库模型设计工具,做“PowerDesigner”,是设计实体以及实体之间的关系的,而且可以生成数据库建表语句的工具。
我们打开PowerDesigner,创建一个“概念模型”,实体集关系表:

然后介绍一下侧面的工具:

上面常用的就这几个
我们创建几个实体和关系:

双击某一个实体之后我们可以看到下面的对话框,然后可以修改实体的名字、数据库表的名字

然后我们在Attribute中设置我们的表单的数据,这个可以从我们的需求分析中获取相应的字段来设置到里面:

双击我们的实体集关系,我们可以设置他们的关系:

我们在Cardinalities可以设置他们的关系为“几对几”:

我们下面开设编写一个“人员组织架构”的概念模型,设置实体之间的关系,最后生成sql语句,以此来熟悉PowerDesigner的操作。
我们的人员组织架构详情:
机构(id,名称)
部门(id,名称):一个机构有多个部门
人员(id,名称):一个人员属于一个部门,一个部门下有多个人员
领导:领导也是人员
角色(id,名称):一个角色可以对应多个人员,一个人员有多个角色
权限(id,名称):一个角色可以有多个权限,一个权限对应多个角色
平常开发我们是从需求中分析出这些实体的。
下面我们打开PowerDesigner开始画这些实体:
我们创建了概念模型之后,画出那6个实体,然后逐个写他们的属性值:

我们实体写完之后要分析他们的关系,并设置关系:
首先是机构和部门,是一对多的关系:

结果:

然后是部门和人员的关系:

然后领导和人员的关系(属于继承关系):

然后人员与角色的关系是需要一张中间表的,我们来设置这个中间表:

之后连线并设置关系:

最后,我们设置权限和角色的关系:

我们的实体和实体之间的关系都设置成功了,我们下面将概念模型生成物理模型:
点击工具(Tools)-->Generate Physical Data Model...
然后弹出以下操作框:

我们可以看到重新生成的物理模型:

与之前有何区别呢?这个是实实在在的表关系,可以拿来在数据库建表的。
我们想获取某一个表的建表语句,就可以点击这个实体,然后点击“Preview”,就可以看到建表语句了:

我们下面利用sql语句建表
首先点击PowerDesign的“Database”(数据库)选项,然后选择“Generate Database”,之后出现如下操作框:

点击确定,在相应文件夹会导出sql文件,我们在D:\PowerDesigner15下找到了crebas.sql文件,内容如下:
/*==============================================================*/
/* DBMS name:      MySQL 5.0                                    */
/* Created on:     2015/11/10 12:39:35                          */
/*==============================================================*/


drop table if exists emp_role;


drop table if exists role_pri;


drop table if exists t_dept;


drop table if exists t_emp;


drop table if exists t_leader;


drop table if exists t_org;


drop table if exists t_privilege;


drop table if exists t_role;


/*==============================================================*/
/* Table: emp_role                                              */
/*==============================================================*/
create table emp_role
(
   emp_id               varchar(32) not null,
   role_id              varchar(32) not null,
   state                int,
   primary key (emp_id, role_id)
);


/*==============================================================*/
/* Table: role_pri                                              */
/*==============================================================*/
create table role_pri
(
   role_id              varchar(32) not null,
   pin_id               varchar(32) not null,
   primary key (role_id, pin_id)
);


/*==============================================================*/
/* Table: t_dept                                                */
/*==============================================================*/
create table t_dept
(
   dept_id              varchar(32) not null,
   org_id               varchar(32) not null,
   name                 varchar(50),
   primary key (dept_id)
);


/*==============================================================*/
/* Table: t_emp                                                 */
/*==============================================================*/
create table t_emp
(
   emp_id               varchar(32) not null,
   dept_id              varchar(32),
   name                 varchar(50) not null,
   primary key (emp_id)
);


/*==============================================================*/
/* Table: t_leader                                              */
/*==============================================================*/
create table t_leader
(
   emp_id               varchar(32) not null,
   dept_id              varchar(32),
   name                 varchar(50) not null,
   position             int,
   primary key (emp_id)
);


/*==============================================================*/
/* Table: t_org                                                 */
/*==============================================================*/
create table t_org
(
   org_id               varchar(32) not null,
   name                 varchar(50),
   primary key (org_id)
);


/*==============================================================*/
/* Table: t_privilege                                           */
/*==============================================================*/
create table t_privilege
(
   pin_id               varchar(32) not null,
   name                 varchar(50),
   primary key (pin_id)
);


/*==============================================================*/
/* Table: t_role                                                */
/*==============================================================*/
create table t_role
(
   role_id              varchar(32) not null,
   name                 varchar(50),
   primary key (role_id)
);


alter table emp_role add constraint FK_emp_role foreign key (emp_id)
      references t_emp (emp_id) on delete restrict on update restrict;


alter table emp_role add constraint FK_emp_role2 foreign key (role_id)
      references t_role (role_id) on delete restrict on update restrict;


alter table role_pri add constraint FK_belong foreign key (role_id)
      references t_role (role_id) on delete restrict on update restrict;


alter table role_pri add constraint FK_own foreign key (pin_id)
      references t_privilege (pin_id) on delete restrict on update restrict;


alter table t_dept add constraint FK_org_dept foreign key (org_id)
      references t_org (org_id) on delete restrict on update restrict;


alter table t_emp add constraint FK_dept_emp foreign key (dept_id)
      references t_dept (dept_id) on delete restrict on update restrict;


alter table t_leader add constraint FK_extends foreign key (emp_id)
      references t_emp (emp_id) on delete restrict on update restrict;
然后我们使用这个sql文件,在Mysql的图形化管理工具Sqlyog建立数据库“pd_test”,并下导入这个sql文件,会成功创建相应表:

表导入成功

至此我们的PowerDesign使用和导入表成功。
下一此我们将使用“逆向工程”来生成相应的Java实体类以及映射文件。
转载请注明出处:http://blog.csdn.net/acmman/article/details/49778379