HBase单机环境搭建及入门
一、安装环境
1、 VM:VMware-workstationl-v7.1.4
2、 OS:ubuntu-11.04
3、 JDK:jdk1.6.0_27
4、 HBase:hbase-0.90.4.tar.gz
二、下载并解压HBase发行包
1、本文使用HBase稳定版:hbase-0.90.4.tar.gz。其下载地址:
http://www.apache.org/dyn/closer.cgi/hbase/
2、将hbase-0.90.4.tar.gz放入自己选好的文件夹下,解压。Shell命令如下:
$ tar xfz hbase-0.90.4.tar.gz
$ cd hbase-0.90.4
三、修改HBase配置文件
1、 hbase-env.sh
取消配置JDK的注释并做并如下修改(我的JDK安装路径):
export JAVA_HOME=/usr/java/jdk1.6.0_27/
2、 hbase-site.xml
因为是单机启动,所以只设定了HBase写入的本地路径,修改如下:
<?xml version="1.0"?>
<?xml-stylesheet type="text/xsl" href="configuration.xsl"?>
<configuration>
<property>
<name>hbase.rootdir</name>
<value>/home/hbase</value>
</property>
</configuration>
四、启动HBase
root@ubuntu:/usr/hbase/hbase-0.90.4# bin/start-hbase.sh
starting master, logging to /usr/hbase/hbase-0.90.4/bin/../logs/hbase-root-master-ubuntu.out
五、Shell实践
1、用shell来连接HBase.
root@ubuntu:/usr/hbase/hbase-0.90.4# bin/hbase shell
HBase Shell; enter 'help<RETURN>' for list of supported commands.
Type "exit<RETURN>" to leave the HBase Shell
Version 0.90.4, r1150278, Sun Jul 24 15:53:29 PDT 2011
3、 建表操作演示
hbase(main):004:0> create 'table1','col1'
0 row(s) in 1.1070 seconds
hbase(main):005:0> list
TABLE
table1
test1
2 row(s) in 0.0210 seconds
hbase(main):006:0> put 'table1','row1','col1:a','value1'
0 row(s) in 0.2710 seconds
hbase(main):008:0> put 'table1','row2','col1:b','value2'
0 row(s) in 0.0090 seconds
hbase(main):009:0> put 'table1','row3','col1:c','value3'
0 row(s) in 0.0070 seconds
hbase(main):010:0>
4、 用scan查看表所有数据
hbase(main):010:0> scan 'table1'
ROW COLUMN+CELL
row1 column=col1:a, timestamp=1317180621803, value=value1
row2 column=col1:b, timestamp=1317180679999, value=value2
row3 column=col1:c, timestamp=1317180708854, value=value3
3 row(s) in 0.0570 seconds
5、 用get查看单行数据
hbase(main):011:0> get 'table1','row1'
COLUMN CELL
col1:a timestamp=1317180621803, value=value1
1 row(s) in 0.0160 seconds
6、 用disable和drop删除表
hbase(main):017:0> disable 'table1'
0 row(s) in 2.0470 seconds
hbase(main):018:0> drop 'table1'
0 row(s) in 0.0960 seconds
hbase(main):019:0> list
TABLE
1 row(s) in 0.0170 seconds
六、停止HBase
root@ubuntu:/usr/hbase/hbase-0.90.4# bin/stop-hbase.sh
stopping hbase.......
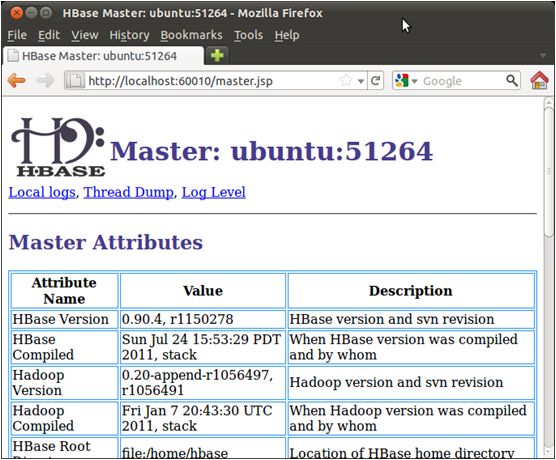
七、通过浏览器查看HBase信息
访问地址:http://localhost:60010/
效果如下:
八、启动HBase Rest服务
启动命令如下:
root@ubuntu:/usr/hbase/hbase-0.90.4# bin/hbase rest start
11/09/27 20:58:01 INFO jvm.JvmMetrics: Initializing JVM Metrics with processName=rest, sessionId=main
11/09/27 20:58:01 INFO hbase.metrics: new MBeanInfo
11/09/27 20:58:01 INFO mortbay.log: Logging to org.slf4j.impl.Log4jLoggerAdapter(org.mortbay.log) via org.mortbay.log.Slf4jLog
11/09/27 20:58:01 INFO mortbay.log: jetty-6.1.26
11/09/27 20:58:01 INFO mortbay.log: Started [email protected]:8080
测试:http://localhost:8080/
注:可以用REST操作(GET/POST/PUT/DELETE)实现对HBase的REST形式数据操作。
九、遇到的问题
hbase(main):001:0> create 'test','cf'
ERROR: org.apache.hadoop.hbase.NotAllMetaRegionsOnlineException: org.apache.hadoop.hbase.NotAllMetaRegionsOnlineException: Timed out (10000ms)
解决方法:修改/etc/hosts。把ubuntu对应的127.0.1.1改成本机的IP。OK!
十、其它
HBase下载:
http://hbase.apache.org/
HBase英文开发指南:
http://hbase.apache.org/book/book.html
