HBase 0.92.1 Scan 源码详细分析
从这篇文章开始终于要讨论比较正常版本的hbase了---0.92.1~~ ![]()
Scan是hbase提供的非常重要的功能之一,我们的hbase分析系列就从这儿开始吧。
首先,我们有一些background的知识需要了解:
1.HBase是如何区分不同记录的,大家可以参考http://punishzhou.iteye.com/blog/1266341,讲的比较详细
2.Region,MemStore,Store,StoreFile分别的含义和如何工作的,可以参考淘宝的入门文档http://www.searchtb.com/2011/01/understanding-hbase.html
3.Scan的客户端实现可以参考http://punishzhou.iteye.com/blog/1297015
4.hbase客户端如何使用scan,这个文章实在太多了,随便搜一篇吧~
在这篇文章中,我们主要focus在Scan的Server端实现。
Scan的概念是扫描数据集中[startkey,stopkey)的数据,数据必须是全体有序的,根据hbase mem+storefile的结构我们大致描述下scan的步骤:
1.准备好所有的scanner,包括memstorescanner,storefilescanner
2.将scanner放入一个prorityQueue
3.开始scan,从prorityQueue中取出当前所有scanner中最小的一个数据记录
4.如果3取出的满足结果则返回,如果不满足则从prorityQueue中取next
5.如果取出的数据记录等于stopkey或者prorityQueue为空则结束
下面开始进入实现部分。
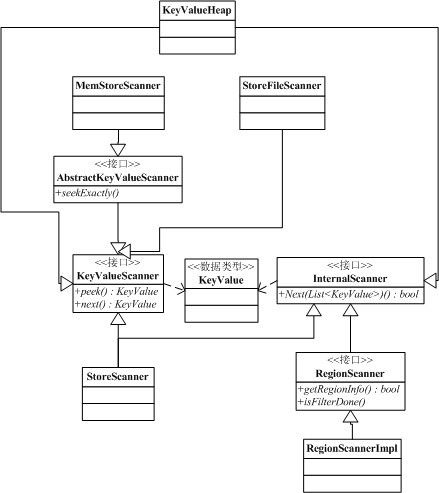
scan过程中会使用到诸多scanner,scanner类图如下:
步骤1:准备Scanner:
memstore和storefile的getScanner:
return Collections.<KeyValueScanner>singletonList(
          new MemStoreScanner());
List<StoreFileScanner> scanners = new ArrayList<StoreFileScanner>(
        files.size());
    for (StoreFile file : files) {
      StoreFile.Reader r = file.createReader();
      scanners.add(r.getStoreFileScanner(cacheBlocks, usePread, isCompaction));
    }
    return scanners;
store层的getScanner:对memstore和storefile分别判断是否满足scan的条件,包括时间,是否支持bloomfilter
List<KeyValueScanner> allStoreScanners =
        this.store.getScanners(cacheBlocks, isGet, false);

    List<KeyValueScanner> scanners =
        new ArrayList<KeyValueScanner>(allStoreScanners.size());

    // include only those scan files which pass all filters
    for (KeyValueScanner kvs : allStoreScanners) {
      if (kvs instanceof StoreFileScanner) {
        if (memOnly == false
            && ((StoreFileScanner) kvs).shouldSeek(scan, columns)) {
          scanners.add(kvs);
        }
      } else {
        // kvs is a MemStoreScanner
        if (filesOnly == false && this.store.memstore.shouldSeek(scan)) {
          scanners.add(kvs);
        }
      }
    }
Store层:获取store的scanner们,seekExactly检查是否符合我们scan的column,scanner.seek调用memscanner或者storefilescanner的seek,检查我们查询的startkey是否在当前的scanner范围中,过滤掉不需要搜索的查询,其中,storefilescanner会使用bloomfilter来seek。当收集到当前store的scanner们后会构建store层的KeyValueHeap。
// pass columns = try to filter out unnecessary ScanFiles
    List<KeyValueScanner> scanners = getScanners(scan, columns);

    // Seek all scanners to the start of the Row (or if the exact matching row
    // key does not exist, then to the start of the next matching Row).
    if (matcher.isExactColumnQuery()) {
      for (KeyValueScanner scanner : scanners)
        scanner.seekExactly(matcher.getStartKey(), false);
    } else {
      for (KeyValueScanner scanner : scanners)
        scanner.seek(matcher.getStartKey());
    }

    // Combine all seeked scanners with a heap
    heap = new KeyValueHeap(scanners, store.comparator);
region层:将store中的scanner中取出来放到scanners里,并创建RegionScanner的KeyValueHeap
for (Map.Entry<byte[], NavigableSet<byte[]>> entry :
          scan.getFamilyMap().entrySet()) {
        Store store = stores.get(entry.getKey());
        StoreScanner scanner = store.getScanner(scan, entry.getValue());
        scanners.add(scanner);
      }
      this.storeHeap = new KeyValueHeap(scanners, comparator);
是不是已经被诸多scanner看晕了,这边先梳理下思路:
- memscanner和storefilescanner为直接数据交互的scanner,因此继承KeyValueScanner接口,每次next读取一个KeyValue对象
- storescanner管理里面的memscanner和storefilescanner,并且将所有的scanner放到一个KeyValueHeap内,KeyValueHeap会保证每次next都会取Store中满足条件的最小值
- regionscanner类似storescanner,管理所有的storescanner,并将所有的scanner放到KeyValueHeap中,作用同上
2.初始化KeyValueHeap(其实在第一部中已经做了),关键是初始化内部的PriorityQueue
this.comparator = new KVScannerComparator(comparator);
    if (!scanners.isEmpty()) {
      this.heap = new PriorityQueue<KeyValueScanner>(scanners.size(),
          this.comparator);
      for (KeyValueScanner scanner : scanners) {
        if (scanner.peek() != null) {
          this.heap.add(scanner);
        } else {
          scanner.close();
        }
      }
      this.current = heap.poll();
关于PriorityQueue可以看看http://blog.csdn.net/hudashi/article/details/6942789,内部实现了一个heap。
3.开始scan的next方法,首先,peekRow取得KeyValueHeap中当前的rowkey。这是通过current的scanner peek获得当前的rowkey,从第二部可知,KeyValueHeap刚开始时current即为heap中最小的那个
public KeyValue peek() {
    if (this.current == null) {
      return null;
    }
    return this.current.peek();
  }
4.开始取出符合当前rowkey的values
调用heap.next 循环从heap中取出相同key的不同value,直到heap取出的key不等于当前的key为止,这就表示我们已经遍历到下一个rowkey了必须停止这次next操作。
do {
            this.storeHeap.next(results, limit - results.size());
            if (limit > 0 && results.size() == limit) {
              if (this.filter != null && filter.hasFilterRow()) {
                throw new IncompatibleFilterException(
                  "Filter with filterRow(List<KeyValue>) incompatible with scan with limit!");
              }
              return true; // we are expecting more yes, but also limited to how many we can return.
            }
          } while (Bytes.equals(currentRow, nextRow = peekRow()));
heap的next方法:首先取出当前的scanner,调用next方法取出一个result塞到results里,然后peek判断这个scanner是否没数据了,如果没了就关闭,如果有就再将scanner放入heap中,再取出下一个最小的scanner
if (this.current == null) {
      return false;
    }
    InternalScanner currentAsInternal = (InternalScanner)this.current;
    boolean mayContainMoreRows = currentAsInternal.next(result, limit);
    KeyValue pee = this.current.peek();
    /*
     * By definition, any InternalScanner must return false only when it has no
     * further rows to be fetched. So, we can close a scanner if it returns
     * false. All existing implementations seem to be fine with this. It is much
     * more efficient to close scanners which are not needed than keep them in
     * the heap. This is also required for certain optimizations.
     */
    if (pee == null || !mayContainMoreRows) {
      this.current.close();
    } else {
      this.heap.add(this.current);
    }
    this.current = this.heap.poll();
    return (this.current != null);
5.对取出的results进行filter,判断是否到了stoprow,如果到了next返回false
	final boolean stopRow = isStopRow(nextRow);

          // now that we have an entire row, lets process with a filters:

          // first filter with the filterRow(List)
          if (filter != null && filter.hasFilterRow()) {
            filter.filterRow(results);
          }

          if (results.isEmpty() || filterRow()) {
            // this seems like a redundant step - we already consumed the row
            // there're no left overs.
            // the reasons for calling this method are:
            // 1. reset the filters.
            // 2. provide a hook to fast forward the row (used by subclasses)
            nextRow(currentRow);

            // This row was totally filtered out, if this is NOT the last row,
            // we should continue on.

            if (!stopRow) continue;
          }
          return !stopRow;
最后总结一下:
1.scan的实现是非常复杂的,原因主要是因为hbase在内存和硬盘中有很多颗有序树,scan时需要将多颗有序树merge成一个
2.scan.next出来的list<KeyValue>是同一个key下按照一定顺序从小到大排列的,顺序是key>column>quality>timestamp>type>maxsequenceId,然后如果是memstore,则比较memstoreTs,大的排前面,而且memstore的maxsequenceId默认是整数最大值
3.最好能指明scan的cf和quality,这样会加快速度
4.memstore的scan和storefile的scan如果有机会后面会再写文详细阐述
