android中进行布局管理界面_一、利用ListView进行布局
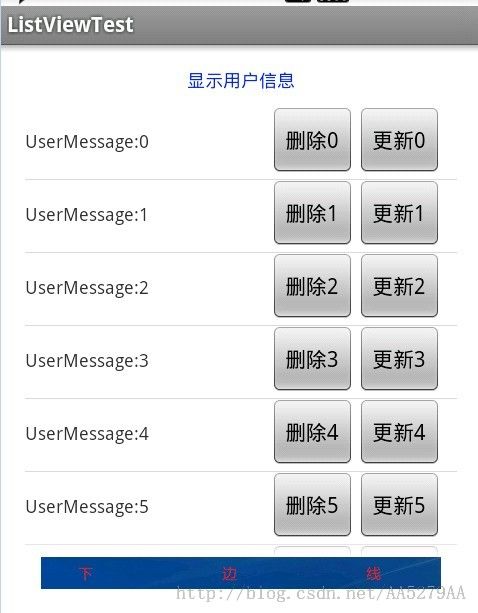
首先添加一张效果图:
UserMessge这里可以添加一些用户信息,这里我定义的是TextView,当然也可以定义成EditView这样就实现了编辑的功能。。
当然,我的本意其实是点了更新之后,TextView变为EditView,更新按钮变为确认的。
当然这些都不是本节的内容,就不多说了。
上重点:
使用ListView,在xml中定义ListView的时候其实就可以发现,ListView里面是不允许定义元素的。
我们其实可以把它想象成一个List<泛型>,只不过这里的泛型还未定义,所以自然而然的就不允许提前添加元素。
我定义的ListView的布局文件如下:
名称:list_layout.xml,放在了layout文件夹下。
<?xml version="1.0" encoding="utf-8"?>
<LinearLayout
    android:id="@+id/RelativeLayout01"
    xmlns:android="http://schemas.android.com/apk/res/android"
    android:layout_width="match_parent"
    android:layout_height="fill_parent"
    >

<TextView
    android:id="@+id/showuser"
    android:layout_width="wrap_content"
    android:layout_height="wrap_content"
    android:textSize="12sp"
    />
<Button
    android:id="@+id/deltebtn"
    android:layout_marginLeft="80dp"
    android:layout_width="wrap_content"
    android:layout_height="wrap_content"
    />
<Button
    android:id="@+id/updatebtn"
    android:layout_width="wrap_content"
    android:layout_height="wrap_content"
    />
</LinearLayout>
当然,这里的代码有几处在下一节需要修改的。
activity_main.xml如下
<RelativeLayout xmlns:android="http://schemas.android.com/apk/res/android"
    xmlns:tools="http://schemas.android.com/tools"
    android:layout_width="match_parent"
    android:layout_height="match_parent"
    android:paddingBottom="@dimen/activity_vertical_margin"
    android:paddingLeft="@dimen/activity_horizontal_margin"
    android:paddingRight="@dimen/activity_horizontal_margin"
    android:paddingTop="@dimen/activity_vertical_margin"
    tools:context=".MainActivity" >

    <RelativeLayout
        android:id="@+id/uplayout"
        android:layout_width="fill_parent"
        android:layout_height="wrap_content"
        android:layout_alignParentTop="true"
        android:layout_centerHorizontal="true"
        android:layout_marginBottom="10dp"
        >
    <TextView
        android:id="@+id/showmsg"
        android:layout_width="fill_parent"
        android:layout_height="wrap_content"
        android:textSize="12sp"
        android:textColor="#0022ff"
        android:layout_centerHorizontal="true"
        android:gravity="center_horizontal"
        android:text="@string/showmsg"
        />

    </RelativeLayout>
     <RelativeLayout
        android:id="@+id/centerlayout"
        android:layout_width="fill_parent"
        android:layout_height="300dp"
        android:layout_below="@id/uplayout"
        >
	 	<ListView
		    android:layout_width="wrap_content"
	        android:layout_height="wrap_content"
	        android:id="@+id/ListView"
	          />
    </RelativeLayout>
	 <RelativeLayout
        android:id="@+id/downlayout"
        android:layout_width="fill_parent"
        android:layout_height="wrap_content"
        android:layout_below="@id/centerlayout"
        >
		<ImageView
		    android:id="@+id/dowmimg"
		    android:layout_width="fill_parent"
		    android:layout_height="wrap_content"
		    android:src="@drawable/down"
		    android:contentDescription="@string/downmsg"
		    />
    </RelativeLayout>
</RelativeLayout>
两个布局文件搞定了。
下面就是activity中的代码了。
public class MainActivity extends Activity {

	ListView listview;

	@Override
	protected void onCreate(Bundle savedInstanceState) {
		super.onCreate(savedInstanceState);
		setContentView(R.layout.activity_main);

		listview=(ListView) findViewById(R.id.ListView);
		 //生成动态数组,加入数据
        ArrayList<HashMap<String, Object>> listItem = new ArrayList<HashMap<String, Object>>();
        for(int i=0;i<10;i++)
        {
            HashMap<String, Object> map = new HashMap<String, Object>();
            map.put("showUser","UserMessage:"+i);//存储用户的信息
            map.put("deleteBtn", "删除"+i);  //添加删除按钮名称
            map.put("updateBtn", "更新"+i);  //添加更新按钮名称
            listItem.add(map);
        }
        //生成适配器的Item和动态数组对应的元素
        SimpleAdapter listItemAdapter = new SimpleAdapter(this,listItem,//数据源
            R.layout.list_layout,//ListItem的XML实现
            //动态数组与list_layout对应的子项
            new String[] {"showUser","deleteBtn", "updateBtn"},
            //list_lauouym的XML文件里面的一个TextView,两个Button的资源ID
            new int[] {R.id.showuser,R.id.deltebtn,R.id.updatebtn}
        );
        //添加并且显示
        listview.setAdapter(listItemAdapter);
	}

	@Override
	public boolean onCreateOptionsMenu(Menu menu) {
		getMenuInflater().inflate(R.menu.main, menu);
		return true;
	}

}
帮助来源:http://www.iteye.com/topic/540423
