OpenGL进阶(十二) - 基础着色(Shading)
提要
经过前面的关于GLSL基础学习,可以参考OpenGL进阶专栏中的一些文章。
接下来的内容将会非常的有意思,比如全局光照,环境贴图,法线贴图,景深....是不是听着就很棒!想要学习的话,当然需要付出更多的努力!不过一切都是值得的。
今天的内容主要是关于光照的一些基础着色。
在光照模型中,光照主要由三部分组成:环境光(ambient),漫反射(diffuse),镜面反射(specular)。环境光是那些在环境中进行充分的散射,无法分辨方向的光,它似乎时来自所有方向的。漫反射来自某个方向,因此,如果它从正面照射表面,它看起来显得更亮一些,反之,如果它是斜着掠过表面,它看起来就显得暗一些,当它撞击到物体的表面的时候,它会均匀地向所有的方向发散。镜面光来自一个特定的方向,并且倾向于从表面某个特定的方向反射,当有一束激光从一面镜子上反弹回来时,它所产生的几乎是百分百的镜面反射光。
关于光照的原理及编程实现,可以参考另一篇文章:光线追踪(RayTracing)算法理论与实践(三)光照
单点光照下的漫反射着色
这里需要用到一个模型,来自stanford的兔子 - bunny,在文章的最后有下载,最好自己加载到blender里面再导出一遍,不然似乎没有法线信息。
程序实现的思路:
1)加载obj模型。
2)将顶点法线坐标存到VBO中,并作为参数传到shader中去。
3)在shader中定义关于光照以及MVP的Uniform变量。
4)在程序中设置uniform变量。
5)在定点shader中计算顶点位置和光照强度,在片段shader中对片段进行着色。
具体的代码实现如下。
首先在代码中添加一个ObjObject类,用来表示Obj模型类。
objobject.h
#ifndef OBJOBJECT_H
#define OBJOBJECT_H
#include "util.h"

class ObjObject
{
    public:
        ObjObject();
        ObjObject(const char * path);
        virtual ~ObjObject();
        int getVerticesCount();
        vector<glm::vec3> vertices;
        vector<glm::vec2> uvs;
        vector<glm::vec3> normals;
    protected:
    private:

};

#endif // TEAPOT_H
objobject.cpp
#include "objobject.h"

ObjObject::ObjObject()
{
    //ctor
}

ObjObject::~ObjObject()
{
    //dtor
}

ObjObject::ObjObject(const char * path)
{
    Util u;
    u.loadOBJ(path, this->vertices, this->uvs, this->normals);
}

int ObjObject::getVerticesCount()
{
    return this->vertices.size();
}
接着就是在渲染中一步步实现上面提到的步骤了。
在initGL中对bunny进行初始化:
bunny = ObjObject("bunny.obj");
然后生成定点和法线相对应的 VAO,VBO,同时加载shader
void CGL::compileShader()
{

	glGenVertexArrays(1, &VertexArrayID);
	glBindVertexArray(VertexArrayID);

	glGenBuffers(1, &vertexbuffer);
	glBindBuffer(GL_ARRAY_BUFFER, vertexbuffer);
	glBufferData(GL_ARRAY_BUFFER, bunny.vertices.size() * sizeof(glm::vec3), &bunny.vertices[0], GL_STATIC_DRAW);
//glBufferData(GL_ARRAY_BUFFER, 12 * sizeof(GLfloat), positionData, GL_STATIC_DRAW);

// 1rst attribute buffer : vertices
		glEnableVertexAttribArray(0);
		glBindBuffer(GL_ARRAY_BUFFER, vertexbuffer);
		glVertexAttribPointer(
			0,                  // attribute
			3,                  // size
			GL_FLOAT,           // type
			GL_FALSE,           // normalized?
			0,                  // stride
			(void*)0            // array buffer offset
		);

    GLuint normalbuffer;
	glGenBuffers(1, &normalbuffer);
	glBindBuffer(GL_ARRAY_BUFFER, normalbuffer);
	glBufferData(GL_ARRAY_BUFFER, bunny.normals.size() * sizeof(glm::vec3), &bunny.normals[0], GL_STATIC_DRAW);

// 3rd attribute buffer : normals
		glEnableVertexAttribArray(1);
		glBindBuffer(GL_ARRAY_BUFFER, normalbuffer);
		glVertexAttribPointer(
			1,                                // attribute
			3,                                // size
			GL_FLOAT,                         // type
			GL_FALSE,                         // normalized?
			0,                                // stride
			(void*)0                          // array buffer offset
		);

    if( ! prog.compileShaderFromFile("shader/basic1.vert",GLSLShader::VERTEX) )
    {
        printf("Vertex shader failed to compile!\n%s",
               prog.log().c_str());
        exit(1);
    }
    if( ! prog.compileShaderFromFile("shader/basic1.frag",GLSLShader::FRAGMENT))
    {
        printf("Fragment shader failed to compile!\n%s",
               prog.log().c_str());
        exit(1);
    }

    prog.bindAttribLocation(0, "VertexPosition");
    prog.bindAttribLocation(1, "VertexNormal");

    if( ! prog.link() )
    {
        printf("Shader program failed to link!\n%s",
               prog.log().c_str());
        exit(1);
    }
    if( ! prog.validate() )
    {
        printf("Program failed to validate!\n%s",
               prog.log().c_str());
        exit(1);
    }
    prog.use();
}
设置uniform变量:
void CGL::setUniform()
{
    mat4 model = mat4(1.0f);
    //model *= glm::rotate(model, -35.0f, vec3(1.0f,0.0f,0.0f));
   // model *= glm::rotate(model, 35.0f, vec3(0.0f,1.0f,0.0f));
    mat4 view = glm::lookAt(vec3(0.0f,5.0f,10.0f), vec3(-1.0f,2.0f,0.0f), vec3(0.0f,1.0f,0.0f));
    mat4 projection = glm::perspective(45.0f, 4.0f / 3.0f, 0.1f, 100.0f);
    mat4 mv = view * model;

    prog.setUniform("Kd", 0.6f, 0.9f, 0.9f);
    prog.setUniform("Ld", 1.0f, 1.0f, 1.0f);
    prog.setUniform("LightPosition", view * vec4(-5.0f,20.0f,15.0f,1.0f) );
    prog.setUniform("ModelViewMatrix", mv);
    prog.setUniform("NormalMatrix",mat3( vec3(mv[0]), vec3(mv[1]), vec3(mv[2]) ));
    prog.setUniform("MVP", projection * mv);

}
顶点shader:
#version 400
layout (location = 0) in vec3 VertexPosition;
layout (location = 1) in vec3 VertexNormal;

out vec3 LightIntensity;

uniform vec4 LightPosition; // Light position in eye coords.
uniform vec3 Kd;            // Diffuse reflectivity
uniform vec3 Ld;            // Diffuse light intensity

uniform mat4 ModelViewMatrix;
uniform mat3 NormalMatrix;
uniform mat4 MVP;


void main()
{
	vec3 tnorm = normalize(NormalMatrix * VertexNormal);
	vec4 eyeCoords = ModelViewMatrix * vec4(VertexPosition, 1.0);
	vec3 s = normalize(vec3(LightPosition - eyeCoords));
	LightIntensity = Ld * Kd * max(dot(s,tnorm),0.0);
	gl_Position = MVP * vec4( VertexPosition, 1.0);
}
片段shader:
#version 400

in vec3 LightIntensity;
out vec4 gl_FragColor;

void main(void)
{
	gl_FragColor = vec4(LightIntensity, 1.0);
}
最后就是渲染了:
glDrawArrays(GL_TRIANGLES, 0, bunny.vertices.size() );
跳出渲染循环的时候,别忘了删除缓存内容:
void CGL::clean()
{
    glDeleteBuffers(1, &vertexbuffer);
	prog.deleteProgram();
	glDeleteVertexArrays(1, &VertexArrayID);
}
运行结果如下:

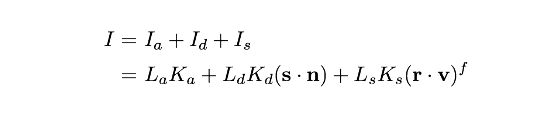
ADS 着色(AmbientDiffuseSpecular Shading)
ADS就是上面提到的光照模型,也称做Phong reflection model 或者 Phong Shading model。这时候光照的计算模型就是:
主要需要修改的是顶点shader,在着色器中实现对光照效果的计算:
basic.vert
#version 400
layout (location = 0) in vec3 VertexPosition;
layout (location = 1) in vec3 VertexNormal;

out vec3 LightIntensity;

struct LightInfo{
	vec4 Position;
	vec3 La;
	vec3 Ld;
	vec3 Ls;
};

struct MaterialInfo{
	vec3 Ka;
	vec3 Kd;
	vec3 Ks;
	float Shininess;
};

uniform LightInfo Light;
uniform	MaterialInfo Material;

uniform mat4 ModelViewMatrix;
uniform mat3 NormalMatrix;
uniform mat4 ProjectionMatrix;
uniform mat4 MVP;


void getEyeSpace(out vec3 norm, out vec4 position)
{
	norm =  normalize(NormalMatrix * VertexNormal);
	position = ModelViewMatrix * vec4(VertexPosition, 1.0);
}

vec3 phongModel(vec4 position, vec3 norm)
{
	vec3 s = normalize(vec3(Light.Position - position));
	vec3 v = normalize(-position.xyz);
	vec3 r = reflect(-s, norm);
	vec3 ambient = Light.La * Material.Ka;
	float sDotN = max(dot(s, norm), 0.0);
	vec3 diffuse = Light.Ld * Material.Kd * sDotN;
	vec3 spec = vec3(0.0);

	if(sDotN >0.0)
		spec = Light.Ls * Material.Ks * pow(max(dot(r,v), 0.0), Material.Shininess);
	return ambient + diffuse + spec;
}

void main()
{
	vec3 eyeNorm;
	vec4 eyePosition;
	getEyeSpace(eyeNorm, eyePosition);
	LightIntensity = phongModel(eyePosition, eyeNorm);

	gl_Position = MVP * vec4( VertexPosition, 1.0);
	//gl_Position = vec4( VertexPosition, 1.0);
}
注意这里在shader中使用了function,使用的方式和c语言中非常相似,但是返回值的定义有些不同,而且不能有重复定义,即使在不同的作用域。
程序中只要设置好相关的uniform就可以了:
void CGL::setUniform()
{
    mat4 model = mat4(1.0f);
    mat4 view = glm::lookAt(vec3(0.0f,5.0f,10.0f), vec3(-1.0f,2.0f,0.0f), vec3(0.0f,1.0f,0.0f));
    mat4 projection = glm::perspective(45.0f, 4.0f / 3.0f, 0.1f, 100.0f);
    mat4 mv = view * model;

    prog.setUniform("Material.Kd", 0.9f, 0.5f, 0.3f);
    prog.setUniform("Light.Ld", 1.0f, 1.0f, 1.0f);
    prog.setUniform("Material.Ka", 0.9f, 0.5f, 0.3f);
    prog.setUniform("Light.La", 0.4f, 0.4f, 0.4f);
    prog.setUniform("Material.Ks", 0.8f, 0.8f, 0.8f);
    prog.setUniform("Light.Ls", 1.0f, 1.0f, 1.0f);
    prog.setUniform("Material.Shininess", 100.0f);
    prog.setUniform("ModelViewMatrix", mv);
    prog.setUniform("NormalMatrix",mat3( vec3(mv[0]), vec3(mv[1]), vec3(mv[2]) ));
    prog.setUniform("MVP", projection * mv);

}
渲染一下。

由于关于着色的计算是在顶点shader中完成的,所以也可以称为逐顶点着色(per-vertex lighting)。
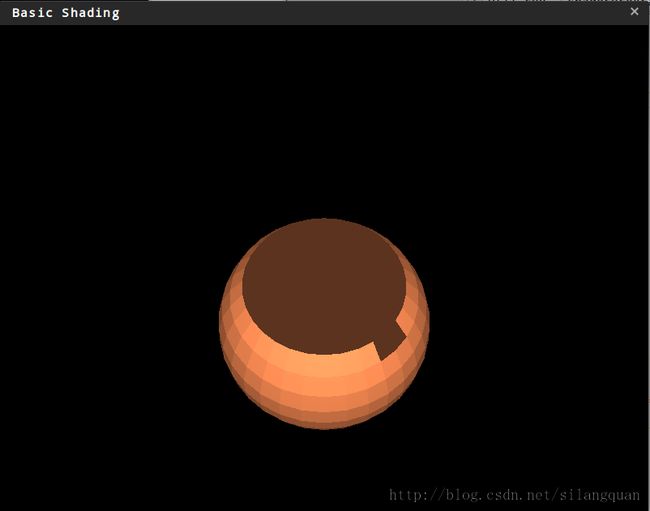
双面着色 two-sided shading
当渲染的模型是完全封闭的时候,模型中所有面的背面都是不可见的,但是,如果模型有开口的话就比较麻烦了,渲染的结果很可能并不正确,因为面的法线并不正确。这时候就需要将法线反向,然后根据反向后的法线来计算光强。
直接渲染带洞的model,结果如下:
修改一下shader:
basic.vert
#version 400
layout (location = 0) in vec3 VertexPosition;
layout (location = 1) in vec3 VertexNormal;

//out vec3 LightIntensity;
out vec3 frontColor;
out vec3 backColor;

struct LightInfo{
	vec4 Position;
	vec3 La;
	vec3 Ld;
	vec3 Ls;
};

struct MaterialInfo{
	vec3 Ka;
	vec3 Kd;
	vec3 Ks;
	float Shininess;
};

uniform LightInfo Light;
uniform	MaterialInfo Material;

uniform mat4 ModelViewMatrix;
uniform mat3 NormalMatrix;
uniform mat4 ProjectionMatrix;
uniform mat4 MVP;


void getEyeSpace(out vec3 norm, out vec4 position)
{
	norm =  normalize(NormalMatrix * VertexNormal);
	position = ModelViewMatrix * vec4(VertexPosition, 1.0);
}

vec3 phongModel(vec4 position, vec3 norm)
{
	vec3 s = normalize(vec3(Light.Position - position));
	vec3 v = normalize(-position.xyz);
	vec3 r = reflect(-s, norm);
	vec3 ambient = Light.La * Material.Ka;
	float sDotN = max(dot(s, norm), 0.0);
	vec3 diffuse = Light.Ld * Material.Kd * sDotN;
	vec3 spec = vec3(0.0);

	if(sDotN >0.0)
		spec = Light.Ls * Material.Ks * pow(max(dot(r,v), 0.0), Material.Shininess);
	return ambient + diffuse + spec;
}

void main()
{
	vec3 eyeNorm;
	vec4 eyePosition;
	getEyeSpace(eyeNorm, eyePosition);
	frontColor = phongModel(eyePosition, eyeNorm);
	backColor = phongModel(eyePosition, -eyeNorm);
	gl_Position = MVP * vec4( VertexPosition, 1.0);
	//gl_Position = vec4( VertexPosition, 1.0);
}
basic.frag
#version 400

//in vec3 LightIntensity;
in vec3 frontColor;
in vec3 backColor;
out vec4 gl_FragColor;

void main(void)
{
	if(gl_FrontFacing) 	gl_FragColor = vec4(frontColor, 1.0);
	else 	gl_FragColor = vec4(backColor, 1.0);
}
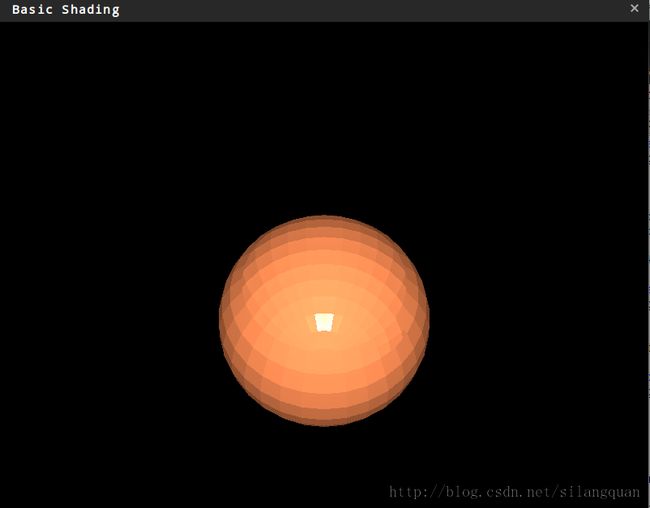
在basic.vert中计算出内部和外部的片段颜色,然后在片段着色器中根据 gl_FrontFacing 来判断面是否为背面,然后分开着色,再渲染一下
平坦着色 flat shading
这个着色方式是想对于Gouraud Shading (高洛德着色/高氏着色)来说的。
Gouraud Shading 在游戏中使用最广泛的一种着色方式。它可对3D模型各顶点的颜色进行平滑、融合处理,将每个多边形上的每个点赋以一组色调值,同时将多边形着上较为顺滑的渐变色,使其外观具有更强烈的实时感和立体动感,不过其着色速度比平面着色慢得多。
在shader中要实现flat shading非常简单,只要在 in out 参数的前面加上flat关键字就可以了。
baisic .vert
......
flat out vec3 LightIntensity;
....
basic.frag
...
flat in vec3 LightIntensity;
...
渲染一下,对比两种效果:

相关下载
Stanford dragon
Stanford bunny
程序源码
参考
OpenGL 4.0 Shading Language Cookbook
OpenGL 编程指南
OpenGL Shading Language