Cocos2d-x开发实例介绍帧动画使用
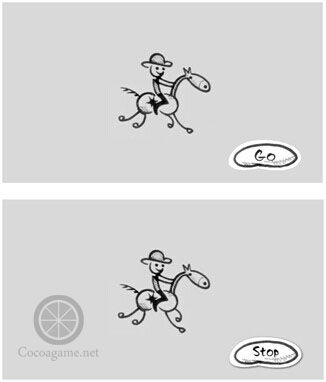
下面我们通过一个实例介绍一下帧动画的使用,这个实例如下图所示,点击Go按钮开始播放动画,这时候播放按钮标题变为Stop,点击Stop按钮可以停止播放动画。
下面我们再看看具体的程序代码,首先看一下看HelloWorldScene.h文件,它的代码如下:
#ifndef __HELLOWORLD_SCENE_H__
#define __HELLOWORLD_SCENE_H__

#include "cocos2d.h"

class HelloWorld : public cocos2d::Layer
{
         bool isPlaying; //播放标识                                                                                                  ①
   cocos2d::Sprite* sprite;                                                                                                        ②
public:

   static cocos2d::Scene* createScene();
   virtual bool init();

    voidOnAction(cocos2d::Ref* pSender);                                                                                       ③

   CREATE_FUNC(HelloWorld);

};

#endif // __HELLOWORLD_SCENE_H__
第①行代码是声明一个布尔变量isPlaying,用来保存播放状态,true时候说明正在播放,false时候说明停止播放。第②行代码cocos2d::Sprite*sprite是声明一个精灵变量。第③行声明了一个函数,用来在选择不同菜单时候的回调。
HelloWorldScene的实现代码HelloWorldScene.ccp文件,其中HelloWorld::init()函数代码如下:
bool HelloWorld::init()
{
    if( !Layer::init() )
    {
         returnfalse;
    }

    SizevisibleSize = Director::getInstance()->getVisibleSize();
    Pointorigin = Director::getInstance()->getVisibleOrigin();

    SpriteFrameCache::getInstance()->addSpriteFramesWithFile("run.plist");

    autobackground = Sprite::createWithSpriteFrameName("background.png");
    background->setAnchorPoint(Point::ZERO);
    this->addChild(background,0);

    sprite= Sprite::createWithSpriteFrameName("h1.png");
    sprite->setPosition(Point(visibleSize.width/2,visibleSize.height /2));
    this->addChild(sprite);

    isPlaying= false;

         //toggle菜单
    autogoSprite = Sprite::createWithSpriteFrameName("go.png");                                                 ①
    autostopSprite = Sprite::createWithSpriteFrameName("stop.png");                                           ②
    autogoToggleMenuItem = MenuItemSprite::create(goSprite, goSprite);                                    ③
 auto stopToggleMenuItem = MenuItemSprite::create(stopSprite,stopSprite);                            ④
 auto toggleMenuItem = MenuItemToggle::createWithCallback(
                    CC_CALLBACK_1(HelloWorld::OnAction,this),
                          goToggleMenuItem , stopToggleMenuItem, NULL);                                             ⑤
    toggleMenuItem->setPosition(Director::getInstance()->convertToGL(Point(930,540)));                   ⑥
   auto mn = Menu::create(toggleMenuItem, NULL);
   mn->setPosition(Point::ZERO);
   this->addChild(mn);

    returntrue;
}
上述代码第①行是创建Go按钮精灵,对应的第③行代码是创建Go按钮(菜单项)。代码第②行是创建Stop按钮精灵,对应的第④行代码是创建Stop按钮(菜单项)。在第⑤行代码是创建Go和Stop是两种状态切换的开关菜单项。第⑥行代码是设置开关菜单项的位置。
HelloWorldScene的实现代码HelloWorldScene.ccp文件,其中HelloWorld::OnAction(Ref*pSender)函数代码如下:
void HelloWorld::OnAction(Ref* pSender)
{

    if(!isPlaying) {

         ///////////////动画开始//////////////////////
         Animation*animation = Animation::create();                                                                    ①
         for(int i=1; i<= 4; i++)
         {
             __String*frameName = __String::createWithFormat("h%d.png",i);                                    ②
             log("frameName= %s",frameName->getCString());
             SpriteFrame*spriteFrame = SpriteFrameCache::getInstance()->
                                       getSpriteFrameByName(frameName->getCString());                                  ③
             animation->addSpriteFrame(spriteFrame);                                                                           ④
         }

         animation->setDelayPerUnit(0.15f);           //设置两个帧播放时间                             ⑤
         animation->setRestoreOriginalFrame(true);    //动画执行后还原初始状态                   ⑥

         Animate*action = Animate::create(animation);                                                                          ⑦
         sprite->runAction(RepeatForever::create(action));                                                         ⑧
         //////////////////动画结束///////////////////

         isPlaying= true;

    }else {
         sprite->stopAllActions();                                                                                               ⑨
         isPlaying= false;
    }
}
上述第①行代码是创建一个Animation对象,它是动画对象,然后我们要通过循环将各个帧图片放到Animation对象中。第②行是获得帧图片的文件名,String类型是Cocos2d-x字符串数据类型。第③行代码是通过帧名创建精灵帧对象,第④行代码把精灵帧对象添加到Animation对象中。
第⑤行代码是animation->setDelayPerUnit(0.15f)是设置两个帧播放时间,我们这个动画播放是4帧。第⑥行代码animation->setRestoreOriginalFrame(true)是动画执行完成是否还原到初始状态。第⑦行代码是通过一个Animation对象创建Animate对象,第⑧行代码sprite->runAction(RepeatForever::create(action))是执行动画动作,无限循环方式。
第⑨行代码sprite->stopAllActions()停止所有的动作。
京东:http://item.jd.com/11584534.html
亚马逊:http://www.amazon.cn/Cocos2d-x%E5%AE%9E%E6%88%98-C-%E5%8D%B7-%E5%85%B3%E4%B8%9C%E5%8D%87/dp/B00PTYWTLU
当当:http://product.dangdang.com/23606265.html
互动出版网:http://product.china-pub.com/3770734
《Cocos2d-x实战 C++卷》源码及样章下载地址:
源码下载地址:http://51work6.com/forum.php?mod=viewthread&tid=1155&extra=page%3D1
样章下载地址:http://51work6.com/forum.php?mod=viewthread&tid=1157&extra=page%3D1

