activiti5第一弹-----基本的activiti示例
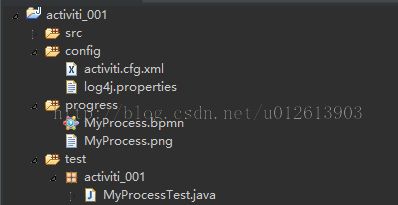
建立一个普通的javaSE工程,工程的目录结构如下:
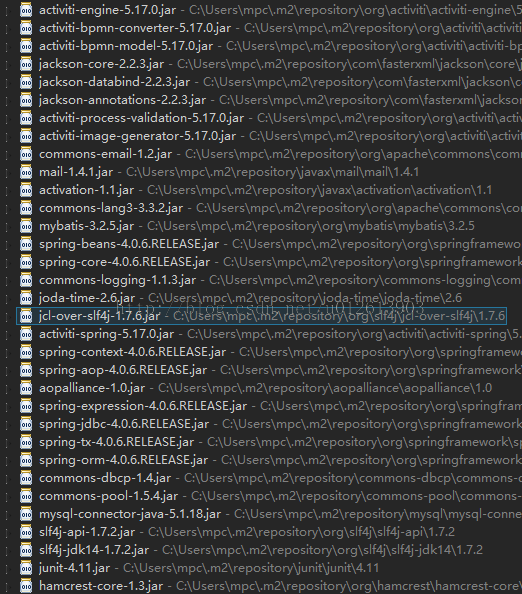
需要的jar包如下:
在config文件夹下创建log4j.properties用来输入日志,内容如下:
log4j.rootLogger=INFO, CA
# ConsoleAppender
log4j.appender.CA=org.apache.log4j.ConsoleAppender
log4j.appender.CA.layout=org.apache.log4j.PatternLayout
log4j.appender.CA.layout.ConversionPattern= %d{hh:mm:ss,SSS} [%t] %-5p %c %x - %m%n
在config文件夹下创建activiti.cfg.xml(每个框架都有自己的配置文件,在没有使用spring托管框架的时候,这个配置文件管理框架的全部配置),内容如下
<?xml version="1.0"?>
<beans default-lazy-init="false"
	xsi:schemaLocation=" http://www.springframework.org/schema/util http://www.springframework.org/schema/util/spring-util-3.0.xsd http://www.springframework.org/schema/beans http://www.springframework.org/schema/beans/spring-beans-3.0.xsd http://www.springframework.org/schema/context http://www.springframework.org/schema/context/spring-context-3.0.xsd http://www.springframework.org/schema/tx http://www.springframework.org/schema/tx/spring-tx-3.0.xsd http://www.springframework.org/schema/jee http://www.springframework.org/schema/jee/spring-jee-3.0.xsd http://www.springframework.org/schema/mvc http://www.springframework.org/schema/mvc/spring-mvc-3.0.xsd http://www.springframework.org/schema/aop http://www.springframework.org/schema/aop/spring-aop-3.0.xsd"
	xmlns:aop="http://www.springframework.org/schema/aop" xmlns:mvc="http://www.springframework.org/schema/mvc"
	xmlns:tx="http://www.springframework.org/schema/tx" xmlns:jee="http://www.springframework.org/schema/jee"
	xmlns:util="http://www.springframework.org/schema/util" xmlns:context="http://www.springframework.org/schema/context"
	xmlns:p="http://www.springframework.org/schema/p" xmlns:xsi="http://www.w3.org/2001/XMLSchema-instance"
	xmlns="http://www.springframework.org/schema/beans">
	<bean
		class="org.activiti.engine.impl.cfg.StandaloneInMemProcessEngineConfiguration"
		id="processEngineConfiguration">
<span style="white-space:pre"> </span><!--配置数据库信息,这里使用mysql 但是测试时推荐使用h2数据库 见activiti自带的demo中的配置文件<span style="font-family: Arial, Helvetica, sans-serif;">--></span>
		<property name="jdbcUrl" value="jdbc:mysql://localhost:3306/activi" />
		<property name="jdbcDriver" value="com.mysql.jdbc.Driver" />
		<property name="jdbcUsername" value="root" />
		<property name="jdbcPassword" value="root" />
<span style="white-space:pre">		</span><!--当表结构不存在时,生成activiti的23个表-->
		<property name="databaseSchemaUpdate" value="true" />
<span style="white-space:pre">		</span><!--工作流转-->
		<property name="jobExecutorActivate" value="true" />
		<!--邮件-->
<span style="white-space:pre">		</span><property name="mailServerHost" value="mail.my-corp.com" />
		<property name="mailServerPort" value="5025" />
		<!--历史-->
<span style="white-space:pre">		</span><property name="history" value="full"></property>
	</bean>
</beans>
在progress文件夹下建立我们的流程定义,右键选择new-----other---------Activiti Diagram(之前需要安装eclipse的activiti插件,推荐在线安装---Name: Activiti BPMN 2.0 designer Location: http://activiti.org/designer/update/)
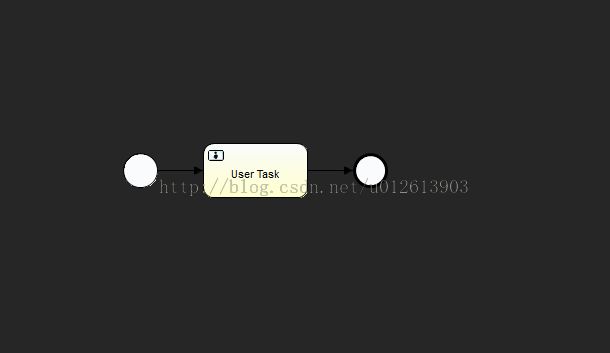
建立如下的流程定义
在该流程右键选择xml打开方式,可以得到流程的xml配置信息
<?xml version="1.0" encoding="UTF-8"?>
<definitions xmlns="http://www.omg.org/spec/BPMN/20100524/MODEL" xmlns:xsi="http://www.w3.org/2001/XMLSchema-instance" xmlns:xsd="http://www.w3.org/2001/XMLSchema" xmlns:activiti="http://activiti.org/bpmn" xmlns:bpmndi="http://www.omg.org/spec/BPMN/20100524/DI" xmlns:omgdc="http://www.omg.org/spec/DD/20100524/DC" xmlns:omgdi="http://www.omg.org/spec/DD/20100524/DI" typeLanguage="http://www.w3.org/2001/XMLSchema" expressionLanguage="http://www.w3.org/1999/XPath" targetNamespace="http://www.activiti.org/test">
<!-- 流程内的信息-->
<process id="myProcess" name="My process" isExecutable="true">
    <startEvent id="startevent1" name="Start"></startEvent>
    <userTask id="usertask1" name="User Task"></userTask>
    <sequenceFlow id="flow1" sourceRef="startevent1" targetRef="usertask1"></sequenceFlow>
    <endEvent id="endevent1" name="End"></endEvent>
    <sequenceFlow id="flow2" sourceRef="usertask1" targetRef="endevent1"></sequenceFlow>
  </process>
<!--这些都是用来标志图中的各种图形的大小和位置的 -->
  <bpmndi:BPMNDiagram id="BPMNDiagram_myProcess">
    <bpmndi:BPMNPlane bpmnElement="myProcess" id="BPMNPlane_myProcess">
      <bpmndi:BPMNShape bpmnElement="startevent1" id="BPMNShape_startevent1">
        <omgdc:Bounds height="35.0" width="35.0" x="140.0" y="180.0"></omgdc:Bounds>
      </bpmndi:BPMNShape>
      <bpmndi:BPMNShape bpmnElement="usertask1" id="BPMNShape_usertask1">
        <omgdc:Bounds height="55.0" width="105.0" x="220.0" y="170.0"></omgdc:Bounds>
      </bpmndi:BPMNShape>
      <bpmndi:BPMNShape bpmnElement="endevent1" id="BPMNShape_endevent1">
        <omgdc:Bounds height="35.0" width="35.0" x="370.0" y="180.0"></omgdc:Bounds>
      </bpmndi:BPMNShape>
      <bpmndi:BPMNEdge bpmnElement="flow1" id="BPMNEdge_flow1">
        <omgdi:waypoint x="175.0" y="197.0"></omgdi:waypoint>
        <omgdi:waypoint x="220.0" y="197.0"></omgdi:waypoint>
      </bpmndi:BPMNEdge>
      <bpmndi:BPMNEdge bpmnElement="flow2" id="BPMNEdge_flow2">
        <omgdi:waypoint x="325.0" y="197.0"></omgdi:waypoint>
        <omgdi:waypoint x="370.0" y="197.0"></omgdi:waypoint>
      </bpmndi:BPMNEdge>
    </bpmndi:BPMNPlane>
  </bpmndi:BPMNDiagram>
</definitions>
可以得到流程的id为 myProcess,当然这是默认的,你可以随意修改.
最后就可以编写测试类来测试这个流程了
package activiti_001;

import junit.framework.Assert;

import org.activiti.engine.ProcessEngine;
import org.activiti.engine.ProcessEngineConfiguration;
import org.activiti.engine.RepositoryService;
import org.activiti.engine.RuntimeService;
import org.activiti.engine.TaskService;
import org.activiti.engine.runtime.ProcessInstance;
import org.activiti.engine.task.Task;
import org.junit.Test;

public class MyProcessTest {

	@Test
	public void test() {
		// 通过默认的资源获得流程引擎的配置信息(默认的--当然就是activiti.cfg.xml 了)
		ProcessEngineConfiguration configuration = ProcessEngineConfiguration
				.createProcessEngineConfigurationFromResourceDefault();
		// 通过配置信息获得流程引擎
		ProcessEngine processEngine = configuration.buildProcessEngine();
		// 流程引擎是activiti的核心,也就是activiti的门户,通过它可以获得各种服务。
		// 获得部署服务
		RepositoryService repositoryService = processEngine
				.getRepositoryService();
		// 获得运行时服务
		RuntimeService runtimeService = processEngine.getRuntimeService();
		// 获得任务服务
		TaskService taskService = processEngine.getTaskService();

		// 部署我们定义的流程
		repositoryService.createDeployment()
				.addClasspathResource("MyProcess.bpmn").deploy();
		// 启动定义的流程 一定要使用BYKEY
		ProcessInstance instance = runtimeService
				.startProcessInstanceByKey("myProcess");
		// 通过任务服务来查询任务
		Task task = taskService.createTaskQuery().singleResult();
		// 断言任务的名称
		System.out.println(task.getName());
		Assert.assertTrue("User Task".equals(task.getName()));
		// 完成任务(因为这是一个用户任务,所以需要模拟完成一下)
		taskService.complete(task.getId());
		task = taskService.createTaskQuery().singleResult();
		// 流程结束
	}

}


