本文笔者会尝试给大家讲解producer的源码脉络,希望对大家有所帮助。
在讲解producer使用的文章中,有如下代码,我们就从这里开始。
Properties props = new Properties();
//指明获取发送地点的地址
props.setProperty("zk.connect","localhost:2181");
props.setProperty("serializer.class", StringEncoder.class.getName());
Producer<String,String> producer = new Producer<String, String>(new  ProducerConfig(props));
for(int i=0;i<1000;i++){
    //构造消息并发送
    producer.send(new StringProducerData("hehe","hehe-data"+i));
}
producer.close();
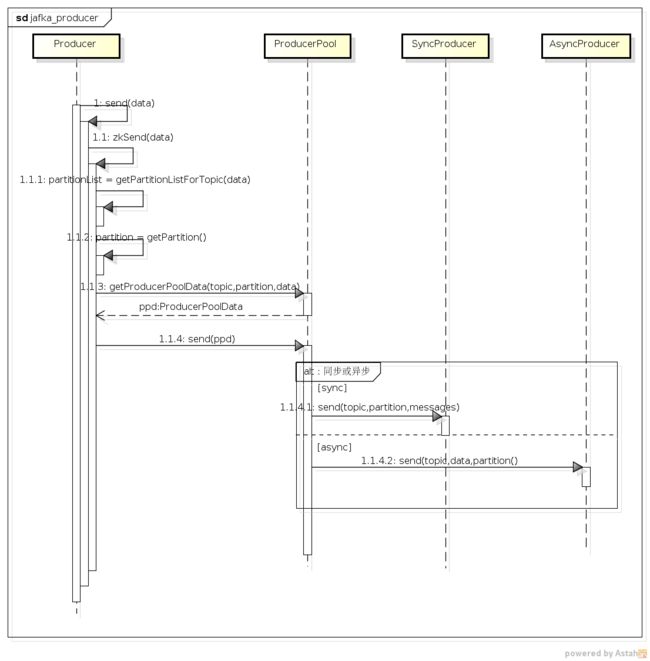
我们来看下producer.send的时序图:
下面我们结合上面的时序图和部分源码和大家说明producer调用send后发生了哪些事情。
- 调用send方法后,会根据是否启用zookeeper来决定调用zkSend或者configSend,这里采用zkSend(
1.1)进行说明。
private void zkSend(ProducerData<K, V> data) {
 int numRetries = 0;
 Broker brokerInfoOpt = null;
 Partition brokerIdPartition = null;
 //由zookeeper中获取可用的broker-partition列表
 while (numRetries <= config.getZkReadRetries() && brokerInfoOpt == null) {
     if (numRetries > 0) {
         logger.info("Try #" + numRetries + " ZK producer cache is stale. Refreshing it by reading from ZK again");
         brokerPartitionInfo.updateInfo();
     }
     List<Partition> partitions = new ArrayList<Partition>(getPartitionListForTopic(data));
     //选择传递消息的broker-partition:随机或者依据用户指定的partitioner
     brokerIdPartition = partitions.get(getPartition(data.getKey(), partitions.size()));
     if (brokerIdPartition != null) {
         brokerInfoOpt = brokerPartitionInfo.getBrokerInfo(brokerIdPartition.brokerId);
     }
     numRetries++;
 }
 if (brokerInfoOpt == null) {
     throw new NoBrokersForPartitionException("Invalid Zookeeper state. Failed to get partition for topic: " + data.getTopic() + " and key: "
             + data.getKey());
 }
 //封装现有数据为ProducerPoolData对象
 ProducerPoolData<V> ppd = producerPool.getProducerPoolData(data.getTopic(),//
         new Partition(brokerIdPartition.brokerId, brokerIdPartition.partId),//
         data.getData());
 //使用producerPool发送数据
 producerPool.send(ppd);
}
zkSend主要做了以下的事情:
-
连接zookeeper获取topic相关可用的broker-partition列表(
1.1.1), 然后调用1.1.2 getPartition方法选取一个partition,选取的策略是如果用户配置了partitioner.class,则调用该类选择,否则随机选择一个partition。 - 将data和partition封装为ProducerPoolData对象(
1.1.3),之后调用producerPool的send方法(1.1.4)。该方法源码如下:
public void send(ProducerPoolData<V> ppd) {
 //判断同步或异步发送
 if (sync) {
     //将消息封装成ByteBufferMessageSet,以便序列化为字节数组
     Message[] messages = new Message[ppd.data.size()];
     int index = 0;
     for (V v : ppd.data) {
         messages[index] = serializer.toMessage(v);
         index++;
     }
     ByteBufferMessageSet bbms = new ByteBufferMessageSet(config.getCompressionCodec(), messages);
     ProducerRequest request = new ProducerRequest(ppd.topic, ppd.partition.partId, bbms);
     SyncProducer producer = syncProducers.get(ppd.partition.brokerId);
     if (producer == null) {
         throw new UnavailableProducerException("Producer pool has not been initialized correctly. " + "Sync Producer for broker "
                 + ppd.partition.brokerId + " does not exist in the pool");
     }
     producer.send(request.topic, request.partition, request.messages);
 } else {
     //异步发送,逐个将data发送出去
     AsyncProducer<V> asyncProducer = asyncProducers.get(ppd.partition.brokerId);
     for (V v : ppd.data) {
         asyncProducer.send(ppd.topic, v, ppd.partition.partId);
     }
 }
}
该方法通过sync来判断是同步发送还是异步发送,如果是同步发送,则最后调用syncProducer(1.1.4.1),否则调用AsyncProducer发送(1.1.4.2)。sync是在初始化Producer时,读取producer.type的设置来确定,如果为async则表明是异步发送。
至此发送消息的过程便完结了,是不是很简单?
syncProducer的创建时机
我们一直没有讲syncProducer是何时建立的,或者说producer是什么时候建立到broker连接的,这是很关键的一部分,因为要没有连接,你的数据就没有传输管道了。其实从producerPool的类名,我们可以猜测这是一个集中了多个producer的池子,调用者依据需要从这个池子中取出producer,然后用它发送数据。那一个合情合理的设计便是这池子里的每一个producer对应一个broker,调用者依据自己发送的broker来获取producer。实际的设计也是这样的。其初始化的代码在producer的构造函数中,如下:
//获取所有的brokerPartition信息
 this.zkEnabled = config.getZkConnect() != null;
 if (this.brokerPartitionInfo == null) {
     if (this.zkEnabled) {
         Properties zkProps = new Properties();
         zkProps.put("zk.connect", config.getZkConnect());
         zkProps.put("zk.sessiontimeout.ms", "" + config.getZkSessionTimeoutMs());
         zkProps.put("zk.connectiontimeout.ms", "" + config.getZkConnectionTimeoutMs());
         zkProps.put("zk.synctime.ms", "" + config.getZkSyncTimeMs());
         this.brokerPartitionInfo = new ZKBrokerPartitionInfo(new ZKConfig(zkProps), this);
     } else {
         this.brokerPartitionInfo = new ConfigBrokerPartitionInfo(config);
     }
 }
 //建立到所有broker的连接,每个broker对应一个producer,SyncProducer或者AsyncProducer
 if (this.populateProducerPool) {
     for (Map.Entry<Integer, Broker> e : this.brokerPartitionInfo.getAllBrokerInfo().entrySet()) {
         Broker b = e.getValue();
         producerPool.addProducer(new Broker(e.getKey(), b.host, b.host, b.port));
     }
 }
首先从zookeeper中读取broker的相关信息,然后遍历所有的broker,调用producerPool的addProducer方法,建立producer,也就建立到broker的连接,addProducer的源码如下:
public void addProducer(Broker broker) {
 Properties props = new Properties();
 props.put("host", broker.host);
 props.put("port", "" + broker.port);
 props.putAll(config.getProperties());
 //根据同步异步配置来建立producer
 if (sync) {
     SyncProducer producer = new SyncProducer(new SyncProducerConfig(props));
     logger.info("Creating sync producer for broker id = " + broker.id + " at " + broker.host + ":" + broker.port);
     syncProducers.put(broker.id, producer);
 } else {
     AsyncProducer<V> producer = new AsyncProducer<V>(new AsyncProducerConfig(props),//
             new SyncProducer(new SyncProducerConfig(props)),//
             serializer,//
             eventHandler,//
             config.getEventHandlerProperties(),//
             this.callbackHandler, //
             config.getCbkHandlerProperties());
     producer.start();
     logger.info("Creating async producer for broker id = " + broker.id + " at " + broker.host + ":" + broker.port);
     asyncProducers.put(broker.id, producer);
 }
}
这段代码不难理解,放在这里的目的是让大家注意下创建AsyncProducer时,后面调用了start方法,也就是启动了一个异步发送的线程,后面会详细讲。
同步发送
producerPool的send方法在调用syncProducer发送数据之前,首先对要发送的多条数据进行了封装,将多条数据组装成ByteBufferMessageSet,这个类我们在之前的文章有提到,不熟悉的读者可以去看下,之后又将其传入ProducerRequest,最终调用了syncProducer的send方法。这里将数据转化为Message的代码serializer.toMessage(v),即用户自定义的serializer.class发挥作用的地方。
send方法
下面我们来看下syncProducer的send方法的源码。
 private void send(Request request) {
    //构造send对象,以备发送
        BoundedByteBufferSend send = new BoundedByteBufferSend(request);
        synchronized (lock) {
            verifySendBuffer(send.getBuffer().slice());
            //确认到broker的连接依然可用
            getOrMakeConnection();
            int written = -1;
            try {
            //写数据
                written = send.writeCompletely(channel);
            } catch (IOException e) {
                // no way to tell if write succeeded. Disconnect and re-throw exception to let client handle retry
                disconnect();
                throw new RuntimeException(e);
            } finally {
                if (logger.isDebugEnabled()) {
                    logger.debug(format("write %d bytes data to %s:%d", written, host, port));
                }
            }
            //记录连接次数,判断是否需要重新连接
            sentOnConnection++;
            if (sentOnConnection >= config.reconnectInterval//
                    || (config.reconnectTimeInterval >= 0 && System.currentTimeMillis() - lastConnectionTime >= config.reconnectTimeInterval)) {
                disconnect();
                channel = connect();
                sentOnConnection = 0;
                lastConnectionTime = System.currentTimeMillis();
            }
        }
    }
该方法的过程也很简单:构造一个Send对象来准备发送;检查到broker连接是不是可用的;写数据。
Send对象在前面的文章中有提到,不了解的读者可以前往查看。同步发送的逻辑并不复杂,这里不多说明了。
异步发送
首先我们来看看AsyncProducer的构造函数。
public AsyncProducer(AsyncProducerConfig config) {
 this(config//
         , new SyncProducer(config)//
         , (Encoder<T>)Utils.getObject(config.getSerializerClass())//
         , (EventHandler<T>)Utils.getObject(config.getEventHandler())//
         , config.getEventHandlerProperties()//
         , (CallbackHandler<T>)Utils.getObject(config.getCbkHandler())//
         , config.getCbkHandlerProperties());
}

public AsyncProducer(AsyncProducerConfig config, //
      SyncProducer producer, //
      Encoder<T> serializer, //
      EventHandler<T> eventHandler,//
      Properties eventHandlerProperties, //
      CallbackHandler<T> callbackHandler, //
      Properties callbackHandlerProperties) {
  super();
  this.config = config;
  //一个SyncProducer类
  this.producer = producer;
  this.serializer = serializer;
  //消息可发送时的处理类
  this.eventHandler = eventHandler;
  this.eventHandlerProperties = eventHandlerProperties;
  this.callbackHandler = callbackHandler;
  this.callbackHandlerProperties = callbackHandlerProperties;
  this.enqueueTimeoutMs = config.getEnqueueTimeoutMs();
  //消息队列,缓冲待发送的消息
  this.queue  = new LinkedBlockingQueue<QueueItem<T>>(config.getQueueSize());
   //
   if(eventHandler != null) {
       eventHandler.init(eventHandlerProperties);
   }
   if(callbackHandler!=null) {
       callbackHandler.init(callbackHandlerProperties);
   }
    //创建发送的线程
   this.sendThread = new ProducerSendThread<T>("ProducerSendThread-" + asyncProducerID,
           queue, //
           serializer,//
           producer, //
           eventHandler!=null?eventHandler//发送事件触发的类
                   :new DefaultEventHandler<T>(new ProducerConfig(config.getProperties()),callbackHandler), //
           callbackHandler, //
           config.getQueueTime(), //
           config.getBatchSize());
   this.sendThread.setDaemon(false);
   AsyncProducerQueueSizeStats<T> stats = new AsyncProducerQueueSizeStats<T>(queue);
   stats.setMbeanName(ProducerQueueSizeMBeanName+"-"+asyncProducerID);
         Utils.registerMBean(stats);
    }
关于AsyncProducer的一些变量含义,不清楚的读者可以去查看producer的文章,这里就不再详述了。其中的eventHandler的使用时机时当asyncProducer发送消息时,下面会讲到。实际使用中的类是DefaultEventHandler,callbackHandler很少用到,感兴趣的读者自己去研究吧,这里不细讲了。另外asyncproducer中都会有一个syncProducer,用它来完成最后的发送消息工作。而sendThread的线程则负责定时定量的发送消息数据。
AsyncProducer初始化后,会调用start方法,即启动一个线程,那么我们就来看看这个线程的run方法都做了什么。
public void start() {
        sendThread.start();//ProducerSendThread
}

//ProducerSendThread的run方法
public void run() {
        try {
            List<QueueItem<T>> remainingEvents = processEvents();
            //handle remaining events
            if (remainingEvents.size() > 0) {
                logger.debug(format("Dispatching last batch of %d events to the event handler", remainingEvents.size()));
                tryToHandle(remainingEvents);
            }
        } catch (Exception e) {
            logger.error("Error in sending events: ", e);
        } finally {
            shutdownLatch.countDown();
        }
    }

private List<QueueItem<T>> processEvents() {
        long lastSend = System.currentTimeMillis();
        final List<QueueItem<T>> events = new ArrayList<QueueItem<T>>();
        boolean full = false;
        while (!shutdown) {
            try {
                //由消息队列中取数据
                QueueItem<T> item = queue.poll(Math.max(0, (lastSend + queueTime) - System.currentTimeMillis()), TimeUnit.MILLISECONDS);
                long elapsed =  System.currentTimeMillis()- lastSend;
                boolean expired = item == null;
                if (item != null) {
                    if (callbackHandler != null) {
                        events.addAll(callbackHandler.afterDequeuingExistingData(item));
                    } else {
                        events.add(item);
                    }
                    full = events.size() >= batchSize;
                }

                //判断是否队列已满或者已经超时
                if (full || expired) {
                    if (logger.isDebugEnabled()) {
                        if (expired) {
                            logger.debug(elapsed + " ms elapsed. Queue time reached. Sending..");
                        } else {
                            logger.debug(format("Batch(%d) full. Sending..", batchSize));
                        }
                    }
                    tryToHandle(events);
                    lastSend = System.currentTimeMillis();
                    events.clear();
                }
            } catch (InterruptedException e) {
                logger.warn(e.getMessage(), e);
            }
        }
        if (queue.size() > 0) {
            throw new IllegalQueueStateException("Invalid queue state! After queue shutdown, " + queue.size() + " remaining items in the queue");
        }
        if (this.callbackHandler != null) {
            events.addAll(callbackHandler.lastBatchBeforeClose());
        }
        return events;
    }
AsyncProducer的start方法中调用了sendThread的start方法,其为ProducerSendThread类,在该类的run方法中可以看到其主要方法为processEvents,该方法的while循环做的事情是:
- 从消息队列(queue)中取数据,获取的方法为poll,该方法是阻塞获取值直到超时(
queue.time)。 - 如果获取了数据,将其加入到event列表中,并判断是否达到了配置的一次发送最大消息个数(
batch.size),如果两个满足其一,则调用tryToHandle方法,该方法的源码也简单,最终它调用了DefaultEventHandler类的handler方法,其中调用栏syncProducer.multiSend方法,将events中封装的数据发送出去,代码这里就不帖了。
在上面的讲解中我们提到了一个消息队列(queue),它的作用是缓冲待发送的消息数据,其长度是由queue.size指定的,那么向其添加数据的代码在哪里?聪明的读者一定已经想到了send方法,这个我们本该一开始就讲的方法,其代码如下:
public void send(String topic,T event,int partition) {
        AsyncProducerStats.recordEvent();
        if(closed.get()) {
            throw new QueueClosedException("Attempt to add event to a closed queue.");
        }
        //简单封装下数据
        QueueItem<T> data = new QueueItem<T>(event, partition, topic);
        if(this.callbackHandler!=null) {
            data = this.callbackHandler.beforeEnqueue(data);
        }

        //向队列中添加该数据
        boolean added = false;
        try {
            if(enqueueTimeoutMs==0) {
                added = queue.offer(data);
            }else if(enqueueTimeoutMs<0) {
                    queue.put(data);
                    added = true;
                }else {
                    added = queue.offer(data, enqueueTimeoutMs, TimeUnit.MILLISECONDS);
                }
        } catch (InterruptedException e) {
            throw new AsyncProducerInterruptedException(e);
        }
        if(this.callbackHandler!=null) {
            this.callbackHandler.afterEnqueue(data, added);
        }
        if(!added) {
            AsyncProducerStats.recordDroppedEvents();
            throw new QueueFullException("Event queue is full of unsent messages, could not send event: " + event);
        }

    }
上面这段代码的核心逻辑很简单:封装data和将data添加到queue中。不过由于queue是有大小限制的(防止数据过多,占用大量内存),所以添加的时候有一定的策略,该策略可以通过queue.enqueueTimeout.ms来配置,即enqueueTimeoutMs。策略如下:
- 等于0---调用offer方法,无论是否成功,直接返回,意味着如果queue满了,消息会被舍弃,并返回false。
- 小于0---调用put方法,阻塞直到可以成功加入queue
- 大于0---调用offer(e,time,unit)方法,等待一段时间,超时的话返回false
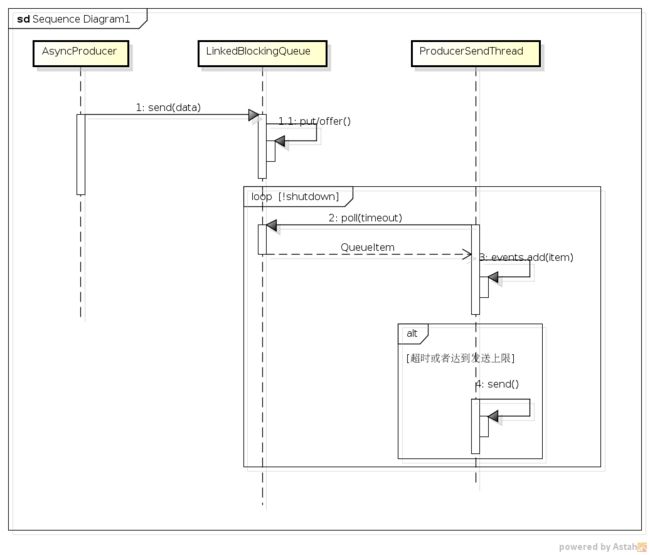
这下异步发送的逻辑,大家应该理清了吧,简单来讲,send向queue里面填数据,sendThread定时定量的发送数据。其简单的时序图如下:
上面的图只是简单地描绘了AsyncProducer的实现原理,并不对应实际方法。另外这只是一个AsyncProducer的图形,实际运行中,一个broker对应一个AsyncProducer,每一个producer都有自己的queue和sendThread。
小结
本文主要讲解了Jafka中Producer调用send方法后的逻辑,讲解了同步和异步发送实现原理和源码,希望对大家有所帮助。

