Android Drawable资源总结篇
LayerDrawable
LayerDrawable是一组按照顺序绘制的drawable资源,是由多个drawable资源重叠绘制而组成的,最后一个drawable会被绘制在最顶层。LayerDrawable资源的使用场景如下:
- 自定义SeekBar和水平进度条ProgressBar的样式
- 代码实现图片叠加效果
1.自定义SeekBar样式和水平进度条ProgressBar样式
<SeekBar android:id="@+id/seekbar" android:layout_width="match_parent" android:layout_height="wrap_content" android:max="10" <!-- maxHeight 用于指定seekBar的高度--> android:maxHeight="2dp" android:progress="3" <!-- 自定义seekBar进度条颜色资源--> android:progressDrawable="@drawable/seekbar_progress_drawable" <!-- seekBar上的图标 --> android:thumb="@drawable/ic_thumb" /> <ProgressBar <!-- 指定 进度条为水平方向--> style="@android:style/Widget.Material.ProgressBar.Horizontal" android:layout_width="match_parent" <!-- 指定进度条的高度--> android:layout_height="2dp" android:max="10" android:progress="3" <!-- 自定义进度条颜色资源--> android:progressDrawable="@drawable/seekbar_progress_drawable" /><?xml version="1.0" encoding="utf-8"?>
<layer-list xmlns:android="http://schemas.android.com/apk/res/android">
<!--进度条上进度背景颜色资源-->
<item android:id="@android:id/background" android:gravity="center">
<shape>
<corners android:radius="2dip" />
<solid android:color="@android:color/white" />
</shape>
</item>
<!-- 进度条上的进度颜色资源-->
<item android:id="@android:id/progress" android:gravity="center">
<!-- 一定要使用 clip标签-->
<clip>
<shape>
<corners android:radius="2dip" />
<solid android:color="#009eff" />
</shape>
</clip>
</item>
</layer-list>2.图片叠加效果
第一种效果
<ImageView android:layout_width="wrap_content" android:layout_height="wrap_content" android:src="@drawable/layer_drawable" />layer_drawable.xml资源文件如下:
<?xml version="1.0" encoding="utf-8"?> <layer-list xmlns:android="http://schemas.android.com/apk/res/android"> <item> <bitmap android:gravity="center" android:src="@drawable/ic_default_heard" /> </item> <item <!--当前图片距离上一张图片的位置--> android:left="35dp" android:top="35dp"> <bitmap android:gravity="center" android:src="@drawable/ic_default_heard" /> </item> <item <!--当前图片距离上一张图片的位置--> android:left="70dp" android:top="70dp"> <bitmap android:gravity="center" android:src="@drawable/ic_default_heard" /> </item> </layer-list> 第二种效果
<ImageView android:layout_width="wrap_content" android:layout_height="wrap_content" android:src="@drawable/layer_drawable1" />layer_drawable1.xml资源文件如下:
<?xml version="1.0" encoding="utf-8"?>
<layer-list xmlns:android="http://schemas.android.com/apk/res/android">
    <item  android:drawable="@drawable/ic_default_heard" android:gravity="center"></item>

    <item  android:drawable="@drawable/ic_default_heard" android:gravity="center" android:left="35dp" android:top="35dp"></item>

    <item  android:drawable="@drawable/ic_default_heard" android:gravity="center" android:left="70dp" android:top="70dp"></item>
</layer-list>
第三种
代码中实现图片重叠效果
效果和第二种一样
 Resources res = getResources();

        Drawable drawables[] = new Drawable [3];
        drawables[0] = res.getDrawable(R.drawable.ic_default_heard);
        drawables[1] = res.getDrawable(R.drawable.ic_default_heard);
        drawables[2] = res.getDrawable(R.drawable.ic_default_heard);
        LayerDrawable layerDrawable = new LayerDrawable(drawables);
        //一下代码设置图片之间的距离
        layerDrawable.setLayerInset(0, 20, 20, 0, 0);
        layerDrawable.setLayerInset(1, 40, 40, 0, 0);
        layerDrawable.setLayerInset(2, 60, 60, 0, 0);
        imageView = (ImageView) findViewById(R.id.imageView);
        imageView.setImageDrawable(layerDrawable);
ShapeDrawable
1.shape 资源属性解析如下
<?xml version="1.0" encoding="utf-8"?> <shape xmlns:android="http://schemas.android.com/apk/res/android" <!--矩形,椭圆,线性,环形--> android:shape=["rectangle" | "oval" | "line" | "ring"] > <!--矩形的四个角的圆角--> <corners <!--四个圆角都一样--> android:radius="integer" <!--左上角的角度--> android:topLeftRadius="integer" <!--右上角的角度--> android:topRightRadius="integer" <!--左下角的角度-> android:bottomLeftRadius="integer" <!--右下角的角度--> android:bottomRightRadius="integer" /> <!--drawable 填充颜色的梯度变化设置--> <gradient <!--颜色渐变类型:线性,圆形,扇形--> android:type=["linear" | "radial" | "sweep"] <!--颜色渐变的方向:0,90,180,270四个方向--> android:angle="integer" <!--开始的颜色--> android:startColor="color" <!--中间的颜色--> android:centerColor="integer"、 <!--结束的颜色--> android:endColor="color" <!--圆形的半径:注:当且仅当颜色渐变类型为 radial 圆形时有效--> android:gradientRadius="integer" <!--圆形的中心点位置:取值范围 0.0~1.0 之间。注:当且仅当颜色渐变类型为radial和sweep时有效--> android:centerX="integer" android:centerY="integer" /> <!--设置内容距离边框的距离--> <padding android:left="integer" android:top="integer" android:right="integer" android:bottom="integer" /> <!--设置drawable资源的尺寸大小--> <size android:width="integer" android:height="integer" /> <!--设置drawable填充的颜色--> <solid android:color="color" /> <!--设置drawable的描边--> <stroke <!--描边的宽度--> android:width="integer" <!--描边的颜色--> android:color="color" <!--描边虚线的宽度,注:添加此属性表示描边是虚线,否则默认描边为实线--> android:dashWidth="integer" <!--描边虚线之间的间距,注:添加此属性表示描边是虚线,否则默认描边为实线--> android:dashGap="integer" /> </shape>2.shape demo
1.矩形
以下代码描述的是一个大小为100*100dp,描边颜色黑色宽度为2dp的一个带有圆角为10dp的矩形
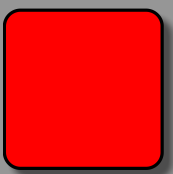
<?xml version="1.0" encoding="utf-8"?>
<shape xmlns:android="http://schemas.android.com/apk/res/android" android:shape="rectangle">
    <corners android:radius="10dp" />
    <stroke  android:width="2dp" android:color="@android:color/black" />
    <size  android:width="100dp" android:height="100dp" />
    <solid android:color="#ff0000" />
</shape>
2.虚线
![]()
<?xml version="1.0" encoding="utf-8"?>
<shape xmlns:android="http://schemas.android.com/apk/res/android" android:shape="line">

    <stroke  android:width="5dp" android:dashWidth="5dp" android:dashGap="5dp" android:color="@android:color/holo_red_dark" />
</shape>
android:dashGap=”5dp” 虚线的间距,如果没有设置该属性,则默认为0,也就是实线了。如果设置了android:dashGap=”5dp”属性,则android:dashWidth=”5dp”属性表示虚线的宽度。
3.环形
以下代码描述的是大小为100*100dp的环形,环形的内圆半径为40dp,环形的厚度为10dp。效果图如下:
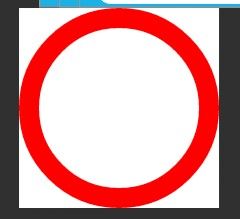
<?xml version="1.0" encoding="utf-8"?>
<shape xmlns:android="http://schemas.android.com/apk/res/android" android:innerRadius="40dp" android:shape="ring" android:thickness="10dp">
    <size  android:width="100dp" android:height="100dp" />
    <solid android:color="#ff0000" />
</shape>
属性解析如下:
当且仅当 android:shape=”ring”时,以下属性才有效
    //环形的内半径大小
    android:innerRadius="40dp"

    //Float类型。这个值表示内部环的比例,例如,如果android:innerRadiusRatio = " 5 ",那么内部的半径等于环的宽度除以5。这个值会被android:innerRadius重写。
    android:innerRadiusRatio="4"


     //环形的厚度
    android:thickness="10dp"

   // Float类型。厚度的比例。例如,如果android:thicknessRatio= " 2 ",然后厚度等于环的宽度除以2。这个值是被android:innerRadius重写。
    android:thicknessRatio="100"
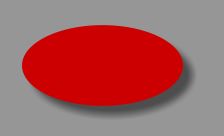
4.椭圆
<?xml version="1.0" encoding="utf-8"?>
<shape xmlns:android="http://schemas.android.com/apk/res/android" android:shape="oval">
    <size  android:width="100dp" android:height="50dp" />
    <solid android:color="@android:color/holo_red_dark" />
</shape>
此处的椭圆大小为100*50dp,当你将size 设置为宽高相等的椭圆时,也就变成了圆形了。
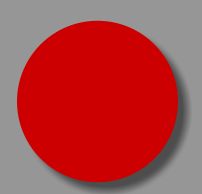
圆形
<?xml version="1.0" encoding="utf-8"?>
<shape xmlns:android="http://schemas.android.com/apk/res/android" android:shape="oval">
    <size  android:width="100dp" android:height="100dp" />
    <solid android:color="@android:color/holo_red_dark" />
</shape>
AnimationDrawable
开发者可以通过 AnimationDrawable来实现逐帧动画。比如进度条,比如wifi信号等动画效果。代码实现如下:
<?xml version="1.0" encoding="utf-8"?> <animation-list xmlns:android="http://schemas.android.com/apk/res/android"> <item <!--每一帧的图片--> android:drawable="@drawable/ic_wifi_0" <!--每一帧图片播放之间的时间间隔--> android:duration="200" /> <item android:drawable="@drawable/ic_wifi_1" android:duration="200" /> <item android:drawable="@drawable/ic_wifi_2" android:duration="200" /> <item android:drawable="@drawable/ic_wifi_3" android:duration="200" /> <item android:drawable="@drawable/ic_wifi_4" android:duration="200" /> <item android:drawable="@drawable/ic_wifi_5" android:duration="200" /> </animation-list>代码调用如下:
 ImageView imageViewWifi = (ImageView) findViewById(R.id.wifi);
        imageViewWifi.setImageResource(R.drawable.anima_drawable);
        AnimationDrawable animationDrawable = (AnimationDrawable) imageViewWifi.getDrawable();
        //启动动画
        animationDrawable.start();
ClipDrawable
图片裁剪
代码如下:
<?xml version="1.0" encoding="utf-8"?>
<clip xmlns:android="http://schemas.android.com/apk/res/android" android:clipOrientation="horizontal" android:drawable="@drawable/ic_background" android:gravity="left"></clip>
android:clipOrientation 裁剪图片的方向,分别有水平和垂直两个方向。
android:gravity 裁剪图片的初始位置。
调用代码如下:
 imageView = (ImageView) findViewById(R.id.imageView);
        ClipDrawable clipDrawable = (ClipDrawable) imageView.getDrawable();
        //修改ClipDrawable的level值,level值为0--10000;
 0:截取图片大小为空白,10000:截取图片为整张图片;
clipDrawable.setLevel(clipDrawable.getLevel()+5000);自定义圆形Drawable资源CircleDrawable
自定义圆形图片,通过继承Drawable来实现。
package com.android.camera.view;

import android.graphics.Bitmap;
import android.graphics.BitmapShader;
import android.graphics.Canvas;
import android.graphics.ColorFilter;
import android.graphics.Matrix;
import android.graphics.Paint;
import android.graphics.PixelFormat;
import android.graphics.Rect;
import android.graphics.RectF;
import android.graphics.Shader;
import android.graphics.drawable.Drawable;

import com.android.camera.util.LogUtil;

/** * Created by 850302 on 2016/1/11. */
public class CircularDrawable extends Drawable {

    private final static String TAG = "CircularDrawable";
    private final BitmapShader mBitmapShader;
    private final Paint mPaint;
    private Rect mRect;
    private int mLength;

    public CircularDrawable(Bitmap bitmap,int targetSize) {
        int w = bitmap.getWidth();
        int h = bitmap.getHeight();
        LogUtil.d(TAG,"the w = "+w+" the h = "+h +" the targetSize = "+targetSize);
        if (Math.min(w, h) < targetSize) {
            Matrix matrix = new Matrix();
            float scale = 1.0f;
            if (w > h) {
                scale = (float) targetSize / (float) h;
            } else {
                scale = (float) targetSize / (float) w;
            }
            matrix.postScale(scale, scale);
            bitmap = Bitmap.createBitmap(bitmap, 0, 0, w, h, matrix, true);
            w = (int) (w * scale);
            h = (int) (h * scale);
        }
        if (w > h) {
            mLength = h;
            bitmap = Bitmap.createBitmap(bitmap, (w - h) / 2, 0, h, h);
        } else if (w < h) {
            mLength = w;
            bitmap = Bitmap.createBitmap(bitmap, 0, (h - w) / 2, w, w);
        } else {
            mLength = w;
        }

        mBitmapShader = new BitmapShader(bitmap, Shader.TileMode.CLAMP, Shader.TileMode.CLAMP);
        mPaint = new Paint(Paint.ANTI_ALIAS_FLAG);
        mPaint.setShader(mBitmapShader);
    }

    @Override
    protected void onBoundsChange(Rect bounds) {
        super.onBoundsChange(bounds);
        mRect = bounds;
    }

    @Override
    public void draw(Canvas canvas) {
        canvas.drawRoundRect(new RectF(mRect), (mRect.right - mRect.left) / 2,
                (mRect.bottom - mRect.top) / 2, mPaint);
    }

    @Override
    public int getOpacity() {
        return PixelFormat.TRANSLUCENT;
    }

    @Override
    public void setAlpha(int alpha) {
        mPaint.setAlpha(alpha);
    }

    @Override
    public void setColorFilter(ColorFilter filter) {
        mPaint.setColorFilter(filter);
    }

    @Override
    public int getIntrinsicWidth() {
        return mLength;
    }

    @Override
    public int getIntrinsicHeight() {
        return mLength;
    }
}


