UIWindow使用介绍
我们在平时的开发过程中,也许忽略了UIWindow。因为系统已经帮我们处理了它的相关操作。比如在程序启动过程中。调用makeKeyAndVisible方法,使整个程序界面可见。
- (BOOL)application:(UIApplication *)application didFinishLaunchingWithOptions:(NSDictionary *)launchOptions {
    // Override point for customization after application launch.

    self.window = [[UIWindow alloc] initWithFrame:[UIScreen mainScreen].bounds];
    self.window.rootViewController = [self rootViewController];
    [self.window makeKeyAndVisible];

    return YES;
}
但大家常用的创建项目应该是 “Single View Application”, 苹果帮我们封装的更彻底了。 连上面的代码都看不到了。这对于我们理解底层的实现过程是不利的。
在IOS应用中,我们使用UIWindow和UIView来呈现界面。UIWindow并不包含任何默认的内容,但它是被当做UIView的容器,用于放置应用中所有的UIView。从继承关系来看,UIWindow继承自UIView,所以UIWIndow除了具有UIView的所有功能外,还增加了一些特有的属性和方法。
UIWindow的主要作用:
1.作为UIView的最顶层容器,包含应用显示所需要的所有UIView。
2.传递触摸消息和键盘事件给UIView(注:关于事件消息的传递,如果有什么疑问的,请参考我上一节的博客,请点击这里)。
关于系统对UIWindow的使用。
通常在一个程序中只会有一个UIWindow,但有些时候我们调用系统的控件(例如UIAlertView)时,IOS系统为了保证UIAlertView在所有的界面之上,它会临时创建一个新的UIWindow,通过将其UIWindow的UIWindowLevel设置的更高,让UIWindow盖在所有的应用界面之上(熟悉html的朋友应该知道,网上上面的“遮罩效果”,就是通过设置元素的z-index属性,来控制层级的上下关系,应该是一个道理)。
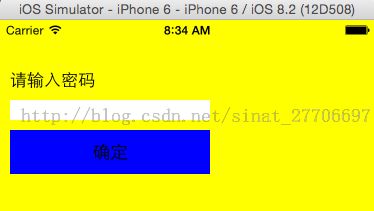
有时候,我们也希望在应用开发中,将某些界面覆盖在所有界面最上层。这个时候,我们就可以手工创建一个新的UIWindow。例如,想做一个密码保护功能,在用户从应用的任何界面按Home键退出,过段时间再从后台切换回来时,显示一个密码输入界面。
Demo界面很简单,每次启动应用或者从后台进入应用,都会显示输入密码界面,只有密码输入正确,才能使用应用。
大致代码如下:
PasswordInputWindow.h 文件。 定义一个继承自UIWindow的子类 PasswordInputWindow, shareInstance 是单例, show方法就是用来显示输入密码界面。
@interface PasswordInputView : UIWindow

+ (PasswordInputView *)shareInstance;

- (void)show;

@end
PasswordInputWindow.m 文件。
#import "PasswordInputView.h"

@interface PasswordInputView()
@property (nonatomic,weak) UITextField *textField;
@end

@implementation PasswordInputView

#pragma mark - Singleton
+ (PasswordInputView *)shareInstance {
    static id instance = nil;
    static dispatch_once_t onceToken;
    dispatch_once(&onceToken, ^{
        instance = [[self alloc] initWithFrame:[UIScreen mainScreen].bounds];
    });

    return instance;
}

#pragma mark - Initilize
- (instancetype)initWithFrame:(CGRect)frame {
    if (self = [super initWithFrame:frame]) {
        [self setup];
    }
    return self;
}

- (instancetype)initWithCoder:(NSCoder *)decoder {
    if (self = [super initWithCoder:decoder]) {
        [self setup];
    }
    return self;
}

- (void)setup {
    UILabel *label = [[UILabel alloc] initWithFrame:CGRectMake(10, 50, 200, 20)];
    label.text = @"请输入密码";
    [self addSubview:label];

    UITextField *textField = [[UITextField alloc] initWithFrame:CGRectMake(10, 80, 200, 20)];
    textField.backgroundColor = [UIColor whiteColor];
    textField.secureTextEntry = YES;
    [self addSubview:textField];
    self.textField = textField;

    UIButton *button = [[UIButton alloc] initWithFrame:CGRectMake(10, 110, 200, 44)];
    [button setBackgroundColor:[UIColor blueColor]];
    [button setTitle:@"确定" forState:UIControlStateNormal];
    [button setTitleColor:[UIColor blackColor] forState:UIControlStateNormal];
    [button addTarget:self action:@selector(completeButtonPressed:) forControlEvents:UIControlEventTouchUpInside];
    [self addSubview:button];

    self.backgroundColor = [UIColor yellowColor];
}

#pragma mark - Common Methods
- (void)completeButtonPressed:(UIButton *)button {
    if ([self.textField.text isEqualToString:@"123456"]) {
        [self.textField resignFirstResponder];
        [self resignKeyWindow];
        self.hidden = YES;
    } else {
        [self showErrorAlertView];
    }
}

- (void)showErrorAlertView {
    UIAlertView *alertView = [[UIAlertView alloc] initWithTitle:nil message:@"密码错误,请重新输入" delegate:nil cancelButtonTitle:@"OK" otherButtonTitles:nil, nil];
    [alertView show];
}

- (void)show {
    [self makeKeyWindow];
    self.hidden = NO;
}

@end
1.代码中我实现了initWithFrame和initWithCoder两个方法,这样可以保证,不管用户是纯代码还是xib实现的初始化,都没有问题。
2.如果我们创建的UIWindow需要处理键盘事件,那就要合理的将其设置为keyWindow。keyWindow是被系统设计用来接受键盘和其他非触摸事件的UIWindow。我们可以通过makeKeyWindow 和 resignKeyWindow 方法来将自己创建的UIWindow实例设置成keyWindow。
3. 加入以下代码,就可以保证,程序每次从后台进入的时候,先显示输入密码界面了。
- (void)applicationDidBecomeActive:(UIApplication *)application {
    [[PasswordInputView shareInstance] show];
}
