Android ListView item 选中高亮显示之高效实现方式
之前在一篇文章中提到过 Android ListView item 选中高亮显示 的实现方式,具体可以查看这篇博文,这里提供另外一种更为高效的方式。
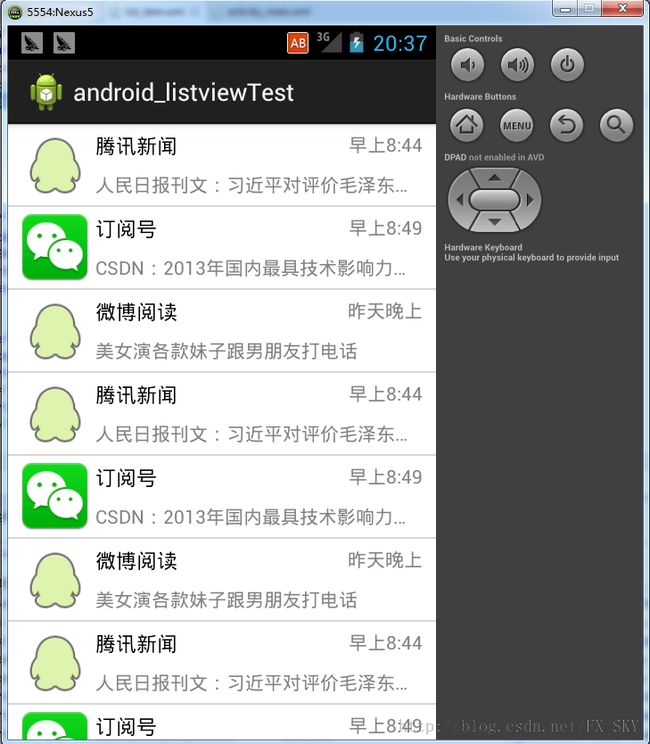
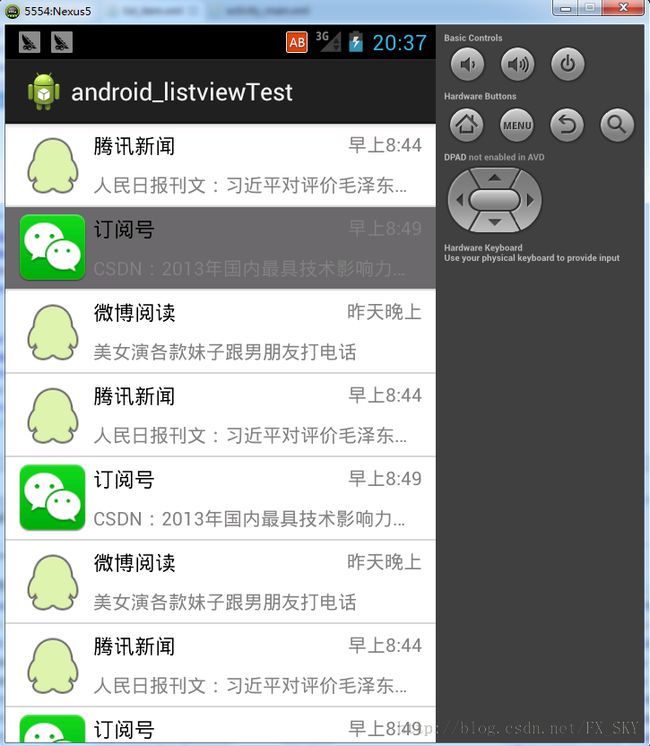
先看效果
未选中时
选中某一项时
下面通过一段代码来讲解实现过程
activity_main.xml
<RelativeLayout xmlns:android="http://schemas.android.com/apk/res/android"
    xmlns:tools="http://schemas.android.com/tools"
    android:layout_width="match_parent"
    android:layout_height="match_parent"
    tools:context=".MainActivity" >

    <ListView
        android:id="@+id/mListView"
        android:layout_width="match_parent"
        android:layout_height="match_parent"
        android:choiceMode="singleChoice"
        android:dividerHeight="1dp"
        android:divider="#d4d4d4"/>

</RelativeLayout>
list_selector.xml
<?xml version="1.0" encoding="utf-8"?>
<selector xmlns:android="http://schemas.android.com/apk/res/android">

    <item android:drawable="@drawable/list_item_bg_normal" android:state_activated="false"/>
    <item android:drawable="@drawable/list_item_bg_pressed" android:state_pressed="true"/>
    <item android:drawable="@drawable/list_item_bg_pressed" android:state_activated="true"/>

</selector>
<?xml version="1.0" encoding="utf-8"?>
<shape xmlns:android="http://schemas.android.com/apk/res/android" >

    <gradient
      android:startColor="@color/white"
      android:endColor="@color/white"
      android:angle="90" />

</shape>
<?xml version="1.0" encoding="utf-8"?>
<shape xmlns:android="http://schemas.android.com/apk/res/android" >

	<gradient
      android:startColor="@color/right_bg"
      android:endColor="@color/right_bg"
      android:angle="90" />
</shape>
list_item.xml
<?xml version="1.0" encoding="utf-8"?>
<RelativeLayout xmlns:android="http://schemas.android.com/apk/res/android"
    android:layout_width="match_parent"
    android:layout_height="wrap_content"
    android:background="@drawable/list_selector"
    android:paddingBottom="5dp"
    android:paddingLeft="10dp"
    android:paddingRight="10dp"
    android:paddingTop="5dp" >

    <ImageView
        android:id="@+id/iv_icon"
        android:layout_width="50dp"
        android:layout_height="50dp"
        android:layout_marginRight="5dp"
        android:src="@drawable/wechat_icon" />

    <TextView
        android:id="@+id/tv_title"
        android:layout_width="wrap_content"
        android:layout_height="wrap_content"
        android:layout_toRightOf="@id/iv_icon"
        android:textColor="@color/black"
        android:textSize="15sp" />

    <TextView
        android:id="@+id/tv_msg"
        android:layout_width="wrap_content"
        android:layout_height="wrap_content"
        android:layout_alignBottom="@id/iv_icon"
        android:layout_alignLeft="@id/tv_title"
        android:ellipsize="end"
        android:singleLine="true"
        android:textColor="@color/grey" />

    <TextView
        android:id="@+id/tv_time"
        android:layout_width="wrap_content"
        android:layout_height="wrap_content"
        android:layout_alignParentRight="true"
        android:layout_alignTop="@id/tv_title"
        android:textColor="@color/grey" />

</RelativeLayout>
ListView 适配器 WXAdapter代码如下:
package com.example.listviewtest.adapter;

import java.util.List;

import android.content.Context;
import android.view.LayoutInflater;
import android.view.View;
import android.view.ViewGroup;
import android.widget.BaseAdapter;
import android.widget.ImageView;
import android.widget.TextView;

import com.example.listviewtest.R;
import com.example.listviewtest.entity.WXMessage;

public class WXAdapter extends BaseAdapter {
    /**
     * 上下文对象
     */
    private Context mContext = null;
    private List<WXMessage> data;

    /**
     * @param mainActivity
     */
    public WXAdapter(Context ctx,List<WXMessage> data) {
        mContext = ctx;
        this.data = data;
    }

    @Override
    public int getCount() {
        return 100;
    }

    @Override
    public Object getItem(int position) {
        return null;
    }

    @Override
    public long getItemId(int position) {
        return position;
    }

    @Override
    public View getView(final int position, View convertView, ViewGroup parent) {

        ViewHolder holder;
        if (convertView == null) {
            convertView = LayoutInflater.from(mContext).inflate(R.layout.list_item, parent, false);
            holder = new ViewHolder();

            holder.iv_icon = (ImageView) convertView.findViewById(R.id.iv_icon);
            holder.tv_title = (TextView)convertView.findViewById(R.id.tv_title);
            holder.tv_msg = (TextView)convertView.findViewById(R.id.tv_msg);
            holder.tv_time = (TextView)convertView.findViewById(R.id.tv_time);

            convertView.setTag(holder);
        } else {// 有直接获得ViewHolder
            holder = (ViewHolder)convertView.getTag();
        }

        WXMessage msg = data.get(position);

        holder.tv_title.setText(msg.getTitle());
        holder.tv_msg.setText(msg.getMsg());
        holder.tv_time.setText(msg.getTime());

        holder.iv_icon.setImageResource(msg.getIcon_id());

        return convertView;
    }

    static class ViewHolder {

        TextView tv_title;
        TextView tv_msg;
        TextView tv_time;
        ImageView iv_icon;
    }
}
MainActivity代码如下:
package com.example.listviewtest;

import java.util.ArrayList;
import java.util.List;
import android.app.Activity;
import android.os.Bundle;
import android.view.View;
import android.widget.AdapterView;
import android.widget.AdapterView.OnItemClickListener;
import android.widget.ListView;
import com.example.listviewtest.adapter.WXAdapter;
import com.example.listviewtest.entity.WXMessage;

public class MainActivity extends Activity implements OnItemClickListener {
	private List<WXMessage> data = new ArrayList<WXMessage>();
	private ListView mListView;

	@Override
	protected void onCreate(Bundle savedInstanceState) {
		super.onCreate(savedInstanceState);
		setContentView(R.layout.activity_main);

		initData();

		findView();
	}

	private void initData() {

		for (int i = 0; i < 50; i++) {
			WXMessage msg = null;
			if (i % 3 == 0) {
				msg = new WXMessage("腾讯新闻", "人民日报刊文:习近平对评价毛泽东提6个重要观点", "早上8:44");
				msg.setIcon_id(R.drawable.qq_icon);
			} else if (i % 3 == 1) {
				msg = new WXMessage("订阅号", "CSDN:2013年国内最具技术影响力公司", "早上8:49");
				msg.setIcon_id(R.drawable.wechat_icon);
			} else {
				msg = new WXMessage("微博阅读", "美女演各款妹子跟男朋友打电话", "昨天晚上");
				msg.setIcon_id(R.drawable.qq_icon);
			}

			data.add(msg);
		}
	}

	private void findView() {

		mListView = (ListView) findViewById(R.id.mListView);

		WXAdapter mAdapter = new WXAdapter(this, data);
		mListView.setAdapter(mAdapter);

		mListView.setOnItemClickListener(this);
	}

	@Override
	public void onItemClick(AdapterView<?> parent, View view, int position,
			long id) {

		mListView.setItemChecked(position, true);
//		mListView.setSelection(position);
	}

}
这里我们通过 ListView.setItemChecked(int position, boolean value)方法来选中被点击的Item,这时之前在list_item中设置的android:background="@drawable/list_selector"就开始生效了。
怎么样,比之前通过Adapter刷新整个ListView的效率要高很多吧!
Demo下载地址:http://download.csdn.net/detail/fx_sky/6821071

