Struts2SH整合
Spring2.5+Hibernate3.6+Struts2.1整合开发
Hibernate-3.6:
${HIBERNATE_HOME}/hibernate3.jar
${HIBERNATE_HOME}/lib/required/*.jar
${HIBERNATE_HOME}/lib/jpa/hibernate-jpa-2.0-api-1.0.0.Final.jar
Spring2.5:
${SPRING_HOME}/dist/spring.jar
${SPRING_HOME}/lib/aspectj/*.jar(有2个)
${SPRING_HOME}/lib/cglib/cglib-nodep-2.1_3.jar
${SPRING_HOME}/lib/jakarta-commons/commons-logging.jar
Struts-2.1.8.1:
${Struts2_Home}/apps/struts2-blank-2.1.8.1.war/WEB-INF/lib/*.jar
${Struts2_Home}/lib/struts2-spring-plugin-2.1.8.1.jar
工具包:
commons-codec.jar
commons-lang.jar
数据库驱动有其他:
mysql-connector-java-5.1.5-bin.jar
log4j-1.2.15.jar
c3p0-0.9.1.2.jar
好了,就这些了,添加到工程之后,再仔细检查一下是否有重复的jar包,保留高版本的jar包,以免日后发生冲突.
接下来还是先将Spring和Hibernate打通,然后做个测试.
准备实体
建立最经典的类:User类,三个属性即可:
public class User {
private Long id;
private String name;
private String password;
生成Getter()、Setter()方法.
搭建Hibernate
创建对应的映射文件:
<hibernate-mapping package="cn.domain">
<class name="User" table="user">
<id name="id">
<generator class="native">generator>
id>
<property name="name">property>
<property name="password">property>
class>
hibernate-mapping>
Hibernate可以通过反射获取类型,所以不配置也行,如果是字符串,在Mysql中的类型是:VARCHAR(255).创建主配置文件:
<hibernate-configuration>
<session-factory>
<property name="hibernate.dialect"> org.hibernate.dialect.MySQL5Dialectproperty>
<property name="hibernate.connection.driver_class">com.mysql.jdbc.Driverproperty>
<property name="hibernate.connection.url">jdbc:mysql:///testproperty>
<property name="hibernate.connection.username">rootproperty>
<property name="hibernate.connection.password">rootproperty>
<property name="hibernate.show_sql">trueproperty>
<property name="hibernate.hbm2ddl.auto">updateproperty>
<mapping resource="cn/domain/User.hbm.xml" />
session-factory>
hibernate-configuration>
@Test
public void testTableStructure() {
Configuration configuration = new Configuration().configure();
SessionFactory sessionFactory = configuration.buildSessionFactory();
sessionFactory.close();
}
在数据库中查看表结构.
配置Spring
这里没有特别的业务需求,照三层架构反而太麻烦,所以把Service层当做是Service层和Dao层来使用.把Hibernate.cfg.xml中连接信息注释掉(不再使用):
<hibernate-configuration>
<session-factory>
         org.hibernate.dialect.MySQL5Dialect


        com.mysql.jdbc.Driver


        jdbc:mysql:///test


        root


        root


        true

             -->


             <property name="hibernate.hbm2ddl.auto">updateproperty>


             <mapping resource="cn/domain/User.hbm.xml" />
         session-factory>
     hibernate-configuration>
在Spring的配置文件中要引入aop、tx、context的命名空间,配置SessionFactory:
<bean id="sessionFactory" class="org.springframework.orm.hibernate3.LocalSessionFactoryBean">
<property name="configLocation" value="classpath:hibernate.cfg.xml">property>
<property name="dataSource">
<bean class=" com.mchange.v2.c3p0.ComboPooledDataSource">
<property name="jdbcUrl" value="jdbc:mysql:///test">property>
<property name="driverClass" value="com.mysql.jdbc.Driver">property>
...
bean>
property>
bean>
这样写可以,但是大多数情况下我们应该把jdbc的配置专门放到一个properties的文件中,不管是修改还是维护都方便一些.所以我们现在新建一个文件:jdbc.properties.在里面存入数据库的连接信息,包括:url、driver、username、password,然后在Spring中引入jdbc.properties文件,用占位符在配置文件里面代替,就像这样:
<context:property-placeholder location="classpath:jdbc.properties"/>
<bean id="sessionFactory" class="org.springframework.orm.hibernate3.LocalSessionFactoryBean">
<property name="configLocation" value="classpath:hibernate.cfg.xml">property>
<property name="dataSource">
<bean class="com.mchange.v2.c3p0.ComboPooledDataSource">
<property name="jdbcUrl" value="${url}">property>
<property name="driverClass" value="${driver}">property>
<property name="user" value="${username}">property>
<property name="password" value="${password}">property>
bean>
property>
bean>
在组件上加注解,显式地交给Spring管理,可以像上述配置SessionFactory一样配置组件,一个组件对应一个bean,很麻烦,所以通常的做法是使用组件自动扫描:
         *自动扫描与装配Bean
          通过把AutowiredAnnotationBeanPostProcessor 和CommonAnnotationBeanPostProcessor
          隐式地包含进来以进行注解解析
      -->
     <context:component-scan base-package="cn">context:component-scan>
我们还是在测试类里面进行测试,加入Struts之后再转到WEB上.
public class UserServiceTest {
@Test
public void testSaveUser() {
ApplicationContext act = new ClassPathXmlApplicationContext("applicationContext.xml");
UserService userService = (UserService) act.getBean("userService");
User user = new User();
user.setName("zhang");
user.setPassword("1234");
userService.save(user);
}
}
我们现在使用的是两层的架构,还需要一个Service层,就叫UserService,也不分什么接口和实现类了,只要一个就行.完整Service类如下:
@Service
@Transactional
public class UserService {
@Resource
private SessionFactory sessionFactory;
public void save(User user) {
user.setPassword(md5(user.getPassword()));
this.getSession().save(user);
}
private String md5(String data){
return DigestUtils.md5Hex(data);
}
public Session getSession() {
return sessionFactory.getCurrentSession();
}
}
我们不用在类上加@Scope注解,因为没有公共的资源,不会出现线程不安全.DigestUtils工具类是commons-codec.jar包中的,这个包中都是跟编码有关的帮助类.SessionFactory由Spring注入进来,我们只需要调用SessionFactory的getCurrentSession就能得到当前线程上绑定的Session.但是线程上什么时候绑定了Session呢?我们将@Transactional注解去除跑一遍,就能知道了:
不能过,也是正常的.我们来看看这个异常报的是什么:
org.hibernate.HibernateException: No Hibernate Session bound to thread, and configuration does not allow creation of non-transactional one here
"没有Hibernate Session绑定在线程上,配置不允许在非事务的这里创建".
其实也就是说Spring会在你开启事务的地方绑定一个Session在你的线程上,如果你没有开启事务,那么你调用getCurrentSession()进行抛异常,如果你不想这做,也可以使用openSession()打开一个新的Session,在这种情况下,就算你没有使用事务,也不会有问题,但是如果你同时开启了事务,你就会再得到一个新的Session,如下:
public Session getSession() {
Session session1 = sessionFactory.getCurrentSession();
System.out.println(session1.hashCode());
session1 = sessionFactory.openSession();
System.out.println(session1.hashCode());
session1 = sessionFactory.getCurrentSession();
System.out.println(session1.hashCode());
return session1;
/**
* 结果:
* 26130360
* 4368408
* 26130360
*/
}
这说明Spring在线程上绑定的Session还在,你又获取了一个新的,而且旧的新的共存.我现在在把程序改动一下,更说明问题:
public Session save(User user) {
Session session = this.getSession();
session.save(user);
return session;
}
public Session getSession() {
Session session1 = sessionFactory.getCurrentSession();
System.out.println(session1.hashCode());
session1 = sessionFactory.openSession();
System.out.println(session1.hashCode());
return session1;
}
将重新打开的Session返回给调用方:
Session session1 = userService.save(user);
System.out.println("-------------事务关闭之后--------------");
SessionFactory sessionFactory = (SessionFactory) act.getBean("sessionFactory");
//还是抛之前的那个异常,因为线程上已经没有绑定Session了
//Session session = sessionFactory.getCurrentSession();
//System.out.println(session);
System.out.println(session1.hashCode());
/**
* 结果:
19492125 这是用getCurrentSession()获取的
8125444 这是用新获得的
-------------事务关闭之后--------------
8125444
*/
这说明你打开的Session要你自己关闭,多此一举!Spring绑定的Session会随事务的提交而自动关闭.如果你已经开启了事务,就不要再重新打开了!
好了,使用getCurrentSession()返回的Session调用save()方法,就能完成Spring2.5+Hibernate3.6的测试了.
搭建Struts
先建立一个UserAction,维护一个UsersService,由Spring注入,当然要交给Spring容器管理才行:
@Controller
public class UserAction extends ActionSupport {
private User user;
@Resource
private UserService userService;
public String save() {
userService.save(user);
return ActionSupport.SUCCESS;
}
public User getUser() {
return user;
}
public void setUser(User user) {
this.user = user;
}
}
再创建struts.xml文件:
<struts>
<constant name="struts.devMode" value="true" />
<package name="default" namespace="/" extends="struts-default">
<action name="userAction_*" class="cn.action.UserAction" method="{1}">
<result>/index.jspresult>
action>
package>
struts>
在index.jsp中输出用户名:
<body>
好吧,你成功了!<br/>
${user.name }
body>
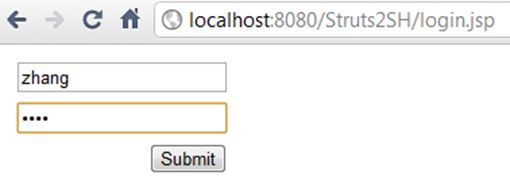
准备登录页面(login.jsp):
<body>
<s:form action="userAction_save">
<s:textfield name="user.name">s:textfield>
<s:password name="user.password">s:password>
<s:submit>s:submit>
s:form>
body>
最后还在修改下web.xml文件,因为UserAction应该是由Spring来管理,虽然我加上了@Controller注解,但是Action默认是程序运行期间只有一个,而且是服务器启动的时候创建的,这就要求Spring至少也要在服务器启动的时候启动.怎么办呢?配置监听器就可以了,这是Spring提供的ServletContextListener监听器:
<listener>
<listener-class>org.springframework.web.context.ContextLoaderListenerlistener-class>
listener>
          将Spring的配置文件载入,并以contextConfigLocation为Key,存储在ServletContext中
          Spring的容器默认会以contextConfigLocation去取,跟我们无关
     -->
     <context-param>
         <param-name>contextConfigLocationparam-name>
         <param-value>classpath:applicationContext*.xmlparam-value>
     context-param>
好了,启动服务器,做最后的测试:
服务器里的程序太多,启动时间长了点,但是没报错:
打开登录页面,随便输入就可以了,会存进数据库:
点提交后会转到UserAction的save()方法,然后返回"success",再转到index.jsp页面,如果能显示上面输入的用户名,就代表成功了.
页面跳转了,而且也显示出来了,我虽然没有把User存在Session(会话)域里面,但是属于同一个请求,struts的标签也能回显.
最后看一眼数据库,我存的密码是1234,应该给我存的是md5摘要:
数据库也正常.那么,到这里就结束了.
如果本文有任何问题,请及时指出,以免对后来者产生不必要的困扰,不胜感激!


