本文将介绍Jafka中Consumer的源码框架,在之前consumer的使用教程中已经讲过,消息消费有同步和异步两种方式,我们针对这两种方式分别讲解其源码实现。
同步消费源码实现
同步消费的代码如下:
SimpleConsumer consumer = new SimpleConsumer("127.0.0.1",9092);
long offset = 0;
//指定fetch请求的参数:topic partition offset maxSize
FetchRequest fetch = new FetchRequest("person",0,offset,1024*1024);
try {
    //获取消息数据集合
    ByteBufferMessageSet messageSet = consumer.fetch(fetch);
    //遍历消息数据集合
    for(MessageAndOffset messageAndOffset:messageSet){
    //从消息中获取代表实际数据的byte数组
    ByteBuffer buffer = messageAndOffset.message.payload();
    byte[] objBytes = new byte[buffer.remaining()];
    buffer.get(objBytes);
    //反序列化字节数组为对象
    ObjectInputStream ois = new ObjectInputStream(new ByteArrayInputStream(objBytes));
    Person tmpPerson = (Person)ois.readObject();
    System.out.println("person:"+tmpPerson.getName()+","+tmpPerson.getId());
    ois.close();
}
} catch (IOException e) {
    e.printStackTrace();
} catch (ClassNotFoundException e) {
    e.printStackTrace();
}
上述代码的逻辑很简单:
-
初始化一个SimpleConsumer对象,传入broker的url和端口号。
-
创建一个FetchRequest,传入topic、partition、起始offset值和要抓取的最大字节数。
-
调用consumer的fetch方法,返回ByteBufferMessageSet,该类中封装了获取的消息。
- 遍历ByteBufferMessageSet中的消息,进行处理
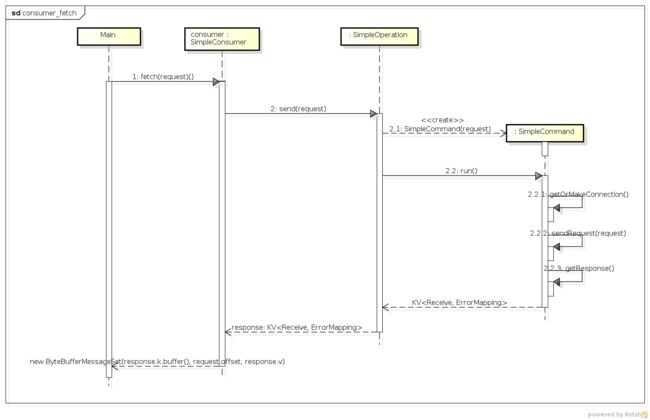
下面我们来看下consumer.fetch方法的时序图。
我们结合时序图来说明下consumer fetch的过程。
- SimpleConsumer继承了SimpleOperation,consumer.fetch会调用其继承下来的send方法(
2),send方法的代码如下:
public KV<Receive, ErrorMapping> send(Request request) throws IOException {
        return new SimpleCommand(request).run();
}其创建了一个SimpleCommand对象(2.1),并调用其run方法(2.2),返回了一个对,key是一个Receive对象,其中包含了取得的消息数据。我们来看下其run方法。
public KV<Receive, ErrorMapping> run() throws IOException {
     synchronized (lock) {
     //建立到broker的连接
         getOrMakeConnection();
         try {
         //发送请求
             sendRequest(request);
             //获取返回值
             return getResponse();
         } catch (IOException e) {
             logger.info("Reconnect in fetch request due to socket error:", e);
             try {
                 channel = connect();
                 sendRequest(request);
                 return getResponse();
             } catch (IOException e2) {
                 throw e2;
             }
         }
         //
     }
}
上述代码的逻辑很简单:建立到broker的连接;发送请求;获取返回值。getOrMakeConnection在consumer和broker之间建立阻塞连接,这里就不呈现其源码了。我们来看下sendRequest的源码。
protected void sendRequest(Request request) throws IOException {
        new BoundedByteBufferSend(request).writeCompletely(channel);
}
sendRequest方法新建了一个BoundedByteBufferSend对象,并调用其writeCompletely方法,将request的内容发送到了broker。关于send的知识,在这里讲过,就不再赘述了。至此,fetch的请求就发送出去了,那么来看getResponse的代码。
protected KV<Receive, ErrorMapping> getResponse() throws IOException {
        BoundedByteBufferReceive response = new BoundedByteBufferReceive();
        response.readCompletely(channel);
        return new KV<Receive, ErrorMapping>(response, ErrorMapping.valueOf(response.buffer().getShort()));
}
getResponse首先创建了一个BoundedByteBufferReceive对象,然后调用其readCompletely方法,从channel中将收到的数据读取到response中,并作为key返回。fetch方法最终的返回值是一个ByteBufferMessageSet对象,它封装了response.k.buffer(),buffer()返回的便是broker传回给consumer的结果。至此,consumer的fetch过程也就结束了。
异步消费源码实现
同步消费是单线程阻塞完成的,从其代码调用上,我们可以看到其api封装比较靠近底层,对使用者不友好,一般没有特殊需求不推荐使用。异步消费封装了对用户友好的api,在同步消费的基础上实现了多线程消费数据的功能。我们先来理一下它的相关代码:
Properties props = new Properties();
//指明zookeeper地址
props.setProperty("zk.connect","localhost:2181");
//指明consumer group的名字
props.setProperty("groupid","test_group");
ConsumerConfig config = new ConsumerConfig(props);
//创建了ZookeeperConsumerConnector,连接zookeeper,获取当前topic的数据信息
ConsumerConnector connector = Consumer.create(config);
//指明每一个topic的消费线程数
Map<String,Integer> topicCountMap = new HashMap<String, Integer>();
topicCountMap.put("hehe",2);
topicCountMap.put("hehe3",1);
//创建消费消息流,key为topic,value为MessageStream的list,大小为上面map中指定的大小
Map<String,List<MessageStream<String>>> streams = connector.createMessageStreams(topicCountMap,new StringDecoder());
List<MessageStream<String>> messageStreamList = streams.get("hehe");
messageStreamList.addAll(streams.get("hehe3"));
final AtomicInteger count = new AtomicInteger(0);
final AtomicInteger streamCount = new AtomicInteger(0);
//创建线程池,该线程池数目必须不小于上面所有的消费线程数
ExecutorService executor = Executors.newFixedThreadPool(3);
//提交消费任务,开始消费消息
for(final MessageStream<String> stream:messageStreamList){
executor.execute(new Runnable() {
    @Override
    public void run() {
        int threadNum = streamCount.incrementAndGet();
        //从stream中获取消息,此处为阻塞式消费,即当没有新消息到来时,阻塞直到新消息到来或者线程结束
        //通过BlockingQueue实现,后续内容会详细讲解
        for(String msg:stream){
        System.out.println("stream#"+threadNum+":msg#"+count.incrementAndGet()+"=>"+msg);
        }
    }
});
}
try {
    executor.awaitTermination(1, TimeUnit.HOURS);
} catch (InterruptedException e) {
    e.printStackTrace();
}
其基本的流程如下:
-
构建配置信息,将consumer的配置写入其中,这里配置了zookeeper的连接地址和consumer group的名字,这是最基本的配置。
-
根据配置创建ConsumerConnector,由名字可猜测该对象负责consumer连接zk、broker并获取数据的工作。这里使用的是其子类ZookeeperConsumerConnector。
-
指明要消费的topic以及并行消费的线程数目,可以指定多个topic。
-
使用connector来创建消息消费流(MessageStream),这里
List<MessageStream>的数目是由上面配置的线程数来决定的。 - 每一个MessageStream中包含了从broker传来的消息,遍历它便可以获取数据,进行自己的操作
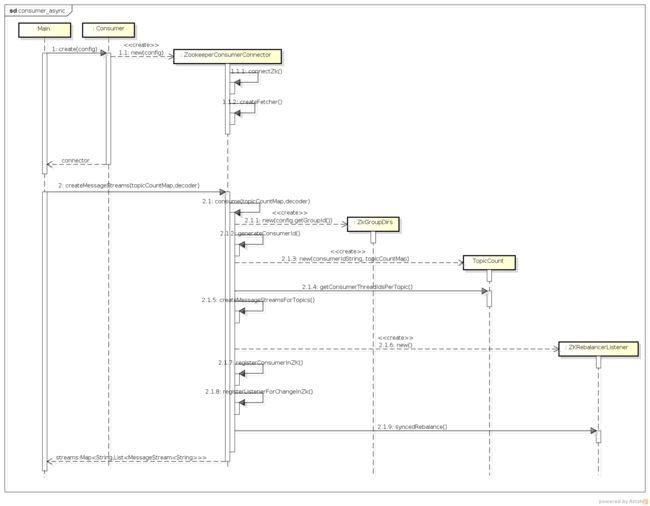
这个流程虽然有些复杂,但使用者只要了解了并行消费的特点,应该可以很好地使用。我们来看下其时序图:
是不是看的有些晕?没关系,我们来一步步地看。
- Consumer.create方法创建了一个ZookeeperConsumerConnector对象,其初始化函数如下:
public ZookeeperConsumerConnector(ConsumerConfig config) {
        this(config, true);
    }

public ZookeeperConsumerConnector(ConsumerConfig config, boolean enableFetcher) {
        this.config = config;
        this.enableFetcher = enableFetcher;
        //
        this.topicRegistry = new Pool<String, Pool<Partition, PartitionTopicInfo>>();
        this.queues = new Pool<StringTuple, BlockingQueue<FetchedDataChunk>>();
        //
        // 建立到zookeeper的连接
        connectZk();
        //创建一个Fetcher,用于抓取数据
        //todo:此处fetcher在consumer确定要消费的partition后,调用 fetcher.startConnection,开始连接到broker,抓取数据
        createFetcher();
        if (this.config.isAutoCommit()) {
            logger.info("starting auto committer every " + config.getAutoCommitIntervalMs() + " ms");
            //启动自动提交消费offset的线程
            scheduler.scheduleWithRate(new AutoCommitTask(), config.getAutoCommitIntervalMs(),
                    config.getAutoCommitIntervalMs());
        }
    }
这里有几个重要的变量介绍一下:
-
topicRegistry:记录了该consumer消费的所有topic对应的partition,从中可以获取消费的当前offset等等(存储在PartitionTopicInfo中),本身是一个map结构,内容为<topic,>。
- queues:StringTuple为一个二元组,这里就是类型,queues也是一个map结构,其内容为<(topic,threadId),dataInfoList)。其value中存储了该topic下的消费线程threadId从broker拉取到的数据,在实时抓取的应用场景下,当有消息到达broker后,该consumer便会间隔一段时间后将数据获取,填入dataInfoList,之后返回给前台用户来消费就可以了。
该connector还建立了到zookeeper的连接,以备后面读取zk上注册的信息,又建立了一个fetcher,为之后建立到broker的连接做好准备。最后,如果用户配置了自动将消费的offset信息提交到zookeeper存储的话,这里会开启一个后台线程,定期地将本consumer的消费信息(offset值)保存到zookeeper。
- createMessageStreams是connector的关键函数,它负责创建consumer的多个消费线程,拉取数据。再讲解其源码之前,我们来考虑其实现的几个关键问题,然后带着这些问题去看源码,会大大提高效率。
1.consumer连接了zookeeper,它从zookeeper获取了哪些信息?
我们可以先来猜测下,每个topic的具体数据是存放在各个broker中的,并且以broker-partition的形式存储在broker中,那么consumer要消费某个topic就一定要获取这个topic存放的broker,以及这个broker上该topic的broker-partition列表,另外该consumer还应该直到它所在consumer group下有哪些个consumer,保证自己分配到的broker-partition不与其他consumer冲突。总结一下:broker信息、要消费topic的所有broker-partition、同一组的其他consumer。实际上是否如此哪?让我们到源码中去验证。
2.consumer是如何获取自己可以请求数据的broker-partition列表的?或者说consumer group是如何分配某topic下所有的broker-partition给其下多个consumer的?
3.consumer获取自己的broker-partition列表后是何时建立到broker的连接,以及如何实时获取新数据的?
下面我们在源码中找答案。createMessageStreams调用了自身的consume方法,这个方法有些长,如下:
 private <T> Map<String, List<MessageStream<T>>> consume(Map<String, Integer> topicCountMap, Decoder<T> decoder) {
        if (topicCountMap == null) {
            throw new IllegalArgumentException("topicCountMap is null");
        }
        //初始化zk上consumer相关的路径名称
        ZkGroupDirs dirs = new ZkGroupDirs(config.getGroupId());
        //<topic,msgStreamList>
        Map<String, List<MessageStream<T>>> ret = new HashMap<String, List<MessageStream<T>>>();
        String consumerUuid = config.getConsumerId();
        if (consumerUuid == null) {
            //自动生成consumerUuid=> hostname-currenttime-uuid.sub(8)
            consumerUuid = generateConsumerId();
        }
        logger.info(format("create message stream by consumerid [%s] with groupid [%s]", consumerUuid,
                config.getGroupId()));
        //
        //consumerIdString => groupid_consumerid
        final String consumerIdString = config.getGroupId() + "_" + consumerUuid;
        final TopicCount topicCount = new TopicCount(consumerIdString, topicCountMap);
        for (Map.Entry<String, Set<String>> e : topicCount.getConsumerThreadIdsPerTopic().entrySet()) {
            final String topic = e.getKey();
            final Set<String> threadIdSet = e.getValue();
            final List<MessageStream<T>> streamList = new ArrayList<MessageStream<T>>();
            for (String threadId : threadIdSet) {
                LinkedBlockingQueue<FetchedDataChunk> stream = new LinkedBlockingQueue<FetchedDataChunk>(
                        config.getMaxQueuedChunks());
                queues.put(new StringTuple(topic, threadId), stream);
                streamList.add(new MessageStream<T>(topic, stream, config.getConsumerTimeoutMs(), decoder));
            }
            ret.put(topic, streamList);
            logger.debug("adding topic " + topic + " and stream to map.");
        }
        //
        //listener to consumer and partition changes
        ZKRebalancerListener<T> loadBalancerListener = new ZKRebalancerListener<T>(config.getGroupId(),
                consumerIdString, ret);
        this.rebalancerListeners.add(loadBalancerListener);
        loadBalancerListener.start();
        registerConsumerInZK(dirs, consumerIdString, topicCount);

        //register listener for session expired event
        zkClient.subscribeStateChanges(new ZKSessionExpireListener<T>(dirs, consumerIdString, topicCount,
                loadBalancerListener));
                //监控consumer的变化
        zkClient.subscribeChildChanges(dirs.consumerRegistryDir, loadBalancerListener);

        for (String topic : ret.keySet()) {
            //register on broker partition path changes
            final String partitionPath = ZkUtils.BrokerTopicsPath + "/" + topic;
            zkClient.subscribeChildChanges(partitionPath, loadBalancerListener);
        }

        loadBalancerListener.syncedRebalance();
        return ret;
    }
这个方法列出了异步消费的主干代码,我们来看看都做了什么:
-
创建ZkGroupDirs对象,内部封装了zookeeper的几个路径,如:/consumers/groups/[groupid]等,方便后面调用。之后获取consumerId,
-
获取或者系统生成consumerId,一般交由系统生成,格式为groupId_hostname-currenttime-uuid.sub(8)(uuid为调用函数库生成的uuid)。
-
创建TopicCount对象,调用其getConsumerThreadIdsPerTopic方法会根据topicCountMap为每个topic及其线程数生成每个consumerThreadId的名称,规则就是consumerId后面加"-"和线程数,以此作为这些消费线程的唯一性标识。其返回的数据是map类型,诸如这种形式。
- 遍历上述map数据,将每个topic的consumerThreadId列表转换为MessageStream,并添加返回值ret中。大家注意,MessageStream出现了,这是API中出现过的类,我们来简单看下它的源码。
public class MessageStream<T> implements Iterable<T> {

    final String topic;

    final BlockingQueue<FetchedDataChunk> queue;

    final int consumerTimeoutMs;

    final Decoder<T> decoder;

    private final ConsumerIterator<T> consumerIterator;

    public MessageStream(String topic, BlockingQueue<FetchedDataChunk> queue, int consumerTimeoutMs, Decoder<T> decoder) {
        super();
        this.topic = topic;
        this.queue = queue;
        this.consumerTimeoutMs = consumerTimeoutMs;
        this.decoder = decoder;
        this.consumerIterator = new ConsumerIterator<T>(topic, queue, consumerTimeoutMs, decoder);
    }

    public Iterator<T> iterator() {
        return consumerIterator;
    }

    /**
     * This method clears the queue being iterated during the consumer
     * rebalancing. This is mainly to reduce the number of duplicates
     * received by the consumer
     */
    public void clear() {
        consumerIterator.clearCurrentChunk();
    }
}
可以看到每一个MessageStream对应一个topic,还有自己的数据队列queue,而迭代的实现是通过ConsumerIterator,这个迭代器的实现就不细讲了,它的功能就是不断地从queue中取出数据,这里T就是我们发送消息时指定的数据类型,一般都是用String,比如我们上面举的例子。有了这个迭代器,便有了代码中for(String msg:stream)类似的代码。
MessageStream的实现是简单的,可是这最后的返回值都构造好了,我们上面提到的3个问题却还是没有答案,那我们就接着往下看吧。
-
35-51行是与zookeeper有关的代码,创建了一个负载均衡的listener,将该consumer注册到zookeeper上,监听consumer和broker的变化,变化时触发负载均衡的listener。
- 后面调用了loadbalancer的syncedRebalance方法,然后就return ret了。那我们那3个问题的答案就只能在这个方法里了。我们来看下这个方法的代码:
public void syncedRebalance() {
            synchronized (rebalanceLock) {
                for (int i = 0; i < config.getMaxRebalanceRetries(); i++) {
                    if (isShuttingDown.get()) {//do nothing while shutting down
                        return;
                    }
                    logger.info(format("[%s] rebalancing starting. try #%d", consumerIdString, i));
                    final long start = System.currentTimeMillis();
                    boolean done = false;
                    //读取所有的broker
                    Cluster cluster = ZkUtils.getCluster(zkClient);
                    try {
                        done = rebalance(cluster);
                    } catch (Exception e) {
                        logger.info("exception during rebalance ", e);
                    }
                    ...
            }
        }

        private boolean rebalance(Cluster cluster) {
            //以topic做key组织threadId---当前consumer
            Map<String, Set<String>> myTopicThreadIdsMap = ZkUtils.getTopicCount(zkClient, group, consumerIdString)
                    .getConsumerThreadIdsPerTopic();
            //以topic做key组织threadid---所有的consumer
            //这里的consumer应该是每一个thread,即线程级别的
            Map<String, List<String>> consumersPerTopicMap = ZkUtils.getConsumersPerTopic(zkClient, group);
            //topic的broker-partition列表
            Map<String, List<String>> brokerPartitionsPerTopicMap = ZkUtils.getPartitionsForTopics(zkClient,
                    myTopicThreadIdsMap.keySet());
             //关闭当前抓取线程,否则会造成消息重复消费
            closeFetchers(cluster, messagesStreams, myTopicThreadIdsMap);
            //释放该consumer对topic对应broker-partition的绑定,因为重新分配后,该broker-partition可能由其他consumer处理
            releasePartitionOwnership(topicRegistry);
            Map<StringTuple, String> partitionOwnershipDecision = new HashMap<StringTuple, String>();
            Pool<String, Pool<Partition, PartitionTopicInfo>> currentTopicRegistry = new Pool<String, Pool<Partition, PartitionTopicInfo>>();
            //遍历当前consumer的topic下面的所有topicThread
            for (Map.Entry<String, Set<String>> e : myTopicThreadIdsMap.entrySet()) {
                final String topic = e.getKey();
                currentTopicRegistry.put(topic, new Pool<Partition, PartitionTopicInfo>());
                ZkGroupTopicDirs topicDirs = new ZkGroupTopicDirs(group, topic);
                //消费该topic的所有consumer列表
                List<String> curConsumers = consumersPerTopicMap.get(topic);
                //该topic下所有的broker-partition列表
                List<String> curBrokerPartitions = brokerPartitionsPerTopicMap.get(topic);
                //计算每个consumer要分配的partition的数目
                final int nPartsPerConsumer = curBrokerPartitions.size() / curConsumers.size();
                //计算平均分配后多出的partition数目
                final int nConsumersWithExtraPart = curBrokerPartitions.size() % curConsumers.size();

                //consumerThreadId=> groupid_consumerid-index (index from count)
                //遍历当前consumer的所有stream
                for (String consumerThreadId : e.getValue()) {
                    final int myConsumerPosition = curConsumers.indexOf(consumerThreadId);
                    assert (myConsumerPosition >= 0);
                    final int startPart = nPartsPerConsumer * myConsumerPosition + Math.min(myConsumerPosition,
                            nConsumersWithExtraPart);
                    final int nParts = nPartsPerConsumer + ((myConsumerPosition + 1 > nConsumersWithExtraPart) ? 0 : 1);

                    if (nParts <= 0) {
                        logger.warn("No broker partitions consumed by consumer thread " + consumerThreadId + " for topic " + topic);
                    } else {
                        for (int i = startPart; i < startPart + nParts; i++) {
                        //获取对应的broker-partition
                            String brokerPartition = curBrokerPartitions.get(i);
                            logger.info("[" + consumerThreadId + "] ==> " + brokerPartition + " claimming");

                            addPartitionTopicInfo(currentTopicRegistry, topicDirs, brokerPartition, topic,
                                    consumerThreadId);
                            partitionOwnershipDecision.put(new StringTuple(topic, brokerPartition), consumerThreadId);
                        }
                    }
                }
            }
            //将任务分配的结果注册到zookeeper上
            if (reflectPartitionOwnershipDecision(partitionOwnershipDecision)) {
                logger.debug("Updating the cache");
                logger.debug("Partitions per topic cache " + brokerPartitionsPerTopicMap);
                logger.debug("Consumers per topic cache " + consumersPerTopicMap);
                //记录当前consumer每个topic下面的其消费的broker-partition的信息<topic,<broker-partition,offset...>>
                topicRegistry = currentTopicRegistry;
                //启动fetcher抓取信息
                updateFetcher(cluster, messagesStreams);
                return true;
            } else {
                return false;
            }
        }
这个方法有些长,中间省去了非关键代码,我们来看下它的流程。
-
11行:ZkUtils.getCluster方法,从zookeeper中获取所有的broker信息,之后调用rebalance方法。
-
23行-24: ZkUtils.getTopicCount.getConsumerThreadIdsPerTopic方法,从zookeeper中获取之前注册的当前consumer下每个topic的消费threadId
-
27行: 从zookeeper上获取所有topic对应的consumerThreadId,即获取同group的其他consumer信息。
-
29-30行: 从zookeeper中获取每个topic的broker-partition列表,要注意的是此处getPartitionsForTopics方法中有
Collections.sort(partList);,这就意味着该列表是有序的,其顺序如下:0-0,0-1,0-2,1-0,1-1,2-0,2-1;保证同broker的在也一起,这样分配的时候也能保证同一个broker的partition分配给一个consumer,减少连接数目。至此,第一个问题显然已经解决了,与我们预料的基本相同。
-
接下来关闭当前所有的抓取线程,防止出现消息重复消费的情况。因为重新分配后,该broker-partition可能被其他consumer消费,而如果该fetcher不停的话,它依然会去消费该broker-partition的数据。之后释放该consumer关联的broker-partition。
-
38-74行:该循环即是负载均衡的主体,其实现理念可以参见前面consumer的文章,实现代码也清晰明了。这里简单说一下addPartitionTopicInfo方法,该方法将consumerThreadId与partition关联在一起,方法为构建一个PartitionTopiCInfo对象,该对象包含了topic partition queue(数据队列) offset等信息,offset的确定也是在该方法中进行的。如果是第一次读,根据用户的配置,是从最近的消息获取,还是从最早的消息获取,否则从上一次消费的位置继续消费。但这里也只是完成了分配,即第二个问题解决了,那取数据的操作是在哪里完成的?
- 76-83行:首先将分配的信息注册到zookeeper上,然后调用了
updateFetcher方法,我们来看下它的源码。
private void updateFetcher(Cluster cluster, Map<String, List<MessageStream<T>>> messagesStreams2) {
     if (fetcher != null) {
         List<PartitionTopicInfo> allPartitionInfos = new ArrayList<PartitionTopicInfo>();
         for (Pool<Partition, PartitionTopicInfo> p : topicRegistry.values()) {
             allPartitionInfos.addAll(p.values());
         }
         //创立连接
         fetcher.startConnections(allPartitionInfos, cluster, messagesStreams2);
     }
}
该方法首先从topicRegistry中获取了该consumer下所有的PartitionTopicInfo对象,该对象中包含了拉取数据所需要的所有信息,如broker offset queue等等。之后调用fetch.startConnections方法。从名字上我们也知道,第三个问题的答案找到了,我们还是来看一下这个方法的源码吧!
public <T> void startConnections(Iterable<PartitionTopicInfo> topicInfos,Cluster cluster,//
            Map<String,List<MessageStream<T>>> messageStreams){
        if(topicInfos == null) {
            return;
        }

        //re-arrange by broker id
        //<brokerid,partition>
        Map<Integer, List<PartitionTopicInfo>> m = new HashMap<Integer, List<PartitionTopicInfo>>();
        for (PartitionTopicInfo info : topicInfos) {
            if (cluster.getBroker(info.brokerId) == null) {
                throw new IllegalStateException("Broker " + info.brokerId + " is unavailable, fetchers could not be started");
            }
            List<PartitionTopicInfo> list = m.get(info.brokerId);
            if (list == null) {
                list = new ArrayList<PartitionTopicInfo>();
                m.put(info.brokerId, list);
            }
            list.add(info);
        }
        //
        final List<FetcherRunnable> fetcherThreads = new ArrayList<FetcherRunnable>();
        //创建到所有broker的连接,启动线程,开始定时抓取数据
        for(Map.Entry<Integer, List<PartitionTopicInfo>> e:m.entrySet()) {
            FetcherRunnable fetcherThread = new FetcherRunnable("FetchRunnable-"+e.getKey(), //
                    zkClient, //
                    config, //
                    cluster.getBroker(e.getKey()), //
                    e.getValue());
            fetcherThreads.add(fetcherThread);
            fetcherThread.start();
        }
        //
        this.fetcherThreads = fetcherThreads;
    }
该方法主要两个步骤:按brokerId划分所有的PartitionTopicInfo对象和为每个broker开启一个线程来拉取数据。FetcherRunnable的代码这里就不贴了,感兴趣的读者可以自己去看,它将PartitionTopicInfo对象列表中的信息封装成一个MultiFetchRequest对象,然后调用SimpleConsumer的multiFetch方法来拉取数据,获得数据后将其添加到PartitionTopicInfo的queue中(也就添加到了MessageStream的queue中,这样前台就能立即消费数据了),之后更新其fetchOffSet等信息,继续抓取数据,如果抓取不到数据,则睡眠一段时间再去抓取,这样便实现了即时消费的功能。
至此三个问题都解决了,大家对consumer的代码框架应该也了然于胸了吧。
小结
本文主要讲解了jafka中同步消费和异步消费的源码实现,异步消费是建立在同步消费基础上的高等api,实现了并行消费消息的功能,其实现方式值得大家好好研究。本文只是尝试讲解其代码的脉络,希望对大家有所帮助。

