Fragment跳转时传递参数及结果回传的方法
前言:不知不觉工作已经八个月了,深感没学到什么东西啊,今年要努力了。但以后真的会用到android技术吗,根本回答不了这个问题,只能说,它是一个在任何事情都不成功的情况下,保命的根本而已,但技术还是要深通的。利用这两年时间把android搞精搞透。加油吧,少年
今天总结一下Fragment间的参数传递及结果返回的方法。
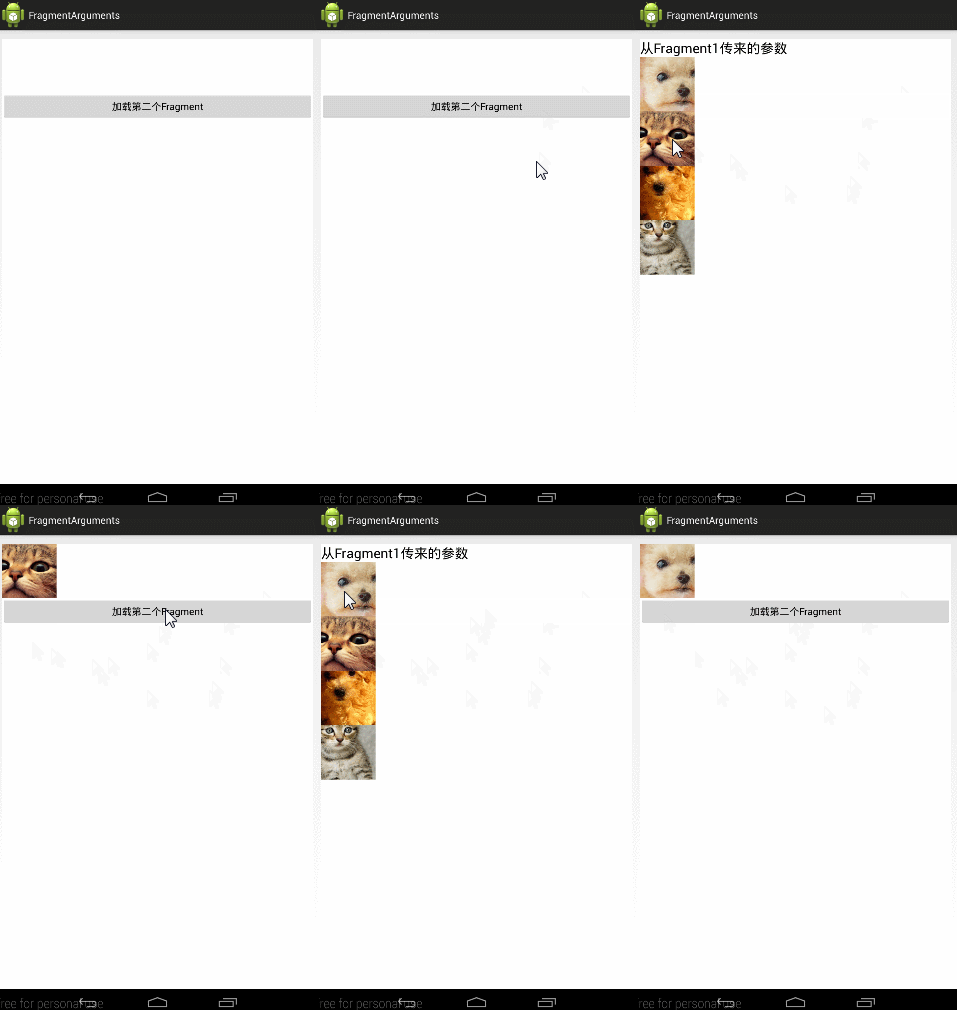
效果图:
1、点击“加载第二个Fragment按钮”,加载出第二个Fragment,同时传递过去参数:“从Fragment1传来的参数”这几个String;
2、当用户点击第二个Fragment中的几个图片时,将点中的结果返回给第一个Fragment,将用户的选择在第一个Fragment显示出来
一、基本架构搭建
首先,我们要把整个架构搭起来,然后再进行参数传递和回传
(一)、基本XML构建:
根据上面的效果,大家很容易看到两个Fragment的布局:
1、Fragment1的布局:(fragment1.xml)
很简单,垂直布局,上面一个ImageView来盛装返回过来的图片结果,下面一个Button来用来点击加载第二个Fragment;
<LinearLayout xmlns:android="http://schemas.android.com/apk/res/android"
    android:layout_width="match_parent"
    android:layout_height="match_parent"
    android:background="#ffffff"
    android:orientation="vertical">
    <ImageView
        android:id="@+id/img_result"
        android:layout_width="100dp"
        android:layout_height="100dp"
        android:scaleType="center"/>

    <Button
        android:id="@+id/load_fragment2_btn"
        android:layout_width="fill_parent"
        android:layout_height="wrap_content"
        android:text="加载第二个Fragment"/>

</LinearLayout>
2、Fragment2的布局:(fragment2.xml)
这个也是垂直布局,上面的一个TextView用来盛装从Fragment1传过来的String参数,下面的几个ImageView用来显示几个供用户选择的图片
<LinearLayout xmlns:android="http://schemas.android.com/apk/res/android"
    android:layout_width="match_parent"
    android:layout_height="match_parent"
    android:background="#ffffff"
    android:orientation="vertical">

    <TextView
        android:id="@+id/textview"
        android:layout_width="wrap_content"
        android:layout_height="wrap_content"
        android:text="This is fragment 2"
        android:textColor="#000000"
        android:textSize="25sp" />

    <ImageView
        android:id="@+id/img1"
        android:layout_width="100dip"
        android:layout_height="100dp"
        android:scaleType="center"
        android:src="@drawable/animal1"/>

    <ImageView
        android:id="@+id/img2"
        android:layout_width="100dip"
        android:layout_height="100dp"
        android:scaleType="center"
        android:src="@drawable/animal2"/>

    <ImageView
        android:id="@+id/img3"
        android:layout_width="100dip"
        android:layout_height="100dp"
        android:scaleType="center"
        android:src="@drawable/animal3"/>

    <ImageView
        android:id="@+id/img4"
        android:layout_width="100dip"
        android:layout_height="100dp"
        android:scaleType="center"
        android:src="@drawable/animal4"/>

</LinearLayout>
(二)对应的Fragment类
1、在MainActivity初始化时,将Fragment1显示出来:
MainActivity对应的XML文件:(main_activity.xml)
<RelativeLayout xmlns:android="http://schemas.android.com/apk/res/android"
    xmlns:tools="http://schemas.android.com/tools"
    android:id="@+id/main_layout"
    android:layout_width="match_parent"
    android:layout_height="match_parent"
    tools:context=".MainActivity">

    <TextView
        android:text="@string/hello_world"
        android:layout_width="wrap_content"
        android:layout_height="wrap_content" />

</RelativeLayout>
对应的代码:
public class MainActivity extends Activity {

    @Override
    protected void onCreate(Bundle savedInstanceState) {
        super.onCreate(savedInstanceState);
        setContentView(R.layout.activity_main);
        Fragment1 fragment1 = new Fragment1();
        getFragmentManager().beginTransaction().replace(R.id.main_layout, fragment1).commit();
    }
}
2、Fragment1:在用户点击时,将fragment2添加到当前页面显示出来;
public class Fragment1 extends Fragment {

    @Override
    public View onCreateView(LayoutInflater inflater, ViewGroup container,
                             Bundle savedInstanceState) {
        View view = inflater.inflate(R.layout.fragment1, container, false);
        Button btn = (Button)view.findViewById(R.id.load_fragment2_btn);
        btn.setOnClickListener(new View.OnClickListener(){
            @Override
            public void onClick(final View view) {
                Fragment2 fragment2 = new Fragment2();

                FragmentTransaction transaction = getFragmentManager().beginTransaction();

                transaction.add(R.id.main_layout, fragment2);
                transaction.addToBackStack(null);
                transaction.commit();
            }
        });
        return view;
    }
}
3、Fragment2:至于目前的它还是很简单的,只要能显示出来 就好了,所以他的代码为:
public class Fragment2 extends Fragment implements View.OnClickListener {

    @Override
    public View onCreateView(LayoutInflater inflater, ViewGroup container, Bundle savedInstanceState) {
        View view = inflater.inflate(R.layout.fragment2, container, false);
        return view;
    }

}
二、Fragment间参数传递
至于Fragment间参数为什么要用SetArguments来传递,我就不讲了,看这篇文章:《Android解惑 - 为什么要用Fragment.setArguments(Bundle bundle)来传递参数》,我这里只说项目中如何使用:
在Fragment2中,新建一个函数:newInstance(String text)来接收传过来的参数:
新建一个Fragment2实例,然后将参数通过SetArguments设置到其中;
    public static Fragment2 newInstance(String text) {
        Fragment2 fragment = new Fragment2();
        Bundle args = new Bundle();
        args.putString("param", text);
        fragment.setArguments(args);
        return fragment;
    }
然后在Fragment2的OnCreateView的时候再从arguments中获取参数:
    public View onCreateView(LayoutInflater inflater, ViewGroup container, Bundle savedInstanceState) {
        View view =  inflater.inflate(R.layout.fragment2, container, false);
        if (getArguments() != null) {
            String mParam1 = getArguments().getString("param");
            TextView tv =  (TextView)view.findViewById(R.id.textview);
            tv.setText(mParam1);
        }
        return view;
    }
在Fragment1中,在调起Fragmen2t时,通过调用newInstance函数来获取实例并传递参数:
public class Fragment1 extends Fragment {

    @Override
    public View onCreateView(LayoutInflater inflater, ViewGroup container,
                             Bundle savedInstanceState) {
        View view = inflater.inflate(R.layout.fragment1, container, false);
        Button btn = (Button)view.findViewById(R.id.load_fragment2_btn);
        btn.setOnClickListener(new View.OnClickListener(){
            @Override
            public void onClick(final View view) {
                Fragment2 fragment2 = Fragment2.newInstance("从Fragment1传来的参数");

                FragmentTransaction transaction = getFragmentManager().beginTransaction();
                transaction.add(R.id.main_layout, fragment2);
                transaction.addToBackStack(null);
                transaction.commit();
            }
        });
        return view;
    }
}
(三)、从Fragment2向Fragment1回传参数
这里只有利用回调,有关回调传递参数的问题,我在前一篇文章中: 《详解Dialog(三)——自定义对话框视图及参数传递》第三部分:参数传递;详细讲过,大家可以先看源码,如果源码不懂,可以参考下这篇文章,这里就不再赘述。源码地址:http://download.csdn.net/detail/harvic880925/8484149
请大家尊重原创者版权,转载请标明出处:http://blog.csdn.net/harvic880925/article/details/44131865
