Activity生命周期详解
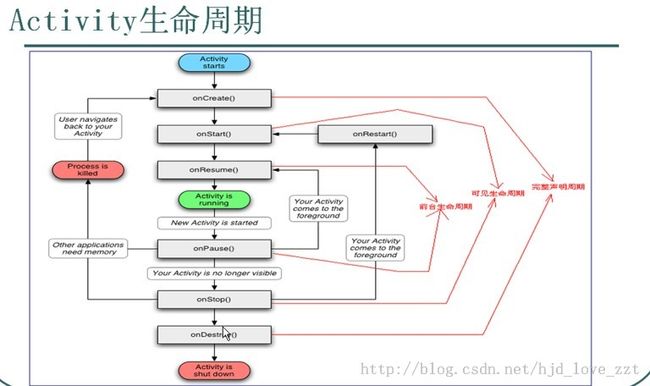
原理图:
文字描述如下:
Activity的作用:
起显示作用,他是用来和用户交互的。也是一个view的容器
1 完整的生命周期:
onCreate() --> onStart() --> onResume() activiyt已经正常显示
点击回退键
onPause() --> onStop() --> onDetroy()
2 可视的生命周期
onCreate() --> onStart() --> onResume() activiyt已经正常显示
打开一个activity。该activity完全覆盖上一个activity
onPause() ---> onStop()
点击回退键
onRestart() --> onStart() ---> onResume()
点击回退键
onPause() --> onStop() --> onDetroy()
3 android:theme="@android:style/Theme.Dialog"
就可以把activity变成对话框的效果
onCreate() --> onStart() --> onResume() activiyt已经正常显示
打开一个activity。该activity没有完全覆盖上一个activity
onPause()
点击回退键
onResume()
------------如果要将完全覆盖-----(转换成)------>>部分覆盖,只需要在清单文件AndroidManifest.xml中在
<activity/>标签中加上这么一句:android:theme="@android:style/Theme.Dialog"------------------------------
代码如下:
1)main.xml
<?xml version="1.0" encoding="utf-8"?>
<LinearLayout xmlns:android="http://schemas.android.com/apk/res/android"
    android:layout_width="match_parent"
    android:layout_height="match_parent"
    android:orientation="vertical" >

    <TextView
        android:layout_width="fill_parent"
        android:layout_height="wrap_content"
        android:text="@string/hello_world" />

    <Button
        android:layout_width="wrap_content"
        android:layout_height="wrap_content"
        android:onClick="get"
        android:text="打开" />

</LinearLayout>
2)main2.xml
android:layout_gravity="center" //控件居中
android:gravity="center" //控件中的文本居中
<?xml version="1.0" encoding="utf-8"?>
<LinearLayout xmlns:android="http://schemas.android.com/apk/res/android"
    android:layout_width="match_parent"
    android:layout_height="match_parent"
    android:orientation="vertical" >

    <TextView android:layout_width="fill_parent"
        android:layout_height="fill_parent"
        android:layout_gravity="center"
        android:gravity="center"
        android:text="第二个activity"
        android:textColor="#00f"/>

</LinearLayout>
3)MainActivity
package com.njupt.activitylife;

import android.os.Bundle;
import android.app.Activity;
import android.content.Intent;
import android.view.Menu;
import android.view.View;

public class MainActivity extends Activity {


	@Override
	protected void onCreate(Bundle savedInstanceState) {
		super.onCreate(savedInstanceState);
		setContentView(R.layout.main);

		System.out.println("onCreate");
	}

	@Override
	protected void onStart() {
		super.onStart();

		System.out.println("onStart()");
	}

	@Override
	protected void onResume() {
		super.onResume();

		System.out.println("onResume()");
	}

	@Override
	protected void onPause() {
		super.onPause();

		System.out.println("onPause()");
	}


	@Override
	protected void onStop() {
		super.onStop();

		System.out.println("onStop()");
	}

	@Override
	protected void onDestroy() {
		super.onDestroy();

		System.out.println("onDestroy()");
	}

	@Override
	protected void onRestart() {
		super.onRestart();

		System.out.println("onRestart()");
	}
	public void get(View v){

		Intent intent = new Intent(this,Main2Activity.class);

		startActivity(intent);
	}


	@Override
	public boolean onCreateOptionsMenu(Menu menu) {
		// Inflate the menu; this adds items to the action bar if it is present.
		getMenuInflater().inflate(R.menu.main, menu);
		return true;
	}

}
4)Main2Activity
package com.njupt.activitylife;

import android.app.Activity;
import android.os.Bundle;

public class Main2Activity extends Activity {

	@Override
	protected void onCreate(Bundle savedInstanceState) {
		super.onCreate(savedInstanceState);

		setContentView(R.layout.main2);
	}
}
5)AndroidManifest.xml
最后在清单文件中将Main2Activity注册上去
<activity android:name="com.njupt.activitylife.Main2Activity" android:label="第二个Activity"
            android:theme="@android:style/Theme.Dialog"/>
