linux(centos5.8)环境下Hadoop 2.0.2单机部署以及Eclipse环境搭建
Hadoop 2.0.2-alpha单机部署
(1)新建hadoop用户以及hadoop用户组
首先取得root权限新
$ su -
建用户hadoop组
# groupadd hadoop
新建用户hadoop,放入hadoop组中,并设置主目录为/home/hadoop
# useradd -g hadoop -d /home/hadoop hadoop
修改密码
# passwd hadoop
其中删除用户命令为userdel,删除用户组命令为groupdel,查看用户和分组信息可以cat /etc/groups 或cat /etc/passwd
回到新建用户目录
# su hadoop
$ cd
(2)下载和配置hadoop
下载hadoop文件
$ wget http://mirror.bjtu.edu.cn/apache/hadoop/common/hadoop-2.0.2-alpha/hadoop-2.0.2-alpha.tar.gz
下载完成后解压
$ tar xzvf hadoop-2.0.2-alpha.tar.gz
新建一个叫hadoop的文件夹,建立软链接,以便以后使用其他版本
$ ln -sf hadoop-2.0.2-alpha hadoop
配置系统环境变量
$ su -
# vim /etc/profile
在最后加上以下几行
export HADOOP_PREFIX="/home/hadoop/hadoop"
PATH="$PATH:$HADOOP_PREFIX/bin:$HADOOP_PREFIX/sbin"
export HADOOP_MAPRED_HOME=${HADOOP_PREFIX}
export HADOOP_COMMON_HOME=${HADOOP_PREFIX}
export HADOOP_HDFS_HOME=${HADOOP_PREFIX}
export YARN_HOME=${HADOOP_PREFIX}
export HADOOP_CONF_DIR="${HADOOP_PREFIX}/etc/hadoop"
重新启动系统
# reboot
重启后使用hadoop用户登录,进入/home/hadoop/hadoop/etc/hadoop中进行配置
$ cd /home/hadoop/hadoop/etc/hadoop/
修改hadoop-env.sh
修改JAVA_HOME,这里JAVA_HOME的路径必须指定为真实的路径,不能引用${JAVA_HOME},否则运行的时候会有错误JAVA_HOME is not set
export JAVA_HOME=/user/java/jdk1.6.0_35修改core-site.xml
<configuration>
  <property>
    <name>fs.default.name</name>
    <value>hdfs://localhost:9000</value>
  </property>
  <property>
    <name>hadoop.tmp.dir</name>
    <value>/tmp/hadoop/hadoop-${user.name}</value>
  </property>
</configuration>
修改hdfs-site.xml
其中,/home/hadoop/dfs/name,/home/hadoop/dfs/data都是文件系统中的目录,需要先新建
<configuration>
  <property>
    <name>dfs.namenode.name.dir</name>
    <value>file:/home/hadoop/dfs/name</value>
    <description>Determines where on the local filesystem the DFS name node
      should store the name table.  If this is a comma-delimited list
      of directories then the name table is replicated in all of the
      directories, for redundancy. </description>
    <final>true</final>
  </property>

  <property>
    <name>dfs.datanode.data.dir</name>
    <value>file:/home/hadoop/dfs/data</value>
    <description>Determines where on the local filesystem an DFS data node
       should store its blocks.  If this is a comma-delimited
       list of directories, then data will be stored in all named
       directories, typically on different devices.
       Directories that do not exist are ignored.
    </description>
    <final>true</final>
  </property>

  <property>
    <name>dfs.replication</name>
    <value>1</value>
  </property>

  <property>
    <name>dfs.permissions</name>
    <value>false</value>
  </property>
</configuration>
修改mapred-site.xml
<configuration>
  <property>
    <name>mapreduce.framework.name</name>
    <value>yarn</value>
  </property>

  <property>
    <name>mapred.system.dir</name>
    <value>file:/home/hadoop/mapred/system</value>
    <final>true</final>
  </property>

  <property>
    <name>mapred.local.dir</name>
    <value>file:/home/hadoop/mapred/local</value>
    <final>true</final>
  </property>
</configuration>
修改yarn-site.xml
<configuration>

<!-- Site specific YARN configuration properties -->
  <property>
    <name>yarn.resourcemanager.resource-tracker.address</name>
    <value>localhost:8081</value>
    <description>host is the hostname of the resource manager and
    port is the port on which the NodeManagers contact the Resource Manager.
    </description>
  </property>

  <property>
    <name>yarn.resourcemanager.scheduler.address</name>
    <value>localhost:8082</value>
    <description>host is the hostname of the resourcemanager and port is the port
    on which the Applications in the cluster talk to the Resource Manager.
    </description>
  </property>

  <property>
    <name>yarn.resourcemanager.scheduler.class</name>
    <value>org.apache.hadoop.yarn.server.resourcemanager.scheduler.capacity.CapacityScheduler</value>
    <description>In case you do not want to use the default scheduler</description>
  </property>

  <property>
    <name>yarn.resourcemanager.address</name>
    <value>localhost:8083</value>
    <description>the host is the hostname of the ResourceManager and the port is the port on
    which the clients can talk to the Resource Manager. </description>
  </property>

  <property>
    <name>yarn.nodemanager.local-dirs</name>
    <value></value>
    <description>the local directories used by the nodemanager</description>
  </property>

  <property>
    <name>yarn.nodemanager.address</name>
    <value>0.0.0.0:port</value>
    <description>the nodemanagers bind to this port</description>
  </property>

  <property>
    <name>yarn.nodemanager.resource.memory-mb</name>
    <value>10240</value>
    <description>the amount of memory on the NodeManager in GB</description>
  </property>

  <property>
    <name>yarn.nodemanager.remote-app-log-dir</name>
    <value>/app-logs</value>
    <description>directory on hdfs where the application logs are moved to </description>
  </property>

   <property>
    <name>yarn.nodemanager.log-dirs</name>
    <value></value>
    <description>the directories used by Nodemanagers as log directories</description>
  </property>

  <property>
    <name>yarn.nodemanager.aux-services</name>
    <value>mapreduce.shuffle</value>
    <description>shuffle service that needs to be set for Map Reduce to run </description>
  </property>
</configuration>
(3)启动hdfs以及yarn
完成以上配置后可以检测是否配置成
首先格式化namenode
$ hdfs namenode -format
然后启动hdfs
$ start-dfs.sh
或者
$ hadoop-daemon.sh start namenode
$ hadoop-daemon.sh start datanode
接着启动yarn daemons
$ start-yarn.sh
或者
$ yarn-daemon.sh start resourcemanager
$ yarn-daemon.sh start nodemanager
启动完成后可以进入http://localhost:50070/dfshealth.jsp 查看dfs状态,如下图所示
转载请注明:http://blog.csdn.net/lawrencesgj/article/details/8240571
Eclipse环境配置
(1)下载eclipse插件并导入到eclipse中
到http://wiki.apache.org/hadoop/EclipsePlugIn上下载对应的eclipse插件,然后eclipse的plugin目录中,我的环境是/usr/share/eclipse/plugins
(2)使用hadoop用户启动eclipse
$ su hadoop
$ eclipse&
(3)配置eclipse
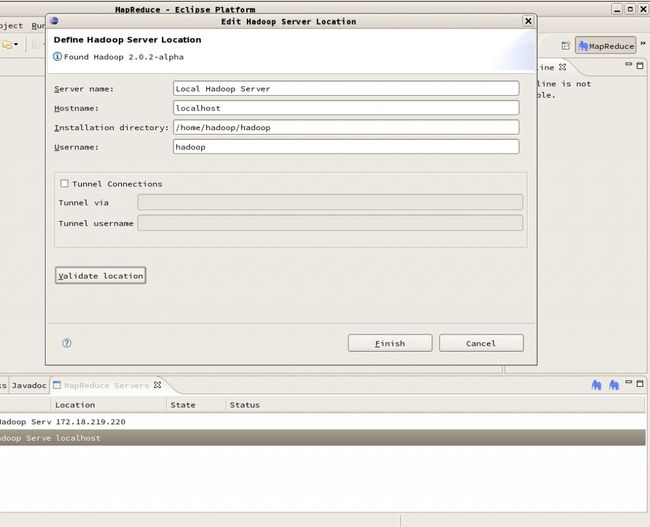
启动后在视图中调出mapreduce视图,并点击右下角new hadoop的大象图标,如下图
填写安装目录以及用户明后Vaildate Location 就可以看到发现hadoop2.02了!这里我自己花了一点时间摸索,要完成关键是用hadoop用户启动eclipse,之前用系统的用户一直验证不成功。。
(3)新建mapreduce project
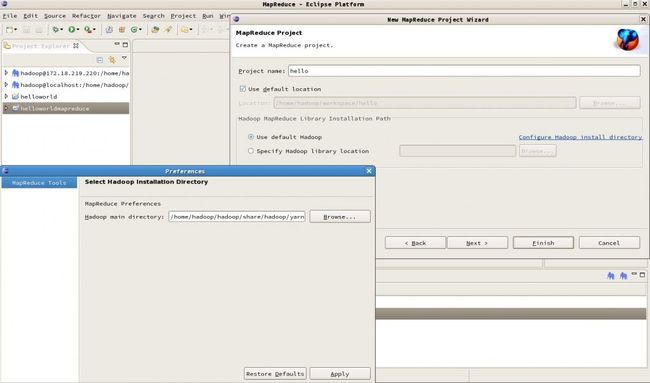
如无意外,在File>>New>>Project下面就会看到有Mapreduce Project,点击后需要配置hadoop install directory,如果用mapreduce框架配置为/home/hadoop/hadoop/share/hadoop/mapreduce,如果用yarn框架配置为/home/hadoop/hadoop/share/hadoop/yarn即可。
转载请注明:http://blog.csdn.net/lawrencesgj/article/details/8240571
一开始因为没有用hadoop用户打开eclipse所以这里费了不少时间,后来才醒悟过来。这样我们就新建了一个mapreduce项目了!
参考:
- http://ipjmc.iteye.com/blog/1703112
- http://slaytanic.blog.51cto.com/2057708/885198
- http://hadoop.apache.org/docs/r2.0.2-alpha/hadoop-yarn/hadoop-yarn-site/SingleCluster.html
- http://wiki.apache.org/hadoop/EclipseEnvironment


