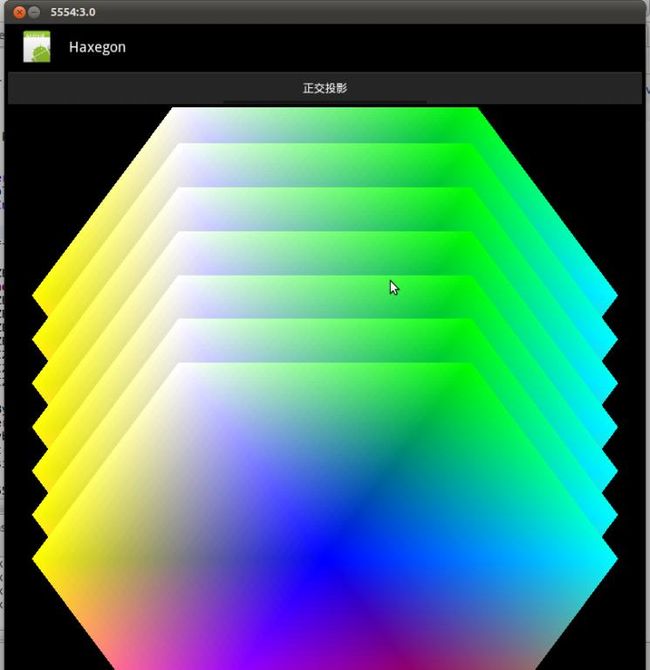
OpenGL ES 正交投影与透视投影效果对比的代码实现
MyActivity.java
package lxy.litsoft;

import android.app.Activity;
import android.os.Bundle;
import android.widget.CompoundButton;
import android.widget.CompoundButton.OnCheckedChangeListener;
import android.widget.LinearLayout;
import android.widget.ToggleButton;

public class MyActivity extends Activity {

	private ToggleButton tb01;
	private MySurfaceView mSurfaceView;
	private LinearLayout ll;

    /** Called when the activity is first created. */
    @Override
    public void onCreate(Bundle savedInstanceState) {
        super.onCreate(savedInstanceState);
        setContentView(R.layout.main);
        mSurfaceView = new MySurfaceView(this);
        mSurfaceView.requestFocus();						//获取焦点
        mSurfaceView.setFocusableInTouchMode(true);			//设置为可触控
        ll = (LinearLayout)findViewById(R.id.main_line);
        ll.addView(mSurfaceView);
        tb01 = (ToggleButton)findViewById(R.id.ToggleButton01);
        tb01.setOnCheckedChangeListener(new MyListener());
    }

    private class MyListener implements OnCheckedChangeListener{

		@Override
		public void onCheckedChanged(CompoundButton buttonView,
				boolean isChecked) {
			// TODO Auto-generated method stub
			mSurfaceView.isPerspection = !mSurfaceView.isPerspection;
															//正交投影与透视投影之间切换
			mSurfaceView.requestRender();					//重新绘制
		}

    }


	@Override
	protected void onPause() {
		// TODO Auto-generated method stub
		super.onPause();
		mSurfaceView.onPause();					//挂起
	}

	@Override
	protected void onResume() {
		// TODO Auto-generated method stub
		super.onResume();
		mSurfaceView.onResume();				//恢复
	}
}
main.xml
<?xml version="1.0" encoding="utf-8"?>
<LinearLayout xmlns:android="http://schemas.android.com/apk/res/android"
    android:orientation="vertical"
    android:id="@+id/main_line"
    android:layout_width="fill_parent"
    android:layout_height="fill_parent">

	<ToggleButton
		android:textOn="透视投影"
		android:textOff="正交投影"
		android:checked="false"
		android:id="@+id/ToggleButton01"
		android:layout_width="fill_parent"
		android:layout_height="wrap_content"></ToggleButton>

</LinearLayout>
MySurfaceView.java
package lxy.litsoft;

import javax.microedition.khronos.egl.EGLConfig;
import javax.microedition.khronos.opengles.GL10;

import android.content.Context;
import android.opengl.GLSurfaceView;
import android.view.MotionEvent;

public class MySurfaceView extends GLSurfaceView{

	private final float TOUCH_SCALE_FACTOR = 180.0f/320;	//角度缩放比例
	private SceneRenderer myRender;							//场景渲染器
	public boolean isPerspection = false;			//投影方式标志位
	private float mPreviousY;								//上一次的触控位置Y坐标
	public float xAngle = 0;								//整体绕x轴旋转的角度

	public MySurfaceView(Context context) {
		super(context);
		// TODO Auto-generated constructor stub
		myRender = new SceneRenderer();
		this.setRenderer(myRender);							//设置渲染器
		this.setRenderMode(GLSurfaceView.RENDERMODE_CONTINUOUSLY);//主动渲染
	}

	@Override
	public boolean onTouchEvent(MotionEvent event) {		//触摸事件回调方法
		// TODO Auto-generated method stub
		float y = event.getY();								//获得当前触控点Y坐标
		switch(event.getAction()){							//获取动作
		case MotionEvent.ACTION_MOVE:						//判断是否是滑动
			float dy = y - mPreviousY;						//计算触控笔y方向位移
			xAngle += dy * TOUCH_SCALE_FACTOR;				//设置沿x轴旋转角度
			requestRender();								//重新绘制
		}
		mPreviousY = y;										//作为上次触控y坐标
		return true;
	}

	private class SceneRenderer implements GLSurfaceView.Renderer{

		Hexagon[] ha = new Hexagon[]{					//六边形数组
			new Hexagon(0),
			new Hexagon(-2),
			new Hexagon(-4),
			new Hexagon(-6),
			new Hexagon(-8),
			new Hexagon(-10),
			new Hexagon(-12),
		};
		public SceneRenderer(){}					//渲染器构造
		@Override
		public void onDrawFrame(GL10 gl) {
			// TODO Auto-generated method stub
			gl.glEnable(GL10.GL_CULL_FACE);			//设置打开背景剪裁
//			gl.glMatrixMode(GL10.GL_MODELVIEW);		//设置当前矩阵为模式矩阵
			gl.glMatrixMode(GL10.GL_PROJECTION);	//设置当前矩阵为投影矩阵
			gl.glLoadIdentity();					//设置当前矩阵为单位矩阵
			float ratio = (float)320/480;			//透视投影的比例
			if(isPerspection){
				gl.glFrustumf(-ratio, ratio, -1, 1, 1f, 10);	//计算产生透视投影矩阵
			}
			else{
				gl.glOrthof(-ratio, ratio, -1, 1, 1, 10);		//计算产生正交投影矩阵
			}
			gl.glShadeModel(GL10.GL_SMOOTH);		//设置平滑着色
			gl.glClear(GL10.GL_COLOR_BUFFER_BIT|GL10.GL_DEPTH_BUFFER_BIT);//清除缓存
			gl.glTranslatef(0, 0f, -1.4f);			//沿z轴向远处推
			gl.glRotatef(xAngle, 1, 0, 0);			//绕x轴旋转指定角度
			for(Hexagon th:ha){
				th.drawSelf(gl);					//循环绘制六边形数组中的每个六边形
			}
		}

		@Override
		public void onSurfaceChanged(GL10 gl, int width, int height) {
			// TODO Auto-generated method stub
			gl.glViewport(0, 0, width, height);		//设置视窗大小和位置
		}

		@Override
		public void onSurfaceCreated(GL10 gl, EGLConfig config) {
			// TODO Auto-generated method stub
			gl.glDisable(GL10.GL_DITHER);			//关闭抗抖动
			gl.glHint(GL10.GL_PERSPECTIVE_CORRECTION_HINT, GL10.GL_FASTEST);//设置Hint模式
			gl.glClearColor(0, 0, 0, 0);			//背景着黑色
			gl.glEnable(GL10.GL_DEPTH_TEST);		//启用深度测试
		}
	}
}
Hexagon.java
package lxy.litsoft;

import java.nio.ByteBuffer;
import java.nio.ByteOrder;
import java.nio.IntBuffer;

import javax.microedition.khronos.opengles.GL10;

public class Hexagon {
	private IntBuffer myVertexBuffer;		//顶点坐标数据缓冲
	private IntBuffer myColorsBuffer;		//顶点着色数据缓冲
	private ByteBuffer myIndexBuffer;		//顶点构建索引数据缓冲
	int vCount = 0;							//顶点个数
	int iCount = 0;							//索引个数
	public Hexagon(int zOffset){
		vCount = 7;
		final int UNIT_SIZE = 10000;		//缩放比例
		int []vertices = new int[]{			//创建顶点数组
				0*UNIT_SIZE, 0*UNIT_SIZE, zOffset*UNIT_SIZE,	//每个顶点三个坐标
				2*UNIT_SIZE, 3*UNIT_SIZE, zOffset*UNIT_SIZE,
				4*UNIT_SIZE, 0*UNIT_SIZE, zOffset*UNIT_SIZE,
				2*UNIT_SIZE, -3*UNIT_SIZE, zOffset*UNIT_SIZE,
				-2*UNIT_SIZE, -3*UNIT_SIZE, zOffset*UNIT_SIZE,
				-4*UNIT_SIZE, 0*UNIT_SIZE, zOffset*UNIT_SIZE,
				-2*UNIT_SIZE, 3*UNIT_SIZE, zOffset*UNIT_SIZE,
		};
		ByteBuffer vbb = ByteBuffer.allocateDirect(vertices.length*4);//开辟新内存
		vbb.order(ByteOrder.nativeOrder());	//设置字节顺序
		myVertexBuffer = vbb.asIntBuffer();	//转换成int型缓冲
		myVertexBuffer.put(vertices);		//向缓冲中放入数据
		myVertexBuffer.position(0);			//缓冲起始位置

		final int one = 65535;				//支持65535色色彩通道
		int []colors = new int[]{			//创建顶点颜色数据数组
			0, 0, one, 0,					//每个顶点色个色彩值RGBA
			0, one, 0, 0,
			0, one, one, 0,
			one, 0, 0, 0,
			one, 0, one, 0,
			one, one, 0, 0,
			one, one, one, 0,
		};
		ByteBuffer cbb = ByteBuffer.allocateDirect(colors.length*4);//开辟新内存
		cbb.order(ByteOrder.nativeOrder());
		myColorsBuffer = cbb.asIntBuffer();
		myColorsBuffer.put(colors);
		myColorsBuffer.position(0);

		iCount = 18;
		byte []indices = new byte[]{	//创建索引数组
			0, 2, 1,
			0, 3, 2,
			0, 4, 3,
			0, 5, 4,
			0, 6, 5,
			0, 1, 6,
		};
		//创建三角形构造索引数据缓冲
		myIndexBuffer = ByteBuffer.allocateDirect(indices.length);
		myIndexBuffer.put(indices);
		myIndexBuffer.position(0);
	}

	public void drawSelf(GL10 gl){		//绘制函数
		gl.glEnableClientState(GL10.GL_COLOR_ARRAY);	//启用顶点坐标数组
		gl.glEnableClientState(GL10.GL_VERTEX_ARRAY);	//启用顶点颜色数组
		gl.glVertexPointer(		//为画笔指定顶点坐标数据
				3, 				//每个顶点有3个坐标值
				GL10.GL_FIXED, 	//顶点坐标值的类型
				0, 				//连续顶点坐标数据之间的间隔
				myVertexBuffer	//顶点坐标数据
				);
		gl.glColorPointer(		//为画笔指定顶点着色数据
				4, 				//每个颜色有4个颜色值RGBA
				GL10.GL_FIXED, 	//顶点坐标值的类型
				0, 				//连续顶点坐标数据之间的间隔
				myColorsBuffer	//顶点颜色数据
				);
		gl.glDrawElements(				//索引法绘制图像
				GL10.GL_TRIANGLES, 		//绘制模式
				iCount, 				//索引数量
				GL10.GL_UNSIGNED_BYTE, 	//索引值的类型
				myIndexBuffer			//索引值数据
				);
	}
}
效果入下:

