32.Android SQLite 及其更新
32.Android SQLite 及其更新
- 32Android SQLite 及其更新
- Android SQLite 介绍
- Android SQLite 继承SQLiteOpenHelper
- Android SQLite 创建表
- Android SQLite 增
- Android SQLite 删
- Android SQLite 改
- Android SQLite 查
- Android SQLite 删除表
- Android SQLite 代码总览
- Android SQLite 更新表的重要性
- Android SQLite 更新表
- Android SQLite 不要close
Android SQLite 介绍
Android上SQLite用起来,相比IOS的SQLite,显得麻烦一些。
SQLite最大的问题就是表的维护(表的升级:添加字段等等)。
这次也是着重谈谈SQLite的维护。
Android SQLite 继承SQLiteOpenHelper
extends SQLiteOpenHelper
定义一个子类继承抽象类SQLiteOpenHelper。
Android SQLite 创建表
在子类的的onCreate方法里执行对应的sql语句。
    public static final String TB_CAMNTER_SQL = "CREATE TABLE IF NOT EXISTS " + TB_CAMNTER + "(_id INTEGER NOT NULL PRIMARY KEY AUTOINCREMENT," +
            " content text)";
    /** * Called when the database is created for the first time. This is where the * creation of tables and the initial population of the tables should happen. * 首次创建数据库时调用。这就是创建表和表的初始种群。 * * @param db The database. */
    @Override
    public void onCreate(SQLiteDatabase db) {
        db.execSQL(TB_CAMNTER_SQL);
    }
Android SQLite 增
    /** * 保存数据 * * @param content */
    public void insert(String content) {
        SQLiteDatabase insert = this.getWritableDatabase();
        insert.beginTransaction();
        ContentValues values = new ContentValues();
        values.put("content", content);
        insert.insert(TB_CAMNTER, "", values);

        /** * 设置事务处理成功,不设置会自动回滚不提交 */
        insert.setTransactionSuccessful();
        /** * 处理完成 */
        insert.endTransaction();
    }
Android SQLite 删
    /** * 删除数据 */
    public void deleteAll() {
        SQLiteDatabase deleteAll = this.getWritableDatabase();
        deleteAll.delete(TB_CAMNTER, null, null);
        deleteAll.close();
    }
Android SQLite 改
    /** * 修改第一条数据 */
    public void updateFirst() {
        List<SQLiteData> allData = this.queryAll();
        if (allData == null || allData.size() < 1) return;
        int firstId = allData.get(0).id;
        SQLiteDatabase update = this.getWritableDatabase();
        update.beginTransaction();
        ContentValues values = new ContentValues();
        values.put("content", UUID.randomUUID().toString());
        update.update(TB_CAMNTER, values, "_id=?", new String[]{firstId + ""});
        update.setTransactionSuccessful();
        update.endTransaction();
    }
Android SQLite 查
    /** * 查询数据 * * @return */
    public List<SQLiteData> queryAll() {
        List<SQLiteData> allData = new ArrayList<>();
        SQLiteDatabase queryAll = this.getReadableDatabase();
        queryAll.beginTransaction();
        String sql = "select * from " + TB_CAMNTER;
        Cursor result = queryAll.rawQuery(sql, null);
        for (result.moveToFirst(); !result.isAfterLast(); result.moveToNext()) {
            SQLiteData data = new SQLiteData();
            data.id = result.getInt(result.getColumnIndex("_id"));
            data.content = result.getString(result.getColumnIndex("content"));
            allData.add(data);
        }
        queryAll.setTransactionSuccessful();
        queryAll.endTransaction();
        result.close();
        return allData;
    }
Android SQLite 删除表
    /** * 删除表 */
    public void deleteTable() {
        SQLiteDatabase delete = this.getWritableDatabase();
        delete.execSQL("DROP TABLE " + TB_CAMNTER);
    }
Android SQLite 代码总览
MySQLiteHelper
public class MySQLiteHelper extends SQLiteOpenHelper {

    private static final String DB_NAME = "camnter.db";
    private static final int VERSION = 1;

    private static final String TB_CAMNTER = "tb_camnter";
    public static final String TB_CAMNTER_SQL = "CREATE TABLE IF NOT EXISTS " + TB_CAMNTER + "(_id INTEGER NOT NULL PRIMARY KEY AUTOINCREMENT," +
            " content text)";

    public static MySQLiteHelper ourInstance;

    public MySQLiteHelper(Context context, String name, SQLiteDatabase.CursorFactory factory, int version) {
        super(context, name, factory, version);
    }

    private MySQLiteHelper(Context context) {
        this(context, DB_NAME, null, VERSION);
    }

    public static MySQLiteHelper getInstance(Context context) {
        if (ourInstance == null) ourInstance = new MySQLiteHelper(context);
        return ourInstance;
    }

    /** * Called when the database is created for the first time. This is where the * creation of tables and the initial population of the tables should happen. * 首次创建数据库时调用。这就是创建表和表的初始种群。 * * @param db The database. */
    @Override
    public void onCreate(SQLiteDatabase db) {
        db.execSQL(TB_CAMNTER_SQL);
    }

    /** * Called when the database needs to be upgraded. The implementation * should use this method to drop tables, add tables, or do anything else it * needs to upgrade to the new schema version. * 数据库需要更新时调用,实现类应该使用这个方法删除表,添加表,或者做其他事情需要更新表到新模式版本 * <p/> * <p> * The SQLite ALTER TABLE documentation can be found * <a href="http://sqlite.org/lang_altertable.html">here</a>. If you add new columns * you can use ALTER TABLE to insert them into a live table. If you rename or remove columns * you can use ALTER TABLE to rename the old table, then create the new table and then * populate the new table with the contents of the old table. * 如果你添加新的列你可以使用ALTER TABLE插入到现存的表里。如果你想重命名或移除列你可以使用ALTER TABLE重命名 * 旧表,然后创建新表,接着填充新表与旧表的内容 * </p><p> * This method executes within a transaction. If an exception is thrown, all changes * will automatically be rolled back. * 这个方法执行了一个事务。如果抛出一个异常,所有更改将自动回滚。 * </p> * * @param db The database. 数据库 * @param oldVersion The old database version. 旧数据库版本 * @param newVersion The new database version. 新数据库版本 */
    @Override
    public void onUpgrade(SQLiteDatabase db, int oldVersion, int newVersion) {
        if (oldVersion == 1 && newVersion == 2) {
            String sql = "ALTER TABLE " + TB_CAMNTER + " ADD " + "status" + " INT default " + 0;
            db.execSQL(sql);
        }
    }

    /** * 删除表 */
    public void deleteTable() {
        SQLiteDatabase delete = this.getWritableDatabase();
        delete.execSQL("DROP TABLE " + TB_CAMNTER);
    }

    /** * 保存数据 * * @param content */
    public void insert(String content) {
        SQLiteDatabase insert = this.getWritableDatabase();
        insert.beginTransaction();
        ContentValues values = new ContentValues();
        values.put("content", content);
        insert.insert(TB_CAMNTER, "", values);

        /** * 设置事务处理成功,不设置会自动回滚不提交 */
        insert.setTransactionSuccessful();
        /** * 处理完成 */
        insert.endTransaction();
    }

    /** * 删除数据 */
    public void deleteAll() {
        SQLiteDatabase deleteAll = this.getWritableDatabase();
        deleteAll.delete(TB_CAMNTER, null, null);
        deleteAll.close();
    }

    /** * 修改第一条数据 */
    public void updateFirst() {
        List<SQLiteData> allData = this.queryAll();
        if (allData == null || allData.size() < 1) return;
        int firstId = allData.get(0).id;
        SQLiteDatabase update = this.getWritableDatabase();
        update.beginTransaction();
        ContentValues values = new ContentValues();
        values.put("content", UUID.randomUUID().toString());
        update.update(TB_CAMNTER, values, "_id=?", new String[]{firstId + ""});
        update.setTransactionSuccessful();
        update.endTransaction();
    }

    /** * 查询数据 * * @return */
    public List<SQLiteData> queryAll() {
        List<SQLiteData> allData = new ArrayList<>();
        SQLiteDatabase queryAll = this.getReadableDatabase();
        queryAll.beginTransaction();
        String sql = "select * from " + TB_CAMNTER;
        Cursor result = queryAll.rawQuery(sql, null);
        for (result.moveToFirst(); !result.isAfterLast(); result.moveToNext()) {
            SQLiteData data = new SQLiteData();
            data.id = result.getInt(result.getColumnIndex("_id"));
            data.content = result.getString(result.getColumnIndex("content"));
            allData.add(data);
        }
        queryAll.setTransactionSuccessful();
        queryAll.endTransaction();
        result.close();
        return allData;
    }

}
Android SQLite 更新表的重要性
正常情况,如果涉及到添加表的新字段,那么可以调用上面的删除表操作:
    /** * 删除表 */
    public void deleteTable() {
        SQLiteDatabase delete = this.getWritableDatabase();
        delete.execSQL("DROP TABLE " + TB_CAMNTER);
}我记得有这么一种情况,不得不得更新表,不能删除表:
是一款关于健身类的应用,用户做的运动都会记录下来,包括在没用网的时候,运动记录都会记录在本地,每次打开App都会判断有无网的情况,上传本地数据给服务端。假如,用户在没用网的时候运动了,并且保存了运动记录在本机,在没用网的情况下,运动记录是上传不到服务端的。这时,用户下载了新版App准备安装,你又不能在新版本App中删除本地数据库,而只能做兼容操作(数据库更新)。不然,会造成数据的流失,这就是包含离线版本的App要考虑的事情。
Android SQLite 更新表
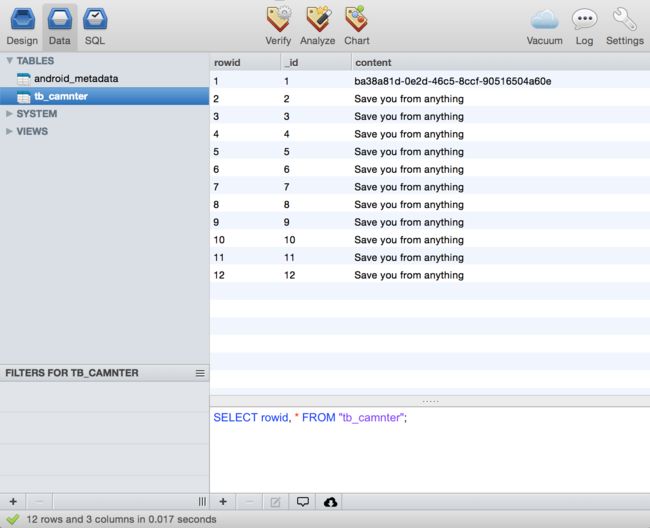
刚才用上述的MySQLiteHelper里的代码可以生成这样的表:
然后,我们将MySQLiteHelper里的:
private static final int VERSION = 1;
改为
private static final int VERSION = 2;
就会走到onUpgrade里:
在这里我们可以判断是从旧的哪个版本更到新的哪个版本里(比如版本1到2需要添加一个字段,版本2到3需要两个字段。那么,版本1-3呢?这时,就需要2个字段了。所以,要对应oldVersion和newVersion的情况重构表)。
    @Override
    public void onUpgrade(SQLiteDatabase db, int oldVersion, int newVersion) {
        if (oldVersion == 1 && newVersion == 2) {
            String sql = "ALTER TABLE " + TB_CAMNTER + " ADD " + "status" + " INT default " + 0;
            db.execSQL(sql);
        }
    }
更新表后,执行任何(增、删、改、查)操作,我们再打开数据库是这样的:
此时,看到了新字段status,就代表更新表成功了。同时,也设置上了默认值,也对应了上面onUpgrade里的SQL语句的字段default 0。
Android SQLite 不要close
除了Cursor意外,都不要在操作完后执行close()
原因: 通过getReadableDatabase()或者getWritableDatabase()都是创建一个数据库的连接放入SQLite的连接池里(可以查看SQLiteDatabase里的SQLiteConnectionPool)。但是如果在多线程中,你每次操作前都打开SQLite连接,执行完操作后又close了连接,就会出现这样的一个问题:
- 1.多线程中,写入数据到数据库,因为多线程会创建不同的连接,在同一时间里,其中线程创建连接时将会失败:
android.database.sqlite.SQLiteDatabaseLockedException: database is locked (code 5)
- 2.多线程中,可能线程1关闭了数据库,然而线程2还在使用数据库,这时候就会崩溃了:
Leak found
Caused by: java.lang.IllegalStateException: SQLiteDatabase created and never closed
相应的,也有解决办法:
1.除了Cursor以外,都不要close(我认为最好的,因为SQLiteDatabase有连接池的概念)。
2.就是在涉及在数据库多线程操作的方法写成 synchronized 方法。
Github 是上也有类似问题的分析

