新时尚Windows8开发(37):获取和设置用户头像
要获取用户相关信息,主要是利用Windows.System.UserProfile 名称空间下的UserInformation类,这个家伙是静态类,你应该知道怎么用了。
获取如用户名之类的就TMD简单了,只需调用对应的方法就完事了,而咱们今天的示例,是获取,设置用户的头像。
获取用户头像调用GetAccountPicture方法;设置用户头像调用SetAccountPictureAsync。
新建一个App项目,把主页面按照新“黄金分割线”划分为左右两部分,我们在左边获取并显示用户头像,在右边设置用户头像。
<Page
    x:Class="App1.MainPage"
    xmlns="http://schemas.microsoft.com/winfx/2006/xaml/presentation"
    xmlns:x="http://schemas.microsoft.com/winfx/2006/xaml"
    xmlns:local="using:App1"
    xmlns:d="http://schemas.microsoft.com/expression/blend/2008"
    xmlns:mc="http://schemas.openxmlformats.org/markup-compatibility/2006"
    mc:Ignorable="d">

    <Grid Background="{StaticResource ApplicationPageBackgroundThemeBrush}">
        <Grid.ColumnDefinitions>
            <ColumnDefinition />
            <ColumnDefinition/>
        </Grid.ColumnDefinitions>
        <Grid Grid.Column="0" Margin="15">
            <Grid.RowDefinitions>
                <RowDefinition Height="auto"/>
                <RowDefinition/>
            </Grid.RowDefinitions>
            <Button Grid.Row="0" Margin="0,18,0,15" HorizontalAlignment="Center" Content="获取用户头像" Click="onGetPic_Click"/>
            <Image Grid.Row="1" x:Name="imgShow" Stretch="Uniform"/>
        </Grid>
        <Grid Grid.Column="1" Margin="15">
            <Grid.RowDefinitions>
                <RowDefinition Height="auto"/>
                <RowDefinition/>
            </Grid.RowDefinitions>
            <StackPanel Grid.Row="0" Margin="0,18,0,15" HorizontalAlignment="Center" Orientation="Horizontal">
                <Button Content="打开图片" Click="onOpenPic_Click"/>
                <Button Content="设置用户头像" Click="onSetPic_Click"/>
            </StackPanel>
            <Image x:Name="imgPreview" Grid.Row="1" Stretch="Uniform"/>
        </Grid>
    </Grid>
</Page>
切换到代码视图,引入以下命名空间:
using Windows.System.UserProfile;
using Windows.Storage;
using Windows.Storage.Pickers;
using Windows.Storage.Streams;
using Windows.UI.Xaml.Media.Imaging;
下面的代码,处理显示用户头像。
        private async void onGetPic_Click(object sender, RoutedEventArgs e)
        {
            // 获得用户头像
            var imageFile = UserInformation.GetAccountPicture(AccountPictureKind.LargeImage);
            using (IRandomAccessStream stream = await imageFile.OpenAsync(FileAccessMode.Read))
            {
                BitmapImage bmp = new BitmapImage();
                bmp.SetSource(stream);
                this.imgShow.Source = bmp;
            }
        }
下面两段代码,第一段是打开并预览图片,第二段是设置用户的头像。
        private async void onOpenPic_Click(object sender, RoutedEventArgs e)
        {
            // 打开一张图片
            FileOpenPicker picker = new FileOpenPicker();
            picker.FileTypeFilter.Add(".jpg");
            picker.FileTypeFilter.Add(".png");
            picker.FileTypeFilter.Add(".jpeg");
            picker.SuggestedStartLocation = PickerLocationId.PicturesLibrary;
            var file = await picker.PickSingleFileAsync();
            if (file != null)
            {
                // 显示图片预览
                BitmapImage bmp = new BitmapImage();
                bmp.SetSource(await file.OpenAsync(FileAccessMode.Read));
                this.imgPreview.Source = bmp;
                // 为了方便后面使用,将文件赋给tag属性
                this.imgPreview.Tag = file;
            }
        }

        private async void onSetPic_Click(object sender, RoutedEventArgs e)
        {
            StorageFile imgFile = this.imgPreview.Tag as StorageFile;
            if (imgFile == null) return;
            var result = await UserInformation.SetAccountPictureAsync(imgFile);
            Windows.UI.Popups.MessageDialog dlg = null;
            if (result == SetAccountPictureResult.Success)
            {
                dlg = new Windows.UI.Popups.MessageDialog("操作成功。");
            }
            else
            {
                dlg = new Windows.UI.Popups.MessageDialog("操作失败。");
            }
            await dlg.ShowAsync();
        }
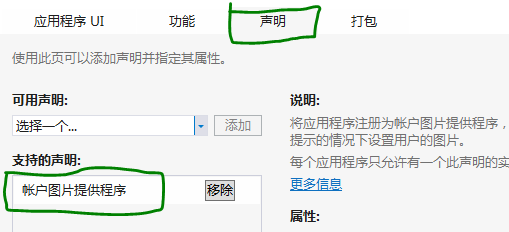
打开清单文件,切换到“声明”选项卡,从下拉列表中选择“帐户图片提供程序”,点击“添加”按钮。保存。
添加这个扩展后,在设置用户图片的时候,系统就不会发出提示。
现在可以运行一下了。
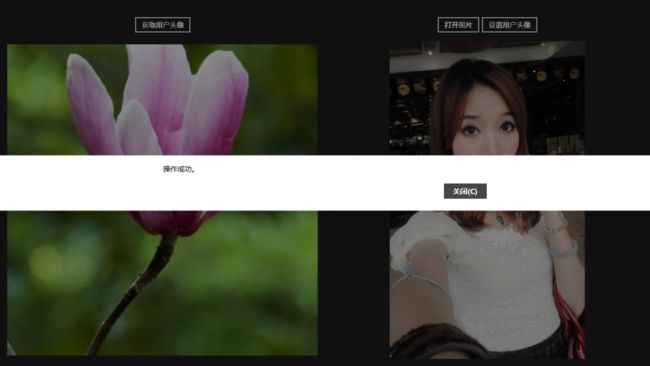
a、在页面的左边,点击按钮,就可以显示当前用户的头像。
b、在页面的右边,设置用户图像。
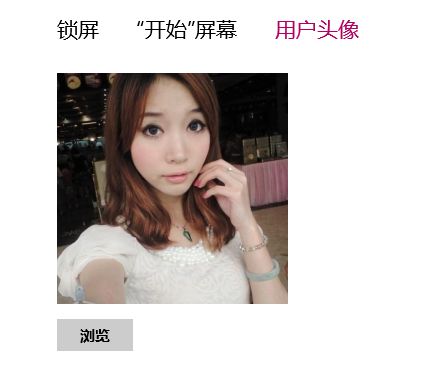
打开系统设置,验证一个是否设置成功。


