Android 4.0 ICS SystemUI浅析——StatusBar加载流程之Notification
前面三篇文章《Android 4.0 ICS SystemUI浅析——SystemUI启动流程》、《Android 4.0 ICS SystemUI浅析——StatusBar结构分析》、《Android 4.0 ICS SystemUI浅析——StatusBar加载流程分析》逐步分析了SystemUI中StatusBar的启动以及加载流程,本文主要分析StatusBar上的Notification的加载,如有不正之处还恳请各位帮忙指正。
本文来自:http://blog.csdn.net/yihongyuelan 欢迎转载 请务必注明出处!
在上一篇文章《Android 4.0 ICS SystemUI浅析——StatusBar加载流程分析》中,我们主要分析了StatusBar上的系统Icons加载的过程,包括了耳机图标、蓝牙图标、禁音图标等等,此文是紧接着上文分析的,因此我们首先看到/SourceCode/frameworks/base/packages/SystemUI/src/com/android/systemui/statusbar/StatusBar.java的start():
         public void start() {
        // First set up our views and stuff.首先准备我们需要显示的view以及原材料
        //我们先跟踪这里的makeStatusBarView
        View sb = makeStatusBarView();

        // Connect in to the status bar manager service
        //初始化各个存储器,用于存储各类信息,这些信息通过StatusBarManagerService获取
        //iconsList用于存放icons
        StatusBarIconList iconList = new StatusBarIconList();
        //nodificationKeys保存以Binder为Key的notification
        ArrayList<IBinder> notificationKeys = new ArrayList<IBinder>();
        //保存StatusBarNotification类型的notifications
        ArrayList<StatusBarNotification> notifications = new ArrayList<StatusBarNotification>();
        //mCommandQueue是和IStatusBarService进行交互的IBinder
        mCommandQueue = new CommandQueue(this, iconList);
        //这里实际上获取的是StatusBarManagerService
        mBarService = IStatusBarService.Stub.asInterface(
                ServiceManager.getService(Context.STATUS_BAR_SERVICE));
        int[] switches = new int[7];
        ArrayList<IBinder> binders = new ArrayList<IBinder>();
        try {
            //通过StatusBarManagerService中的registerStatusBar来获取初始设置
            mBarService.registerStatusBar(mCommandQueue, iconList, notificationKeys, notifications,
                    switches, binders);
        } catch (RemoteException ex) {
            // If the system process isn't there we're doomed anyway.
        }
        ... ...

        // Set up the initial notification state
        //加载notifications,本文的分析主要从这里开始!
        N = notificationKeys.size();
        if (N == notifications.size()) {
            for (int i=0; i<N; i++) {
                addNotification(notificationKeys.get(i), notifications.get(i));
            }
        } else {
            Log.wtf(TAG, "Notification list length mismatch: keys=" + N
                    + " notifications=" + notifications.size());
        }

        ... ...
        lp.gravity = getStatusBarGravity();
        lp.setTitle("StatusBar");
        lp.packageName = mContext.getPackageName();
        lp.windowAnimations = R.style.Animation_StatusBar;
        //在Window上显示StatusBar界面
        WindowManagerImpl.getDefault().addView(sb, lp);
        mDoNotDisturb = new DoNotDisturb(mContext);
    }
我们可以看到addNotification()方法主要完成Notification图标的加载。跟进去看看(因为我们分析的是Phone因此选择PhoneStatusBar),代码如下:
   public void addNotification(IBinder key, StatusBarNotification notification) {
        //该方法主要构造Notification Icons以及Expaned View
        StatusBarIconView iconView = addNotificationViews(key, notification);
        if (iconView == null) return;

        boolean immersive = false;
        try {
            //判断当前栈顶Activity是否具有android:immersive属性。该属性在Android 4.0中新加入的属性,如果该属性为true则该Activity不能被其他Activity或者Notification所打断。
            immersive = ActivityManagerNative.getDefault().isTopActivityImmersive();
            if (DEBUG) {
                Slog.d(TAG, "Top activity is " + (immersive?"immersive":"not immersive"));
            }
        } catch (RemoteException ex) {
        }
        //因为这里我们返回的是false,所以不会执行
        if (immersive) {
            if ((notification.notification.flags & Notification.FLAG_HIGH_PRIORITY) != 0) {
                Slog.d(TAG, "Presenting high-priority notification in immersive activity");
                // special new transient ticker mode
                // 1. Populate mIntruderAlertView

                ImageView alertIcon = (ImageView) mIntruderAlertView.findViewById(R.id.alertIcon);
                TextView alertText = (TextView) mIntruderAlertView.findViewById(R.id.alertText);
                alertIcon.setImageDrawable(StatusBarIconView.getIcon(
                    alertIcon.getContext(),
                    iconView.getStatusBarIcon()));
                alertText.setText(notification.notification.tickerText);

                View button = mIntruderAlertView.findViewById(R.id.intruder_alert_content);
                button.setOnClickListener(
                    new NotificationClicker(notification.notification.contentIntent,
                        notification.pkg, notification.tag, notification.id));

                // 2. Animate mIntruderAlertView in
                mHandler.sendEmptyMessage(MSG_SHOW_INTRUDER);

                // 3. Set alarm to age the notification off (TODO)
                mHandler.removeMessages(MSG_HIDE_INTRUDER);
                mHandler.sendEmptyMessageDelayed(MSG_HIDE_INTRUDER, INTRUDER_ALERT_DECAY_MS);
            }
        //这里的fullScreenIntent=null因此也不执行
        } else if (notification.notification.fullScreenIntent != null) {
            // not immersive & a full-screen alert should be shown
            Slog.d(TAG, "Notification has fullScreenIntent; sending fullScreenIntent");
            try {
                notification.notification.fullScreenIntent.send();
            } catch (PendingIntent.CanceledException e) {
            }
        } else {
            // usual case: status bar visible & not immersive

            // show the ticker
            //因此StatusBar可见同时不具有immersive属性,因此显示tiker
            tick(notification);
        }

        // Recalculate the position of the sliding windows and the titles.
        // 重新计算滑动窗口的位置和标题
        setAreThereNotifications();
        // 更新ExpanedView
        updateExpandedViewPos(EXPANDED_LEAVE_ALONE);
    }
通过对以上代码的分析,我们可以大致知道,Notification的加载主要分为三步:
1.addNotificationViews(key, notification);
2.tick(notification);
3.setAreThereNotifications()和updateExpandedViewPos(EXPANDED_LEAVE_ALONE);
那么接下来我们就通过这三个方法来分析Notification的加载。
(1). addNotificationViews(key, notification);
跟踪查看代码如下:
   StatusBarIconView addNotificationViews(IBinder key, StatusBarNotification notification) {
        if (DEBUG) {
            Slog.d(TAG, "addNotificationViews(key=" + key + ", notification=" + notification);
        }
        // Construct the icon.
        // 初始化iconView
        final StatusBarIconView iconView = new StatusBarIconView(mContext,
                notification.pkg + "/0x" + Integer.toHexString(notification.id),
                notification.notification);
        //设置icons按照什么方式显示
        iconView.setScaleType(ImageView.ScaleType.CENTER_INSIDE);
        // 对全局变量赋值
        final StatusBarIcon ic = new StatusBarIcon(notification.pkg,
                    notification.notification.icon,
                    notification.notification.iconLevel,
                    notification.notification.number,
                    notification.notification.tickerText);
        // 设置显示icons 和上一篇文章提到的系统icons图标设置是一样的 如果返回true则表示设置成功
        if (!iconView.set(ic)) {
            handleNotificationError(key, notification, "Couldn't create icon: " + ic);
            return null;
        }
        // Construct the expanded view.
        // 将Notification在ExpandedView上显示出来
        NotificationData.Entry entry = new NotificationData.Entry(key, notification, iconView);
        if (!inflateViews(entry, mPile)) {
            handleNotificationError(key, notification, "Couldn't expand RemoteViews for: "
                    + notification);
            return null;
        }

        // Add the expanded view and icon.
        //mNotificationData中保存着当前显示的Notification的数量及其属性
        int pos = mNotificationData.add(entry);
        if (DEBUG) {
            Slog.d(TAG, "addNotificationViews: added at " + pos);
        }
        //更新图标
        updateNotificationIcons();

        return iconView;
    }
根据以上代码,我们可以知道在addNotificationViews()中,又可以细分为三步:设置icons,设置ExpanedView,更新图标。其中,设置icons实际上和上一篇文章中设置系统Icons类似。主要区别在设置ExpandedView和更新图标。那跟踪inflateViews()方法可以看到:
   private boolean inflateViews(NotificationData.Entry entry, ViewGroup parent) {
        StatusBarNotification sbn = entry.notification;
        //初始化remoteViews(如果有过自定义Notification经验的朋友肯定对这个很熟悉,不了解的朋友可以自己去试试)
        RemoteViews remoteViews = sbn.notification.contentView;
        if (remoteViews == null) {
            return false;
        }

        // create the row view
        LayoutInflater inflater = (LayoutInflater)mContext.getSystemService(
                Context.LAYOUT_INFLATER_SERVICE);
        // 加载布局文件,默认的通知信息在ExpandedView中是以一行来显示的,左侧是图标,右侧是通知标题和内容
        View row = inflater.inflate(R.layout.status_bar_notification_row, parent, false);
        //这个所谓的button实际上是在清除单个通知信息时调用的
        View vetoButton = updateNotificationVetoButton(row, sbn);
        //设置vetoButton的备注说明,作为一种辅助功能提供,为一些没有文字描述的View提供说明。这在界面上不会有效果,可临时放一点字符串数据
        vetoButton.setContentDescription(mContext.getString(
                R.string.accessibility_remove_notification));

        // the large icon
        //如果有largeIcon则进行设置。这里提到的largeIcon我也不知道具体用处是什么
        ImageView largeIcon = (ImageView)row.findViewById(R.id.large_icon);
        if (sbn.notification.largeIcon != null) {
            largeIcon.setImageBitmap(sbn.notification.largeIcon);
            largeIcon.setContentDescription(sbn.notification.tickerText);
        } else {
            largeIcon.getLayoutParams().width = 0;
            largeIcon.setVisibility(View.INVISIBLE);
        }
        largeIcon.setContentDescription(sbn.notification.tickerText);

        // bind the click event to the content area
        ViewGroup content = (ViewGroup)row.findViewById(R.id.content);
        // XXX: update to allow controls within notification views
        content.setDescendantFocusability(ViewGroup.FOCUS_BLOCK_DESCENDANTS);
//        content.setOnFocusChangeListener(mFocusChangeListener);
        PendingIntent contentIntent = sbn.notification.contentIntent;
        if (contentIntent != null) {
            //绑定largIcons和content区域的点击事件
            final View.OnClickListener listener = new NotificationClicker(contentIntent,
                    sbn.pkg, sbn.tag, sbn.id);
            largeIcon.setOnClickListener(listener);
            content.setOnClickListener(listener);
        } else {
            largeIcon.setOnClickListener(null);
            content.setOnClickListener(null);
        }

        View expanded = null;
        Exception exception = null;
        try {
            //  Inflates视图对象并且应用到所有的动作中
            expanded = remoteViews.apply(mContext, content);
        }
        catch (RuntimeException e) {
            exception = e;
        }
        if (expanded == null) {
            final String ident = sbn.pkg + "/0x" + Integer.toHexString(sbn.id);
            Slog.e(TAG, "couldn't inflate view for notification " + ident, exception);
            return false;
        } else {
            //content 添加显示view
            content.addView(expanded);
            // 获取view中的图像前需要设为true
            row.setDrawingCacheEnabled(true);
        }
        // 设置这些通知信息原始背景
        applyLegacyRowBackground(sbn, content);
        // 将设置好的属性回传给entry
        entry.row = row;
        entry.content = content;
        entry.expanded = expanded;
        entry.largeIcon = largeIcon;

        return true;
    }
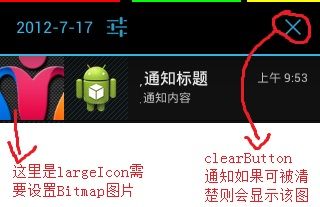
对于ExpanedView中的Notification设置,可能这里有点模糊,那请看以下图1和图2:
图 1
图2
通过图1和图2我们可以看到largeIcon以及vetoButton触发时间。对于ExpandedView,后面会有较为详细的分析。
上面分析了ExpandedView中的Notification的设置,在addNotificationViews(key, notification);中就还剩下最后一个步骤了,即更新图标,那么查看addNotificationView()中的updateNotificationIcons()方法,代码如下:
    private void updateNotificationIcons() {
        // 该方法主要用于将通知信息在ExpandedView中显示 如果注释掉则通知将不会在ExpandedView中显示
        loadNotificationShade();
        // 下面的操作主要完成在StatusBar添加通知提示图标
        final LinearLayout.LayoutParams params
            = new LinearLayout.LayoutParams(mIconSize + 2*mIconHPadding, mNaturalBarHeight);

        int N = mNotificationData.size();

        if (DEBUG) {
            Slog.d(TAG, "refreshing icons: " + N + " notifications, mNotificationIcons=" + mNotificationIcons);
        }

        ArrayList<View> toShow = new ArrayList<View>();

        for (int i=0; i<N; i++) {
            toShow.add(mNotificationData.get(N-i-1).icon);
        }

        ArrayList<View> toRemove = new ArrayList<View>();
        for (int i=0; i<mNotificationIcons.getChildCount(); i++) {
            View child = mNotificationIcons.getChildAt(i);
            if (!toShow.contains(child)) {
                toRemove.add(child);
            }
        }

        for (View remove : toRemove) {
            mNotificationIcons.removeView(remove);
        }

        for (int i=0; i<toShow.size(); i++) {
            View v = toShow.get(i);
            if (v.getParent() == null) {
                mNotificationIcons.addView(v, i, params);
            }
        }
    }
通过以上代码的分析,我们可以知道updateNotificationIcons()主要做了两件事:更新ExpanddeView上的通知信息;更新StatusBar上的通知图标。更新方法都类似,先查通知看是否有效,如果不是则删除,如果是则添加。以上完成了加载Notification的第一步,那么我来看第二步tick(notification)。
(2).tick(notification),跟踪代码如下:
    private void tick(StatusBarNotification n) {
        // Show the ticker if one is requested. Also don't do this
        // until status bar window is attached to the window manager,
        // because...  well, what's the point otherwise?  And trying to
        // run a ticker without being attached will crash!
        if (n.notification.tickerText != null && mStatusBarView.getWindowToken() != null) {
            if (0 == (mDisabled & (StatusBarManager.DISABLE_NOTIFICATION_ICONS
                            | StatusBarManager.DISABLE_NOTIFICATION_TICKER))) {
                //ticker执行方法
                mTicker.addEntry(n);
            }
        }
    }
跳转到mTicker.addEntry();方法中,代码路径:SourceCode/frameworks/base/packages/SystemUI/src/com/android/systemui/statusbar/phone/Ticker.java中,代码如下:
    public void addEntry(StatusBarNotification n) {
        int initialCount = mSegments.size();

        // If what's being displayed has the same text and icon, just drop it
        // (which will let the current one finish, this happens when apps do
        // a notification storm).
        if (initialCount > 0) {
            final Segment seg = mSegments.get(0);
            //判断该Notififacation是不是已经在StatusBar上显示了的(同一个Notification发送两次这里并么有执行,为什么?)
            if (n.pkg.equals(seg.notification.pkg)
                    && n.notification.icon == seg.notification.notification.icon
                    && n.notification.iconLevel == seg.notification.notification.iconLevel
                    && CharSequences.equals(seg.notification.notification.tickerText,
                        n.notification.tickerText)) {
                return;
            }
        }
        // 获取该Notification的icon
        final Drawable icon = StatusBarIconView.getIcon(mContext,
                new StatusBarIcon(n.pkg, n.notification.icon, n.notification.iconLevel, 0,
                        n.notification.tickerText));
        // 将Notification的一些信息放入对象newSegment中,这里的Segment翻译过来是片段和部分的意思
        // Segment是Ticker类的内部类,用于存放notification的部分信息以及对信息的一些处理,比如tickerText
        final Segment newSegment = new Segment(n, icon, n.notification.tickerText);

        // If there's already a notification schedule for this package and id, remove it.
        // 若果该信息在Segment中已经存在,则删除掉
        for (int i=0; i<mSegments.size(); i++) {
            Segment seg = mSegments.get(i);
            if (n.id == seg.notification.id && n.pkg.equals(seg.notification.pkg)) {
                // just update that one to use this new data instead(什么时候触发?)
                mSegments.remove(i--); // restart iteration here
            }
        }
        // 将Notification的部分信息放到mSegments链表中。
        mSegments.add(newSegment);

        if (initialCount == 0 && mSegments.size() > 0) {
            Segment seg = mSegments.get(0);
            seg.first = false;
            //初始化id/tickerIcon
            mIconSwitcher.setAnimateFirstView(false);
            mIconSwitcher.reset();
            mIconSwitcher.setImageDrawable(seg.icon);
            //初始化id/tickerText
            mTextSwitcher.setAnimateFirstView(false);
            mTextSwitcher.reset();
            mTextSwitcher.setText(seg.getText());
            //启动ticker
            tickerStarting();
            scheduleAdvance();
        }
    }
通过Open Implementation我们跳转到PhoneStatusBar中的tickerStatrting()中,代码如下:
        @Override
        public void tickerStarting() {
            mTicking = true;
            //这里的mIcons和ticker组成了整个StatusBar的布局,因此这里要线将它置为GONE
            mIcons.setVisibility(View.GONE);
            //显示tickerText
            mTickerView.setVisibility(View.VISIBLE);
            //加载ticker弹出时的动画
            mTickerView.startAnimation(loadAnim(com.android.internal.R.anim.push_up_in, null));
            mIcons.startAnimation(loadAnim(com.android.internal.R.anim.push_up_out, null));
        }
这里可以发现ticker开加载动画并显示了,实际上Notification在StatusBar上的显示效果是加载了动画的原因。继续查看scheduleAdvance()方法:
    private void scheduleAdvance() {
        mHandler.postDelayed(mAdvanceTicker, TICKER_SEGMENT_DELAY);
    }
通过Handler的PostDelay方法执行mAdvanceTicker这个Runnable中的run方法,代码如下:
    private Runnable mAdvanceTicker = new Runnable() {
        public void run() {
            while (mSegments.size() > 0) {
                Segment seg = mSegments.get(0);

                if (seg.first) {
                    // this makes the icon slide in for the first one for a given
                    // notification even if there are two notifications with the
                    // same icon in a row
                    // 第一次显示时,设置tickerIcon的值,这里就是ticker最前方显示的那个icon
                    mIconSwitcher.setImageDrawable(seg.icon);
                }
                CharSequence text = seg.advance();
                if (text == null) {
                    mSegments.remove(0);
                    continue;
                }
                // 显示用户设置的tickerText内容
                mTextSwitcher.setText(text);

                scheduleAdvance();
                break;
            }
            if (mSegments.size() == 0) {
                // 完成ticker的一次显示
                tickerDone();
            }
        }
    };
最后我们再来看看tickerDone()方法,该方法主要对应于tickerStarting()方法,代码如下:
        @Override
        public void tickerDone() {
            //显示mIcons布局
            mIcons.setVisibility(View.VISIBLE);
            //tickerText消失
            mTickerView.setVisibility(View.GONE);
            //加载ticker消失的动画
            mIcons.startAnimation(loadAnim(com.android.internal.R.anim.push_down_in, null));
            mTickerView.startAnimation(loadAnim(com.android.internal.R.anim.push_down_out,
                        mTickingDoneListener));
        }
至此,我们完成了Notification加载的前两步,分别是addNotificationViews(key, notification)和tick(notification)。剩下最后一步,即:setAreThereNotifications()和updateExpandedViewPos(EXPANDED_LEAVE_ALONE);
(3).setAreThereNotifications()和updateExpandedViewPos().这里先说一下setAreThereNotifications()方法,代码如下:
    private void setAreThereNotifications() {
        //是否有Notification
        final boolean any = mNotificationData.size() > 0;
        //该Notification是否可被清除
        final boolean clearable = any && mNotificationData.hasClearableItems();

        if (DEBUG) {
            Slog.d(TAG, "setAreThereNotifications: N=" + mNotificationData.size()
                    + " any=" + any + " clearable=" + clearable);
        }
        //对"清除所有通知"按钮进行设置
        if (mClearButton.isShown()) {
            if (clearable != (mClearButton.getAlpha() == 1.0f)) {
                ObjectAnimator.ofFloat(mClearButton, "alpha",
                        clearable ? 1.0f : 0.0f)
                    .setDuration(250)
                    .start();
            }
        } else {
            mClearButton.setAlpha(clearable ? 1.0f : 0.0f);
        }
        mClearButton.setEnabled(clearable);

... ...
    }
继续分析updateExpandedViewPos(EXPANDED_LEAVE_ALONE);方法,代码如下;
    void updateExpandedViewPos(int expandedPosition) {
        if (SPEW) {
            Slog.d(TAG, "updateExpandedViewPos before expandedPosition=" + expandedPosition
                    + " mTrackingParams.y=" + ((mTrackingParams == null) ? "?" : mTrackingParams.y)
                    + " mTrackingPosition=" + mTrackingPosition);
        }
        //获取StatusBar高度
        int h = mStatusBarView.getHeight();
        //获取当前分辨率高度
        int disph = mDisplayMetrics.heightPixels;

        // If the expanded view is not visible, make sure they're still off screen.
        // Maybe the view was resized.
        //如果ExpanedView不可见则执行
        if (!mExpandedVisible) {
            //更新mTrackingView属性,设置mExpandedDialog属性
            updateExpandedInvisiblePosition();
            return;
        }

        // tracking view...
        //设置TriackingView的各种属性
        int pos;
        if (expandedPosition == EXPANDED_FULL_OPEN) {
            pos = h;
        }
        else if (expandedPosition == EXPANDED_LEAVE_ALONE) {
            //传递参数为EXPANDED_LEAVE_ALONE
            pos = mTrackingPosition;
        }
        else {
            if (expandedPosition <= disph) {
                pos = expandedPosition;
            } else {
                pos = disph;
            }
            pos -= disph-h;
        }
        mTrackingPosition = mTrackingParams.y = pos;
        mTrackingParams.height = disph-h;
        WindowManagerImpl.getDefault().updateViewLayout(mTrackingView, mTrackingParams);

        if (mExpandedParams != null) {
            if (mCloseView.getWindowVisibility() == View.VISIBLE) {
                mCloseView.getLocationInWindow(mPositionTmp);
                final int closePos = mPositionTmp[1];

                mExpandedContents.getLocationInWindow(mPositionTmp);
                final int contentsBottom = mPositionTmp[1] + mExpandedContents.getHeight();

                mExpandedParams.y = pos + mTrackingView.getHeight()
                        - (mTrackingParams.height-closePos) - contentsBottom;

                if (SPEW) {
                    Slog.d(PhoneStatusBar.TAG,
                            "pos=" + pos +
                            " trackingHeight=" + mTrackingView.getHeight() +
                            " (trackingParams.height - closePos)=" +
                                (mTrackingParams.height - closePos) +
                            " contentsBottom=" + contentsBottom);
                }

            } else {
                // If the tracking view is not yet visible, then we can't have
                // a good value of the close view location.  We need to wait for
                // it to be visible to do a layout.
                mExpandedParams.y = -mDisplayMetrics.heightPixels;
            }
            int max = h;
            if (mExpandedParams.y > max) {
                mExpandedParams.y = max;
            }
            int min = mTrackingPosition;
            if (mExpandedParams.y < min) {
                mExpandedParams.y = min;
            }

            boolean visible = (mTrackingPosition + mTrackingView.getHeight()) > h;
            if (!visible) {
                // if the contents aren't visible, move the expanded view way off screen
                // because the window itself extends below the content view.
                mExpandedParams.y = -disph;
            }
            mExpandedDialog.getWindow().setAttributes(mExpandedParams);

            // As long as this isn't just a repositioning that's not supposed to affect
            // the user's perception of what's showing, call to say that the visibility
            // has changed. (Otherwise, someone else will call to do that).
            if (expandedPosition != EXPANDED_LEAVE_ALONE) {
                if (SPEW) Slog.d(TAG, "updateExpandedViewPos visibilityChanged(" + visible + ")");
                visibilityChanged(visible);
            }
        }

        if (SPEW) {
            Slog.d(TAG, "updateExpandedViewPos after  expandedPosition=" + expandedPosition
                    + " mTrackingParams.y=" + mTrackingParams.y
                    + " mTrackingPosition=" + mTrackingPosition
                    + " mExpandedParams.y=" + mExpandedParams.y
                    + " mExpandedParams.height=" + mExpandedParams.height);
        }
    }
以上代码主要完成对TrackingView的属性设置,ExpandedView实际上是包裹在TrackingView中的,因此这里也附带进行了设置,最后更新,完成了整个Notification的加载。
小结
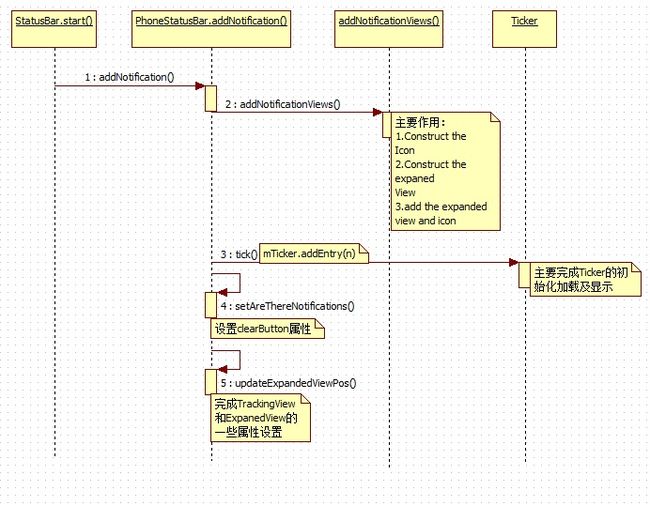
通过对Notification加载流程的分析,对Notifification工作流程有了大致的了解。针对上文中的分析可能部分地方还有所偏颇,还需要加强自己的代码阅读能力。以下是简单的时序图,如图3:
图3


