5、动画和矩阵变换
Copyright © MikeFeng QQ: 76848502
D3D中世界的运动是通过矩阵变化完成的。这里不打算讲数学知识,相关问题请参考计算机图形学书籍。
在D3D中矩阵变换分为三种:世界变换,观察变换和投影变换。世界变换描述了物体本身的缩放,旋转和平移,也就是物体本身的运动;观察变换描述了一个观察者在场景中的位置和朝向;投影变换描述了观察者可以看到内容的范围,类似这个范围类似于削去顶部的金字塔形状,该变换将透视法应用到一个3D场景中。
矩阵在D3D中是按语言分开定义的,如果用的是C语言,那么只能利用D3DMatrix;如果用的是C++,那么还可以用D3DXMatrix。它们的差别就是后者利用了C++中的操作符重载的功能,例如矩阵乘法。这些矩阵都是4*4的,这样方便进行各种转换。另外还有一个D3DXMatrix16,这是经过优化的版本,是以16位对齐的。D3DXMatrix定义如下:
typedef struct D3DXMATRIX {
FLOAT _11, FLOAT _12, FLOAT _13, FLOAT _14,
FLOAT _21, FLOAT _22, FLOAT _23, FLOAT _24,
FLOAT _31, FLOAT _32, FLOAT _33, FLOAT _34,
FLOAT _41, FLOAT _42, FLOAT _43, FLOAT _44 );
} D3DXMATRIX;
一个单位矩阵可以这样定义:
D3DXMatrix* m;
D3DMatrixIdentity(&m);
在世界变换中,有以下函数用于进行物体位置的变换:
- D3DXMatrixTranslation:平移矩阵。例如:D3DXMatrixTranslation(x, y, z)将物体平移到(x, y, z)
- D3DXMatrixRotationX:绕x轴旋转。类似的有绕Y和Z轴的旋转函数。例如:D3DXMatrixRotationX(&matrix,fAngle)。其中fAngle是旋转弧度。
- D3DXMatrixRotationAxis:绕任意轴旋转
- D3DXMatrixRotationQuaternion:绕四元组旋转。
-
D3DXMatrixScaling:对物体进行缩放操作
向量的归一:
因为D3D采用浮点数表示矩阵,在进行多次平移旋转缩放后可能会丢失一定的精度,从而造成原来垂直的向量不垂直。为了解决这个问题,D3D采用了归一(Normalize)叉积的方法。具体代码如下:
D3DXVec3Normalize( &vLook, &vLook ); // 以Look为标准
D3DXVec3Cross( &vRight, &vUp, &vLook ); // 求Up和Look叉积来设定Right
D3DXVec3Normalize( &vRight, &vRight );
D3DXVec3Cross ( &vUp, &vLook, &vRight); // 求Look和Right叉积来设定Up
D3DXVec3Normalize( &vUp, &vUp );
归一就是把向量单位化,计算公式为||A|| = sqrt(x*x + y*y + z*z)。
四元数:
四元数就是一个向量加上一次旋转。四元数将三维空间的旋转概念扩展到四维空间,这对于表示和处理3D中点的旋转很有用。四元数可以用于实现:
n 骨骼动画 ( skeletal animation )
n 反向动力学动画 ( inverse cinematics )
n 3D物理学
我们可以在一个游戏中将所有的矩阵替换为四元数,因为这样不仅节省内存空间,同时也降低了计算成本。并且当需要一个矩阵进行操作时,随时可以将四元数转换成矩阵。
四元数包括一个标量w和一个向量v。其中向量应为单位向量w,标量为绕v轴旋转的数量。通常表示为(x, y, z, w)。它的物理意义是这样的:考虑以角度θ绕轴A(x , y, z)旋转的所有旋转矩阵,四元数Q将是Q=( x sin(θ/2), y sin(θ/2), z sin(θ/2), cos(θ/2) )。因此由一个四元数可以很容易求出旋转角θ= 2 arc cos w,那么旋转轴A也就很容易求出了。
关于四元数的数学意义以及和矩阵的具体转换方法参见游戏编程精粹1中的2.7和2.8章。在D3D中四元数的典型应用是在一个偏航,俯仰,横滚系统中( yaw, pitch, roll )。如果由键盘控制一架飞机的偏航,俯仰以及横滚,我们就可以用四元数计算取代矩阵计算。从用户的键盘中得到飞机的偏航角度为yaw,俯仰角度为pitch,横滚角度为roll,那么便可以通过D3DXQuaternionRotationYawPitchRoll( D3DQUATERNION * pOut, FLOAT yaw, FLOAT pitch, FLOAT roll)来获得相应的四元数pOut。然后用四元数的乘法操作取代矩阵的乘法操作。四元数乘法操作Q=q1*q2的意义是绕轴2旋转某角度,然后再绕轴1旋转某角度。将最终得到的四元数结果应用于D3DXMatrixRotationQuaternion( D3DXMatrix *pOut, CONST D3DXQUATERNION *pQ)就能得到最终矩阵pOut了。另外常用的四元数操作函数还有四元数的归一D3DXQUATERNIONNormalize,四元数乘法D3DXQUATERNIONMultiply。
观察变换
观察变换通常用于描述一个观察者在场景中的位置和朝向。可以用照相机看场景的例子来描述这种变换。观察变换可以通过一个观察变换矩阵来表示。世界矩阵以行的次序存储向量的朝向,而观察矩阵则以列的次序存储。D3D中提供了一种比较简单的观察矩阵获取方式,即调用D3DXMatrixLookAtLH。这个函数必须要传进去三个向量,它们分别定义了照相机所在点eye,照相机拍摄物体位置at,和上方向量up。返回的矩阵第一列前三个值存储了up向量,第二列的前3个值存储了Right向量,第三列的前3个值存储了Look向量。D3DXMatrixLookAtLH适合用于跟随式照相机,对于太空射击游戏或者飞行模拟器就不适合了。解决办法有两个,一是将照相机绕向量旋转,二是使用四元数将照相机绕任意轴旋转。
Example 1
A plain’s Simple Transform
将平面做成一个对象,以简化主回调函数的逻辑
#include
"dxstdafx.h"
// Plain vertex struct
struct
PlainVertex
{
FLOAT
x
, y, z;
FLOAT
tu
, tv;
};
// replace D3DFVF_XYZRHW with D3DFVF_XYZ
#define
PLAIN_FVF
(
D3DFVF_XYZ
|
D3DFVF_TEX1
)
// Object PlainVertex wrap class
class
Plain
{
public
:
Plain
(IDirect3DDevice9* device);
~
Plain
();
HRESULT
CreatePlain
();
bool
OnFrameMove
( IDirect3DDevice9* pd3dDevice, double fTime );
bool
OnFrameRender
( D3DMATERIAL9* mtrl, IDirect3DTexture9* tex);
public
:
IDirect3DDevice9
* m_device;
IDirect3DVertexBuffer9
* m_vb;
IDirect3DIndexBuffer9
* m_ib;
};
// Constructor
Plain
::Plain(IDirect3DDevice9* device)
{
m_device
=
device
;
m_vb
=
NULL
;
m_ib
=
NULL
;
}
// Create the plain first when reset device
inline
HRESULT
Plain
::CreatePlain()
{
HRESULT
hr
;
PlainVertex
plainVertex
[] =
{
{ -1.0f, -1.0f, 0.0f, 1.0f, 1.0f },
// x, y, z, tu, tv : left bottom
{ 1.0f, -1.0f, 0.0f, 0.0f, 1.0f },
// right bottom
{ 1.0f, 1.0f, 0.0f, 0.0f, 0.0f },
// right up
{ -1.0f, 1.0f, 0.0f, 1.0f, 0.0f },
// left up
};
V_RETURN
(m_device->CreateVertexBuffer(
sizeof
(plainVertex),
0,
PLAIN_FVF
,
D3DPOOL_MANAGED
,
&
m_vb
,
NULL
));
PlainVertex
* v;
V_RETURN
(m_vb->Lock(0, 0, (void**)&v, 0));
memcpy
( v, plainVertex, sizeof(plainVertex) );
m_vb
->Unlock();
WORD
wIndeces
[] = {3,2,0,2,1,0};
V_RETURN
( m_device->CreateIndexBuffer( sizeof(wIndeces),
0,
D3DFMT_INDEX16
,
D3DPOOL_MANAGED
, &m_ib, NULL) );
VOID
* pIndeces;
V_RETURN
( m_ib->Lock( 0, sizeof(wIndeces), &pIndeces, 0) );
memcpy
( pIndeces, wIndeces, sizeof(wIndeces) );
m_ib
->Unlock();
return
S_OK
;
}
// Things to do when frame move for this plain
inline
bool
Plain
::OnFrameMove( IDirect3DDevice9* pd3dDevice, double fTime )
{
D3DXMATRIX
matRotY
;
D3DXMatrixRotationY
( &matRotY, (float)fTime * 2.0f );
D3DXMATRIX
matTrans
;
D3DXMatrixTranslation
( &matTrans, 0.0f, 0.0f, 0.0f );
D3DXMATRIX
matResult
;
matResult
=
matRotY
*
matTrans
;
pd3dDevice
->SetTransform( D3DTS_WORLD, &matResult );
return
true
;
}
// Things to do when frame render for this plain
inline
bool
Plain
::OnFrameRender(D3DMATERIAL9* mtrl, IDirect3DTexture9* tex)
{
if
( mtrl )
m_device
->SetMaterial(mtrl);
if
( tex )
m_device
->SetTexture(0, tex);
m_device
->SetSamplerState(0, D3DSAMP_MAGFILTER, D3DTEXF_LINEAR);
m_device
->SetSamplerState(0, D3DSAMP_MINFILTER, D3DTEXF_LINEAR);
m_device
->SetSamplerState(0, D3DSAMP_MIPFILTER, D3DTEXF_LINEAR);
m_device
->SetStreamSource(0, m_vb, 0, sizeof(PlainVertex));
m_device
->SetIndices(m_ib);
m_device
->SetFVF(PLAIN_FVF);
m_device
->DrawIndexedPrimitive(D3DPT_TRIANGLELIST, 0, 0, 4,
0,
2);
return
true
;
}
// destructor, must invoked when lost device
Plain
::~Plain()
{
SAFE_RELEASE
(m_vb);
SAFE_RELEASE
(m_ib);
}
接下来的事情就是在主回调函数中调用上面函数了
// Declaration
Plain*
g_pPlain = NULL;
// codes in OnCreateDevice
// Turn off culling
pd3dDevice
->SetRenderState( D3DRS_CULLMODE, D3DCULL_NONE );
// Turn off D3D lighting
pd3dDevice
->SetRenderState( D3DRS_LIGHTING, FALSE );
// Turn on the zbuffer
pd3dDevice
->SetRenderState( D3DRS_ZENABLE, TRUE );
// Codes in OnResetDevice
g_pPlain
=
new
Plain
(pd3dDevice);
V_RETURN
(
g_pPlain
->CreatePlain() );
// Codes in OnFrameMove.
// invoke plain’s OnFrameMove fisrt to set the world matrics
g_pPlain->OnFrameMove( pd3dDevice, fTime );
// Set up our view matrix. A view matrix can be defined given an eye point,
// a point to lookat, and a direction for which way is up. Here, we set the
// eye five units back along the z-axis and up three units, look at the
// origin, and define "up" to be in the y-direction.
D3DXVECTOR3
vEyePt
( 0.0f, 0.0f, 4.0f );
D3DXVECTOR3
vLookatPt
( 0.0f, 0.0f, 0.0f );
D3DXVECTOR3
vUpVec
( 0.0f, 1.0f, 0.0f );
D3DXMATRIXA16
matView
;
D3DXMatrixLookAtLH
( &matView, &vEyePt, &vLookatPt, &vUpVec );
pd3dDevice
->SetTransform( D3DTS_VIEW, &matView );
// For the projection matrix, we set up a perspective transform (which
// transforms geometry from 3D view space to 2D viewport space, with
// a perspective divide making objects smaller in the distance). To build
// a perpsective transform, we need the field of view (1/4 pi is common),
// the aspect ratio, and the near and far clipping planes (which define at
// what distances geometry should be no longer be rendered).
D3DXMATRIXA16
matProj
;
D3DXMatrixPerspectiveFovLH
( &matProj, D3DX_PI/4, 1.0f, 1.0f, 100.0f );
pd3dDevice
->SetTransform( D3DTS_PROJECTION, &matProj );
// Codes in OnFrameRender
g_pPlain->OnFrameRender(0,g_pTexture);
// Codes in OnLostDevice
g_pPlain->~Plain();
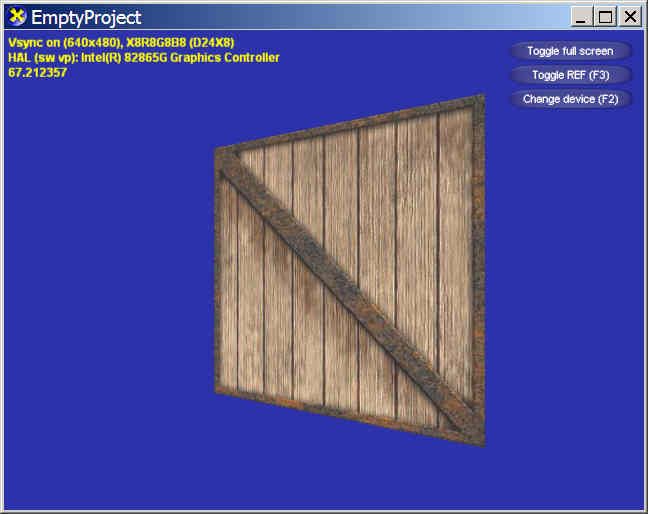
从上面的代码可以看出,这个程序是将一个平面绕Y轴旋转。由于定义的定点是在[-1, 1]区间的,所以动画显示出来的效果就是绕平面中心竖线选转的。这里用到了前几章的顶点缓冲和索引缓冲,然后在平面上做了纹理贴图,利用了mipmap并进行了双线过滤(见Plain::OnFrameRender)。需要注意的一点是D3D中默认打开了背面剔除(culling)和光照效果(lighting),所以我们必须手动调用SetRenderState手动关闭它们(OnCreateDevice),否则动画将只现实是黑乎乎的旋转平面正面。关闭后效果如下:
