使用Android Studio进行安卓开发教程
本教程介绍如何创建Android应用程序。它基于Android5.0(Lollipop)介绍Android Studio的用法。
安卓介绍
Android是基于Linux内核的操作系统。负责开发Android系统的项目被为Android Open Source Project (AOSP) ,由谷歌领导。
Android系统支持后台处理,提供了丰富的用户界面库,使用的OpenGL标准支持2-D和3-D图形,并允许访问文件系统以及嵌入式SQLite数据库。
Android应用包含可见和不可见组件,并可重用其他应用程序的组件。
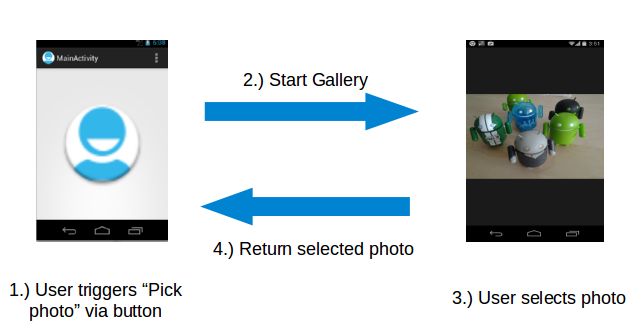
在Android中重用其他应用组件即任务的(Task),比如调用图片管理应用。事件流如下:
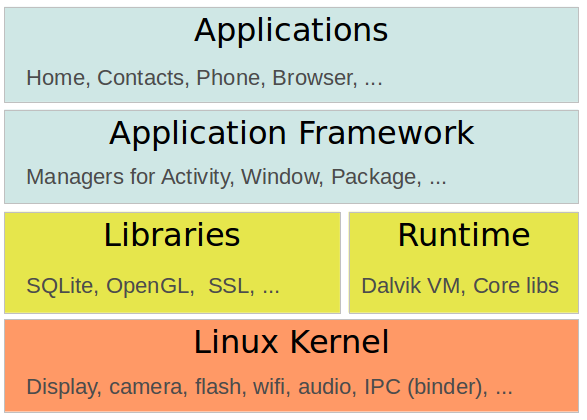
安卓平台组件如下:
应用 - Android开源项目包含几个默认的应用程序,如浏览器,相机,图库,音乐,电话等。
应用程序框架 - Android应用与Android系统高层交互API。
库和运行时 - 应用程序框架和Dalvik运行时的常用功能的库(如:图形渲染,数据存储,网页浏览等)和运行Android应用的核心Java库。
Linux内核 - 底层硬件的通信层。
谷歌提供的Google Play是程序员可以提供他们的Android应用给用户的市场。客户使用谷歌Play可购买和安装应用程序。
Google Play还提供了更新的服务。如果程序员上传自己的应用程序的新版本时,该服务将通知现有用户有更新可用并允许他们来安装更新。
Google Play提供服务和库访问,比如谷歌地图和Android设备之间同步的服务。这些服务对旧版安卓也可用,不依赖安卓版本
安卓开发工具
Android Software Development Kit (Android SDK): 包含来创建,编译和打包Android应用的工具。这些工具大部分基于命令行。主要基于Java编程语言,也涉及Python和c++等。
Android debug bridge (adb):能连接到虚拟或真实的Android设备以管理设备或调试应用。
Gradle和Android Gradle 插件:Android的工具使用Gradle作为构建系统。 Android团队提供了Gradle插件用于构建Android应用,Android项目的根目录的build.gradle文件是输入。比如:
// Top-level build file where you can add configuration options common to all sub-projects/modules.

buildscript {
    repositories {
        jcenter()
    }
    dependencies {
        classpath 'com.android.tools.build:gradle:1.4.0'

        // NOTE: Do not place your application dependencies here; they belong
        // in the individual module build.gradle files
    }
}

allprojects {
    repositories {
        jcenter()
    }
}
不同版本的插件参见https://jcenter.bintray.com/com/android/tools/build/gradle/。
Android Studio基于IntelliJ IDE。Android工具为Android特定文件提供了专门的编辑器。多数Android的配置文件都基于XML。编辑器可以在XML表示和用于输入数据的结构化UI之间进行切换。
安卓5.0的运行时为Android RunTime (ART)。ART使用提前编译。应用程序的部署时代码翻译成机器代码。编译代码大30%的,但执行更快,只编译一次,也会更省电。dex2oat工具编译.dex文件为可执行和链接格式(ELF文件Executable and Linkable Format)。该文件包含DEX代码,编译的本地代码和元数据。保持.dex代码允许现有的工具仍然可以工作。ART的垃圾收集进行了优化,减少了应用冻结时间。
Android应用主要用Java编程语言。开发人员创建了Android特定的配置文件,并用Java写应用逻辑。
Android的工具将这些应用程序文件打包成为Android应用。在IDE部署时,整个Android应用程序被编译,打包,部署并启动。Java源文件是由Java编译器转换成Java类文件。
Android SDK的dx工具把Java类文件转换到.dex(Dalvik的可执行文件)文件同时去除冗余内容。因此,这些.dex文件的远小于相应的类文件。
.dex文件和Android项目的资源文件,例如图像和XML文件的,打包成一个apk文件(Android Package)文件。aapt (Android Asset Packaging Tool)完成此步骤。
然后adb可以部署.apk到Android设备。
安装Android Studio
硬件建议,在2.6 GHz CPU,8 GB的内存。 SSD硬盘更佳。
Android SDK的是32位的,因此64位的Linux系统需要安装包ia32-libs库。比如Ubuntu:。
apt-get install ia32-libs
在Ubuntu 13.04还必须安装OpenGL支持。
# install OpenGL support
# sudo apt-get install libgl1-mesa-dev
下载http://developer.android.com/sdk/installing/studio.html
Windows安装很简单,只需启动你下载的.exe文件。在Max OSX拖放Android Studio到应用程序文件夹。
在Linux上解压缩下载的ZIP文件到一个合适的位置,在android-studio/bin/中执行studio.sh。
Android SDK Manager
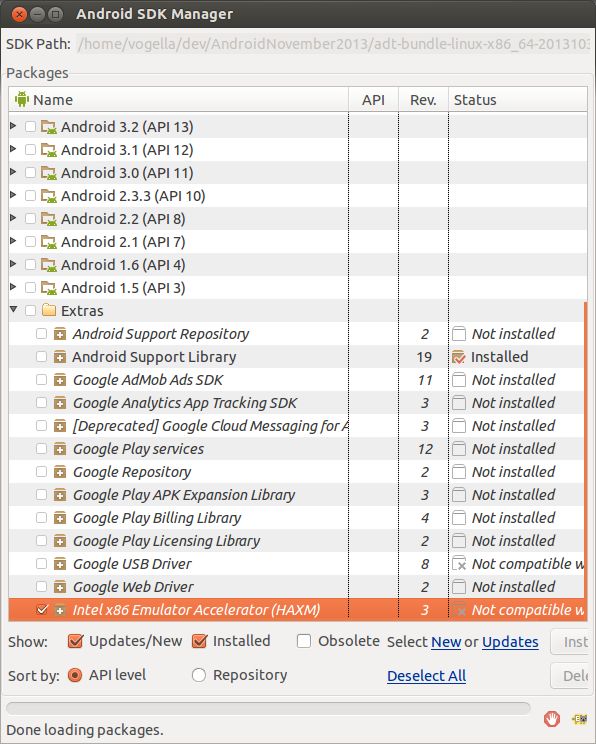
Tools → Android → SDK Manager 或下面的快捷方式:
支持库可以在较低的Android版本提供更高的Android版本的功能。
在Android SDK管理器中选择Extras并安装Android支持库。 Android的支持库为Eclipse ADT工具使用。
Android目前有几个版本的库中,V4,V7和V13版本对应安卓的各个API。高版本支持库的Android设备也需要较低的版本一起使用。例如,支持库V7需要V4库。
在谷歌开发团队着力于Android Studio的发展,所以这是目前Android应用程序最好的发展环境。目前的ADT工具使用特殊的Eclipse构建系统,而不是新的Gradle构建系统,构建时可能产生不一致,另外也不支持AAR文件。
虚拟机与真机测试
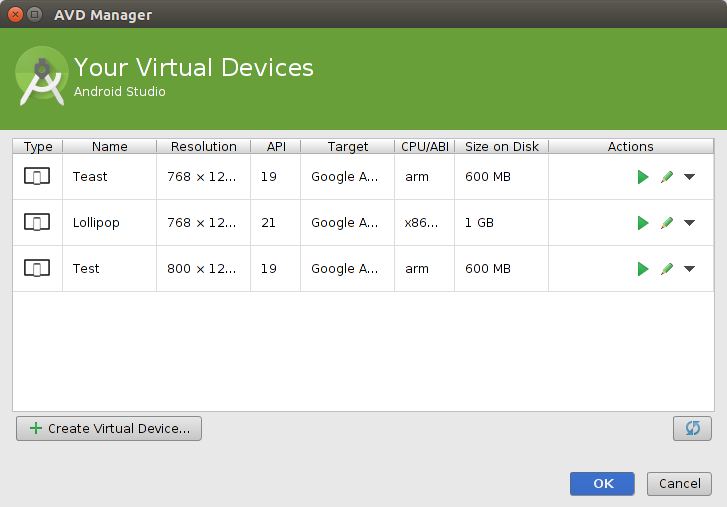
Android的工具包含Android设备模拟器(emulator)。该模拟器可用于运行Android虚拟设备(AVD Android Virtual Device),它模拟真正的Android手机。
AVD让你不访问真机的情况下对不同的Android版本和配置Android应用进行测试。即使你有真正的Android设备,也应该熟悉AVDS的创建和使用。
在创建AVD时定义为虚拟设备的配置。这包括分辨率、Android的API版本和显示密度。
您可以定义多个有不同配置的AVD,并同时运行,一次测试不同的设备配置。
注意如果在启动过程停止,AVD可能会损坏。旧机器上第一次启动可能需要长达10分钟的。一般需要1-3分钟的启动新的AVD。
你可以用鼠标控制的图形用户界面。右侧仿真器的菜单还可以访问手机的按钮。
在Android设备安装之前,Android应用程序都必须进行签名。Eclipse使用debug key自动签名。此调试证书有365天有效期。当证书过期后,删除debug.keystore文件j就会重新生成。默认存储位置在OS X和Linux是在~/.android/,Windows XP:C:\Documents andSettings\[username]\.android\中,在Windows Vista和Windows 7:C:\Users\[username]]\.android\。快捷方式如下:
| Shortcut | Description |
|---|---|
| Alt+Enter | Maximizes the emulator. |
| Ctrl+F11 | Changes the orientation of the emulator from landscape to portrait and vice versa. |
| F8 | Turns the network on and off |
AVD可以模拟Android设备或谷歌的设备。前者包含Android开源项目的程序。后者AVD包含附加谷歌特有的代码,可以使用新谷歌地图API或新的位置服务。
快照或主机GPU功能只能选择一个。前者第二次启动启动速度非常快。后者渲染速度更快。
AVD可以运行基于ARM的CPU体系结构或基于英特尔CPI。后者在Intel / AMD的硬件快,因为模拟器不需要翻译ARM CPU指令到Intel / AMD的CPU。
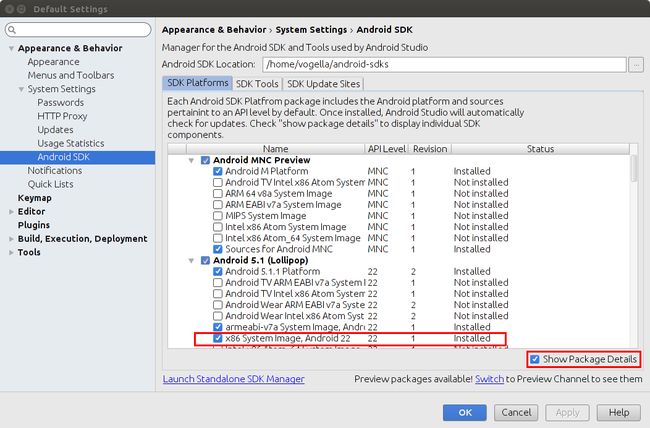
Intel image API(不是每个版本都有)
可以通过Android SDK管理器进行安装,在Android Studio创建设备时自动安装。通过包详细信息可进行配置。
驱动安装:
下载之后Android安装目录下的extras/intel文件夹包含驱动程序。你需要通过运行启动.exe文件来安装驱动程序。
下载后,您可以创建基于英特尔模拟器新的AVD。模拟器启动速度不变,但Android应用程序的执行过程更快。
Linux需要一个更复杂的设置,参见https://software.intel.com/en-us/android/articles/intel-hardware-accelerated-execution-manager。
在设备上打开USB调试(Settings → Development Options)可以使用真机,Windows通常需要安装驱动程序,参见http://developer.android.com/guide/developing/device.html。
注意Android版本的设备需要满足Android应用程序的最低版本。
如果连接了多台设备,你可以选择。如果只有一个设备连接时,应用程序被自动部署在该设备上。
另外特别推荐仿真器:Genymotion https://www.genymotion.com/
Android Studio入门
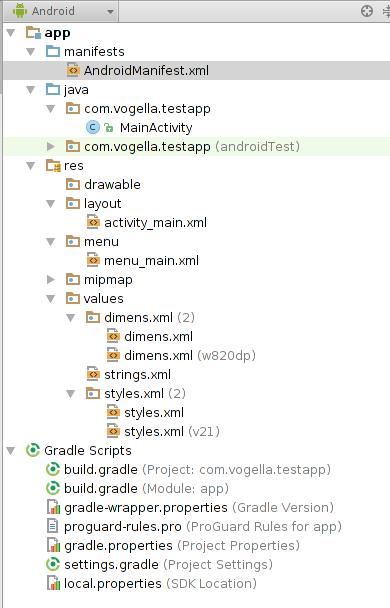
启动页面点击"Start a new Android Studio project"启动新的Android Studio项目。另外,您可以从菜单File → New Project进入。
| Property | Value |
|---|---|
| Application name | Test App |
| Company Domain | vogella.com |
| Package Name | com.vogella.testapp |
| API (Minimum, Target, Compile with) | Latest |
| Template | Empty Activity |
选择“Empty Activity”, 效果如下:
由通过Tools → Android→ AVD Manager管理器定义新的Android虚拟设备(AVD)。
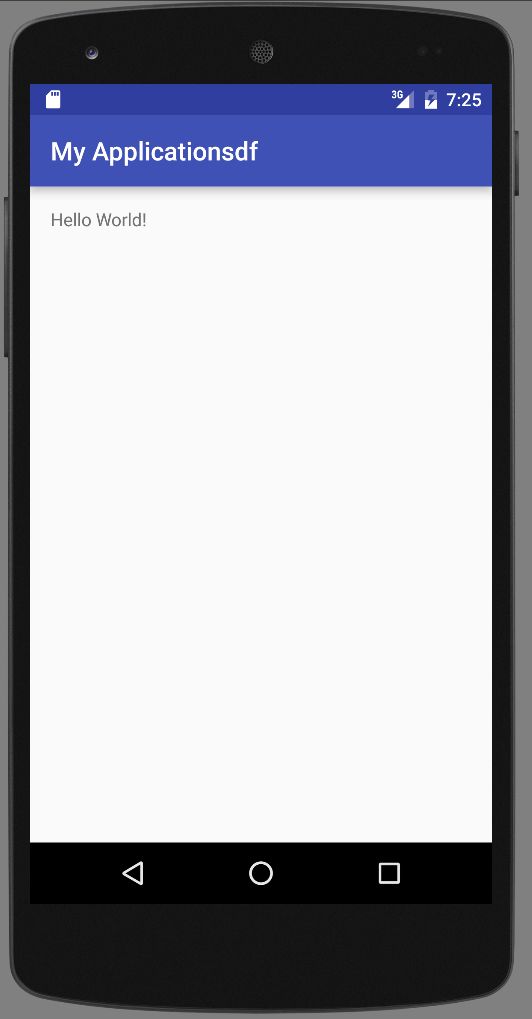
启动模拟器,通过Run → Run 'app' 启动应用:
Android应用的部件
Android应用是可独立于其他Android应用启动和使用安装单位。Android应用由Android组件,Java源文件和资源文件组成。
基于Intent对象的任务描述,Android应用组件可以连接到其他Android应用的组件。这样可以创建跨应用的任务。
Android的软件组件:Application、Activities、Services、Broadcast receivers (short: receivers)、Content providers (short: providers)。
Android应用有一个Application类,它最先启动并最后关闭。如果没有明确的制定,Android会创建默认Application对象。
activity是Android应用的可视化表示。 Android应用可以有多个activity。Activity使用 UI工具(Widget)和布局管理器及fragment来创建用户界面并与用户交互。这两个因素在接下来的章节中介绍。
广播接收器(Broadcast receiver)可以注册为监听系统消息和intent。如果指定的事件发生接收器得到Android系统的通知。例如可以注册一个Android系统完成启动事件的接收器。
服务执行任务,而无需提供用户界面。它们可以与其它Android组件通信,例如,经由广播接收器通知用户。
内容提供者(content provider)定义了应用数据的结构化的接口。provider可用于在应用访问的数据,但也可用于与其他应用共享数据。SQLite数据库经常和provider一起使用。 SQLite数据库存储数据,provider访问数据。
类android.content.Context(上下文)的实例连接应用和Android系统,也可以访问项目资源和应用程序中全局信息。例如,您可以查看当前设备显示的大小。上下文类还可以访问Android的服务,例如,报警管理器触发基于时间的事件。Activity和service扩展Context类。
Android的基本用户界面组件
Activity:前面已经介绍。
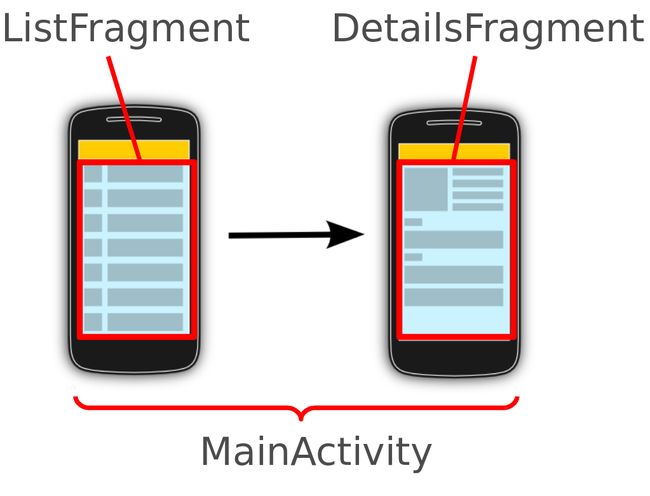
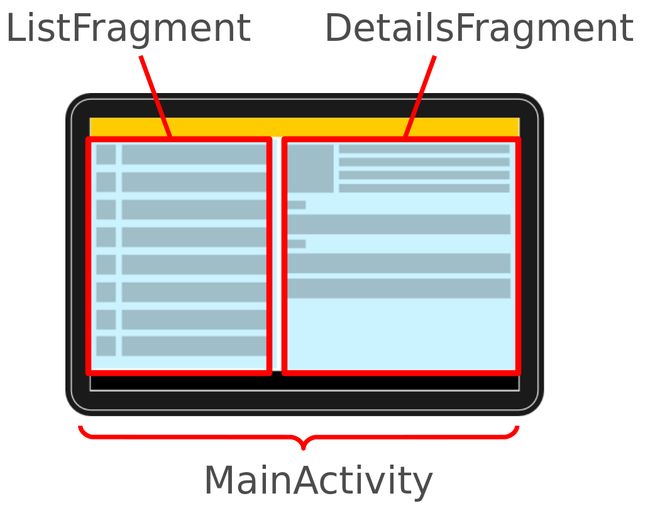
Fragment:片段是Activity内运行的context组件。片段封装的应用代码,使得它更容易重用,并支持不同大小的设备。
下图的MainActivity在较小的屏幕,仅显示一个片段,并允许用户导航到另一片段。在宽屏幕立即显示这两个片段。
视图(View)是用户界面工具,例如按钮或文本域。View有可用于配置它们的外观和行为的属性。ViewGroup中负责安排其他View,也称为布局管理器(layout manager)。布局管理器的基类是android.view.ViewGroup类(基类android.view.View类)。布局管理器可以嵌套创建复杂的布局。
其他重要的Android元素
主屏幕和锁屏小工具:Widget是主要用于Android主屏幕上的交互式组件。它们通常显示某些种类型数据,并允许用户执行。例如Widget可以显示新电子邮件的简短摘要,并且如果用户选择了电子邮件,可以开启对应的电子邮件应用。
为了避免和view(这也称为widget)混淆,本文指明是主屏widget。
动态壁纸为Android主屏幕创建背景。
manifest
组件和Android应的设置在AndroidManifest.xml文件描述。此文件被称为manifest文件或manifest。manifest还指定应用的其他元数据,例如icon和应用程序的版本号。Android系统安装的应用时读取该文件。而Android系统评估这个配置文件,并确定应用的权限。
应用所有活动,服务和内容提供商组件必须在此文件中静态声明。广播接收器可以静态地在manifest文件生命或在运行时动态使用。
Android manifest文件还必须包含应用所需的权限。例如网络访问。下面是简单的manifest文件实例:
<manifest xmlns:android="http://schemas.android.com/apk/res/android"
    package="com.example.android.rssreader"
    android:versionCode="1"
    android:versionName="1.0" >
    <uses-sdk
        android:minSdkVersion="16"
        android:targetSdkVersion="19" />
    <uses-permission android:name="android.permission.INTERNET" />
    <application
        android:name="RssApplication"
        android:allowBackup="false"
        android:icon="@drawable/ic_launcher"
        android:label="@string/app_name"
        android:theme="@style/AppTheme" >
        <activity
            android:name="RssfeedActivity"
            android:label="@string/title_activity_main" >
            <intent-filter>
                <action android:name="android.intent.action.MAIN" />
                <category android:name="android.intent.category.LAUNCHER" />
            </intent-filter>
        </activity>
        <activity
            android:name=".DetailActivity"
            android:label="Details" >
        </activity>
        <activity android:name="MyPreferenceActivity" >
        </activity>
        <service android:name="RssDownloadService" >
        </service>
    </application>
</manifest>
package属性定义该文件中Java对象引用的基础包。如果Java对象在不同的包,必须包的全名声明。
Google Play要求每个Android应用都使用自己独特的包名。通常使用反向域名,以避免与其他Android应用冲突。
android:versionName and android:versionCode指定应用的版本。 versionName对用户可见,并且可以是任意字符串。android:versionCode必须是整数。而Android市场基于android:versionCode确定是否安装执行更新。您通常以从1开始递加。
<application>部分允许定义元数据和选择性定义一个explicit应用类。是宣布Android组件的容器。
<activity>标签定义activity组件。 name属性指向类。
intent filter部分Android运行时该activity注册为应用可能的入口点,并在Android系统的launcher可见。(android:name="android.intent.action.MAIN" ) 表明可以启动,category android:name="android.intent.category.LAUNCHER"表明添加activity到launcher。
@string/app_name指向资源文件,包含应用名称。资源文件的使用很容易地对不同的设备提供不同的资源(例如,字符串,颜色,图标),容易地翻译应用。
类似<activity>,您可以使用service,receiver和provider生命其他Android组件。
| Value | Description |
|---|---|
| minSdkVersion | Define the minimum version of Android your application works on. This attribute is used as a filter in Google Play, i.e., a user cannot install your application on a device with a lower API level than specified in this attribute. |
| targetSdkVersion | Specifies the version on which you tested and developed. If it is not equal to the API version of the Android device, the Android system might apply forward- or backward-compatibility changes. It is good practice to always set this to the latest Android API version to take advantages of changes in the latest Android improvements. |
uses-configuration可以指明输入方式.例如硬键盘。
<uses-configuration android:reqHardKeyboard="true"/>
uses-feature允许您指定硬件配置。例如要求具有摄像头。
<uses-feature android:name="android.hardware.camera" />
installLocation指定安装位置如果可以在外部存储安装。使用auto或preferExternal允许。实际上这个选项很少使用,如安装在外部存储,一旦设备被连接到计算机作为USB存储应用就被停止。
更多资料:http://developer.android.com/intl/zh-cn/guide/topics/manifest/manifest-intro.html
资源
Android可以创建如图像和XML配置文件静态资源。资源文件必须放在应用/res目录中预定义的子文件夹。
| Resource | Folder | Description |
|---|---|---|
| Drawables | /res/drawables |
Images (e.g., png or jpeg files) or XML files which describe a Drawable object. Since Android 5.0 you can also use vector drawables which scale automatically with the density of the Android device. |
| Simple Values | /res/values |
Used to define strings, colors, dimensions, styles and static arrays of strings or integers via XML files. By convention each type is stored in a separate file, e.g., strings are defined in the res/values/strings.xml file. |
| Layouts | /res/layout |
XML files with layout descriptions are used to define the user interface for Activities and fragments. |
| Styles and Themes | /res/values |
Files which define the appearance of your Android application. |
| Animations | /res/animator |
Defines animations in XML for the animation API which allows to animate arbitrary properties of objects over time. |
| Raw data | /res/raw |
Arbitrary files saved in their raw form. You access them via an InputStream object. |
| Menus | /res/menu |
Defines the actions which can be used in the toolbar of the application. |
下面/res/values/,它定义了一些字符串常量,字符串数组,颜色和尺寸。values.xml
<?xml version="1.0" encoding="utf-8"?>
<resources>
    <string name="app_name">Test</string>
    <string name="action_settings">Settings</string>
    <string name="hello_world">Hello world!</string>
    <string-array name="operationsystems">
        <item>Ubuntu</item>
        <item>Android</item>
        <item>Microsoft Windows</item>
    </string-array>
    <color name="red">#ffff0000</color>
    <dimen name="mymargin">10dp</dimen>
</resources>
附加限定符到文件夹名称指示相关的资源应该用于特殊的配置。例如可以指定布局文件仅适用于特定的屏幕尺寸。
Android构建系统为每个资源分配一个ID。在Android项目gen目录中包含R.java引用文件,其中包含这些生成的值。这些引用是静态的整数值。
添加新的资源文件,相应的引用会自动在R.java文件中创建。不需要手工修改。Android系统提供的方法通过这些ID来访问相应的资源文件。
例如,在源代码中访问R.string.yourString ID的字符串,你会使用的上下文类定义getString(R.string.yourString)方法。
而Android SDK使用驼峰表示法大部分的ID,例如,buttonRefresh的。
系统资源在Android命名空间。例如,android.R.string.cancel取消操作定义的平台字符串。
资源文件布局
Android的activity使用views (widgets)和fragment定义其用户界面。该用户界面可在/res/layout文件夹或Java代码中定义。您也可以混合使用这两种方法。通过XML布局文件定义的布局是首选方法,可分隔布局定义和编程逻辑。它也允许为不同的设备定义不同的布局的。
布局资源文件被称为layout。布局指定ViewGroup和View,比如:
<RelativeLayout xmlns:android="http://schemas.android.com/apk/res/android"
    xmlns:tools="http://schemas.android.com/tools"
    android:layout_width="match_parent"
    android:layout_height="match_parent"
    android:paddingBottom="@dimen/activity_vertical_margin"
    android:paddingLeft="@dimen/activity_horizontal_margin"
    android:paddingRight="@dimen/activity_horizontal_margin"
    android:paddingTop="@dimen/activity_vertical_margin"
    tools:context=".MainActivity" >
    <TextView
        android:id="@+id/mytext"
        android:layout_width="wrap_content"
        android:layout_height="wrap_content"
        android:text="@string/hello_world" />
</RelativeLayout>
setContentView()方法可分配布局给activity,比如:
package com.vogella.android.first;

import android.os.Bundle;
import android.app.Activity;
import android.view.Menu;

public class MainActivity extends Activity {
    @Override
    protected void onCreate(Bundle savedInstanceState) {
        super.onCreate(savedInstanceState);
        setContentView(R.layout.activity_main);
    }
}
如果需要通过Java代码访问view,需要通过android:id给视图唯一ID。比如:
<Button
  android:id="@+id/button1"
  android:layout_width="wrap_content"
  android:layout_height="wrap_content"
  android:text="Show Preferences" >
</Button>
在/res/values/ids.xml中定义id是好方法:
<?xml version="1.0" encoding="utf-8"?>
<resources>
    <item name="button1" type="id"/>
</resources>
在布局文件可以使用ID。
<RelativeLayout xmlns:android="http://schemas.android.com/apk/res/android"
    xmlns:tools="http://schemas.android.com/tools"
    android:layout_width="match_parent"
    android:layout_height="match_parent"
    tools:context=".MainActivity" >

    <Button
        android:id="@id/button1"
        android:layout_width="wrap_content"
        android:layout_height="wrap_content"
        android:layout_centerHorizontal="true"
        android:layout_centerVertical="true"
        android:layout_marginRight="27dp"
        android:text="Button" />

</RelativeLayout>
注意:如果要在独立文件中定义id,首先需要删除在布局文件中的@+id条目,否则会得到文件已经创建了的错误信息。
计算layout和画view是资源密集型操作。布局要可能简单。例如应该避免嵌套布局管理器太深。
Android view - UI Widget
Android中的view代表widget,例如按钮或布局管理器。 Android SDK提供的标准views(widgets,例如,通过按钮、TextView、EditText类。它还包括复杂的widget,例如ListView。
在Android的所有视图扩展android.view.View类。这个类是比较大(超过1.8万行的代码),并为子类提供了大量的的基本功能。
view的主包是的基类是android.view命名空间的一部分,android.widget为Android平台的默认widget。
Layout Manager和ViewGroup
布局管理器(layout manager)是ViewGroup的子类,负责本身及其子视图的布局。 Android支持不同的默认布局管理器。Android 4.0的最相关的布局管理器是的LinearLayout、FrameLayout、RelativeLayout的和GridLayout。AbsoluteLayout已不建议使用,TableLayout可以更有效地通过GridLayout来实现。
所有布局允许开发者定义的属性。孩子也可以定义可被其父亲布局进行评估的属性。孩子可以通过以下属性指定他们希望的宽度和高度。
| ttribute | Description |
|---|---|
android:layout_width |
Defines the width of the widget. |
android:layout_height |
Defines the height of the widget. |
Widget可以使用固定尺寸,例如dp定义为100dp。虽然dp固定大小,可根据设备配置扩展。
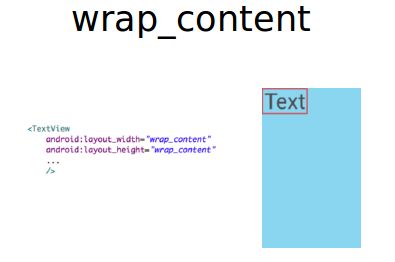
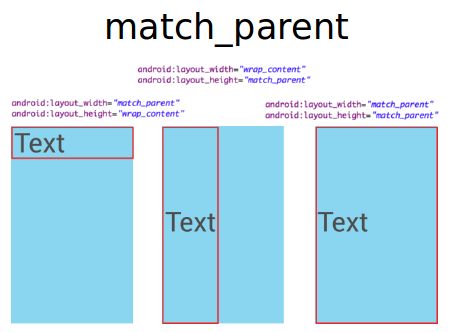
match_parent告诉应用最大限度地在父亲最大化widget。wrap_content尽量少使用以保证正确渲染。窗口小部件正确呈现的最低金额。这些元素的效果表现在以下的图形。
FrameLayout是在子元素的顶部互相画。有漂亮的视觉效果。比如Gmail:
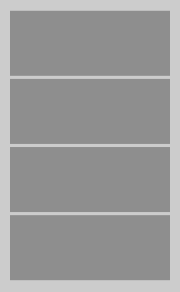
LinearLayout中把所有子元素放入行或者列(基于android:orientation确定)。可能的属性为horizontal或vertical,默认为horizontal。
horizontal效果如下:
Vertical效果如下:
LinearLayout中可以嵌套以实现更复杂的布局。LinearLayout支持通过android:layout_weight分配权重。
RelativeLayout的用于复杂的布局。比如要居中一个组件,设置android:layout_centerInParent为true。
<?xml version="1.0" encoding="utf-8"?>
<RelativeLayout xmlns:android="http://schemas.android.com/apk/res/android"
    android:layout_width="match_parent"
    android:layout_height="match_parent"
    android:orientation="vertical" >
    <ProgressBar
        android:id="@+id/progressBar1"
        style="?android:attr/progressBarStyleLarge"
        android:layout_width="wrap_content"
        android:layout_height="wrap_content"
        android:layout_centerInParent="true"
         />
</RelativeLayout>
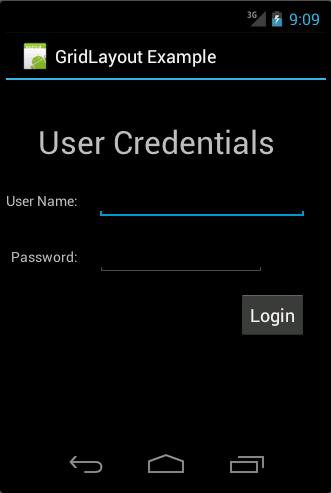
Android 4.0引入了网格布局(GridLayout)。类似表格,绘图区域为行,列和单元格。
你可以指定每个视图要多少列,放置的行和列。如果没有指定,GridLayout使用默认值,例如:一列一行,视图的位置取决于声明的顺序。比如:
下面的布局文件定义了使用GridLayout的布局。
<?xml version="1.0" encoding="utf-8"?>
<GridLayout xmlns:android="http://schemas.android.com/apk/res/android"
    android:id="@+id/GridLayout1"
    android:layout_width="match_parent"
    android:layout_height="match_parent"
    android:columnCount="4"
    android:useDefaultMargins="true" >
    <TextView
        android:layout_column="0"
        android:layout_columnSpan="3"
        android:layout_gravity="center_horizontal"
        android:layout_marginTop="40dp"
        android:layout_row="0"
        android:text="User Credentials"
        android:textSize="32dip" />
    <TextView
        android:layout_column="0"
        android:layout_gravity="right"
        android:layout_row="1"
        android:text="User Name: " >
    </TextView>
    <EditText
        android:id="@+id/input1"
        android:layout_column="1"
        android:layout_columnSpan="2"
        android:layout_row="1"
        android:ems="10" />
    <TextView
        android:layout_column="0"
        android:layout_gravity="right"
        android:layout_row="2"
        android:text="Password: " >
    </TextView>
    <EditText
        android:id="@+id/input2"
        android:layout_column="1"
        android:layout_columnSpan="2"
        android:layout_row="2"
        android:inputType="textPassword"
        android:ems="8" />
    <Button
        android:id="@+id/button1"
        android:layout_column="2"
        android:layout_row="3"
        android:text="Login" />
</GridLayout>
这将创建类似下面的截图的用户界面。
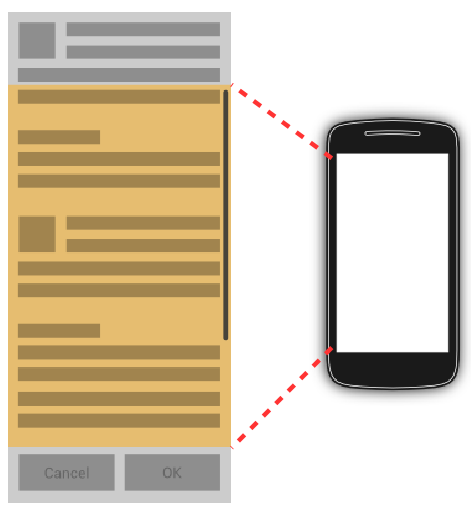
ScrollView或HorizontalScrollView类不是布局管理器,但要提供可视性,即使在不适合屏幕上。滚动视图可以包含一个视图,例如含有多个视图的布局管理器。 如果子view太大,滚动视图允许滚动的内容。
代码实例:
<?xml version="1.0" encoding="utf-8"?>
<ScrollView xmlns:android="http://schemas.android.com/apk/res/android"
    android:layout_width="match_parent"
    android:layout_height="match_parent"
    android:fillViewport="true"
    android:orientation="vertical" >
    <TextView
        android:id="@+id/TextView01"
        android:layout_width="wrap_content"
        android:layout_height="wrap_content"
        android:paddingLeft="8dip"
        android:paddingRight="8dip"
        android:paddingTop="8dip"
        android:text="This is a header"
        android:textAppearance="?android:attr/textAppearanceLarge" >
    </TextView>
</ScrollView>
android:fillViewport="true"属性保证了滚动视图设置为全屏, 哪怕元素比屏幕小。
使用layout和view进行交互
继续前面的例子:修改res/layout/activity_main.xml
原文件:
<?xml version="1.0" encoding="utf-8"?>
<RelativeLayout xmlns:android="http://schemas.android.com/apk/res/android"
    xmlns:tools="http://schemas.android.com/tools"
    xmlns:app="http://schemas.android.com/apk/res-auto" android:layout_width="match_parent"
    android:layout_height="match_parent" android:paddingLeft="@dimen/activity_horizontal_margin"
    android:paddingRight="@dimen/activity_horizontal_margin"
    android:paddingTop="@dimen/activity_vertical_margin"
    android:paddingBottom="@dimen/activity_vertical_margin"
    app:layout_behavior="@string/appbar_scrolling_view_behavior"
    tools:showIn="@layout/activity_main" tools:context=".MainActivity">
    <TextView android:text="Hello World!" android:layout_width="wrap_content"
        android:layout_height="wrap_content" />
</RelativeLayout>
修改后的文件:
<?xml version="1.0" encoding="utf-8"?>
<RelativeLayout xmlns:android="http://schemas.android.com/apk/res/android"
    xmlns:tools="http://schemas.android.com/tools"
    android:layout_width="match_parent"
    android:layout_height="match_parent"
    android:paddingBottom="@dimen/activity_vertical_margin"
    android:paddingLeft="@dimen/activity_horizontal_margin"
    android:paddingRight="@dimen/activity_horizontal_margin"
    android:paddingTop="@dimen/activity_vertical_margin"
    tools:context=".MainActivity" >
    <EditText
        android:id="@+id/main_input"
        android:layout_width="wrap_content"
        android:layout_height="wrap_content"
        android:layout_alignParentTop="true"
        android:layout_alignParentStart="true"
        android:layout_alignParentEnd="true" />
    <Button
        android:id="@+id/button1"
        android:layout_width="wrap_content"
        android:layout_height="wrap_content"
        android:layout_alignLeft="@+id/main_input"
        android:layout_below="@+id/main_input"
        android:layout_marginTop="31dp"
        android:onClick="onClick"
        android:text="Start" />
</RelativeLayout>
MainActivity.java
原文件:
package com.vogella.testapp;

import android.support.v7.app.AppCompatActivity;
import android.os.Bundle;

public class MainActivity extends AppCompatActivity {

    @Override
    protected void onCreate(Bundle savedInstanceState) {
        super.onCreate(savedInstanceState);
        setContentView(R.layout.activity_main);
    }
}
使用该文件点击"START"按钮,会因为没有实现onClick 而发生崩溃。
下面增加onClick:
package com.vogella.testapp;

import android.support.v7.app.AppCompatActivity;
import android.os.Bundle;
import android.view.View;
import android.widget.Toast;

public class MainActivity extends AppCompatActivity {

    @Override
    protected void onCreate(Bundle savedInstanceState) {
        super.onCreate(savedInstanceState);
        setContentView(R.layout.activity_main);
    }

    public void onClick (View view) {
        Toast.makeText(this, "Button 1 pressed",
                Toast.LENGTH_LONG).show();
    }

}
现在就有弹出信息显示。下面修改成显示编辑框的内容。
package com.vogella.testapp;

import android.app.Activity;
import android.os.Bundle;
import android.view.View;
import android.widget.EditText;
import android.widget.Toast;

public class MainActivity extends Activity {

    @Override
    protected void onCreate(Bundle savedInstanceState) {
        super.onCreate(savedInstanceState);
        setContentView(R.layout.activity_main);
    }

    // you may have here an onCreateOptionsMenu method
    // this method is not required for this exercise
    // therefore you can delete it

    public void onClick(View view) {
        EditText input = (EditText) findViewById(R.id.main_input);
        String string = input.getText().toString();
        Toast.makeText(this, string, Toast.LENGTH_LONG).show();
    }
}
上面代码因为原代码的log部分有错而删除,不影响主体功能。
运行时调整视图布局
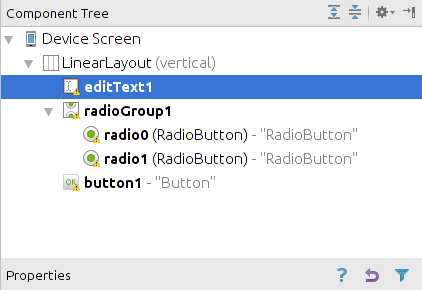
继续修改activity_main.xml,添加radio组和radio按钮:
| ID | View |
|---|---|
| orientation | Radio Group |
| horizontal | First radio button |
| vertical | Second radio button |
<RelativeLayout xmlns:android="http://schemas.android.com/apk/res/android"
    xmlns:tools="http://schemas.android.com/tools"
    android:layout_width="match_parent"
    android:layout_height="match_parent"
    android:paddingBottom="@dimen/activity_vertical_margin"
    android:paddingLeft="@dimen/activity_horizontal_margin"
    android:paddingRight="@dimen/activity_horizontal_margin"
    android:paddingTop="@dimen/activity_vertical_margin"
    tools:context=".MainActivity" >


    <EditText
        android:layout_width="wrap_content"
        android:layout_height="wrap_content"
        android:id="@+id/main_input"
        android:layout_alignParentTop="true"
        android:layout_alignParentStart="true"
        android:layout_alignParentEnd="true" />

    <Button
        android:layout_width="wrap_content"
        android:layout_height="wrap_content"
        android:text="Start"
        android:id="@+id/button"
        android:layout_below="@id/main_input"
        android:layout_alignParentStart="true"
        android:onClick="onClick"/>


    <RadioGroup
        android:id="@+id/orientation"
        android:layout_below="@id/button"
        android:layout_width="match_parent"
        android:layout_height="wrap_content"
        android:layout_marginTop="16dp">

        <RadioButton
            android:id="@+id/horizontal"
            android:layout_width="wrap_content"
            android:layout_height="wrap_content"
            android:text="Horizontal" >
        </RadioButton>

        <RadioButton
            android:id="@+id/vertical"
            android:layout_width="wrap_content"
            android:layout_height="wrap_content"
            android:checked="true"
            android:text="Vertical" >
        </RadioButton>
    </RadioGroup>


</RelativeLayout>
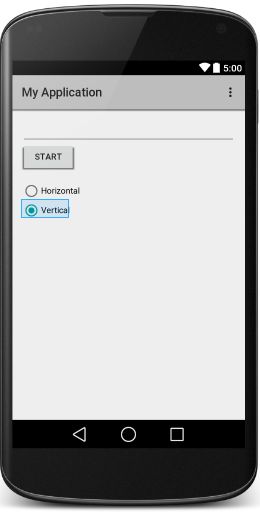
现在布局如下:
更改onCreate()。使用findViewById()方法来查找您的布局中的RadioGroup。
基于当前选择单选按钮实现监听器,选择之后改变方向为横向或纵向。
MainActivity.java代码如下:
package com.vogella.testapp;

import android.app.Activity;
import android.os.Bundle;
import android.view.View;
import android.widget.EditText;
import android.widget.LinearLayout;
import android.widget.RadioGroup;
import android.widget.Toast;

public class MainActivity extends Activity {

    @Override
    protected void onCreate(Bundle savedInstanceState) {
        super.onCreate(savedInstanceState);
        setContentView(R.layout.activity_main);
        RadioGroup group1 = (RadioGroup) findViewById(R.id.orientation);
        group1.setOnCheckedChangeListener(new RadioGroup.OnCheckedChangeListener() {
            @Override
            public void onCheckedChanged(RadioGroup group, int checkedId) {
                switch (checkedId) {
                    case R.id.horizontal:
                        group.setOrientation(LinearLayout.HORIZONTAL);
                        break;
                    case R.id.vertical:
                        group.setOrientation(LinearLayout.VERTICAL);
                        break;
                }
            }
        });
    }

    // you may have here an onCreateOptionsMenu method
    // this method is not required for this exercise
    // therefore you can delete it

    public void onClick(View view) {
        EditText input = (EditText) findViewById(R.id.main_input);
        String string = input.getText().toString();
        Toast.makeText(this, string, Toast.LENGTH_LONG).show();
    }
}
温度转换实例
下载地址:https://play.google.com/store/apps/details?id=de.vogella.android.temperature
也可以在Google Play扫描二维码:
创建工程:
| Property | Value |
|---|---|
| Application Name | Temperature Converter |
| Package name | com.vogella.android.temperatureconverter |
| API (Minimum, Target, Compile with) | Latest |
| Template | Empty Activity |
| Activity | MainActivity |
| Layout | activity_main |
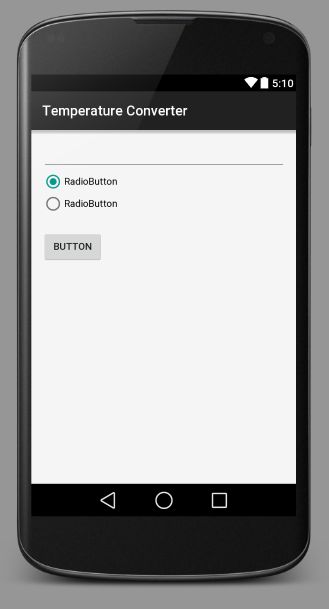
在res/values/strings.xml创建属性
| Type | Name | Value |
|---|---|---|
| Color | myColor | #F5F5F5 |
| String | celsius | to Celsius |
| String | fahrenheit | to Fahrenheit |
| String | calc | Calculate |
修改后内容如下:
<?xml version="1.0" encoding="utf-8"?>
<resources>
    <string name="app_name">Temperature Converter</string>
    <string name="action_settings">Settings</string>
    <string name="hello_world">Hello world!</string>
    <color name="myColor">#F5F5F5</color>
    <string name="celsius">to Celsius</string>
    <string name="fahrenheit">to Fahrenheit</string>
    <string name="calc">Calculate</string>
</resources>
修改布局res/layout/activity_main.xml
内容如下:
<?xml version="1.0" encoding="utf-8"?>
<LinearLayout xmlns:android="http://schemas.android.com/apk/res/android"
    xmlns:tools="http://schemas.android.com/tools"
    android:layout_width="match_parent"
    android:layout_height="match_parent"
    android:orientation="vertical"
    android:paddingBottom="@dimen/activity_vertical_margin"
    android:paddingLeft="@dimen/activity_horizontal_margin"
    android:paddingRight="@dimen/activity_horizontal_margin"
    android:paddingTop="@dimen/activity_vertical_margin"
    tools:context=".MainActivity"
    android:background="@color/myColor">


    <EditText
        android:layout_width="match_parent"
        android:layout_height="wrap_content"
        android:id="@+id/inputValue"
        android:inputType="numberSigned|numberDecimal"/>

    <RadioGroup
        android:id="@+id/radioGroup1"
        android:layout_width="wrap_content"
        android:layout_height="wrap_content"
        android:layout_alignStart="@+id/editText1"
        android:layout_below="@+id/editText1">

        <RadioButton
            android:id="@+id/radio0"
            android:layout_width="wrap_content"
            android:layout_height="wrap_content"
            android:checked="true"
            android:text="@string/celsius" />

        <RadioButton
            android:id="@+id/radio1"
            android:layout_width="wrap_content"
            android:layout_height="wrap_content"
            android:text="@string/fahrenheit" />
    </RadioGroup>

    <Button
        android:id="@+id/button1"
        android:layout_width="wrap_content"
        android:layout_height="wrap_content"
        android:layout_alignStart="@+id/radioGroup1"
        android:layout_below="@+id/radioGroup1"
        android:layout_marginTop="22dp"
        android:text="@string/calc"
        android:onClick="onClick"/>

</LinearLayout>
创建ConverterUtil类用于转换温度:
com.vogella.android.temperatureconverter;

 {
    convertFahrenheitToCelsius(fahrenheit) {
        ((fahrenheit - ) * / );
    }

    convertCelsiusToFahrenheit(celsius) {
        ((celsius * ) / ) + ;
    }
}
修改MainActivity.java
原文件:
package com.vogella.android.temperatureconverter;

import android.support.v7.app.AppCompatActivity;
import android.os.Bundle;

public class MainActivity extends AppCompatActivity {

    @Override
    protected void onCreate(Bundle savedInstanceState) {
        super.onCreate(savedInstanceState);
        setContentView(R.layout.activity_main);
    }
}
修改后:
package com.vogella.android.temperatureconverter;

import android.app.Activity;
import android.os.Bundle;
import android.view.View;
import android.widget.EditText;
import android.widget.RadioButton;
import android.widget.Toast;

public class MainActivity extends Activity {

    private EditText text;

    @Override
    public void onCreate(Bundle savedInstanceState) {
        super.onCreate(savedInstanceState);
        setContentView(R.layout.activity_main);
        text = (EditText) findViewById(R.id.inputValue);
    }

    // this method is called at button click because we assigned the name to the
    // "OnClick" property of the button
    public void onClick(View view) {
        switch (view.getId()) {
            case R.id.button1:
                RadioButton celsiusButton = (RadioButton) findViewById(R.id.radio0);
                RadioButton fahrenheitButton = (RadioButton) findViewById(R.id.radio1);
                if (text.getText().length() == 0) {
                    Toast.makeText(this, "Please enter a valid number",
                            Toast.LENGTH_LONG).show();
                    return;
                }
                float inputValue = Float.parseFloat(text.getText().toString());
                if (celsiusButton.isChecked()) {
                    text.setText(String
                            .valueOf(ConverterUtil.convertFahrenheitToCelsius(inputValue)));
                    celsiusButton.setChecked(false);
                    fahrenheitButton.setChecked(true);
                } else {
                    text.setText(String
                            .valueOf(ConverterUtil.convertCelsiusToFahrenheit(inputValue)));
                    fahrenheitButton.setChecked(false);
                    celsiusButton.setChecked(true);
                }
                break;
        }
    }
}
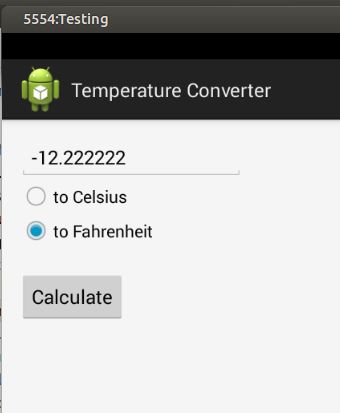
运行:
未完待续,参考资料: http://www.vogella.com/tutorials/Android/article.html
微博 http://weibo.com/cizhenshi 作者博客:http://www.cnblogs.com/pythontesting/ python测试开发精华群 291184506 PythonJava单元白盒测试 144081101
