Android中的Service初探
Android中的Service初探
一、简介
1. 官方API的个人翻译
- 服务是Android的四大组件之一,所以服务需要在
AndroidManifest.xml中用<service>声明。服务有两种功能:
- 在不影响用户的情况下,执行长时间的操作;
- 提供功能给其他应用使用。
- 服务可以用
Context.startService()或Context.bindService()启动 - 服务跟其他三大应用组件一样,是运行在宿主进程的主线程的。这意味着,如果你用服务去做一些CPU密集型(比如播放MP3)或者引起阻塞(比如访问网络)的操作,将会产生大量子线程去完成这些任务。IntentService类是Service的标准实现类,它拥有单独的线程去完成任务。
- 注意:
- 一个Service不是一个单独的进程,除非特别指定,否则是跟应用的进程是同一的
- 一个Service不是一个线程,它不是在主线程上处理事务的工具(为了避免ANR错误)
2. 个人的理解
- Service :对外提供服务或者执行长时间的操作
- IBinder:可远程调用的对象,Activity通过它调用Service的方法,一般使用它的实现类Binder。它的设计符合动态代理模式
- Intent:意图,表明将要Service执行的操作
- ServiceConnection:模拟进程间或者进程内部服务通信的状态
- Activity:通过Intent启动服务和停止服务或绑定和解绑服务
- 全局服务:通过startService启动的服务为全局服务,生命周期不受客户端影响
- 绑定服务:通过bindService绑定的服务,生命周期受客户端影响
- 本地服务:同一个应用的服务
- 远程服务:不同应用的服务
综合理解:Activity通过Intent启动/绑定Service,Service再通过回调ServiceConnection中的方法告知Activity与之的通信状态,并返回一个IBinder对象供Activity使用服务。一个应用就一个进程,一个主线程。Activity和Service都是运行在主线程上的,所以都不能直接运行耗时或耗CPU的操作。
二、创建Service
- 写一个类继承自Service
- 重写onBind(Intent intent)方法
- 在AndroidManifest.xml文件中注册
//MyService.java
public class MyService extends Service {
    @Override
    public IBinder onBind(Intent intent) {
        return null;
    }
}
<!--AndroidManifest.xml-->
<service android:name="com.example.servicestudy.MyService">
</service>
三、Service的生命周期方法及调用时机
1. 第一种启动方式
1.1 代码展示
Intent intent = new Intent(this, MyService.class);
//启动服务
this.startService(intent);
//停止服务
this.stopService(intent);
1.2 生命周期方法
**********启动服务***********
构造器//第一次启动时调用,如果先前的没有停止不会新建服务
onCreate()//创建时调用
onStartCommand()//使用startService()启动服务时调用
**********停止服务***********
onDestroy()//停止服务时调用
2. 第二种启动方式
2.1 代码展示
Intent intent = new Intent(this,MyService.class);
/** * 功能:绑定服务 * 参数intent:服务的意图 * 参数serviceConnection:服务的连接对象,告知使用服务者通信状态 * 参数flag:标识,Context.BIND_AUTO_CREATE表示若无则创建 */
bindService(intent,serviceConnection,flag);
//通过serviceConnection中的IBinder调用服务中的方法
/** * 功能:解绑服务 */
unBindService(ServiceConnection);
2.3 ServiceConnection
/** * 模拟通信状态的接口 */
public interface ServiceConnection {
    /** * 功能:服务连接上时由主线程调用,伴随着一个服务代理对象IBinder * 参数name: 连接的服务名称 * 参数service :可供调用的服务代理对象 */
    public void onServiceConnected(ComponentName name, IBinder service);

    /** * 功能:当失去连接时调用,比如说服务进程阻塞或被杀死。 * 注意:ServiceConnection本身并没有被移除,当服务下一次启动时会继续调用onServiceConnected * * 参数name: 失去连接的服务名称 */
    public void onServiceDisconnected(ComponentName name);
}
2.4 生命周期方法
**********绑定服务***********
构造器//第一次启动时调用,如果先前的没有停止不会新建服务
onCreate()//创建时调用
onBind()//绑定服务时调用
**********解绑服务***********
onUnbind()//解绑服务时调用
onDestroy()//销毁时调用
四、使用Service
1. 本地服务通信
activity_main.xml
//此处省略很多东西,只关注重点
<Button
    android:onClick="startService"
    android:text="绑定服务" />
<Button
    android:onClick="method"
    android:text="调用服务方法" />
<Button
    android:onClick="stopService"
    android:text="解绑服务" />
MyService.java
//此处省略import语句
public class MyService extends Service {
    public class MyBinder extends Binder{
        public void callDosth(){
            dosth();
        }
    }
    @Override
    public IBinder onBind(Intent intent) {
        System.out.println("onBind");
        return new MyBinder();
    }
    public MyService(){
        System.out.println("MyService");
    }
    @Override
    public boolean onUnbind(Intent intent) {
        System.out.println("onUnbind");
        return super.onUnbind(intent);
    }
    private void dosth(){
        System.out.println("do something...");
    }
    @Override
    public void onCreate() {
        System.out.println("onCreate");
        super.onCreate();
    }
    @Override
    public void onDestroy() {
        System.out.println("onDestroy");
        super.onDestroy();
    }
    @Override
    public boolean stopService(Intent name) {
        System.out.println("stopService");
        return super.stopService(name);
    }
}
AndroidMenifest.xml
<application
    ......
    <service android:name="com.example.servicestudy.MyService" />
</application>
MainActivity.java
//此处省略import语句
public class MainActivity extends Activity {
    private MyBinder myBinder;
    private MyServiceConnection conn;
    @Override
    protected void onCreate(Bundle savedInstanceState) {
        super.onCreate(savedInstanceState);
        setContentView(R.layout.activity_main);
    }
    private class MyServiceConnection implements ServiceConnection {
        @Override
        public void onServiceConnected(ComponentName name, IBinder service) {
            System.out.println("name:"+name);
            System.out.println("connected");
            myBinder = (MyBinder) service;
        }
        @Override
        public void onServiceDisconnected(ComponentName name) {
            System.out.println("disconnected");
            myBinder=null;
        }
    }
    public void method(View v) {
        if (conn != null && myBinder != null)
            myBinder.callDosth();
    }
    public void startService(View v) {
        if (conn == null) {
            conn = new MyServiceConnection();
            Intent service = new Intent();
            service.setClass(MainActivity.this, MyService.class);
            bindService(service, conn, Context.BIND_AUTO_CREATE);
        }
    }
    public void stopService(View v) {
        if (conn != null) {
            unbindService(conn);
            conn = null;
        }
    }
}
2. 远程服务通信
2.1 AIDL简介
AIDL(Android Interface Definition Language)安卓接口定义语言。在Android中,进程内的通信由函数调用、Intent完成,那么进程间的通信(IPC,interprocess communication)用什么完成呢?Binder机制,AIDL是Binder机制的一种实现。通过定义AIDL接口文件来定义一个IPC接口,Server端实现IPC接口,Client端调用IPC接口的本地代理。
2.2 AIDL实现IPC的流程
- 在远程服务端定义aidl文件 ,定义好比接口定义,系统工具会自动生成相应的java接口
- 在服务端的Service中继承该接口的Stub类,作为远程服务的代理对象
- 在客户端中先拷贝服务端的aidl文件,并且放在与服务端包名一致的包下面
- 在客户端通过ServiceConnetion来获得远程服务的代理对象,实现远程进程通信
- 在服务端对Service设置IntentFileter,用于远程组件的调用
- AIDL是线性安全的,由框架来维护其线性安全
注意:这里的服务端指的是提供服务的另一个应用(处在另一个进程中)而不是Tomcat服务器子类的,不要会错意!
2.3 AIDL文件说明
- 接口名和aidl文件名相同。
- 接口和方法前不用加访问权限修饰符public,private,protected等,也不能用final,static。
- Aidl默认支持的类型包话java基本类型(int、long、boolean等)和(String、List、Map、CharSequence),使用这些类型时不需要import声明。对于List和Map中的元素类型必须是Aidl支持的类型。如果使用自定义类型作为参数或返回值,自定义类型必须实现Parcelable接口。
- 自定义类型和AIDL生成的其它接口类型在aidl描述文件中,应该显式import,即便在该类和定义的包在同一个包中。
- 在aidl文件中所有非Java基本类型参数必须加上in、out、inout标记,以指明参数是输入参数、输出参数还是输入输出参数。
- Java原始类型默认的标记为in,不能为其它标记。
3. 案例:使用支付宝支付功能
这个例子模拟的是一个购物应用,且名为乐购,当点击支付时调用手机上支付宝的支付服务进行付款。
3.1 支付宝端
PayService.java
package com.example.alipay;

import android.app.Service;
import android.content.Intent;
import android.os.Binder;
import android.os.IBinder;

public class PayService extends Service{
    @Override
    public IBinder onBind(Intent intent) {
        return new MPayBinder();
    }
    private void pay(String from, String to, double amount) {
        System.out.println(from+"向"+to+"支付了"+amount+"元.");
    }
    public class MPayBinder extends Binder implements IPayBinder{
        @Override
        public void callPay(String from, String to, double amount) {
            pay(from, to, amount);
        }
    }
}
IPayBinder.java
package com.example.alipay;

public interface IPayBinder {
    void callPay(String from,String to,double amount);
}
AndroidMenifest.xml
<service android:name="com.example.alipay.PayService">
    <intent-filter>
        <action android:name="alipay.service.pay"/>
        <category android:name="android.intent.category.DEFAULT" />
    </intent-filter>
</service>
————-修改前————-
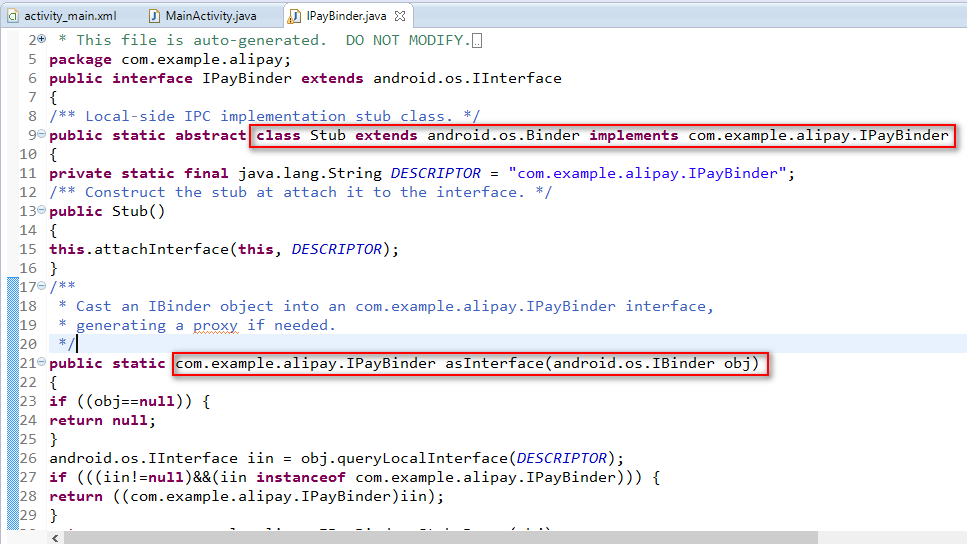
- 在硬盘中找到IPayBinder.java改名为IPayBinder.adil并修改以符合aidl的规则
- 接着在/gen目录下会自动产生IPayBinder.java,据此修改PayService.java
IPayBinder.java中要关注的点
————-修改后————-
IPayBinder.adil
package com.example.alipay;

interface IPayBinder {
    void callPay(String from,String to,double amount);
}
PayService.java
package com.example.alipay;

import android.app.Service;
import android.content.Intent;
import android.os.IBinder;

public class PayService extends Service{
    @Override
    public IBinder onBind(Intent intent) {
        return new MPayBinder();
    }
    private void pay(String from, String to, double amount) {
        System.out.println(from+"向"+to+"支付了"+amount+"元.");
    }
    public class MPayBinder extends IPayBinder.Stub{
        @Override
        public void callPay(String from, String to, double amount) {
            pay(from, to, amount);
        }
    }
}
3.2 乐购应用
拷贝支付宝的aidl文件到乐购,注意包名要跟服务端的一致
activity_main.xml
<RelativeLayout xmlns:android="http://schemas.android.com/apk/res/android" xmlns:tools="http://schemas.android.com/tools" android:layout_width="match_parent" android:layout_height="match_parent">
    <Button  android:onClick="pay" android:layout_width="wrap_content" android:layout_height="wrap_content" android:layout_centerHorizontal="true" android:layout_centerVertical="true" android:text="支付" />
</RelativeLayout>
MainActivity.java
package com.example.leshop;

import android.app.Activity;
import android.content.ComponentName;
import android.content.Context;
import android.content.Intent;
import android.content.ServiceConnection;
import android.os.Bundle;
import android.os.IBinder;
import android.os.RemoteException;
import android.view.View;
import com.example.alipay.IPayBinder;

public class MainActivity extends Activity {

    private MServiceConnection conn;
    private IPayBinder mIPayBinder;

    @Override
    protected void onCreate(Bundle savedInstanceState) {
        super.onCreate(savedInstanceState);
        setContentView(R.layout.activity_main);
        //建立获取连接状态的对象
        conn = new MServiceConnection();
        //使用隐式意图绑定服务
        Intent service = new Intent();
        service.setAction("alipay.service.pay");
        bindService(service, conn, Context.BIND_AUTO_CREATE);
    }
    public void pay(View v) {
        //连接不为空,并且代理在就可以支付了
        if (conn != null && mIPayBinder != null) {
            try {
                mIPayBinder.callPay("Lshare", "乐购", 100);
            } catch (RemoteException e) {
                e.printStackTrace();
            }
        }
    }
    private class MServiceConnection implements ServiceConnection {
        @Override
        public void onServiceConnected(ComponentName name, IBinder service) {
            /* * 连接上了就获取代理对象 * 注意:如果用mIPayBinder =(IPayBinder) service会导致类型转换异常 */
            mIPayBinder = IPayBinder.Stub.asInterface(service);
        }
        @Override
        public void onServiceDisconnected(ComponentName name) {
            //失去连接就不要代理了
            mIPayBinder = null;
        }
    }
    @Override
    protected void onDestroy() {
        //应用退出了就解绑服务
        if (conn != null) {
            unbindService(conn);
            conn = null;
        }
    }
}
输出结果
先运行支付宝,再运行乐购应用,点击支付后可以在Logcat中看到如下结果:

