jwchat 的安装和配置、Service unavailable、Authorization failed问题汇总
上一篇介绍了Openfire开源聊天IM服务器的安装:http://blog.csdn.net/ibm_hoojo/article/details/7577763
这篇文章介绍Jwchat的安装和配置
首先Jwchat的配置和安装需要具备的环境:
Tomcat 5.0.28+/Tomcat 6
JDK 1.6+
Openfire 3.7.1
1、 下载jwchat工程文件
下载站点:http://blog.jwchat.org/jwchat/download/
Zip下载:http://downloads.sourceforge.net/jwchat/jwchat-1.0.zip?use_mirror=
2、 下载完成后,将jwchat-1.0.zip解压到你的tomcat的webapps目录,将jwchat-1.0命名为jwchat,如果不这样的话,可能会出现错误,如Authorization failed。至少这样会方便你访问jwchat工程。
然后将index.html.zh_CN等这样带有*.后缀.zh_CN的这样的文件的.zh_CN都删掉,进行重命名。.zh_CN是表示中文版的,当然你也可以直接将*.后缀.后缀的文件进行重命名,那样就是默认的英文版的了。
批量命名工具类:
package com.hoo.util;

import java.io.File;

/**
 * <b>function:</b> 文件命名工具类
 * @author hoojo
 * @createDate 2012-5-14 下午01:58:14
 * @file FileRenameUtils.java
 * @package com.hoo.util
 * @blog http://blog.csdn.net/IBM_hoojo
 * @email [email protected]
 * @version 1.0
 */
public abstract class FileRenameUtils {

	private final static String FILE_PATH = "D:\\apache-tomcat-6.0.33\\webapps\\jwchat";

	/**
	 * <b>function:</b> 将指定目录下的文件的type类型的文件,进行重命名,命名后的文件将去掉type
	 * <p>example: 如果type = html; index.html.html -> index.html</p>
	 * <p>example: 如果type = zh_CN; index.html.zh_CN -> index.html</p>
	 * @author hoojo
	 * @createDate 2012-5-16 下午02:16:48
	 * @param path
	 * @param type
	 */
	public static void rename(String path, String type) {
		if (path == null || "".equals(path)) {
			path = FILE_PATH;
		}
		File dir = new File(path);
		File[] list = dir.listFiles();
		for (File file : list) {
			String name = file.getName();
			String[] s = name.split("\\.");
			if (s.length == 3 && type.equals(s[2])) {
				System.out.println(s[0] + "--" + s[1] + "--" + s[2]);
				file.renameTo(new File(path + "/" + s[0] + "." + s[1]));
			}
		}
	}

	public static void main(String[] args) {
	FileRenameUtils.rename("D:\\apache-tomcat-6.0.33\\webapps\\jwchat", "zh_CN");
	}
}
3、 下载JabberHTTPBind这个包,因为直接下载的jwchat没有WEB-INF、web.xml是无法运行的。
JabberHTTPBind是jwchat进行http bind通信的一种方式,它可以让jwchat和openfire进行链接通信。
站点:http://blog.jwchat.org/jhb/
下载地址:http://blog.jwchat.org/download/JabberHTTPBind-1.1.1.zip
JabberHTTPBind会依赖xalan的library库
下载站点:http://xml.apache.org/xalan-j/downloads.html
下载目录:http://labs.renren.com/apache-mirror/xml/xalan-j/
4、 下载完成后,将JabberHTTPBind的zip解压出来的WEB-INF、META-INF一并放到刚才的jwchat目录中,并且将刚才下载的xalan的xalan.jar,serializer.jar, xercesImpl.jar, xml-apis.jar放到webapps\jwchat\WEB-INF\lib目录下即可。
5、 修改jwchat目录中的相关配置
修改config.js文件
var BACKENDS =
[
		{
			……
		},
		{
			……
		},
		{
			name:"Open Relay",
			description:"HTTP Binding backend that allows connecting to any jabber server",
			httpbase:"/JHB/", /* 修改这里为:/jwchat/JHB/ */
			type:"binding",
			default_server: SITENAME
		},
		{
			……
		}
];
修改WEB-INF目录下的web.xml文件
<servlet-mapping>
        <servlet-name>Jabber HTTP Binding Servlet</servlet-name>
        <url-pattern>/</url-pattern>
         url-pattern修改为:/JHB/
         <!-- 这里的修改主页是对应上面的config.js,如果config.js的httpbase配置是/jwchat/,那这里的就不用修改了 -->
</servlet-mapping>
6、 启动tomcat后,访问http://localhost:8080/jwchat/
如果登录出现Service unavailable这个问题,那么会有以下几种情况:
A、 表明服务器不可用,可能是openfire服务器没有启动,
B、 webapps\jwchat \config.js的配置有问题,如var SITENAME = "localhost";和openfire服务器地址没有对应
C、 伴随出现:Exception in thread "Thread-34" javax.xml.transform.TransformerFactoryConfigurationError: Provider org.apache.xalan.processor.TransformerFactoryImpl not found异常,可能是tomcat版本低于tomcat6或是jwchat缺少相应的jar包,如缺少xml的serializer.jar、xalan.jar、xercesImpl.jar、xml-apis.jar
D、如果在满足了c步骤,有添加jra包还出现Exception in thread "Thread-34" javax.xml.transform.TransformerFactoryConfigurationError: Provider org.apache.xalan.processor.TransformerFactoryImpl not found异常,建议删除tomcat/work目录下的缓存,然后重启tomcat试试
7、 如果登录出现Authorization failed验证失败,那么有以下几种可能的情况:
A、 用户没有注册
B、 openfire的证书(C:\Program Files\openfire\resources\security)没有安装到相应的jdk的C:\Program Files\Java\jre6\lib\security目录下
如果出现这种异常信息:javax.net.ssl.SSLHandshakeException: sun.security.validator.ValidatorException: PKIX path building failed也表明是安全证书的问题;
关于解决ssl验证,网上有人说在jsjac.js中的if(this.has_sasl) 这行前面加上this.has_sasl = false;来取消ssl安全证书的验证。
C、 如果你的工程名称不是jwchat,建议把它修改成jwchat并且修改config.xml的相关链接的配置(httpbase)
D、 还有可能是你当前的用户没有注册,这个时候你可以注册一个用户或是在openfire控制台的用户组中添加一个用户,然后再等了看看是否存在这个问题。
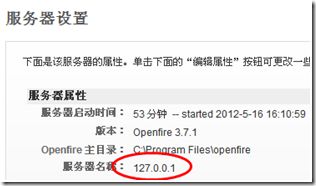
8、 修改服务器名称
点击服务器à服务器管理器à编辑属性 修改服务器名称
修改后的服务器名称
出现叹号,我们要删除安全证书,点击服务器à服务器设置à服务器安全证书删掉这里的证书。
删除后,在当前页面会出现提示,然后按照提示点击相应的链接,重启服务器,然后登陆,再生成证书
生成证书需要点时间,然后生成完成后,手动重启openfire服务器,再次登陆发现警告没有了。
9、 在服务器端增加配置
xmpp.httpbind.client.requests.polling = 0
xmpp.httpbind.client.requests.wait = 10


