【OpenCV笔记】图像预处理
对输入的任意一张图片要做预处理,本文的预处理主要有:灰度化、尺寸归一化、灰度直方图均衡化。
1、改变图片大小
(1)创建新图像
c函数接口:
IplImage* cvCreateImage(CvSize size, int depth, int channels);
参数:
|
(2)图像变换大小
c函数接口:
void cvResize(const CvArr* src, CvArr* dst, int interpolation=CV_INTER_LINEAR )
参数:
(3)缩放图像示例
void show_resized_image(float fScale)
{
	const char *pstrSrcImg = "yueyu.jpg";
	const char *pstrDstImg = "yueyu_resize.jpg";
	const char *pstrSrcWin = "Source Image";
	const char *pstrDstWin = "Resize Image";

	//double fScale = 0.5;
	CvSize dstSize;

	IplImage *pSrcImg = cvLoadImage(pstrSrcImg, CV_LOAD_IMAGE_UNCHANGED);
	IplImage *pDstImg = NULL;

	//calculate the size of the objective image
	dstSize.height = pSrcImg->height * fScale;
	dstSize.width = pSrcImg->width * fScale;

	//create the resized image
	pDstImg = cvCreateImage(dstSize, pSrcImg->depth, pSrcImg->nChannels);
	cvResize(pSrcImg, pDstImg, CV_INTER_AREA);

	//show the image
	cvShowImage(pstrSrcWin, pSrcImg);
	cvShowImage(pstrDstWin, pDstImg);

	//wait for the key
	cvWaitKey(0);

	//save the image
	cvSaveImage(pstrDstImg, pDstImg);

	cvDestroyWindow(pstrSrcWin);
	cvDestroyWindow(pstrDstWin);
	cvReleaseImage(&pSrcImg);
	cvReleaseImage(&pDstImg);
}
结果如图: 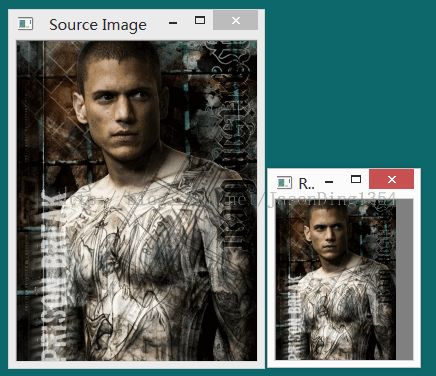
2、灰度直方图与灰度直方图均衡化
灰度直方图是指对图像的灰度信息进行统计,而灰度直方图均衡化则是使图片的颜色分布均衡,增强对比度,使图片从一个亮度分布映射到另一个更宽、更理想的亮度分布。
(1)创建直方图
c函数接口:
CvHistogram* cvCreateHist(int dims, int* sizes, int type, float** ranges=NULL, int uniform=1 )
参数:
直方图的数据结构如下所示: typedef struct CvHistogram
{
int type;
CvArr* bins;
float thresh[CV_MAX_DIM][2]; /* For uniform histograms. */
float** thresh2; /* For non-uniform histograms. */
CvMatND mat; /* Embedded matrix header for array histograms. */
}CvHistogram;
(2)计算直方图
c函数接口:
void cvCalcHist(IplImage** image, CvHistogram* hist, int accumulate=0, const CvArr* mask=NULL )
参数:
(3)直方图均衡化,归一化图像亮度、增强对比度
c函数接口:
void cvEqualizeHist(const CvArr* src, CvArr* dst)
参数:
void FillWhite(IplImage *pImage)
{
    cvRectangle(pImage, cvPoint(0, 0), cvPoint(pImage->width, pImage->height), CV_RGB(255, 255, 255), CV_FILLED);
}

//create histogram of gray image
CvHistogram* CreateGrayImageHist(IplImage **ppImage)
{
    int nHistSize = 256;
    float fRange[] = {0, 255};  //gray scale
    float *pfRanges[] = {fRange};
    CvHistogram *pcvHistogram = cvCreateHist(1, &nHistSize, CV_HIST_ARRAY, pfRanges);
    cvCalcHist(ppImage, pcvHistogram);
    return pcvHistogram;
}

IplImage *CreateHistImage(int nImageWidth, int nImageHeight, int nScale, CvHistogram *pcvHistogram)
{
	IplImage *pHistImg = cvCreateImage(cvSize(nImageWidth*nScale, nImageHeight),IPL_DEPTH_8U,1);
	FillWhite(pHistImg);

	//calculate the max histogram value
	float fMaxHistValue = 0;
	cvGetMinMaxHistValue(pcvHistogram, NULL, &fMaxHistValue, NULL, NULL);

	//draw each histogram block
	int i;
	for(i = 0;i < nImageWidth;i++){
		float fHistValue = cvQueryHistValue_1D(pcvHistogram, i);
		int nRealHeight = cvRound((fHistValue/fMaxHistValue) * nImageHeight);//height to draw
		cvRectangle(pHistImg,
			cvPoint(i*nScale,nImageHeight-1),
			cvPoint((i+1)*nScale-1,nImageHeight-nRealHeight),
			cvScalar(i,0,0,0),
			CV_FILLED);
	}
	return pHistImg;
}

void show_histogram()
{
	const char *pstrGrayWin = "Gray Image";
	const char *pstrHistWin = "Histogram Image";

	IplImage *pGrayImg = cvLoadImage("yueyu.jpg", CV_LOAD_IMAGE_GRAYSCALE);

	//gray histogram
	CvHistogram *pcvHist = CreateGrayImageHist(&pGrayImg);

	int nHistWidth = 255;
	int nHistHeight = 200;
	int nScale = 3;
	IplImage *pHistImg = CreateHistImage(nHistWidth,nHistHeight,nScale,pcvHist);

	//show
	cvNamedWindow(pstrGrayWin, CV_WINDOW_AUTOSIZE);
	cvNamedWindow(pstrHistWin, CV_WINDOW_AUTOSIZE);
	cvShowImage(pstrGrayWin, pGrayImg);
	cvShowImage(pstrHistWin, pHistImg);

	//wait for key
	cvWaitKey(0);

	cvReleaseHist(&pcvHist);

	cvDestroyWindow(pstrGrayWin);
	cvDestroyWindow(pstrHistWin);
	cvReleaseImage(&pGrayImg);
	cvReleaseImage(&pHistImg);
}

void show_gray_equalize()
{
	const char *pstrGrayWin = "Gray Image";
	const char *pstrGrayEqualWin = "Gray Image(Equalized)";
	const char *pstrHistWin = "Histogram Image";
	const char *pstrHistEqualWin = "Histogram Image(Equalized)";

	IplImage *pGrayImg = cvLoadImage("yueyu.jpg", CV_LOAD_IMAGE_GRAYSCALE);
	IplImage *pGrayEqualImg = cvCreateImage(cvGetSize(pGrayImg),IPL_DEPTH_8U,1);

	//gray histogram
	CvHistogram *pcvHist = CreateGrayImageHist(&pGrayImg);

	int nHistWidth = 255;
	int nHistHeight = 160;
	int nScale = 2;
	IplImage *pHistImg = CreateHistImage(nHistWidth,nHistHeight,nScale,pcvHist);

	//gray equalize
	cvEqualizeHist(pGrayImg, pGrayEqualImg);
	CvHistogram *pcvHistEqual = CreateGrayImageHist(&pGrayEqualImg);
	IplImage *pHistEqualImg = CreateHistImage(nHistWidth,nHistHeight,nScale,pcvHistEqual);

	//show
	cvNamedWindow(pstrGrayWin, CV_WINDOW_AUTOSIZE);
	cvNamedWindow(pstrHistWin, CV_WINDOW_AUTOSIZE);
	cvNamedWindow(pstrGrayEqualWin, CV_WINDOW_AUTOSIZE);
	cvNamedWindow(pstrHistEqualWin, CV_WINDOW_AUTOSIZE);
	cvShowImage(pstrGrayWin, pGrayImg);
	cvShowImage(pstrHistWin, pHistImg);
	cvShowImage(pstrGrayEqualWin, pGrayEqualImg);
	cvShowImage(pstrHistEqualWin, pHistEqualImg);

	//wait for key
	cvWaitKey(0);

	cvReleaseHist(&pcvHist);
	cvReleaseHist(&pcvHistEqual);

	cvDestroyWindow(pstrGrayWin);
	cvDestroyWindow(pstrHistWin);
	cvDestroyWindow(pstrGrayEqualWin);
	cvDestroyWindow(pstrHistEqualWin);
	cvReleaseImage(&pGrayImg);
	cvReleaseImage(&pHistImg);
	cvReleaseImage(&pGrayEqualImg);
	cvReleaseImage(&pHistEqualImg);
}
结果如图: 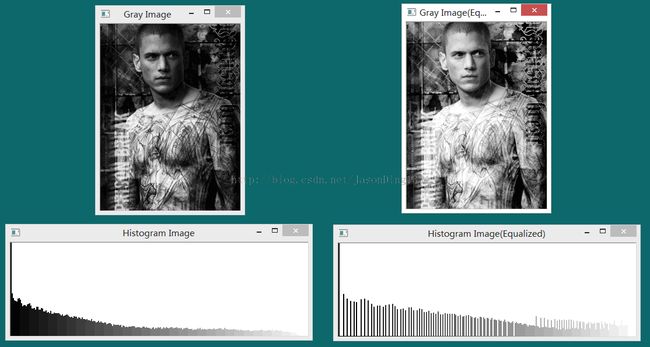 |
转载请标明出处,原文地址:http://blog.csdn.net/jasonding1354/article/details/38061171