Android软件开发之盘点常用系统控件界面大合集(三)
常用系统控件界面大合集
雨松MOMO带大家盘点Android 开发中的一些常用系统控件的简单用法
今天我用自己写的一个Demo 和大家详细介绍一个Android开发中遇到的一些常用系统控件的使用技巧。
今天我用自己写的一个Demo 和大家详细介绍一个Android开发中遇到的一些常用系统控件的使用技巧。

1.文本框TextView
TextView的作用是用来显示一个文本框 ,下面我用两种方式为大家呈现TextView, 第一种是通过xml布局文件呈现 ,第二种是通过代码来呈现,由此可见Android 的界面开发真的是非常灵活。

- public class TextViewActivity extends Activity {
- @Override
- protected void onCreate(Bundle savedInstanceState) {
- setContentView(R.layout.textview);
- LinearLayout ll = (LinearLayout) findViewById(R.id.textviewll);
- TextView textView = new TextView(this);
- //设置显示文字
- textView.setText("从代码中添加一个TextView");
- //设置显示颜色
- textView.setTextColor(Color.WHITE);
- //设置显示字体大小
- textView.setTextSize(18);
- //设置显示背景颜色
- textView.setBackgroundColor(Color.BLUE);
- //设置锚点位置
- textView.setGravity(Gravity.CENTER_VERTICAL|Gravity.CENTER_HORIZONTAL);
- //把这个view加入到布局当中
- ll.addView(textView);
- super.onCreate(savedInstanceState);
- }
- }
- <?xml version="1.0" encoding="utf-8"?>
- <LinearLayout xmlns:android="http://schemas.android.com/apk/res/android"
- android:id="@+id/textviewll"
- android:orientation="vertical" android:layout_width="fill_parent"
- android:layout_height="fill_parent">
- <TextView android:id="@+id/textView0"
- android:layout_width="fill_parent"
- android:layout_height="wrap_content"
- android:textColor="#000000"
- android:textSize="18dip"
- android:background="#00FF00"
- android:text="@string/textView"
- android:gravity="center_vertical|center_horizontal"
- />
- </LinearLayout>
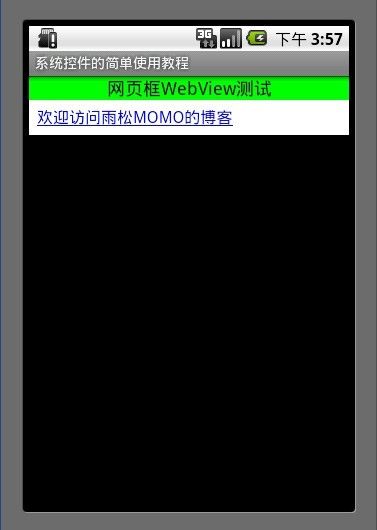
2.网页框WebView
WebView可以实现 类似web的网页 的系统控件 最主要的是可以使用html代码,如访问网页等。

- public class WebViewActivity extends Activity {
- WebView webView = null;
- static final String MIME_TYPE = "text/html";
- static final String ENCODING = "utf-8";
- @Override
- protected void onCreate(Bundle savedInstanceState) {
- setContentView(R.layout.webview);
- webView = (WebView) findViewById(R.id.webview);
- webView.loadDataWithBaseURL(null,"<a href='http://blog.csdn.net/xys289187120'>欢迎访问雨松MOMO的博客</a>", MIME_TYPE, ENCODING, null);
- super.onCreate(savedInstanceState);
- }
- }
- <?xml version="1.0" encoding="utf-8"?>
- <LinearLayout xmlns:android="http://schemas.android.com/apk/res/android"
- android:id="@+id/textviewll"
- android:orientation="vertical" android:layout_width="fill_parent"
- android:layout_height="fill_parent">
- <TextView android:layout_width="fill_parent"
- android:layout_height="wrap_content"
- android:textColor="#000000"
- android:textSize="18dip"
- android:background="#00FF00"
- android:text="网页框WebView测试"
- android:gravity="center_vertical|center_horizontal"
- />
- <WebView android:id="@+id/webview"
- android:layout_height="wrap_content"
- android:layout_width="fill_parent"/>
- </LinearLayout>
3.Menu菜单
Menu菜单在android系统控件中真的很具有特色 点击以后会悬浮出一个菜单在次点击菜单则会消失,今天我只是简单的介绍一下系统的Menu菜单, 其实Menu菜单可以做出非常好看的效果,比如半透明 自定义按钮图片等等,后面我会详细的介绍menu菜单。


- public class MenuActivity extends Activity {
- @Override
- protected void onCreate(Bundle savedInstanceState) {
- setContentView(R.layout.menuview);
- super.onCreate(savedInstanceState);
- }
- @Override
- public boolean onCreateOptionsMenu(Menu menu) {
- menu.add(0, 0, Menu.NONE, "菜单1").setIcon(R.drawable.icon);
- menu.add(0, 1, Menu.NONE, "菜单2").setIcon(R.drawable.icon);
- menu.add(0, 2, Menu.NONE, "菜单3").setIcon(R.drawable.icon);
- menu.add(0, 3, Menu.NONE, "菜单4").setIcon(R.drawable.icon);
- menu.add(0, 4, Menu.NONE, "菜单5").setIcon(R.drawable.icon);
- menu.add(0, 5, Menu.NONE, "菜单6").setIcon(R.drawable.icon);
- return super.onCreateOptionsMenu(menu);
- }
- @Override
- public boolean onOptionsItemSelected(MenuItem item) {
- Dialog(item.getItemId());
- return super.onOptionsItemSelected(item);
- }
- private void Dialog(int message) {
- new AlertDialog.Builder(this).setMessage(
- "您单击第【" + message + "】项Menu菜单项.").show();
- }
- }
- <?xml version="1.0" encoding="utf-8"?>
- <LinearLayout xmlns:android="http://schemas.android.com/apk/res/android"
- android:orientation="vertical" android:layout_width="fill_parent"
- android:layout_height="fill_parent">
- <TextView android:layout_width="fill_parent"
- android:layout_height="wrap_content"
- android:textColor="#000000"
- android:textSize="18dip"
- android:background="#00FF00"
- android:text="Menu菜单测试"
- android:gravity="center_vertical|center_horizontal"
- />
- </LinearLayout>
4.按钮Button
第一个是绘制系统字的button, 第二个是带图片的button 。

- public class ButtonActivity extends Activity {
- Context mContext = null;
- @Override
- protected void onCreate(Bundle savedInstanceState) {
- setContentView(R.layout.buttonview);
- mContext = this;
- //普通按钮
- Button button0 = (Button)findViewById(R.id.buttonview0);
- //设置按钮文字颜色
- button0.setTextColor(Color.BLUE);
- //设置按钮文字大小
- button0.setTextSize(30);
- //设置按钮监听 点击事件
- button0.setOnClickListener(new OnClickListener() {
- @Override
- public void onClick(View arg0) {
- Toast.makeText(ButtonActivity.this, "您点击了‘这是一个按钮’", Toast.LENGTH_LONG).show();
- }
- });
- //带图片的按钮
- ImageButton button1 = (ImageButton)findViewById(R.id.buttonview1);
- //设置按钮监听 点击事件
- button1.setOnClickListener(new OnClickListener() {
- @Override
- public void onClick(View arg0) {
- Toast.makeText(ButtonActivity.this, "您点击了一个带图片的按钮", Toast.LENGTH_LONG).show();
- }
- });
- super.onCreate(savedInstanceState);
- }
- }
- <?xml version="1.0" encoding="utf-8"?>
- <LinearLayout xmlns:android="http://schemas.android.com/apk/res/android"
- android:orientation="vertical" android:layout_width="fill_parent"
- android:layout_height="fill_parent">
- <TextView android:layout_width="fill_parent"
- android:layout_height="wrap_content"
- android:textColor="#000000"
- android:textSize="18dip"
- android:background="#00FF00"
- android:text="Button按钮测试"
- android:gravity="center_vertical|center_horizontal"
- />
- <Button
- android:id="@+id/buttonview0"
- android:layout_width="fill_parent"
- android:layout_height="wrap_content"
- android:text="这是一个按钮"
- />
- <ImageButton
- android:id="@+id/buttonview1"
- android:layout_width="fill_parent"
- android:layout_height="wrap_content"
- android:src="@drawable/icon"
- />
- </LinearLayout>
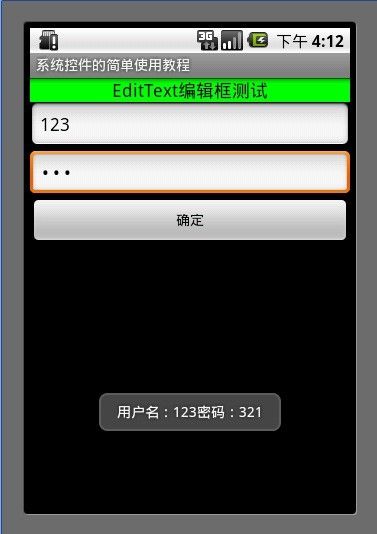
5.编辑框EditView
编辑框在实际开发中用到的非常普遍 比如登录 输入账号 密码 等等。
- public class EditTextActivity extends Activity {
- Context mContext = null;
- @Override
- protected void onCreate(Bundle savedInstanceState) {
- setContentView(R.layout.editview);
- mContext = this;
- //帐号
- final EditText editText0 = (EditText)findViewById(R.id.editview0);
- //密码
- final EditText editText1 = (EditText)findViewById(R.id.editview1);
- //确认按钮
- Button button = (Button)findViewById(R.id.editbutton0);
- button.setOnClickListener(new OnClickListener() {
- @Override
- public void onClick(View arg0) {
- String username = editText0.getText().toString();
- String password = editText1.getText().toString();
- Toast.makeText(EditTextActivity.this, "用户名:"+username +"密码:"+ password, Toast.LENGTH_LONG).show();
- }
- });
- super.onCreate(savedInstanceState);
- }
- }
- <?xml version="1.0" encoding="utf-8"?>
- <LinearLayout xmlns:android="http://schemas.android.com/apk/res/android"
- android:orientation="vertical" android:layout_width="fill_parent"
- android:layout_height="fill_parent">
- <TextView android:layout_width="fill_parent"
- android:layout_height="wrap_content"
- android:textColor="#000000"
- android:textSize="18dip"
- android:background="#00FF00"
- android:text="EditText编辑框测试"
- android:gravity="center_vertical|center_horizontal"
- />
- <EditText
- android:id="@+id/editview0"
- android:layout_width="fill_parent"
- android:layout_height="wrap_content"
- android:hint="请输入帐号"
- android:phoneNumber="true"
- />
- <EditText
- android:id="@+id/editview1"
- android:layout_width="fill_parent"
- android:layout_height="wrap_content"
- android:hint="请输入密码"
- android:password="true"
- />
- <Button
- android:id="@+id/editbutton0"
- android:layout_width="fill_parent"
- android:layout_height="wrap_content"
- android:text="确定"
- />
- </LinearLayout>
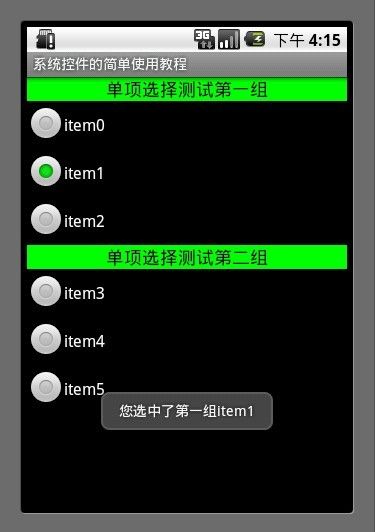
6.单项选择
使用RadioGroup 包住若干个RadioButton 来实现单项选择。监听每一个 RadioGroup 就可以知道那个单选组中的第一个ID被按下。
- public class RadioActivity extends Activity {
- Context mContext = null;
- @Override
- protected void onCreate(Bundle savedInstanceState) {
- setContentView(R.layout.radioview);
- mContext = this;
- //单选组(只有在一个组中的按钮可以单选)
- RadioGroup radioGroup = (RadioGroup)findViewById(R.id.radion0);
- //单选按钮(第一组)
- final RadioButton radioButton0 = (RadioButton)findViewById(R.id.radionButton0);
- final RadioButton radioButton1 = (RadioButton)findViewById(R.id.radionButton1);
- final RadioButton radioButton2 = (RadioButton)findViewById(R.id.radionButton2);
- radioGroup.setOnCheckedChangeListener(new OnCheckedChangeListener() {
- @Override
- public void onCheckedChanged(RadioGroup arg0, int checkID) {
- if(radioButton0.getId() == checkID) {
- Toast.makeText(RadioActivity.this, "您选中了第一组" + radioButton0.getText(), Toast.LENGTH_LONG).show();
- }else if(radioButton1.getId() == checkID) {
- Toast.makeText(RadioActivity.this, "您选中了第一组" + radioButton1.getText(), Toast.LENGTH_LONG).show();
- }else if(radioButton2.getId() == checkID) {
- Toast.makeText(RadioActivity.this, "您选中了第一组" + radioButton2.getText(), Toast.LENGTH_LONG).show();
- }
- }
- });
- RadioGroup radioGroup0 = (RadioGroup)findViewById(R.id.radion1);
- //单选按钮(第二组)
- final RadioButton radioButton3 = (RadioButton)findViewById(R.id.radionButton3);
- final RadioButton radioButton4 = (RadioButton)findViewById(R.id.radionButton4);
- final RadioButton radioButton5 = (RadioButton)findViewById(R.id.radionButton5);
- radioGroup0.setOnCheckedChangeListener(new OnCheckedChangeListener() {
- @Override
- public void onCheckedChanged(RadioGroup arg0, int checkID) {
- if(radioButton3.getId() == checkID) {
- Toast.makeText(RadioActivity.this, "您选中了第二组" + radioButton3.getText(), Toast.LENGTH_LONG).show();
- }else if(radioButton4.getId() == checkID) {
- Toast.makeText(RadioActivity.this, "您选中了第二组" + radioButton4.getText(), Toast.LENGTH_LONG).show();
- }else if(radioButton5.getId() == checkID) {
- Toast.makeText(RadioActivity.this, "您选中了第二组" + radioButton5.getText(), Toast.LENGTH_LONG).show();
- }
- }
- });
- super.onCreate(savedInstanceState);
- }
- }
- <?xml version="1.0" encoding="utf-8"?>
- <LinearLayout xmlns:android="http://schemas.android.com/apk/res/android"
- android:orientation="vertical" android:layout_width="fill_parent"
- android:layout_height="fill_parent">
- <TextView android:layout_width="fill_parent"
- android:layout_height="wrap_content"
- android:textColor="#000000"
- android:textSize="18dip"
- android:background="#00FF00"
- android:text="单项选择测试第一组"
- android:gravity="center_vertical|center_horizontal"
- />
- <RadioGroup
- android:id="@+id/radion0"
- android:layout_width="fill_parent"
- android:layout_height="wrap_content" >
- <RadioButton
- android:id="@+id/radionButton0"