C#识别验证码
以前看过一篇关于验证码识别功能的代码,于是整理了一下。主要原理就是识别图片的颜色不同从而转换为文字。不过对于不规则的验证码就不太行了。
主要代码如下:
           recordString = string.Empty;

            IHTMLControlRange imgRange;

            IHTMLDocument2 document = new HTMLDocumentClass();

            document = (IHTMLDocument2)this.axWebBrowser.Document;

            HTMLBody body = (HTMLBody)document.body;

            Bitmap bmp = new Bitmap(50, 20);

            foreach (IHTMLImgElement imageElement in document.images)
            {
                if (imageElement.src.IndexOf("suijitupian") > -1)
                {
                    imgRange = (IHTMLControlRange)body.createControlRange();

                    imgRange.add((IHTMLControlElement)imageElement);

                    imgRange.execCommand("Copy", false, null);

                    bmp = (Bitmap)Clipboard.GetDataObject().GetData(DataFormats.Bitmap);

                    bmp.Save(@"now.bmp");
                }
            }

            this.EraseNoiseDotAndGray(bmp);

            this.pictureBox1.Image = bmp;

            bmp.Save(@"now_no_noise_dot.bmp");

            //从左向右一列一列扫描,寻找四个数字的左右边界以切割
            int verticalBlackContent = 0;

            int width = 0;

            int currentNumberIndex = 0;

            int[,] horizonAxisArray = new int[4,2];

            //左右边界初始化
            for (int i = 0; i < 4; i++)
            {
                for (int j = 0; j < 2; j++)
                {
                    horizonAxisArray[i, j] = 0;
                }
            }
            while (currentNumberIndex <= 3 && width < 50)
            {
                for (int h = 8; h < 18; h++)
                {
                    if (bmp.GetPixel(width, h).ToArgb() == Color.Black.ToArgb())
                    {
                        verticalBlackContent++;
                    }
                }

                if (horizonAxisArray[currentNumberIndex, 0] == 0 && verticalBlackContent > 0) //左边界
                {
                    horizonAxisArray[currentNumberIndex, 0] = width;
                }
                else if (horizonAxisArray[currentNumberIndex, 0] != 0 && horizonAxisArray[currentNumberIndex, 1] == 0 && verticalBlackContent == 0) //右边界
                {
                    horizonAxisArray[currentNumberIndex++, 1] = width - 1;
                }

                width = width + 1;

                verticalBlackContent = 0;
            }

            int[] tNumArr = new int[4]; //识别后的4个数字

            //加载10个标准数字
            Bitmap[] sNumArr = new Bitmap[10];

            for (int i = 0; i < 10; i++)
            {
                sNumArr[i] = new Bitmap(@"s" + i + ".bmp");
            }

            //分割出来的4个数字分别与等宽的标准数字相匹配
            for (int i = 0; i < 4; i++)
            {
                int maxMatch = 0;

                Bitmap cutNum = bmp.Clone(new Rectangle(horizonAxisArray[i, 0], 8, horizonAxisArray[i, 1] - horizonAxisArray[i, 0] + 1, 10), PixelFormat.Format24bppRgb);

                for (int s = 0; s < 10; s++)
                {
                    if (cutNum.Width == sNumArr[s].Width) //等宽则匹配
                    {
                        int curMatch = 0;

                        for (int j = 0; j < cutNum.Width; j++)
                        {
                            for (int k = 0; k < 10; k++)
                            {
                                if (cutNum.GetPixel(j, k).ToArgb() == sNumArr[s].GetPixel(j, k).ToArgb() &&

                                    cutNum.GetPixel(j, k).ToArgb() == Color.Black.ToArgb() &&

                                    sNumArr[s].GetPixel(j, k).ToArgb() == Color.Black.ToArgb())
                                {
                                    curMatch++;
                                }
                            }
                        }
                        if (curMatch > maxMatch)
                        {
                            maxMatch = curMatch;

                            tNumArr[i] = s;
                        }
                    }
                }
                recordString += tNumArr[i] + "";
            }

            this.richTextBox1.Text = recordString;
       private void EraseNoiseDotAndGray(Bitmap bmp)
        {
            for (int w = 0; w < 50; w++)
            {
                for (int h = 0; h < 20; h++)
                {
                    if (bmp.GetPixel(w, h).R == 204) //为杂点,变为白色
                    {
                        bmp.SetPixel(w, h, Color.White);
                    }
                    else if (bmp.GetPixel(w, h).G != 255) //为数字所在点,变为黑色
                    {
                        bmp.SetPixel(w, h, Color.Black);
                    }
                }
            }
        }
这里用了AxWebBrowser控件,结果老是加不到工具栏中去,所以只好手动写了个初始化,然后加到Desinge里。
        private AxWebBrowser axWebBrowser = null;

        private void InitialAxWebBrowser()
        {
            System.ComponentModel.ComponentResourceManager resources = new System.ComponentModel.ComponentResourceManager(typeof(VCCMainForm));

            this.axWebBrowser = new AxSHDocVw.AxWebBrowser();

            ((System.ComponentModel.ISupportInitialize)(this.axWebBrowser)).BeginInit();

            this.axWebBrowser.Dock = System.Windows.Forms.DockStyle.Bottom;

            this.axWebBrowser.Enabled = true;

            this.axWebBrowser.Location = new System.Drawing.Point(0, 225);

            this.axWebBrowser.OcxState = ((System.Windows.Forms.AxHost.State)(resources.GetObject("axWebBrowser.OcxState")));

            this.axWebBrowser.Size = new System.Drawing.Size(592, 212);

            this.axWebBrowser.TabIndex = 0;

            this.axWebBrowser.ProgressChange += new DWebBrowserEvents2_ProgressChangeEventHandler(axWebBrowser_ProgressChange);

            this.axWebBrowser.StatusTextChange += new DWebBrowserEvents2_StatusTextChangeEventHandler(axWebBrowser_StatusTextChange);

            this.axWebBrowser.DocumentComplete += new DWebBrowserEvents2_DocumentCompleteEventHandler(axWebBrowser_DocumentComplete);

            this.Controls.Add(this.axWebBrowser);
        }
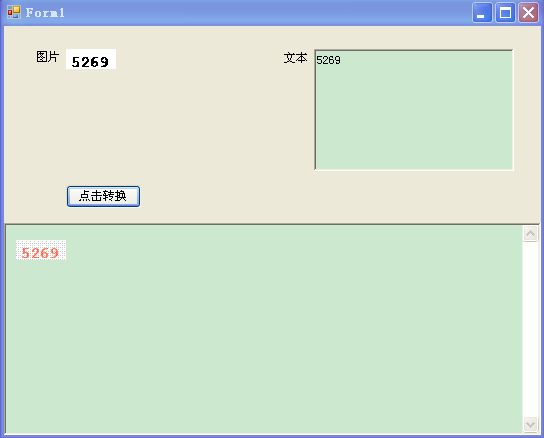
结果如下:

详细工程:http://download.csdn.net/detail/yysyangyangyangshan/4233915