Gentoo安装kvm桥接网络
本来最先是在 Gentoo 上实现 KVM 的,后来又在 Debian 上玩了玩:http://blog.csdn.net/cenziboy/article/details/6957890
后来觉得还是有必要再总结总结,只当是复习罢了,于是乎出现了此文。
一 安装前准备
1. KVM需要硬件支持,并在BIOS中开启CPU虚拟化功能
2. 配置 kernel
kvm 模块
[*] Virtualization --->
    --- Virtualization
    <M> Kernel-based Virtual Machine (KVM) support
    <M>   KVM for Intel processors support  #我是 intel CPU
    < >   KVM for AMD processors support
3. TUN/TAP 模块,桥接网络要用到
Device Drivers --->
    [*] Network device support --->
            <M> Universal TUN/TAP device driver support

Networking support --->
    Networking options --->
        <*> 802.1d Ethernet Bridging
        <*> 802.1Q VLAN Support
4. 半虚拟化(可选,根据自己需求)
Processor type and features --->
    [*] Paravirtualized guest support  --->
            [*]   KVM paravirtualized clock
            [*]   KVM Guest support
            -*-   Enable paravirtualization code
            [*]     Paravirtualization layer for spinlocks
编译并安装内核(模块)
# make
# make install
# make modules_install
二 安装qemu
kvm是内核模块,用户无法直接使用。这里就要借助 qemu ( 也叫 kvm 的前段工具)来使用 kvm
1. 先看看 qemu-kvm :
# emerge -pv qemu-kvm

These are the packages that would be merged, in order:

Calculating dependencies... done!
[ebuild   R    ] app-emulation/qemu-kvm-0.15.1-r1  USE="aio alsa jpeg ncurses png pulseaudio sdl ssl vhost-net -bluetooth -brltty -curl -debug (-esd) -fdt -hardened -nss -qemu-ifup (-rbd) -sasl -spice -threads -vde -xattr -xen" QEMU_SOFTMMU_TARGETS="x86_64 -arm -cris -i386 -m68k -microblaze -mips -mips64 -mips64el -mipsel -ppc -ppc64 -ppcemb -sh4 -sh4eb -sparc -sparc64" QEMU_USER_TARGETS="-alpha -arm -armeb -cris -i386 -m68k -microblaze -mips -mipsel -ppc -ppc64 -ppc64abi32 -sh4 -sh4eb -sparc -sparc32plus -sparc64 -x86_64" 0 kB

Total: 1 package (1 reinstall), Size of downloads: 0 kB
当然,我的系统上已经安装过了[ ebuild R ]
2. 然后再改变USE、QEMU_SOFTMMU 和 QEMU_USER_TARGETS 变量看看(对照两次参数与结果):
# USE="-jpeg -png" QEMU_SOFTMMU="i386" QEMU_USER_TARGETS="i386 x86_64" emerge -pv qemu-kvm

These are the packages that would be merged, in order:

Calculating dependencies... done!
[ebuild   R    ] app-emulation/qemu-kvm-0.15.1-r1  USE="aio alsa ncurses pulseaudio sdl ssl vhost-net -bluetooth -brltty -curl -debug (-esd) -fdt -hardened -jpeg* -nss -png* -qemu-ifup (-rbd) -sasl -spice -threads -vde -xattr -xen" QEMU_SOFTMMU_TARGETS="x86_64 -arm -cris -i386 -m68k -microblaze -mips -mips64 -mips64el -mipsel -ppc -ppc64 -ppcemb -sh4 -sh4eb -sparc -sparc64" QEMU_USER_TARGETS="i386* x86_64* -alpha -arm -armeb -cris -m68k -microblaze -mips -mipsel -ppc -ppc64 -ppc64abi32 -sh4 -sh4eb -sparc -sparc32plus -sparc64" 0 kB

Total: 1 package (1 reinstall), Size of downloads: 0 kB
3. 当然,去掉 emerge 后面的 -pv 就可以安装了。如下(根据自己需要来改变编译条件 USE, QEMU_SOFTMMU 和 QEMU_USER_TARGETS ):
# emerge qemu-kvm
三 开始
1. 为了让普通用户也能使用kvm ,添加用户至 kvm 用户组
# gpasswd -a <用户名> kvm
2. 创建虚拟磁盘
qemu-img create -f qcow2 gentoo.img 10G
四 桥接网络
因为安装某些系统( Gentoo )需要网络,所以就先配置好网络
1. 编辑 /etc/conf.d/net (此处只给出了 静态IP 的方法,其他的本人没做过)
# config_eth0="10.65.10.80/16"  #注释掉之前的网络接口 eth0
# routes_eth0="default via 10.65.255.254" #注释掉之前的 网关

config_eth0="null"

bridge_br0="eth0"
config_br0="10.65.10.80/16"   #原来 eth0 的地址
brctl_br0="setfd 0 sethello 30 stp off"
routes_br0="default via 10.65.255.254"
2. 安装桥接网络工具:
net-misc/bridge-utils: 命令 brctl 要使用
sys-apps/usermode-utilities: 命令 tunctl 要使用
# emerge bridge-utils
# emerge usermode-utilities
3. 创建 br0 ,并设置起开机启动
# cd /etc/init.d
# ln -s net.lo net.br0
# rc-update add net.br0 default

# rc-update del net.eth0    # 移除 eth0 开机启动
4. 重启网络
# rc-service net.br0 restart
看看网络可用不,如下图所示就可以了,否则就有问题了
# ifconfig
br0       Link encap:Ethernet  HWaddr 18:03:73:af:66:99
          inet addr:10.65.10.80  Bcast:10.65.255.255  Mask:255.255.0.0
          UP BROADCAST RUNNING MULTICAST  MTU:1500  Metric:1
          RX packets:137 errors:0 dropped:44 overruns:0 frame:0
          TX packets:53 errors:0 dropped:0 overruns:0 carrier:0
          collisions:0 txqueuelen:0
          RX bytes:17364 (16.9 KiB)  TX bytes:6562 (6.4 KiB)

eth0      Link encap:Ethernet  HWaddr 18:03:73:af:66:99
          UP BROADCAST RUNNING PROMISC MULTICAST  MTU:1500  Metric:1
          RX packets:41495 errors:0 dropped:0 overruns:0 frame:0
          TX packets:13952 errors:0 dropped:0 overruns:0 carrier:0
          collisions:0 txqueuelen:1000
          RX bytes:15108839 (14.4 MiB)  TX bytes:2736817 (2.6 MiB)
          Interrupt:20 Memory:7ea00000-7ea20000

lo        Link encap:Local Loopback
          inet addr:127.0.0.1  Mask:255.0.0.0
          UP LOOPBACK RUNNING  MTU:16436  Metric:1
          RX packets:4 errors:0 dropped:0 overruns:0 frame:0
          TX packets:4 errors:0 dropped:0 overruns:0 carrier:0
          collisions:0 txqueuelen:0
          RX bytes:312 (312.0 B)  TX bytes:312 (312.0 B)
5. 配置桥接网络
# modprobe tun
# tunctl -u <用户名> #为某用户(-u 参数可选)创建虚拟网卡tapX (X代表数字0,1,2…本文使用的是tap0)
# brctl addif br0 tap0 #将上一步创建的 tapX 加入网桥 br0
# ifconfig tap0 promisc up #启用tapX 并设置为promisc 模式
我的执行结果如下(nehc是用户名):
nehc ~ # tunctl -u nehc
Set 'tap0' persistent and owned by uid 1000
nehc ~ # brctl addif br0 tap0
nehc ~ # ifconfig tap0 promisc up
nehc ~ # ifconfig
br0       Link encap:Ethernet  HWaddr 18:03:73:af:66:99
          inet addr:10.65.10.80  Bcast:10.65.255.255  Mask:255.255.0.0
          UP BROADCAST RUNNING MULTICAST  MTU:1500  Metric:1
          RX packets:1295 errors:0 dropped:400 overruns:0 frame:0
          TX packets:156 errors:0 dropped:0 overruns:0 carrier:0
          collisions:0 txqueuelen:0
          RX bytes:165002 (161.1 KiB)  TX bytes:85908 (83.8 KiB)

eth0      Link encap:Ethernet  HWaddr 18:03:73:af:66:99
          UP BROADCAST RUNNING PROMISC MULTICAST  MTU:1500  Metric:1
          RX packets:42725 errors:0 dropped:0 overruns:0 frame:0
          TX packets:14055 errors:0 dropped:0 overruns:0 carrier:0
          collisions:0 txqueuelen:1000
          RX bytes:15291865 (14.5 MiB)  TX bytes:2816677 (2.6 MiB)
          Interrupt:20 Memory:7ea00000-7ea20000

lo        Link encap:Local Loopback
          inet addr:127.0.0.1  Mask:255.0.0.0
          UP LOOPBACK RUNNING  MTU:16436  Metric:1
          RX packets:4 errors:0 dropped:0 overruns:0 frame:0
          TX packets:4 errors:0 dropped:0 overruns:0 carrier:0
          collisions:0 txqueuelen:0
          RX bytes:312 (312.0 B)  TX bytes:312 (312.0 B)

tap0      Link encap:Ethernet  HWaddr 62:65:15:b5:ad:25
          UP BROADCAST PROMISC MULTICAST  MTU:1500  Metric:1
          RX packets:0 errors:0 dropped:0 overruns:0 frame:0
          TX packets:0 errors:0 dropped:0 overruns:0 carrier:0
          collisions:0 txqueuelen:500
          RX bytes:0 (0.0 B)  TX bytes:0 (0.0 B)
五 安装 Guest OS
1. 加载 kvm 模块
# modprobe kvm_intel
2. 安装系统
$ kvm -net nic,macaddr=00:00:00:00:00:00 -net tap,ifname=tap0,script=no,downscript=no -hda gentoo.img -cdrom gentoo_amd64.iso -m 512 -boot d
六 启动系统
系统已经安装完毕,没必要像上一步提供那么多参数
$ kvm -net nic,macaddr=00:00:00:00:00:00 -net tap,ifname=tap0,script=no,downscript=no gentoo.img
另外提供一种后台运行虚拟机的方法:
$ kvm -net nic,macaddr=00:00:00:00:00:00 -net tap,ifname=tap0,script=no,downscript=no gentoo.img -vnc 0.0.0.0:0 -daemonize启动后Guest OS 在后台运行,Host OS 没有 Guest OS 窗口弹出,适合运行在没有图形界面的系统(服务器应该都是这么干的吧)。
这里虽然提供了 -vnc 参数,但 Guest OS 并没有安装 vnc , 我还是习惯使用 ssh 远程连接。
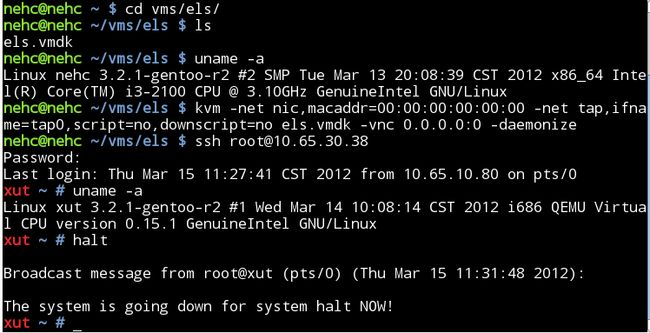
我的执行结果:
nehc@nehc ~/vms/els $ uname -a                # Host OS 信息
Linux nehc 3.2.1-gentoo-r2 #2 SMP Tue Mar 13 20:08:39 CST 2012 x86_64 Intel(R) Core(TM) i3-2100 CPU @ 3.10GHz GenuineIntel GNU/Linux
nehc@nehc ~/vms/els $ kvm -net nic,macaddr=00:00:00:00:00:00 -net tap,ifname=tap0,script=no,downscript=no els.vmdk -vnc 0.0.0.0:0 -daemonize  # 启动Guest OS, 后台运行
nehc@nehc ~/vms/els $ ssh [email protected]    # ssh 连接后台运行的虚拟机
Password:
Last login: Thu Mar 15 11:27:41 CST 2012 from 10.65.10.80 on pts/0
xut ~ # uname -a       # 虚拟机信息
Linux xut 3.2.1-gentoo-r2 #1 Wed Mar 14 10:08:14 CST 2012 i686 QEMU Virtual CPU version 0.15.1 GenuineIntel GNU/Linux
xut ~ # halt           # 关闭虚拟机

Broadcast message from root@xut (pts/0) (Thu Mar 15 11:31:48 2012):

The system is going down for system halt NOW!
xut ~ #
附图:
七 没有了
参考自:http://en.gentoo-wiki.com/wiki/KVM
