suse autoyast介绍
Chapter 4. Configuration and Installation Options
Contents
- 4.1. General Options
- 4.2. Reporting
- 4.3. The Boot Loader
- 4.4. Partitioning
- 4.5. Software
- 4.6. Services and Runlevels
- 4.7. Network Configuration
- 4.8. NIS
- 4.9. LDAP client
- 4.10. NFS Client and Server
- 4.11. NTP Client
- 4.12. Mail Configuration (Sendmail or Postfix)
- 4.13. Security settings
- 4.14. Monitor and X11 Configuration
- 4.15. Users
- 4.16. Custom User Scripts
- 4.17. System Variables (Sysconfig)
- 4.18. Adding Complete Configurations
- 4.19. Ask the user for values during installation
- 4.20. Kernel dumps
- 4.21. Miscellaneous Hardware and System Components
This chapter introduces important parts of a control file for standard purposes. To learn about other available options, use the configuration management system.
Note that for some of the configuration options to work, additional packages have to be installed, depending on the software selection you have configured. If you choose to install Minimal then some packages might be missing and have to be added to the individual package selection.
YaST will install packages required in the second phase of the installation and before the post-installation phase of AutoYaST has started. However, if necessary YaST modules are not available in the system, important configuration steps will be skipped. For example, no security settings will be configured if yast2-security is not installed.
4.1. General Options 
General options include all the settings related to the installation process and the environment of the installed system.
Example 4.1. General Options
The mode section configures the behavior of AutoYaST with regard to confirmation and rebooting. The following has to be in the <general><mode> section.
By default, the user must confirm the auto-installation process. This option allows the user to view and change the settings for a target system before they are committed and can be used for debugging. confirm is set to "true" by default to avoid recursive installs when the system schedules a reboot after initial system setup. Only disable confirmation if you want to carry out a fully unattended installation.
With halt you cause AutoYaST to shut down the machine after all packages have been installed. Instead of a reboot into stage two, the machine is turned off. The bootloader is alreay installed and all your chroot scripts have run.
final_halt and final_reboot have been introduced with openSUSE 11.0 and SLES11. You can reboot or halt the machine after installation and configuration are finished at the end of stage 2.
openSUSE 11.0 uses the kexec feature and does not reboot anymore between stage1 and stage2. With the forceboot option you can force the reboot in case you need it for some reason. The value "true" will reboot, "false" will not reboot and a missing forceboot option uses the product's default.
    <general>
      <signature-handling>
        <accept_unsigned_file         config:type="boolean">true</accept_unsigned_file>
        <accept_file_without_checksum config:type="boolean">true</accept_file_without_checksum>
        <accept_verification_failed   config:type="boolean">true</accept_verification_failed>
        <accept_unknown_gpg_key       config:type="boolean">true</accept_unknown_gpg_key>
        <import_gpg_key               config:type="boolean">true</import_gpg_key>
        <accept_non_trusted_gpg_key   config:type="boolean">true</accept_non_trusted_gpg_key>
      </signature-handling>
      <mode>
        <halt config:type="boolean">false</halt>
        <forceboot config:type="boolean">false</forceboot>     <! -- since 11.0 -->
        <final_reboot config:type="boolean">false</final_reboot>   <! -- since 11.0 -->
        <final_halt config:type="boolean">false</final_halt>       <! -- since 11.0 -->
        <confirm config:type="boolean">true</confirm>
        <second_stage config:type="boolean">true</second_stage>
      </mode>
      <proposals config:type="list">        <!-- since 11.1 -->
        <proposal>partitions_proposal</proposal>
      </proposals>
      <wait>  <!-- since 11.1 / SLES11 -->
          <pre-modules config:type="list">
              <module>
                  <name>networking</name>
                  <sleep>
                      <time config:type="integer">10</time>
                      <feedback config:type="boolean">true</feedback>
                  </sleep>
                  <script>
                      <source>
                          sleep 5
                      </source>
                      <debug config:type="boolean">false</debug>
                  </script>
              </module>
          </pre-modules>
          <post-modules config:type="list">
              <module>
                  <name>networking</name>
                  <sleep>
                      <time config:type="integer">3</time>
                      <feedback config:type="boolean">true</feedback>
                  </sleep>
                  <script>
                      <source>
                          sleep 7
                      </source>
                      <debug config:type="boolean">false</debug>
                  </script>
              </module>
          </post-modules>
      </wait>

      <!-- the storage section was invented with openSUSE 11.3 and SLES11 SP2 -->
      <storage>
        <!--
            partition_alignment:

            `align_optimal  - That's the default. Partitions are aligned like the kernel suggests.
                              This can lead to problem with some machines/bioses that are unable to boot with that
                              alignment
            `align_cylinder - that's the alignment like it was in pre-openSUSE 11.3 time for years. Partitions
                              always start on a cylinder boundary
        -->
        <partition_alignment config:type="symbol">align_cylinder</partition_alignment>
      </storage>

    </general>
AutoYaST in openSUSE 11.1 allows you to configure the proposal screen with the <proposals config:type="list"> option in the profile. All proposals that are listed in that section are shown in the proposal screen if you set the confirm option to "true".
This is the proposal list openSUSE 11.1, which you can also find in the control.xml file on the installation source:
-
partitions_proposal
-
bootloader_proposal
-
country_simple_proposal
-
timezone_proposal
-
users_proposal
-
hwinfo_proposal
-
mouse_proposal
-
software_proposal
-
runlevel_proposal
-
deploying_proposal
The wait section has been introduced with openSUSE 11.1 and SLES11. You can let AutoYaST sleep before and after each module run during the second stage. You can run scripts and/or pass a value (in seconds) for AutoYaST to sleep. In the example above AutoYaST will sleep for 15 seconds (10+5) before the network configuration starts and 10 seconds (3+7) after the network configuration is done. The scripts in the example don't really make a lot of sense because you could pass that value as "time" value too. They are only used to show how scripts in the wait section work now.
| Changes since SUSE Linux 10.1/SLES10 | |
|---|---|
| The language, keyboard and clock properties in the general resource were moved to the root (profile) element of the autoyast profile. Do not use them in the general section anymore. Now you can use the second_stage property to turn off AutoYaST after the first reboot (set to "false"). Then the complete second stage is a manual installation. Default is "true", which means AutoYaST is doing a complete installation. Since openSUSE 11.0 you can set the boolean final_reboot and final_halt to reboot or turn off the machine at the end of stage 2. For signature handling, read the Section 4.5, “ Software ”. |
|
4.2. Reporting 
The report resource manages three types of popups that may appear during installation:
-
message popups (usually non-critical, informative messages),
-
warning popups (if something might go wrong),
-
error popups (in case an error occurs).
Example 4.2. Reporting Behavior
    <report>
      <messages>
	<show config:type="boolean">true</show>
	<timeout config:type="integer">10</timeout>
	<log config:type="boolean">true</log>
      </messages>
      <errors>
	<show config:type="boolean">true</show>
	<timeout config:type="integer">10</timeout>
	<log config:type="boolean">true</log>
      </errors>
      <warnings>
	<show config:type="boolean">true</show>
	<timeout config:type="integer">10</timeout>
	<log config:type="boolean">true</log>
      </warnings>
    </report>
Depending on your experience, you can skip, log and show (with timeout) those messages. It is recommended to show all messages with timeout. Warnings can be skipped in some places but should not be ignored.
The default setting in auto-installation mode is to show all messages without logging and with a timeout of 10 seconds.
| Critical System Messages | |
|---|---|
| Note that not all messages during installation are controlled by the report resource. Some critical messages concerning package installation and partitioning will show up ignoring your settings in the report section. Mostly those messages will have to be answered with Yes or No. |
|
4.3. The Boot Loader
This documentation is for yast2-bootloader and applies to SLE11 and openSUSE 11.0+. For older versions, use the documentation that comes with your distribution in /usr/share/doc/packages/autoyast2/
General scope of AutoYaST profile only bootloader part.
<bootloader>
   <device_map config:type="list">
    - info about order of devices in device.map
   </device_map>
   <global>
   - info about configuration of installation (installation settings for GRUB and generic boot code)
   </global>
   <initrd_modules config:type="list">
   - list of initrd modules
   </initrd_modules>
   <loader_type>grub</loader_type> - type of bootloader
   <sections config:type="list">
   - bootloader sections in menu.lst
   </sections>
 </bootloader>
4.3.1. Device map
You can define devices and their order in device.map, but it is not necessary. yast2-bootloader checks the devices during installation and proposes a device.map. It can happen that the order of the devices is wrong or you have defined a different order than the one set in the BIOS. Take care when you make changes there. The system might not boot afterwards.
<device_map config:type="list">
     <device_map_entry>
       <firmware>hd0</firmware> <!-- order of devices in target map  -->
       <linux>/dev/disk/by-id/ata-ST3500418AS_6VM23FX0</linux> <!-- name of device (disk)  -->
     </device_map_entry>
</device_map>
4.3.2. Globals
This is an important if optional part. Define here where to install GRUB and how the boot process will work. Again, yast2-bootloader proposes a configuration if you don't define one. Usually the AutoYaST profile includes only this part and all other parts are added automatically during installation by yast2-bootloader. Unless you have some special requirements, don't specify the bootloader config in the XML file.
<global>
     <activate>true</activate>
     <default>openSUSE 11.2 - 2.6.31.5-0.1</default>
     <gfxmenu>(hd0,1)/boot/message</gfxmenu>
     <lines_cache_id>4</lines_cache_id>
     <timeout config:type="integer">10</timeout>
 </global>
| Attribute |
Values |
Description |
|---|---|---|
| activate |
Set the boot flag on the boot partition. The boot partition can be "/" if there is no separate /boot partition. If the boot partition is on a logical partition, the boot flag is set to the extended partition. <activate>true</activate> |
|
| default |
Name (title) of the default boot section from <default>openSUSE 11.2 - 2.6.31.5-0.1</default> |
|
| gfxmenu |
Path to the graphical boot menu (/boot/message). Set to 'none' if you do not want to use a graphical boot menu. <gfxmenu>(hd0,1)/boot/message</gfxmenu> |
|
| timeout |
The timeout in seconds for automatically booting the default boot section from <timeout config:type="integer">10</timeout> |
|
| generic_mbr |
Write generic boot code to MBR, will be ignored if boot_mbr is set to "true". <generic_mbr>false</generic_mbr> |
|
| boot_mbr |
Write GRUB to MBR of the first disk in the order (device.map includes order of disks). <boot_mbr>false</boot_mbr> |
|
| boot_boot |
Write GRUB to separate /boot partition. If no separate /boot partition exists, GRUB will be written to "/". <boot_boot>false</boot_boot> |
|
| boot_root |
Write GRUB to "/" partition. <boot_root>false</boot_root> |
|
| boot_extended |
Write GRUB to the extended partition (important if you want to use a generic boot code and the "boot" partition is logical). NOTE: if the boot partition is logical, it should use boot_mbr (write GRUB to MBR) instead of generic_mbr. <boot_extended>false</boot_extended> |
|
| boot_custom |
Write GRUB to custom device. <boot_custom>/dev/sda3</boot_custom> |
|
| trusted_grub |
Use trusted GRUB instead of the classical GRUB (gfxmenu is deleted automatically if this option is true). Do not use trusted GRUB if your hardware does not support it. <trusted_grub>false</trusted_grub> |
|
| lines_cache_id |
Internal option specifying the cache id for perl-Bootloader. Do not use or change it in a cloned XML file. |
4.3.3. Initrd modules 
A list of initrd modules. Do not create your own list if you do not fully understand the impact. AutoYaST will take care of it for you.
4.3.4. Loader Type
Define which boot loader to use: grub, lilo, ppc or elilo.
<loader_type>grub</loader_type>
4.3.5. Sections
The configuration of the boot sections in the menu.lst is added automatically here by yast2-bootloader during installation. yast2-bootloader deletes boot sections with no valid kernel and initrd path.
<sections config:type="list">
     <section>
       <append>resume=/dev/disk/by-id/raid-sil_ajacccbhejai-part2 splash=silent quiet showotps</append>
       <image>(hd0,0)/vmlinuz-2.6.31-10-default</image>
       <initial>1</initial>
       <initrd>(hd0,0)/initrd-2.6.31-10-default</initrd>
       <lines_cache_id>0</lines_cache_id>
       <name>openSUSE 11.2 Milestone 8 - 2.6.31-10 (default)</name>
       <original_name>linux</original_name>
       <root>/dev/mapper/sil_ajacccbhejai_part3</root>
       <type>image</type>
       <vgamode>0x31a</vgamode>
     </section>
     <section>
       <append>resume=/dev/disk/by-id/raid-sil_ajacccbhejai-part2 splash=silent quiet showopts</append>
       <image>(hd0,0)/vmlinuz-2.6.31-10-xen</image>
       <initrd>(hd0,0)/initrd-2.6.31-10-xen</initrd>
       <lines_cache_id>2</lines_cache_id>
       <name>Xen -- openSUSE 11.2 Milestone 8 - 2.6.31-10</name>
       <nounzip>0</nounzip>
       <original_name>xen</original_name>
       <root>/dev/mapper/sil_ajacccbhejai_part3</root>
       <type>xen</type>
       <vgamode>0x31a</vgamode>
       <xen>(hd0,0)/xen.gz</xen>
       <xen_append></xen_append>
     </section>
     <section>
       <blockoffset>1</blockoffset>
       <chainloader>/dev/fd0</chainloader>
       <lines_cache_id>3</lines_cache_id>
       <name>Floppy</name>
       <noverifyroot>true</noverifyroot>
       <original_name>floppy</original_name>
       <type>other</type>
     </section>
   </sections>
4.3.6. Options
Available options depend on the type.
4.3.6.1. Options for Section Type: image and xen
| Attribute |
Values |
Description |
|---|---|---|
| append |
List of kernel args but without(!) vga= and root=. <append>splash=silent quiet showopts</append> |
|
| image |
Path to the kernel. <image>(hd0,0)/vmlinuz-2.6.31-10</image> |
|
| initrd |
Path to the initrd. <initrd>(hd0,0)/my-initrd</initrd> |
|
| lines_cache_id |
Internal option specifying the cache id for perl-Bootloader. Do not use or change it in a cloned XML file. |
|
| name |
Name of section. <name>Productive System</name> |
|
| original_name |
Internal name of section parsed by YaST from a comment in the configuration file. There are some rules for names, and original_name helps to determine if the boot section is "linux" or "failsafe". For chainloader it helps to determine if it is "windows" or other (linux, floppy, etc). Use a simple original_name: linux, xen, windows, floppy, etc. <original_name>linux</original_name> |
|
| root |
Location of the root partition ("/"). <root>/dev/mapper/sil_ajacccbhejai_part3</root> |
|
| type |
Type of section (image/xen/other/menu). <type>xen</type> |
|
| vgamode |
Kernel arg for vga (vga=). <vgamode>0x31a</vgamode> |
|
| xen |
Path to xen.gz. <xen>(hd0,0)/xen.gz</xen> |
|
| xen_append |
Kernel args for XEN. <xen_append></xen_append> |
4.3.6.2. Options for Section Type: other (chainloader)
| Attribute |
Values |
Description |
|---|---|---|
| lines_cache_id |
Internal option specifying the cache id for perl-Bootloader. Do not use or change it in a cloned XML file. |
|
| name |
Name or title of the section. <name>Floppy</name> |
|
| original_name |
Internal name of the section parsed by YaST from a comment in the configuration file. There are some rules for names and original_name helps to determine if the boot section is "linux" or "failsafe". For the chainloader it helps to determine if it is "windows" or other (linux, floppy, etc). Use a simple original_name: linux, xen, windows, floppy etc. <original_name>linux</original_name> |
|
| type |
Type of section (image/xen/other/menu). <type>other</type> |
|
| blockoffset |
Offset in chainloader (used only in grub). <blockoffset>1</blockoffset> |
|
| chainloader |
Partition part for chainloader (so chainloader+blockoffset get final chainloader item in grub). <chainloader>/dev/fd0</chainloader> |
|
| noverifyroot |
With or without checking root. <noverifyroot>true</noverifyroot> |
|
| remap |
Windows-specific option for remapping hard disks, for example switch the first and second disk: map (hd0) (hd1) map (hd1) (hd0) <remap>false</remap> |
|
| makeactive |
Add the makeactive argument for the chainloader section. <makeactive>false</makeactive> |
4.3.6.3. Options for section type: menu (configfile)
| Attribute |
Values |
Description |
|---|---|---|
| lines_cache_id |
Internal option specifying the cache id for perl-Bootloader. Do not use or change it in a cloned XML file. |
|
| name |
Name or title of section. <name>Floppy</name> |
|
| original_name |
Internal name of section parsed by YaST from a comment in the configuration file. There are some rules for names and original_name helps to determine if the boot section is "linux" or "failsafe". For the chainloader it helps to determine if it is "windows" or other (linux, floppy etc). Use a simple original_name: linux, xen, windows, floppy etc. <original_name>linux</original_name> |
|
| type |
Type of section (image/xen/other/menu). <type>other</type> |
|
| configfile |
Path to menu.lst config file. <configfile>1</configfile> |
|
| root |
Device name for loading menu.lst from another installation of Linux. <root>/dev/sda1</root> |
4.4. Partitioning
4.4.1. Drive Configuration
| EVMS Support Dropped in openSUSE 11.1 and SLES11 | |
|---|---|
| Since openSUSE 11.1 and SLES11, EVMS is no longer supported in the installation system. That means all support for EVMS in AutoYaST was dropped as well. All EVMS documentation here is only valid for SLES10 (all service packs) |
|
The following elements must be between the <partitioning config:type="list"><drive> ... </drive></partitioning> tags in the <profile> section.
| Attribute |
Values |
Description |
|---|---|---|
| device |
The device you want to configure in this <drive> section. You can use persistent device names via id, like /dev/disk/by-id/ata-WDC_WD3200AAKS-75L9A0_WD-WMAV27368122 or by-path,like /dev/disk/by-path/pci-0001:00:03.0-scsi-0:0:0:0. <device>/dev/hda</device> |
Optional. If left out, AutoYaST tries to guess the device (on openSUSE 12.2 and SLES11 SP2 you can influess the guessing - see below this table for instructions on how to do that). A RAID must always have "/dev/md" as device. |
| initialize |
If set to "true", the partition table gets wiped out before AutoYaST starts the partition calculation. <initialize config:type="boolean" >true</initialize> |
Optional. The default is "false". |
| partitions |
A list of <partition> entries (see table below). <partitions config:type="list"> <partition>...</partition> ... </partitions> |
Optional. If no partitions are specified, AutoYaST will create a reasonable partitioning (see Automated Partitioning below). |
| pesize |
This value makes only sense with LVM/EVMS. <pesize>8M</pesize> |
Optional. Default is 4M for EVMS/LVM volume groups. |
| use |
Specifies the strategy AutoYaST will use to partition the hard disk. Choose between:
|
This parameter should be provided. |
| type |
Specify the type of the drive Choose between:
<type config:type="symbol">CT_LVM</type> |
Optional. Default is CT_DISK for a normal physical hard disk. |
| disklabel |
Describes the type of the partition table. Choose between:
<disklabel>gpt</disklabel> |
Optional and available since openSUSE 12.1 and SLES11 SP2. By default YaST decides what makes sense (msdos in most cases). |
| keep_unknown_lv |
This value only makes sense for type=CT_LVM drives. If you are reusing a LVG and you set this to "true", all existing LVs in that VG will not be touched unless they are specified in the <partitioning> section. So you can keep existing LVs without specifying them. <keep_unknown_lv config:type="boolean" >false</keep_unknown_lv> |
Optional and available since openSUSE 12.1 and SLES11 SP2. The default is "false". |
Since openSUSE 12.2 and SLES11 SP2 you can influence the device-guessing of AutoYaST for the case that you don't specify a <device> entry on your own. Usually AutoYaST would use the first device it can find and that looks reasonable but you can configure to skip some devices like this:
<partitioning config:type="list">
  <drive>
    <initialize config:type="boolean">true</initialize>
    <!-- the skip_list is optional and available since openSUSE 12.2 and SLES11 SP2 -->
    <skip_list config:type="list">
      <listentry>
        <!-- skip devices that use the usb-storage driver -->
        <skip_key>driver</skip_key>
        <skip_value>usb-storage</skip_value>
      </listentry>
      <listentry>
        <!-- skip devices that are smaller than 1GB -->
        <skip_key>size_k</skip_key>
        <skip_value>1048576</skip_value>
        <skip_if_less_than config:type="boolean">true</skip_if_less_than>
      </listentry>
      <listentry>
        <!-- skip devices that are larger than 100GB -->
        <skip_key>size_k</skip_key>
        <skip_value>104857600</skip_value>
        <skip_if_more_than config:type="boolean">true</skip_if_more_than>
      </listentry>
    </skip_list>
    ...
For a list of all possible <skip_key>, run "yast2 ayast_probe" on openSUSE 12.2 or SLES11SP2
4.4.2. Partition Configuration
The following elements must be between the <partitions config:type="list"><partition> ... </partition></partitions> tags in the <drive> section.
| Attribute |
Values |
Description |
|---|---|---|
| create |
Specify if this partition must be created or if it already exists. <create config:type="boolean" >false</create> |
If set to "false", provide information for AutoYaST which partition this is (like with partition_nr). |
| mount |
The mountpoint of this partition. <mount>/</mount> <mount>swap</mount> |
You should have at least a root partition (/) and a swap partition. |
| fstopt |
Mount options for this partition. <fstopt >ro,noatime,user,data=ordered,acl,user_xattr</fstopt> |
See man mount for available mount options. |
| label |
The label of the partition (useful for the "mountby" parameter; see below). <label>mydata</label> |
See man e2label for an example. |
| uuid |
The uuid of the partition (only useful for the "mountby" parameter; see below). <uuid >1b4e28ba-2fa1-11d2-883f-b9a761bde3fb</uuid> |
See man uuidgen. |
| size |
The size of the partition, e.g. 4G, 4500M, etc. The /boot partition and the swap partition can have "auto" as size. Then AutoYaST calculates a reasonable size. One partition can have the value "max" to use all remaining space. You can specify the the size in percentage. So 10% will use 10% of the size of the hard disk or VG. You can mix auto, max, size, and percentage as you like. <size>10G</size> |
|
| format |
Specify if AutoYaST should format the partition. <format config:type="boolean">false</format> |
If you set "create" to "true", then you likely want this is option set to "true" as well. |
| filesystem |
Specify the filesystem to use on this partition:
<filesystem config:type="symbol" >reiser</filesystem> |
Optional. The default is reiser |
| partition_nr |
The partition number of this partition. If you have set create=false or if you use LVM, then you can specify the partition via partition_nr. You can force AutoYaST to only create primary partitions by assigning numbers below 5. <partition_nr config:type="integer" >2</partition_nr> |
In most cases, numbers 1 to 4 are primary partitions while 5 and higher are logical partitions. |
| partition_id |
The partition_id sets the id of the partition. If you want different identifiers than 131 for Linux partition or 130 for swap, configure them with partition_id. <partition_id config:type="integer" >131</partition_id> |
The default is 131 for linux partition and 130 for swap. |
| mountby |
Instead of a partition number, you can tell AutoYaST to mount a partition by device, label, uuid, path or id, which are the udev path and udev id (see /dev/disk/...). <mountby config:type="symbol" >label</mountby> |
See "label" and "uuid" documentation above. The default depends on YaST and is id in most cases. It was device in the past. |
| lv_name |
If this partition is in a logical volume in a volume group (LVM or EVMS) specify the logical volume name here (see is_lvm_vg or is_evms_vg parameter in drive configuration). <lv_name>opt_lv</lv_name> |
|
| stripes |
An integer that configures LVM striping. Specify across how many devices you want to stripe (spread data). <stripes config:type="integer">2</stripes> |
|
| stripesize |
Specify the size of each block in kb. <stripesize config:type="integer" >4</stripesize> |
|
| lvm_group |
If this is a physical partition used by (part of) a volume group (LVM), you have to specify the name of the volume group here. <lvm_group>system</lvm_group> |
|
| evms_group |
If this physical partition is used by a volume group (EVMS), you have to specify the name of the volume group here. <evms_group>system</evms_group> |
|
| raid_name |
If this physical volume is part of a RAID, specify the name of the RAID. <raid_name>/dev/md0</raid_name> |
|
| raid_type |
Specify the type of the RAID. <raid_type>raid1</raid_type> |
|
| raid_options |
Specify RAID options, see below. <raid_options>...</raid_options> |
|
| resize |
This boolean must be "true" if an existing partition should be resized. In this case, you want to set create to false and in most cases you don't want to format the partition. You need to tell AutoYaST the partition_nr and the size. The size can be in percentage of the original size or a number, like 800M. max and auto do not work as size here. <resize config:type="boolean" >false</resize> |
The resize only works with physical disks. Not with LVM/EVMS volumes. |
4.4.3. RAID Options
The following elements must be between the <partition><raid_options> ... </raid_options></partition> tags.
| Attribute |
Values |
Description |
|---|---|---|
| chunk_size |
<chunk_size>4</chunk_size> |
|
| parity_algorithm |
Possible values are: left_asymmetric, left_symmetric, right_asymmetric, right_symmetric. Since SLES11 SP2 and openSUSE 12.1 you can use: parity_first, parity_last, left_asymmetric_6, left_symmetric_6, right_asymmetric_6, right_symmetric_6, parity_first_6, n2, o2, f2, n3, o3, f3 for RAID6 and RAID10 <parity_algorithm >left_asymmetric</parity_algorithm> |
|
| raid_type |
Possible values are: raid0,raid1 and raid5. <raid_type>raid1</raid_type> |
The default is raid1. |
4.4.4. Automated Partitioning 
For automated partitioning, you only need to provide the sizes and mount points of partitions. All other data needed for successful partitioning is calculated during installation—unless provided in the control file.
If no partitions are defined and the specified drive is also the drive where the root partition should be created, the following partitions are created automatically:
-
/boot
The size of the /boot partition is determined by the architecture of the target system.
-
swap
The size of the swap partition is determined by the amount of memory available in the system.
-
/ (root partition)
The size of the root partition is determined by the space left after creating swap and /boot.
Depending on the initial status of the drive and how it was previously partitioned, it is possible to create the default partitioning in the following ways:
-
Use free space
If the drive is already partitioned, it is possible to create the new partitions using the free space on the hard drive. This requires the availability of enough space for all selected packages in addition to swap.
-
Reuse all available space
Use this option to delete all existing partitions (Linux and non-Linux).
-
Reuse all available Linux partitions
This option deletes all existing Linux partitions. Other partitions (i.e. Windows) remain untouched. Note that this works only if the Linux partitions are at the end of the device.
-
Reuse only specified partitions
This option allows you to select specific partitions to delete. Start the selection with the last available partition.
Repartitioning only works if the selected partitions are neighbors and located at the end of the device.
| Important Notice | |
|---|---|
| The value provided in the use property determines how existing data and partitions are treated. The value all means that ALL data on the disk will be erased. Make backups and use the confirm property if you are going to keep some partitions with important data. During automated installation, no popups will notify you about partitions being deleted. |
|
If multiple drives are present in the target system, identify all drives with their device names and specify how the partitioning should be performed.
Partition sizes can be given in gigabytes, megabytes or can be set to a flexible value using the keywords auto and max. max uses all available space on a drive, therefore should only be set for the last partition on the drive. With auto the size of a swap or boot partition is determined automatically, depending on the memory available and the type of the system.
A fixed size can be given as shown below:
1GB will create a partition of the size 1 GB. 1500MB will create a partition of the size 1.5 GB.
Example 4.3. Automated Partitioning
The following is an example of a single drive system, which is not pre-partitioned and should be automatically partitioned according to the described pre-defined partition plan. If you do not specify the device, it will be automatically detected. You do not have to create different profiles for /dev/sda or /dev/hda systems.
  <partitioning  config:type="list">
    <drive>
      <device>/dev/hda</device>
      <use>all</use>
    </drive>
  </partitioning>
A more detailed example shows how existing partitions and multiple drives are handled.
Example 4.4. Detailed Automated Partitioning
<partitioning  config:type="list">
  <drive>
    <device>/dev/hda</device>
    <partitions config:type="list">
      <partition>
	<mount>/</mount>
	<size>5gb</size>
      </partition>
      <partition>
	<mount>swap</mount>
	<size>1gb</size>
      </partition>
    </partitions>
  </drive>
  <drive>
    <device>/dev/hdb</device>
    <use>all</use>
    <partitions config:type="list">
      <partition>
	<filesystem  config:type="symbol">reiser</filesystem>
	<mount>/data1</mount>
	<size>15gb</size>
      </partition>
      <partition>
	<filesystem  config:type="symbol">jfs</filesystem>
	<mount>/data2</mount>
	<size>auto</size>
      </partition>
    </partitions>
    <use>free</use>
  </drive>
</partitioning>
4.4.5. Advanced Partitioning Features
4.4.5.1. Wipe out Partition Table
In most cases this is not needed because AutoYaST can delete partitions one by one automatically, but you have the option to let AutoYaST clear the partition table instead of deleting partitions individually.
Go to the "drive" section and add:
<initialize config:type="boolean">true</initialize>
With this setting AutoYaST will delete the partition table before it starts to analyse the actual partitioning and calculates its partition plan. Of course this means, that you cannot keep any of your existing partitions.
4.4.5.2. Mount Options
By default a file system to be mounted is identified in /etc/fstab by the device name. This identification can be changed so the file system is found by searching for a UUID or a volume label. Note that not all file systems can be mounted by UUID or a volume label. To specify how a partition is to be mounted, use the mountby property which has the symbol type. Possible options are:
-
device (default),
-
label,
-
UUID.
If you choose to mount the partition using a label, the name entered for the label property is used as the volume label.
Add any legal mount option in the fourth field of /etc/fstab. Multiple options are separated by commas. Possible fstab options:
-
Mount read-only (ro): No write access to the file system. Default is "false".
-
No access time (noatime): Access times are not updated when a file is read. Default is "false".
-
Mountable by User (user): The file system can be mounted by a normal user. Default is "false".
-
Data Journaling Mode (ordered, journal, writeback): Specifies the journaling mode for file data.
- journal
-
All data is committed to the journal prior to being written to the main file system.
- ordered
-
All data is directly written to the main file system before its meta data is committed to the journal.
- writeback
-
Data ordering is not preserved.
-
Access Control List (acl): Enable access control lists on the file system.
-
Extended User Attributes (user_xattr): Allow extended user attributes on the file system.
Example 4.5. Mount Options
  <partitions config:type="list">
    <partition>
      <filesystem config:type="symbol">reiser</filesystem>
      <format config:type="boolean">true</format>
      <fstopt>ro,noatime,user,data=ordered,acl,user_xattr</fstopt>
      <mount>/local</mount>
      <mountby config:type="symbol">uuid</mountby>
      <partition_id config:type="integer">131</partition_id>
      <size>10gb</size>
    </partition>
  </partitions>
4.4.5.3. Keeping Specific Partitions
In some cases you may want to leave partitions untouched and only format specific target partitions, rather than creating them from scratch. For example, if different Linux installations coexist, or you have another operating system installed, likely you do not want to wipe these out. Or you may want to leave data partitions untouched.
Such scenarios require certain knowledge about the target systems and hard drives. Depending on the scenario, you might need to know the exact partition table of the target hard drive with partition ids, sizes and numbers. With this data you can tell AutoYaST to keep certain partitions, format others and create new partitions if needed.
The following example will keep partitions 1, 2 and 5 and delete partition 6 to create two new partitions. All remaining partitions will only be formatted.
Example 4.6. Keeping partitions
    <partitioning config:type="list">
      <drive>
        <device>/dev/hdc</device>
        <partitions config:type="list">
          <partition>
            <create config:type="boolean">false</create>
            <format config:type="boolean">true</format>
            <mount>/</mount>
            <partition_nr config:type="integer">1</partition_nr>
          </partition>
          <partition>
            <create config:type="boolean">false</create>
            <format config:type="boolean">false</format>
            <partition_nr config:type="integer">2</partition_nr>
            <mount>/space</mount>
          </partition>
          <partition>
            <create config:type="boolean">false</create>
            <format config:type="boolean">true</format>
            <filesystem config:type="symbol">swap</filesystem>
            <partition_nr config:type="integer">5</partition_nr>
            <mount>swap</mount>
          </partition>
          <partition>
            <format config:type="boolean">true</format>
            <mount>/space2</mount>
            <size>50mb</size>
          </partition>
          <partition>
            <format config:type="boolean">true</format>
            <mount>/space3</mount>
            <size>max</size>
          </partition>
        </partitions>
        <use>6</use>
      </drive>
    </partitioning>
The last example requires exact knowledge of the existing partition table and the partition numbers of those partitions that should be kept. In some cases however, such data may not be available, especially in a mixed hardware environment with different hard drive types and configurations. The following scenario is for a system with a non-Linux OS with a designated area for a Linux installation.
Figure 4.1. Keeping partitions
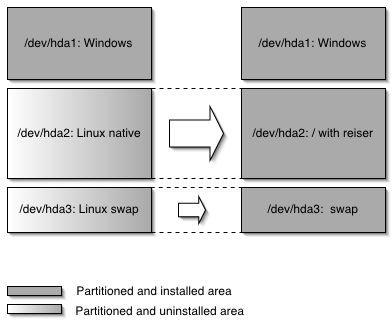
In this scenario, shown in figure “Figure 4.1, “Keeping partitions””, AutoYaST will not create new partitions. Instead it searches for certain partition types on the system and uses them according to the partitioning plan in the control file. No partition numbers are given in this case, only the mount points and the partition types (additional configuration data can be provided, for example file system options, encryption and filesystem type).
Example 4.7. Auto-detection of partitions to be kept.
    <partitioning config:type="list">
      <drive>
        <partitions config:type="list">
          <partition>
            <create config:type="boolean">false</create>
            <format config:type="boolean">true</format>
            <mount>/</mount>
            <partition_id config:type="integer">131</partition_id>
          </partition>
          <partition>
            <create config:type="boolean">false</create>
            <format config:type="boolean">true</format>
            <filesystem config:type="symbol">swap</filesystem>
            <partition_id config:type="integer">130</partition_id>
            <mount>swap</mount>
          </partition>
        </partitions>
      </drive>
    </partitioning>
4.4.6. Using Existing Mount Table (fstab)
| New Feature | |
|---|---|
| This option will allow AutoYaST to use an existing |
|
Although the default behaviour is to format all partitions, it is also possible to leave some partitions untouched and only mount them, for example data partitions. If multiple installations are found on the system (multiple root partitions with different fstab files, the installation will abort, unless the root partition is configured in the control file. The following example illustrates how this option can be used:
Example 4.8. Reading existing /etc/fstab
    <partitioning_advanced>
      <fstab>
	<!-- Read data from existing fstab. If multiple root partitions are
	found, use the one specified below. Otherwise the first root
	partition is taken -->
	<!-- <root_partition>/dev/hda5</root_partition> -->
	<use_existing_fstab config:type="boolean">true</use_existing_fstab>
	<!-- all partitions found in fstab will be formatted and mounted
	by default unless a partition is listed below with different
	settings -->
	<partitions config:type="list">
	  <partition>
	    <format config:type="boolean">false</format>
	    <mount>/bootmirror</mount>
	  </partition>
	</partitions>
      </fstab>
    </partitioning_advanced>
4.4.7. Logical Volume Manager (LVM) 
To configure LVM, first create a physical volume using the normal partitioning method described above.
Example 4.9. Create LVM Physical Volume
The following example shows how to prepare for LVM in the partitioning resource:
  <partitioning config:type="list">
    <drive>
      <device>/dev/sda</device>

      <partitions config:type="list">
	<partition>
	  <lvm_group>system</lvm_group>
	  <partition_type>primary</partition_type>
	  <size>max</size>
	</partition>
      </partitions>
      <use>all</use>
    </drive>
  </partitioning>
In the last example, a non-formatted partition is created on device /dev/sda1 of the type LVM and with the volume group system. This partition will use all space available on the drive.
Example 4.10. LVM Logical Volumes (New syntax)
  <partitioning config:type="list">
    <drive>
      <device>/dev/sda</device>
      <partitions config:type="list">
	<partition>
	  <lvm_group>system</lvm_group>
	  <partition_type>primary</partition_type>
	  <size>max</size>
	</partition>
      </partitions>
      <use>all</use>
    </drive>
    <drive>
      <device>/dev/system</device>
      <is_lvm_vg config:type="boolean">true</is_lvm_vg>
      <partitions config:type="list">
	<partition>
	  <filesystem config:type="symbol">reiser</filesystem>
	  <lv_name>user_lv</lv_name>
	  <mount>/usr</mount>
	  <size>500mb</size>
	</partition>
	<partition>
	  <filesystem config:type="symbol">reiser</filesystem>
	  <lv_name>opt_lv</lv_name>
	  <mount>/opt</mount>
	  <size>1500mb</size>
	</partition>
	<partition>
	  <filesystem config:type="symbol">reiser</filesystem>
	  <lv_name>var_lv</lv_name>
	  <mount>/var</mount>
	  <size>200mb</size>
	</partition>
      </partitions>
      <pesize>4M</pesize>
      <use>all</use>
    </drive>
  </partitioning>
With SUSE Linux 10.1 and all following versions, it is possible to set the size to max for the logical volumes. Of course, you can only use max for one(!) logical volume. You cannot set two logical volumes in one volume group to sizemax
4.4.8. Enterprise Volume Management System (EVMS) — SLES10 only! 
SLES10 AutoYaST has EVMS support. SLES11 has not!
Using EVMS is quite similar to using LVM (see above). Switching from LVM to EVMS is just a small change in the AutoYaST profile. Change the "is_lvm_vg" element to "is_evms_vg" and the "lvm_group" element to "evms_group".
With AutoYaST it is not possible to mix LVM and EVMS.
Using the LVM example from above for EVMS, looks like this:
Example 4.11. EVMS Logical Volumes
  <partitioning config:type="list">
    <drive>
      <device>/dev/sda</device>
      <partitions config:type="list">
	<partition>
	  <evms_group>system</evms_group>
	  <partition_type>primary</partition_type>
	  <size>max</size>
	</partition>
      </partitions>
      <use>all</use>
    </drive>
    <drive>
      <device>/dev/system</device>
      <is_evms_vg config:type="boolean">true</is_evms_vg>
      <partitions config:type="list">
	<partition>
	  <filesystem config:type="symbol">reiser</filesystem>
	  <lv_name>user_lv</lv_name>
	  <mount>/usr</mount>
	  <size>500mb</size>
	</partition>
	<partition>
	  <filesystem config:type="symbol">reiser</filesystem>
	  <lv_name>opt_lv</lv_name>
	  <mount>/opt</mount>
	  <size>1500mb</size>
	</partition>
	<partition>
	  <filesystem config:type="symbol">reiser</filesystem>
	  <lv_name>var_lv</lv_name>
	  <mount>/var</mount>
	  <size>200mb</size>
	</partition>
      </partitions>
      <pesize>4M</pesize>
      <use>all</use>
    </drive>
  </partitioning>
4.4.9. Software RAID
Using AutoYaST, you can create and assemble software RAID devices. The supported RAID levels are the following:
-
RAID 0: This level increases your disk performance. There is no redundancy in this mode. If one of the drives crashes, data recovery will not be possible.
-
RAID 1:This mode offers the best redundancy. It can be used with two or more disks. An exact copy of all data is maintained on all disks. As long as at least one disk is still working, no data is lost. The partitions used for this type of RAID should have approximately the same size.
-
RAID 5: This mode combines management of a larger number of disks and still maintains some redundancy. This mode can be used on three disks or more. If one disk fails, all data is still intact. If two disks fail simultaneously, all data is lost.
-
Multipath:This mode allows access to the same physical device via multiple controllers for redundancy against a fault in a controller card. This mode can be used with at least two devices.
As with LVM, you need to create all RAID partitions first and assign the partitions to the RAID device you want to create. Additionally you need to specify whether a partition or a device should be configured in the RAID or if it should be configured as a Spare device.
The following example shows a simple RAID1 configuration:
Example 4.12. RAID1 configuration
  <partitioning config:type="list">
    <drive>
      <device>/dev/sda</device>
      <partitions config:type="list">
	<partition>
	  <partition_id config:type="integer">253</partition_id>
	  <format config:type="boolean">false</format>
	  <raid_name>/dev/md0</raid_name>
	  <raid_type>raid</raid_type>
	  <size>4gb</size>
	</partition>

	<!-- Here come the regular partitions, i.e. / and swap -->
      </partitions>
      <use>all</use>
    </drive>
    <drive>
      <device>/dev/sdb</device>

      <partitions config:type="list">
	<partition>
	  <format config:type="boolean">false</format>
	  <partition_id config:type="integer">253</partition_id>
	  <raid_name>/dev/md0</raid_name>
	  <raid_type>raid</raid_type>
	  <size>4gb</size>
	</partition>
      </partitions>
      <use>all</use>
    </drive>
    <drive>
      <device>/dev/md</device>
      <partitions config:type="list">
	<partition>
	  <filesystem config:type="symbol">reiser</filesystem>
	  <format config:type="boolean">true</format>
	  <mount>/space</mount>
	  <partition_id config:type="integer">131</partition_id>
	  <partition_nr config:type="integer">0</partition_nr>
	  <raid_options>
	    <chunk_size>4</chunk_size>
	    <parity_algorithm>left-asymmetric</parity_algorithm>
	    <raid_type>raid1</raid_type>
	  </raid_options>

	</partition>
      </partitions>
      <use>all</use>
    </drive>

  </partitioning>
Consider the following when configuring raid:
-
The device for raid is always /dev/md
-
The property partition_nr is used to determine the MD device number. If partition_nr is equal to 0, then /dev/md0 is configured.
-
All RAID-specific options are contained in the raid_options resource.
4.4.10. IBM System z Specific Configuration
4.4.10.1. Configuring DASD Disks
The following elements must be between the
<dasd>
 <devices config:type="list">
  <listentry>
   ...
  </listentry>
 </devices>
</dasd>
tags in the <profile> section. Each disk needs to be configured in a separate <listentry> ... </listentry> section.
| Attribute |
Values |
Description |
|---|---|---|
| device |
<device >DASD</dev_name> |
|
| dev_name |
The device ( <dev_name >/dev/dasda</dev_name> |
Optional but recommended. If left out, AutoYaST tries to guess the device. |
| channel |
Channel by which the disk is accessed. <channel>0.0.0150</channel> |
Mandatory. |
| diag |
Enable or disable the use of <diag config:type="boolean">true</diag> |
Optional. |
4.4.10.2. Configuring zFCP Disks
The following elements must be between the
<zfcp>
 <devices config:type="list">
  <listentry>
   ...
  </listentry>
 </devices>
</zfcp>
tags in the <profile> section. Each disk needs to be configured in a separate <listentry> ... </listentry> section.
| Attribute |
Values |
Description |
|---|---|---|
| controller_id |
Channel number <controller_id >0.0.fc00</controller_id> |
|
| fcp_lun |
Logical unit number <fcp_lun >0x4010400400000000</fcp_lun> |
|
| wwpn |
World wide port number <wwpn >0x500507630510473a</wwpn> |
4.5. Software 
4.5.1. Package Selections with Patterns 
SLES10 no longer supports selections but uses patterns. AutoYaST cannot convert selections to patterns. If you want to use a SLES9 AutoYaST profile to install a SLES10 server, you have to remove all addon entries and the base entry. Patterns are configured like this:
Example 4.13. Package Selection in Control File with Patterns
  <software>
    <patterns config:type="list">
        <pattern>directory_server</pattern>
    </patterns>
    <packages  config:type="list">
      <package>apache</package>
      <package>sendmail</package>
    </packages>
    <do_online_update config:type="boolean">true</do_online_update>  <!-- since openSUSE 11.1 -->
  </software>
The packages section is still the same as on a SLES9. Just the addon and base sections are gone.
4.5.2. Deploying Images 
This feature is available since openSUSE 11.1 but not in SLES11.
Since openSUSE 11.0 you can use images during installation to speed up the installation. This feature is available in openSUSE 11.1 as well.
Example 4.14. Activating Image Deployment
   <!-- since openSUSE 11.1 -->
   <!-- note! this is not in the software section! -->
  <deploy_image>
      <image_installation config:type="boolean">false</image_installation>
  </deploy_image>
4.5.3. Installing Additional and Customized Packages 
In addition to the packages available for installation on the CD-ROMs, you can add external packages including customized kernels. Customized kernel packages must be compatible to the SuSE packages and must install the kernel files to the same locations.
Unlike in earlier in versions, you do not need a special resource in the control file to install custom and external packages. Instead you need to re-create the package database and update it with any new packages or new package versions in the source repository.
A script is provided for this task which will query packages available in the repository and create the package database. Use the command /usr/bin/create_package_descr. When creating the database, all languages will be reset to English.
Example 4.15. Creating Package Database
cd /usr/local/CDs/LATEST/suse
	create_package_descr  -x PATH_TO_EXTRA_PROV -d /usr/local/CDs/LATEST/suse
In the above example, the directory /usr/local/CDs/LATEST/suse contains the architecture dependent and independent packages, i.e. noarch and i586. This might look different on other architectures.
The advantage of this method is that you can keep an up-to-date repository with fixed and updated package (e.g. from SuSE FTP server). Additionally this method makes the creation of custom CD-ROMs easier.
| Changes starting with SUSE Linux 10.1/SLES 10 | |
|---|---|
| With SLES10/SL10.1, the concept of adding your own RPMs to an installation source has changed. Neither yast/order nor yast/instorder are supported any longer by AutoYaST or by YaST. To add your own RPMs to an installation source (or add-on products like the SDK), add a file add_on_products to CD1 of the main product. media_url [path_on_media [product_1 [product_2 [....]]] media_url is the URL of the media, path_on_media is the path to the catalog on the media. If not present, / (root) is assumed. product_1 and following are the names of products, which should be marked for installation. If no product is specified, all products found on the media are selected for installation. For example: http://192.168.66.6/SLES10/sdk/CD1
http://192.168.66.6/SLES10/CD1/updates Besides the add_on_products file, you can use the AutoYaST profile to specify add-on products. For example: <add-on>
<add_on_products config:type="list">
<listentry>
<media_url>http://192.168.66.6/SLES10/CD1/updates</media_url>
<product>SuSE-Linux-Updates</product>
<product_dir>/</product_dir>
<ask_on_error config:type="boolean">false</ask_on_error> <!-- available since openSUSE 11.0 -->
<name>MyUpdates</name> <!-- available since openSUSE 11.1/SLES11 (bnc#433981) -->
</listentry>
</add_on_products>
</add-on> With this entry in the AutoYaST profile, the add_on_products file is not necessary. Since openSUSE 11.0, AutoYaST can ask the user to make add-on products available instead of reporting a time-out error when an add-on product cannot be found at the given location. Set ask_on_error to "true" (the default is "false"). Then your add-on product can be on a different CD/DVD than the installation source. YaST checks the signatures of files on the installation source. If a content file is not signed, during a manual installation YaST asks the user what to do. During an automatic installation, the installation source is rejected silently. |
|
If you want to use unsigned installation sources with AutoYaST, turn off the checks with the following configuration in your AutoYaST profile (part of the general section.
The following elements must be between the <general><signature-handling> ... </signature-handling></general> tags.
| Attribute |
Values |
Description |
|---|---|---|
| accept_unsigned_file |
If set to "true", AutoYaST will accept unsigned files like the content file. <accept_unsigned_file config:type="boolean" >true</accept_unsigned_file> |
Optional. If left out, AutoYaST lets YaST decide what to do. |
| accept_file_without_checksum |
If set to "true", AutoYaST will accept files without a checksum in the content file. <accept_file_without_checksum config:type="boolean" >true</accept_file_without_checksum> |
Optional. If left out, AutoYaST lets YaST decide what to do. |
| accept_verification_failed |
If set to "true", AutoYaST will accept signed files even when the verification of the signature failed. <accept_verification_failed config:type="boolean" >true</accept_verification_failed> |
Optional. If left out, AutoYaST lets YaST decide what to do. |
| accept_unknown_gpg_key |
If set to "true", AutoYaST will accept new gpg keys on the installation source, for example the key used to sign the content file. <accept_unknown_gpg_key config:type="boolean" >true</accept_unknown_gpg_key> |
Optional. If left out, AutoYaST lets YaST decide what to do. |
| accept_non_trusted_gpg_key |
This basically means, we know the key, but it is not trusted. <accept_non_trusted_gpg_key config:type="boolean" >true</accept_non_trusted_gpg_key> |
Optional. If left out, AutoYaST lets YaST decide what to do. |
| import_gpg_key |
If set to "true", AutoYaST will accept and import new gpg keys on the installation source in its database. <import_gpg_key config:type="boolean" >true</import_gpg_key> |
Optional. If left out, AutoYaST lets YaST decide what to do. |
Since openSUSE 10.3, it is possible to configure the signature handling for each add-on product individually. The following elements must be between the <signature-handling> section of the individual add-on product.
| Attribute |
Values |
Description |
|---|---|---|
| accept_unsigned_file |
If set to "true", AutoYaST will accept unsigned files like the content file for this add-on product. <accept_unsigned_file config:type="boolean" >true</accept_unsigned_file> |
Optional. If left out, the global signature-handing in the <general> section is used. |
| accept_file_without_checksum |
If set to "true", AutoYaST will accept files without a checksum in the content file for this add-on. <accept_file_without_checksum config:type="boolean" >true</accept_file_without_checksum> |
Optional. If left out, the global signature-handing in the <general> section is used. |
| accept_verification_failed |
If set to "true", AutoYaST will accept signed files even when the verification of the signature fails. <accept_verification_failed config:type="boolean" >true</accept_verification_failed> |
Optional. If left out, the global signature-handing in the <general> section is used. |
| accept_unknown_gpg_key |
If set to "true", AutoYaST will accept new gpg keys on the installation source, for example the key used to sign the content file. <accept_unknown_gpg_key>
<all config:type="boolean">false</all>
<keys config:type="list">
<keyid>3B3011B76B9D6523</keyid>
</keys>
</accept_unknown_gpg_key> |
Optional. If left out, the global signature-handing in the <general> section is used. |
| accept_non_trusted_gpg_key |
This basically means, we know the key, but it is not trusted. <accept_non_trusted_gpg_key>
<all config:type="boolean">false</all>
<keys config:type="list">
<keyid>3B3011B76B9D6523</keyid>
</keys>
</accept_non_trusted_gpg_key> |
optional. If left out, the global signature-handing in the <general> section is used. |
| import_gpg_key |
If set to "true", AutoYaST will accept and import new gpg keys on the installation source into its database. <import_gpg_key>
<all config:type="boolean">false</all>
<keys config:type="list">
<keyid>3B3011B76B9D6523</keyid>
</keys>
</import_gpg_key> |
Optional. If left out, the global signature-handing in the <general> section is used. |
4.5.4. Kernel Packages
Kernel packages are not part of any selection. The required kernel is determined during installation. If the kernel package is added to any selection or to the individual package selection, installation will mostly fail due to conflicts.
To force the installation of a specific kernel, use the kernel property. The following is an example of forcing the installation of the default kernel. This kernel will be installed even if an SMP or other kernel is required.
Example 4.16. Package Selection in Control File
  <software>
    <kernel>kernel-default</kernel>
    <packages  config:type="list">
      <package>apache2</package>
    </packages>
  </software>
4.5.5. Removing Automatically Selected Packages
Some packages are selected automatically either because of a dependency or because it is available in a selection.
Removing such packages might break the system consistency and it is not recommended to remove basic packages unless a replacement which provides the same services is provided. The best example for this case are MTA packages. By default, postfix will be selected and installed. If you wish to use another MTA like sendmail, then postfix can be removed from the list of selected package using a list in the software resource. The following example shows how this can be done:
Example 4.17. Package Selection in Control File
  <software>
    <packages  config:type="list">
      <package>sendmail</package>
    </packages>
    <remove-packages  config:type="list">
      <package>postfix</package>
    </remove-packages>
  </software>
4.5.6. Installing Packages in Stage 2
If you want to install packages after the reboot during stage 2, instead of during the normal installation process in stage 1, you can use the post-packages element for that:
<software>
  <post-packages config:type="list">
    <package>yast2-cim</package>
  </post-packages>
</software>
4.5.7. Installing Patterns in Stage 2
Since SLES11 and openSUSE 11.1, you can also install patterns in stage 2. Use the post-patterns element for that:
<software>
  <post-patterns config:type="list">
    <pattern>apparmor</pattern>
  </post-patterns>
</software>
4.5.8. Online Update in Stage 2
Since openSUSE 11.1, you can perform an online update at the end of the installation. Set the boolean do_online_update to "true". Of course this makes only sense if you add an online update repository in the suse-register/customer-center section, for example, or in a post-script. If the online update repository was available in stage 1 already via add-on section, then AutoYaST has already installed the latest packages available. If a kernel update is done via online-update, a reboot at the end of stage 2 is triggered.
<software>
  <do_online_update config:type="boolean">true</do_online_update>
</software>
4.6. Services and Runlevels 
With the runlevel resource you can set the default runlevel and specify in detail which system services you want to be started in which run-level.
The default property specifies the default runlevel of the system. Changes to the default runlevel will take effect the next time you boot the system. After the installation is completed, the system runs in runlevel 5, which is full multiuser with network and XDM. If you have configured a system with no X11, it is recommended to reboot the system after stage 1, using the reboot property in the general resource.
Specify in which runlevels a service should run via a space separated list of the runlevels, as shown in the following example. Alternatively change the status of the service by either enabling or disabling it using the service_status property.
Example 4.18. Run-level Configuration
....
  <runlevel>
   <default>3</default>
   <services config:type="list" >
    <service>
     <service_name>at</service_name>
     <service_start>3 5</service_start>
    </service>
    <service>
     <service_name>portmap</service_name>
     <service_status>enable</service_status>
    </service>
    <service>
     <service_name>hwscan</service_name>
     <service_status>disable</service_status>
    </service>
   </services>
  </runlevel>
....
4.7. Network Configuration 
4.7.1. Network Devices, DNS and Routing. 
Network configuration is used to connect a single SuSE Linux workstation to an Ethernet-based LAN or to configure a dial-up connection. More complex configurations (multiple network cards, routing, etc.) are also provided. With this module it is possible to configure and setup Ethernet controllers and Token-Ring controllers.
In the networking section, set this option to "true" (default is "false", available since openSUSE 11.2 but not in SLES11):
<keep_install_network config:type="boolean">true</keep_install_network>
YaST will keep network settings created during installation (via Linuxrc) and/or merge it with network settings from the AutoYaST profile (if defined). AutoYaST settings have higher priority than already present configuration files. YaST will write ifcfg-* files from profile without removing old ones. If there is an empty or no dns and routing section, YaST will keep already present values. Otherwise settings from the profile will be applied.
To configure network settings and activate networking automatically, one global resource is used to store the whole network configuration.
Example 4.19. Network configuration
.....
    <networking>
      <dns>
        <dhcp_hostname config:type="boolean">true</dhcp_hostname>
        <dhcp_resolv config:type="boolean">true</dhcp_resolv>
        <domain>local</domain>
        <hostname>linux</hostname>
      </dns>
      <interfaces config:type="list">
        <interface>
          <bootproto>dhcp</bootproto>
          <device>eth0</device>
          <startmode>onboot</startmode>
        </interface>
      </interfaces>
      <routing>
        <ip_forward config:type="boolean">false</ip_forward>
        <routes config:type="list">
          <route>
            <destination>default</destination>
            <device>-</device>
            <gateway>192.168.1.240</gateway>
            <netmask>-</netmask>
          </route>
        </routes>
      </routing>
      <modules config:type="list">
        <module_entry>
          <device>eth0</device>
          <module>e100</module>
          <options></options>
        </module_entry>
      </modules>
    </networking>
....
4.7.2. Proxy 
Configure your Internet proxy (caching) settings.
HTTP proxy is the name of the proxy server for your access to the world wide web (WWW). FTP proxy is the name of the proxy server for your access to the file transfer services (FTP). No proxy domains is a list of domains for which requests should be carried out directly without caching.
If you are using a proxy server with authorization, fill in Proxy user name and Proxy password.
Example 4.20. Network configuration: Proxy
<?xml version="1.0"?>
<!DOCTYPE profile>
<profile xmlns="http://www.suse.com/1.0/yast2ns" xmlns:config="http://www.suse.com/1.0/configns">
    <proxy>
      <enabled config:type="boolean">true</enabled>
      <ftp_proxy>http://192.168.1.240:3128</ftp_proxy>
      <http_proxy>http://192.168.1.240:3128</http_proxy>
      <no_proxy>localhost</no_proxy>
      <proxy_password>testpw</proxy_password>
      <proxy_user>testuser</proxy_user>
    </proxy>
</profile>
4.7.3. (X)Inetd 
The profile has elements to specify which superserver should be used (netd_service), whether it should be enabled (netd_status) and how the services should be configured (netd_conf).
A service description element has two parts: key and non-key. When writing the configuration, services are matched using the key fields; to the matching service, non-key fields are applied. If no service matches, it is created. If more services match, a warning is reported. The key fields are script, service, protocol and server.
service and protocol are matched literally. script is the base name of the config file: usually a file in /etc/xinetd.d, for example "echo-udp", or "inetd.conf". For compatibility with 8.2, server is matched more loosely: if it is /usr/sbin/tcpd, the real server name is taken from server_args. After that, the basename of the first whitespace-separated word is taken and these values are compared.
Example 4.21. Inetd Example
<profile>
  ...
  <inetd>
    <netd_service config:type="symbol">xinetd</netd_service>
    <netd_status config:type="integer">0</netd_status>
    <netd_conf config:type="list">
      <conf>
	<script>imap</script>
	<service>pop3</service>
	<enabled config:type="boolean">true</enabled>
      </conf>
      <conf>
	<server>in.ftpd</server>
	<server_args>-A</server_args>
	<enabled config:type="boolean">true</enabled>
      </conf>
      <conf>
	<service>daytime</service>
	<protocol>tcp</protocol>
      </conf>
      ....
      <conf>...</conf>
    </netd_conf>
  </inetd>
  ...
</profile>
4.8. NIS
Using the nis resource, you can configure the target machine as a NIS client. The following example shows a detailed configuration using multiple domains.
Example 4.22. Network configuration: NIS
...
    <nis>
      <nis_broadcast config:type="boolean">true</nis_broadcast>
      <nis_broken_server config:type="boolean">true</nis_broken_server>
      <nis_by_dhcp config:type="boolean">false</nis_by_dhcp>
      <nis_domain>test.com</nis_domain>
      <nis_local_only config:type="boolean">true</nis_local_only>
      <nis_options></nis_options>
      <nis_other_domains config:type="list">
        <nis_other_domain>
          <nis_broadcast config:type="boolean">false</nis_broadcast>
          <nis_domain>domain.com</nis_domain>
          <nis_servers config:type="list">
            <nis_server>10.10.0.1</nis_server>
          </nis_servers>
        </nis_other_domain>
      </nis_other_domains>
      <nis_servers config:type="list">
        <nis_server>192.168.1.1</nis_server>
      </nis_servers>
      <start_autofs config:type="boolean">true</start_autofs>
      <start_nis config:type="boolean">true</start_nis>
    </nis>
...
4.9. LDAP client 
The installed machine can be set up as an LDAP client to authenticate users with an OpenLDAP; server. Required data are the name of the search base (base DN, e.g, dc=mydomain,dc=com) and the IP address of the LDAP server (e.g., 10.20.0.2).
If LDAP is activated, NSS and PAM will be configured accordingly to use LDAP for user authentication.
Example 4.23. Network configuration: LDAP client
...
    <ldap>
      <ldap_domain> dc=mydomain,dc=com</ldap_domain>
      <ldap_server>10.10.0.1</ldap_server>
      <ldap_tls config:type="boolean">true</ldap_tls>
      <ldap_v2 config:type="boolean">true</ldap_v2>
      <pam_password>crypt</pam_password>
      <start_ldap config:type="boolean">true</start_ldap>
    </ldap>
...
4.10. NFS Client and Server 
Configuring a system as an NFS client or an NFS server is can be done using the configuration system. The following examples show how both NFS client and server can be configured.
Up to SLE11 and openSUSE 11.2, the following structure of NFS client configuration has been used:
Example 4.24. Network Configuration: NFS Client
...
    <nfs config:type="list">
      <nfs_entry>
        <mount_point>/home</mount_point>
        <nfs_options>defaults</nfs_options>
        <server_path>192.168.1.1:/home</server_path>
      </nfs_entry>
    </nfs>
...
From openSUSE 11.3 (SLE12 respectively) on, the structure of NFS client configuration has changed. Some global configuration options were introduced: enable_nfs4 to switch NFS4 support on/off and idmapd_domain to define domain name for rpc.idmapd (this only makes sense with enabled NFS4). Attention: the old structure is not compatible with the new one and the profiles with an NFS section created on older releases will not work with newer products.
Example 4.25. Network Configuration: NFS Client - New Style (openSUSE 11.3 and newer)
...
  <nfs>
    <enable_nfs4 config:type="boolean">true</enable_nfs4>
    <idmapd_domain>suse.cz</idmapd_domain>
    <nfs_entries config:type="list">
      <nfs_entry>
        <mount_point>/home</mount_point>
        <nfs_options>sec=krb5i,intr,rw</nfs_options>
        <server_path>saurus.suse.cz:/home</server_path>
        <vfstype>nfs4</vfstype>
      </nfs_entry>
      <nfs_entry>
        <mount_point>/work</mount_point>
        <nfs_options>defaults</nfs_options>
        <server_path>bivoj.suse.cz:/work</server_path>
        <vfstype>nfs</vfstype>
      </nfs_entry>
      <nfs_entry>
        <mount_point>/mnt</mount_point>
        <nfs_options>defaults</nfs_options>
        <server_path>fallback.suse.cz:/srv/dist</server_path>
        <vfstype>nfs</vfstype>
      </nfs_entry>
    </nfs_entries>
  </nfs>
...
Example 4.26. Network Configuration: NFS Server
....
    <nfs_server>
      <nfs_exports config:type="list">
        <nfs_export>
          <allowed config:type="list">
            <allowed_clients>*(ro,root_squash,sync)</allowed_clients>
          </allowed>
          <mountpoint>/home</mountpoint>
        </nfs_export>
        <nfs_export>
          <allowed config:type="list">
            <allowed_clients>*(ro,root_squash,sync)</allowed_clients>
          </allowed>
          <mountpoint>/work</mountpoint>
        </nfs_export>
      </nfs_exports>
      <start_nfsserver config:type="boolean">true</start_nfsserver>
    </nfs_server>
....
4.11. NTP Client 
Select whether to start the NTP daemon when booting the system. The NTP daemon resolves host names when initializing. The first synchronization of the clock is performed before the NTP daemon is started. To use this host for initial synchronization, configure the property initial_sync.
To run NTP daemon in chroot jail, set start_in_chroot. Starting any daemon in a chroot jail is more secure and strongly recommended. To adjust NTP servers, peers, local clocks, and NTP broadcasting, add the appropriate entry to the control file. An example of various configuration options is shown below.
Example 4.27. Network configuration: NTP Client
<?xml version="1.0"?>
<!DOCTYPE profile>
<profile xmlns="http://www.suse.com/1.0/yast2ns" xmlns:config="http://www.suse.com/1.0/configns">
    <ntp-client>
      <configure_dhcp config:type="boolean">false</configure_dhcp>
      <peers config:type="list">
        <peer>
          <address>ntp1.example.com</address>
          <initial_sync config:type="boolean">true</initial_sync>
          <options></options>
          <type>server</type>
        </peer>
      </peers>
      <start_at_boot config:type="boolean">true</start_at_boot>
      <start_in_chroot config:type="boolean">true</start_in_chroot>
    </ntp-client>
</profile>
4.12. Mail Configuration (Sendmail or Postfix) 
For the mail configuration of the client, this module lets you create a detailed mail configuration. The module contains various options. We recommended you use it at least for the initial configuration.
Example 4.28. Mail Configuration
...
    <mail>
      <aliases config:type="list">
        <alias>
          <alias>root</alias>
          <comment></comment>
          <destinations>foo</destinations>
        </alias>
        <alias>
          <alias>test</alias>
          <comment></comment>
          <destinations>foo</destinations>
        </alias>
      </aliases>
      <connection_type config:type="symbol">permanent</connection_type>
      <fetchmail config:type="list">
        <fetchmail_entry>
          <local_user>foo</local_user>
          <password>bar</password>
          <protocol>POP3</protocol>
          <remote_user>foo</remote_user>
          <server>pop.foo.com</server>
        </fetchmail_entry>
        <fetchmail_entry>
          <local_user>test</local_user>
          <password>bar</password>
          <protocol>IMAP</protocol>
          <remote_user>test</remote_user>
          <server>blah.com</server>
        </fetchmail_entry>
      </fetchmail>
      <from_header>test.com</from_header>
      <listen_remote config:type="boolean">true</listen_remote>
      <local_domains config:type="list">
        <domains>test1.com</domains>
      </local_domains>
      <masquerade_other_domains config:type="list">
        <domain>blah.com</domain>
      </masquerade_other_domains>
      <masquerade_users config:type="list">
        <masquerade_user>
          <address>[email protected]</address>
          <comment></comment>
          <user>joeuser</user>
        </masquerade_user>
        <masquerade_user>
          <address>[email protected]</address>
          <comment></comment>
          <user>foo</user>
        </masquerade_user>
      </masquerade_users>
      <mta config:type="symbol">postfix</mta>
      <outgoing_mail_server>test.com</outgoing_mail_server>
      <postfix_mda config:type="symbol">local</postfix_mda>
      <smtp_auth config:type="list">
        <listentry>
          <password>bar</password>
          <server>test.com</server>
          <user>foo</user>
        </listentry>
      </smtp_auth>
      <use_amavis config:type="boolean">true</use_amavis>
      <virtual_users config:type="list">
        <virtual_user>
          <alias>test.com</alias>
          <comment></comment>
          <destinations>foo.com</destinations>
        </virtual_user>
        <virtual_user>
          <alias>geek.com</alias>
          <comment></comment>
          <destinations>bar.com</destinations>
        </virtual_user>
      </virtual_users>
    </mail>
...
4.13. Security settings 
Using the features of this module, you will be able to change the local security settings on the target system. The local security settings include the boot configuration, login settings, password settings, user addition settings, and file permissions.
Configuring the security settings automatically corresponds to the Custom Settings in the security module available in the running system which lets you create your own, customized configuration.
Example 4.29. Security configuration
See the reference for the meaning and the possible values of the settings in the following example.
...
   <security>
      <console_shutdown>ignore</console_shutdown>
      <cwd_in_root_path>no</cwd_in_root_path>
      <displaymanager_remote_access>no</displaymanager_remote_access>
      <fail_delay>3</fail_delay>
      <faillog_enab>yes</faillog_enab>
      <gid_max>60000</gid_max>
      <gid_min>101</gid_min>
      <kdm_shutdown>root</kdm_shutdown>
      <lastlog_enab>yes</lastlog_enab>
      <encryption>md5</encryption>
      <obscure_checks_enab>no</obscure_checks_enab>
      <pass_max_days>99999</pass_max_days>
      <pass_max_len>8</pass_max_len>
      <pass_min_days>1</pass_min_days>
      <pass_min_len>6</pass_min_len>
      <pass_warn_age>14</pass_warn_age>
      <passwd_use_cracklib>yes</passwd_use_cracklib>
      <permission_security>secure</permission_security>
      <run_updatedb_as>nobody</run_updatedb_as>
      <uid_max>60000</uid_max>
      <uid_min>500</uid_min>
  </security>
...
4.13.1. Password Settings Options
Change various password settings. These settings are mainly stored in the /etc/login.defs file.
Use this resource to activate one of the encryption methods currently supported. If not set, DES is configured.
DES, the Linux default method, works in all network environments, but it restricts you to passwords no longer than eight characters. MD5 allows longer passwords, thus provides more security, but some network protocols don't support this, and you may have problems with NIS. Blowfish is also supported.
Additionally, you can setup the system to check for password plausibility and length etc.
4.13.2. Boot Settings
Use the security resource, you can change various boot settings.
-
How to interpret Ctrl + Alt + Del
When someone at the console has pressed the CTRL + ALT + DEL key combination, the system usually reboots. Sometimes it is desirable to ignore this event, for example, when the system serves as both workstation and server.
-
Shutdown behavior of KDM
Set who is allowed to shut down the machine from KDM.
4.13.3. Login Settings
Change various login settings. These settings are mainly stored in the '/etc/login.defs' file.
4.13.4. New user settings (useradd settings)
Set the minimum and maximum possible user ID and set the minimum and maximum possible group ID.
4.14. Monitor and X11 Configuration 
| Since openSUSE 11.2 there is not AutoYaST client for X11 configuration anymore. You can still have the X11 section in your profile but it will be ignored. SLES11 SP1 still has a X11 client. |
|
FIXME
Example 4.30. X11 and Monitor configuration (deprecated since openSUSE 11.2)
...
  <x11>
    <color_depth>16</color_depth>
    <configure_x11 config:type="boolean">true</configure_x11>
    <display_manager>kde</display_manager>
    <enable_3d config:type="boolean">false</enable_3d>
    <monitor>
      <display>
        <frequency config:type="integer">60</frequency>
        <max_hsync config:type="integer">97</max_hsync>
        <max_vsync config:type="integer">180</max_vsync>
        <min_hsync config:type="integer">30</min_hsync>
        <min_vsync config:type="integer">50</min_vsync>
        <width config:type="integer">1024</width>
      </display>
      <monitor_device>G90F</monitor_device>
      <monitor_vendor>VIEWSONIC</monitor_vendor>
    </monitor>
    <resolution>1600x1200,1280x1024,1024x768,800x600,640x480</resolution>
    <window_manager>kdm</window_manager>
  </x11>


...
4.15. Users 
The root user and at least one normal user can be added during install using data supplied in the control file. User data and passwords (encrypted or in clear text) are part of the configure resource in the control file.
At least the root user should be configured during auto-installation so you can login after the installation is finished. It will also ensure nobody else can login to the system (in case the password is not set).
The two users in the following example are added during system configuration.
Example 4.31. User Configuration
...
   <users config:type="list">
      <user>
         <username>root</username>
         <user_password>password</user_password>
         <encrypted config:type="boolean">true</encrypted>
         <forename/>
         <surname/>
      </user>
      <user>
         <username>nashif</username>
         <user_password>password</user_password>
         <encrypted config:type="boolean">true</encrypted>
         <forename>Anas</forename>
         <surname>Nashif</surname>
      </user>
   </users>
...
The last example shows the minimal information required for adding users. Additional options are available for a more customized user account management. The data in /etc/default/useradd is used to determine the home directory of the user to be created as well as other parameters.
4.16. Custom User Scripts
By adding scripts to the auto-installation process you can customize the installation according to your needs and take control in different stages of the installation.
In the auto-installation process, five types of scripts can be executed and they will be described here in order of "appearance" during the installation.
All scripts have to be in the <scritps> section.
-
pre-scripts (very early, before anything else really happens)
-
postpartitioning-scripts (after partitioning and mounting to /mnt but before RPM installation—since openSUSE 11.2)
-
chroot-scripts (after the package installation, before the first boot)
-
post-scripts (during the first boot of the installed system, no services running)
-
init-scripts (during the first boot of the installed system, all services up and running)
4.16.1. Pre-Install Scripts
Executed before YaST does any real change to the system (before partitioning and package installation but after the hardware detection).
You can use a pre-script to modify your profile and let AutoYaST reread it. Find your profile in "/tmp/profile/autoinst.xml". Adjust the file and store the modified version in "/tmp/profile/modified.xml". AutoYaST will read the modified file after the pre-script finishes.
With SUSE Linux 10.0 and all later versions, it is possible to change the partitioning with fdisk in your pre-script. With pre-10.0 versions of SUSE Linux (like SLES9), this was not possible.
| Pre-Install Scripts with Confirmation | |
|---|---|
| Pre-scripts are executed at an early stage of the installation. This means if you have requested to confirm the installation, the pre-scripts will be executed before the confirmation screen shows up (profile/install/general/mode/confirm). |
|
The following elements must be between the <scripts><pre-scripts config:type="list"><script> ... </script></pre-scripts>...</scripts> tags.
Table 4.1. Pre-script XML Representation
| Element |
Description |
Comment |
|---|---|---|
| location |
Define a location from where the script gets fetched. Locations can be the same as for the profile (http, ftp, nfs, etc.). <location >http://10.10.0.1/myPreScript.sh</location> |
Either <location> or <source> must be defined. |
| source |
The script itself (source code), encapsulated in a CDATA tag. If you do not want to put the whole shell script into the XML profile, refer to the location parameter. <source> <![CDATA[ echo "Testing the pre script" > /tmp/pre-script_out.txt ]]> </source> |
Either <location> or <source> must be defined. |
| interpreter |
Specify the interpreter that must be used for the script. Supported options are shell and perl. <interpreter>perl</interpreter> |
Optional (default is "shell"). |
| filename |
The filename of the script. It will be stored in a temporary directory under /tmp/... <filename>myPreScript5.sh</filename> |
Optional. Default is the type of the script (pre-scripts in this case). If you have more than one script, you should set the filename to a reasonable value. |
| feedback |
If this boolean is "true", stdout and stderr of the script will be shown in a popup, which the user has to confirm via the OK button. If stdout and stderr are empty, no popup is shown and therefore no confirmation is needed. <feedback config:type="boolean" >true</feedback> |
Optional, default is "false". This option was introduced with SL 10.1/SLES10. |
| feedback_type |
This can be "message", "warning" or "error". Set the timeout for these popups in the <report> section. <feedback_type>warning</feedback_type> |
Optional, if missing, an always blocking popup is used. This option was introduced with openSUSE 11.2 (not SLES11). |
| debug |
If this is "true", every single line of a shell script is logged. Perl scripts are run with warnings turned on. <debug config:type="boolean">true</debug> |
Optional, default is "true". This option was introduced with SL 10.1/SLES10. |
| notification |
This text will be shown in a popup for the time the script is running in the background. <notification>Please wait while script is running...</notification> |
Optional, if not configured, no notification popup will be shown. This option was introduced with openSUSE 11.3/SLES11 SP2 (not SLES10). |
| rerun |
A script is only run once. Even if you use ayast_setup to run a XML file multiple times, the script is only run once. Change this default behavior by setting this boolean to "true". <rerun config:type="boolean">true</rerun> |
Optional, default is "false" (scripts only run once). |
4.16.2. Postpartitioning Scripts
| Available since openSUSE 11.2 only (not SLES11). |
|
Executed after YaST has done the partitioning and written the fstab. The empty system is mounted to /mnt already.
The following elements must be between the <scripts><postpartitioning-scripts config:type="list"><script> ... </script></postpartitioning-scripts>...</scripts> tags
Table 4.2. Postpartitioning Script XML Representation
| Element |
Description |
Comment |
|---|---|---|
| location |
Define a location from where the script gets fetched. Locations can be the same as for the profile (http, ftp, nfs, etc.). <location >http://10.10.0.1/myScript.sh</location> |
Either <location> or <source> must be defined. |
| source |
The script itself (source code), encapsulated in a CDATA tag. If you don't want to put the whole shell script into the XML profile, refer to the location parameter. <source> <![CDATA[ echo "Testing postpart script" > /mnt/postpart_test.txt ]]> </source> |
Either <location> or <source> must be defined. |
| interpreter |
The interpreter that must be used for the script. Supported options are shell and perl. <interpreter>perl</interpreter> |
Optional, default is "shell". |
| filename |
The filename of the script. It will be stored in a temporary directory under /tmp/... <filename>myScript5.sh</filename> |
Optional, default is the type of the script (postpartitioning-scripts in this case). If you have more than one script, set the filename to a reasonable value. |
| feedback |
If this boolean is "true", stdout and stderr of the script will be shown in a popup, which the user has to confirm via the OK button. If stdout and stderr are empty, no popup is shown and therefore no confirmation is needed. <feedback config:type="boolean" >true</feedback> |
Optional, the default is "false". This option was introduced with SL 10.1/SLES10. |
| feedback_type |
This can be "message", "warning" or "error". Set the timeout for these popups in the <report> section. <feedback_type>warning</feedback_type> |
Optional, if missing, an always blocking popup is used. This option was introduced with openSUSE 11.2 (not SLES11). |
| debug |
If this is "true", every single line of a shell script is logged. Perl scripts are run with warnings turned on. <debug config:type="boolean">true</debug> |
Optional, default is "true". This option was added with SL 10.1/SLES10. |
| notification |
This text will be shown in a popup for the time the script is running in the background. <notification>Please wait while script is running...</notification> |
Optional, if not configured, no notification popup will be shown. This option was added with openSUSE 11.3/SLES11 SP2 (not SLES10). |
| rerun |
A script is only run once. Even if you use ayast_setup to run a XML file multiple times, the script is only run once. Set this boolean to "true" if you want to change this default behavior. <rerun config:type="boolean">true</rerun> |
Optional, default is false (scripts only run once). |
4.16.3. Chroot Environment Scripts
Chroot scripts are executed before the machine reboots for the first time. You can execute chroot scripts before the installation chroots into the installed system and configures the boot loader or you can execute a script after the chroot into the installed system has happened (look at the "chrooted" parameter for that).
The following elements must be between the <scripts><chroot-scripts config:type="list"><script> ... </script></chroot-scripts>...</scripts> tags
Table 4.3. Chroot Script XML Representation
| Element |
Description |
Comment |
|---|---|---|
| location |
Define a location from where the script gets fetched. Locations can be the same as for the profile (http, ftp, nfs, etc.). <location >http://10.10.0.1/myChrootScript.sh</location> |
Either <location> or <source> must be defined. |
| source |
The script itself (source code), encapsulated in a CDATA tag. If you do not want to put the whole shell script into the XML profile, use the location parameter. <source> <![CDATA[ echo "Testing the chroot script" > /tmp/chroot_out.txt ]]> </source> |
Either <location> or <source> must be defined. |
| chrooted |
This value can be "true" or "false". If set to "false", the installed system remains mounted at "/mnt" and no chroot happens. The bootloader is not installed either at this stage. Set to "true" means, a chroot into /mnt is performed, where the installed system is mounted. The bootloader is installed, and if you want to change anything in the installed system, you don't have to use the "/mnt/" prefix anymore. <chrooted config:type="boolean" >true</chrooted> |
Optional, default is "false". |
| interpreter |
The interpreter that must be used for the script. Supported options are shell and perl. If you are in a chrooted=true condition, you can also use python if installed. <interpreter>perl</interpreter> |
Optional, default is shell. |
| filename |
The filename of the script. It will be stored in a temporary directory under /tmp/... <filename>myPreScript5.sh</filename> |
Optional, default is the type of the script (chroot-scripts in this case). If you have more than one script, you should set the filename to a reasonable value. |
| feedback |
If this boolean is "true", stdout and stderr of the script will be shown in a popup, which the user has to confirm via the OK button. If stdout and stderr are empty, no popup is shown and therefore no confirmation is needed. <feedback config:type="boolean" >true</feedback> |
Optional, default is "false". This option was added with SL 10.1/SLES10. |
| feedback_type |
This can be "message", "warning" or "error". Set the timeout for these popups in the <report> section. <feedback_type>warning</feedback_type> |
Optional, if missing, an always blocking popup is used. This option was introduced with openSUSE 11.2 (not SLES11). |
| debug |
If this is true, every single line of a shell script is logged. Perl scripts are run with warnings turned on. <debug config:type="boolean">true</debug> |
Optional, default is "true". This option was added with SL 10.1/SLES10. |
| notification |
This text will be shown in a popup for the time the script is running in the background. <notification>Please wait while script is running...</notification> |
Optional, if not configured, no notification popup will be shown. This option was added with openSUSE 11.3/SLES11 SP2 (not SLES10). |
| rerun |
A script is only run once. Even if you use ayast_setup to run a XML file multiple times, the script is only run once. You can change the default behavior by setting this boolean to "true". <rerun config:type="boolean">true</rerun> |
Optional, default is "false" (scripts only run once). |
4.16.4. Post-Install Scripts
These scripts are executed after AutoYaST has completed the system configuration and after it has booted the system for the first time.
It is possible to execute post scripts in an earlier phase while the installation network is still up and before AutoYaST configures the system. To run network-enabled post scripts, the boolean property network_needed has to be set to "true".
The following elements must be between the <scripts><post-scripts config:type="list"><script> ... </script></post-scripts>...</scripts> tags.
Table 4.4. Post Script XML Representation
| Element |
Description |
Comment |
|---|---|---|
| location |
Define a location from where the script gets fetched. Locations can be the same as for the profile (http, ftp, nfs, etc.). <location >http://10.10.0.1/myPostScript.sh</location> |
Either <location> or <source> must be defined. |
| source |
The script itself (source code), encapsulated in a CDATA tag. If you do not want to put the whole shell script into the XML profile, use the location parameter. <source> <![CDATA[ echo "Testing the chroot script" > /tmp/chroot_out.txt ]]> </source> |
Either <location> or <source> must be defined. |
| network_needed |
This value can be "true" or "false". On "false" the script will run after the YaST modules like the user configuration and everything else are done. The network is configured but not up and running yet. With this value set to "true", the script runs before all YaST modules are configured. So there is no local user and no network is configured but the installation network is still up and running (if you did a network installation). <network_needed config:type="boolean" >true</network_needed> |
Optional, default is "false". |
| interpreter |
The interpreter that must be used for the script. Supported options are shell, perl and python if installed. <interpreter>perl</interpreter> |
Optional, default is shell. |
| filename |
The filename of the script. It will be stored in a temporary directory under /tmp/... <filename>myPostScript5.sh</filename> |
Optional, default is the type of the script (post-scripts in this case). If you have more than one script, set the filename to a reasonable value. |
| feedback |
If this boolean is "true", stdout and stderr of the script will be shown in a popup, which the user has to confirm via the OK button. If stdout and stderr are empty, no popup is shown and therefore no confirmation is needed. <feedback config:type="boolean" >true</feedback> |
Optional, default is "false". This option was added with SL 10.1/SLES10. |
| feedback_type |
This can be "message", "warning" or "error". Set the timeout for these popups in the <report> section. <feedback_type>warning</feedback_type> |
Optional, if missing, an always blocking popup is used. This option was added with openSUSE 11.2 (not SLES11). |
| debug |
If this is "true", every single line of a shell script is logged. Perl scripts are run with warnings turned on. <debug config:type="boolean">true</debug> |
Optional, default is "true". This option was added with SL 10.1/SLES10. |
| notification |
This text will be shown in a popup for the time the script is running in the background. <notification>Please wait while script is running...</notification> |
Optional, if not configured, no notification popup will be shown. This option was introduced with openSUSE 11.3/SLES11 SP2 (not SLES10). |
| rerun |
A script is only run once. Even if you use ayast_setup to run a XML file multiple times, the script is only run once. Change this default behavior by setting this boolean to "true". <rerun config:type="boolean">true</rerun> |
Optional, default is "false" (scripts only run once). |
4.16.5. Init Scripts
These scripts are executed when YaST has finished, during the initial boot process after the network has been initialized. These final scripts are executed using a special init.d script executed only once.
Init scripts are configured using the tag init-scripts and are run using the special purpose init.d script /etc/init.d/autoyast.
The following elements must be between the <scripts><init-scripts config:type="list"><script> ... </script></init-scripts>...</scripts> tags
Table 4.5. Init script XML representation
| Element |
Description |
Comment |
|---|---|---|
| location |
Define a location from where the script gets fetched. Locations can be the same as for the profile (http, ftp, nfs, etc.). <location >http://10.10.0.1/myInitScript.sh</location> |
Either <location> or <source> must be defined. |
| source |
The script itself (source code), encapsulated in a CDATA tag. If you do not want to put the whole shell script into the XML profile, use the location parameter. <source> <![CDATA[ echo "Testing the init script" > /tmp/init_out.txt ]]> </source> |
Either <location> or <source> must be defined. |
| filename |
The filename of the script. It will be stored in a temporary directory under /tmp/... <filename>mynitScript5.sh</filename> |
Optional, default is the type of the script (init-scripts in this case). If you have more than one script, set the filename to a reasonable value. |
| rerun |
A script is only run once. Even if you use ayast_setup to run a XML file multiple times, the script is only run once. Change this default behavior by setting this boolean to "true". <rerun config:type="boolean">true</rerun> |
Optional, default is "false" (scripts only run once). |
When added to the control file manually, scripts have to be included in a CDATA element to avoid confusion with the file syntax and other tags defined in the control file.
4.16.6. Script Example
Example 4.32. Post Script Configuration
<?xml version="1.0"?>
<!DOCTYPE profile>
<profile xmlns="http://www.suse.com/1.0/yast2ns" xmlns:config="http://www.suse.com/1.0/configns">
        <scripts>
            <chroot-scripts config:type="list">
                <script>
                    <chrooted config:type="boolean">true</chrooted>
                    <filename>chroot.sh</filename>
                    <interpreter>shell</interpreter>
                    <source><![CDATA[
#!/bin/sh
echo "Testing chroot (chrooted) scripts"
ls
]]>
                    </source>
                </script>
                <script>
                    <filename>chroot.sh</filename>
                    <interpreter>shell</interpreter>
                    <source><![CDATA[
#!/bin/sh
echo "Testing chroot scripts"
df
cd /mnt
ls
]]>
                    </source>
                </script>
            </chroot-scripts>
            <post-scripts config:type="list">
                <script>
                    <filename>post.sh</filename>
                    <interpreter>shell</interpreter>
                    <source><![CDATA[
#!/bin/sh

echo "Running Post-install script"
/etc/init.d/portmap start
mount -a 192.168.1.1:/local /mnt
cp /mnt/test.sh /tmp
umount /mnt
]]>
                </source>
                </script>
                <script>
                    <filename>post.pl</filename>
                    <interpreter>perl</interpreter>
                    <source><![CDATA[
#!/usr/bin/perl
print "Running Post-install script";

]]>
                    </source>
                </script>
            </post-scripts>
            <pre-scripts config:type="list">
                <script>
                    <interpreter>shell</interpreter>
                    <location>http://192.168.1.1/profiles/scripts/prescripts.sh</location>
                </script>
                <script>
                    <filename>pre.sh</filename>
                    <interpreter>shell</interpreter>
                    <source><![CDATA[
#!/bin/sh
echo "Running pre-install script"
]]>
                    </source>
                </script>
            </pre-scripts>
            <postpartitioning-scripts config:type="list">
                <script>
                    <filename>postpart.sh</filename>
                    <interpreter>shell</interpreter>
                    <debug config:type="boolean">false</debug>
                    <feedback config:type="boolean">true</feedback>
                    <source><![CDATA[
touch /mnt/testfile
echo Hi
]]>
                    </source>
                </script>
            </postpartitioning-scripts>
        </scripts>
</profile>
After installation is finished, the scripts and the output logs can be found in the directory /var/adm/autoinstall. The scripts are located in the subdirectory scripts and the output logs in the log directory.
The log is the output when executing the shell scripts using the following command:
/bin/sh -x <script_name> 2&> /var/adm/autoinstall/logs/<script_name>.log
4.17. System Variables (Sysconfig)
Using the sysconfig resource, it is possible to define configuration variables in the sysconfig repository (/etc/sysconfig) directly. Sysconfig variables, offer the possibility to fine-tune many system components and environment variables exactly to your needs.
The following example shows how a variable can be set using the sysconfig resource.
To configure a variable in a sysconfig file, the following syntax can be used:
Example 4.33. Sysconfig Configuration
  <sysconfig config:type="list" >
   <sysconfig_entry>
    <sysconfig_key>XNTPD_INITIAL_NTPDATE</sysconfig_key>
    <sysconfig_path>/etc/sysconfig/xntp</sysconfig_path>
    <sysconfig_value>ntp.host.com</sysconfig_value>
   </sysconfig_entry>
   <sysconfig_entry>
    <sysconfig_key>HTTP_PROXY</sysconfig_key>
    <sysconfig_path>/etc/sysconfig/proxy</sysconfig_path>
    <sysconfig_value>proxy.host.com:3128</sysconfig_value>
   </sysconfig_entry>
   <sysconfig_entry>
    <sysconfig_key>FTP_PROXY</sysconfig_key>
    <sysconfig_path>/etc/sysconfig/proxy</sysconfig_path>
    <sysconfig_value>proxy.host.com:3128</sysconfig_value>
   </sysconfig_entry>
  </sysconfig>
Both relative and absolute pathes can be provided. If no absolute path is given, it is treated as a sysconfig file under the /etc/sysconfig directory.
4.18. Adding Complete Configurations
For many applications and services you might have prepared a configuration file which should be copied to the appropriate location in the installed system, for example if you are installing a web server and have a ready to go server configuration file (httpd.conf).
Using this resource, you can embed the file into the control file by specifying the final path on the installed system. YaST will copy this file to the specified location.
This feature requires the autoyast2 package to be installed. If the package is missing, AutoYaST will silently ignore the files section. Since openSUSE 11.1 and SLES11, AutoYaST will install the package automatically if it is missing.
Since openSUSE 11.1 and SLES11, you can specify the file_location where the file should be retrieved from. For an HTTP server this would look like: <file_location>http://my.server.site/issue</file_location>.
Since openSUSE 11.2 (not SLES11), you can create directories by specifying a file_path that ends with a slash.
Example 4.34. Dumping files into the installed system
  <files config:type="list">
      <config_file>
        <file_path>/etc/httpd/httpd.conf</file_path>
        <file_contents>

<![CDATA[
some content
]]>

       </file_contents>
     </config_file>
  </files>
  <files config:type="list">
      <config_file>
        <file_path>/mydir/a/b/c/</file_path> <!-- create directory (since openSUSE 11.2) -->
     </config_file>
  </files>
A more advanced example is shown below. This configuration will create a file using the content supplied in file_contents and change the permissions and ownership of the file. After the file has been copied to the system, a script is executed, which can be used to manipulate the file and prepare it for the environment of the client.
Example 4.35. Dumping files into the installed system
  <files config:type="list">
      <config_file>
        <file_path>/etc/someconf.conf</file_path>
        <file_contents>

<![CDATA[
some content
]]>

       </file_contents>
        <file_owner>nashif.users</file_owner>
        <file_permissions>444</file_permissions>
        <file_script>
          <interpreter>shell</interpreter>
          <source>

<![CDATA[
#!/bin/sh

echo "Testing file scripts" >> /etc/someconf.conf
df
cd /mnt
ls
]]>

          </source>
        </file_script>
     </config_file>
  </files>
4.19. Ask the user for values during installation 
This feature is only available since SUSE Linux 10.1 and SLES10.
You have the option to let the user decide the values of specific parts of the profile during the installation. If you use this feature, a popup will ask the user to enter a specific part of the profile during installation. If you want a full auto installation, but the user should set the password of the local account, you can do this via the ask directive in the profile.
The following elements must be between the <ask-list config:type="list"><ask> ... </ask></ask-list> tags in the <general> section.
Table 4.6. XML representation
| Element |
Description |
Comment |
|---|---|---|
| question |
The question you want to ask the user. <question>Enter the LDAP server</question> |
The default value is the path to the element (the path often looks strange, so we recommend to enter a question) |
| default |
Set a pre-selection for the user. A textentry will be filled out with this value. A checkbox will be "true" or "false" and a selection will have this default "value" pre-selected. <default>dc=suse,dc=de</default> |
Optional. |
| help |
An optional helptext that is shown on the left side of the question. <help>Enter the LDAP server address.</help> |
Optional. |
| title |
An optional title that is shown above the questions. <title>LDAP server</title> |
Optional. |
| type |
The type of the element you want to change. Possible values are "symbol","boolean","string" and "integer". The filesystem in the partition section is a symbol, while the "encrypted" element in the user configuration is a boolean. You can see the type of that element if you look in your profile at the config:type="...." attribute. Since openSUSE 11.2 and SLES11-SP2 you can use "static_text" as type too. A static_text is just a text that does not require any user input and can be used to show information if it's not wanted in the help text. <type>symbol</type> |
Optional. The defaul is string. If type is "symbol", you must provide the selection element too (see below). |
| password |
If this boolean is set to "true", a password dialog pops up instead of a simple text entry. Setting this to "true" makes only sense if "type" is string. <password config:type="boolean">true</password> |
Optional. The default is "false". |
| path (deprecated since openSUSE 11.0 - use pathlist) |
deprecated deprecated |
deprecated |
| pathlist (available since openSUSE 11.0 and replaces path) |
A list of path elements. A path is a comma seperated list of elements that describes the path to the element you want to change. For example, the ldap server element can be found in the profile in the <ldap><ldap_server> section. So if you want to change that value, you have to set the path to "ldap,ldap_server". If you want to change the password of the first user in the profile, you have to set the path to "users,0,user_password". The "0" indicates the first user in the <users config:type="list"> list of users in the profile. <pathlist config:type="list" ><path>networking,dns,hostname</path> <path>...</path> |
This information is optional but you should at least provide path or file. |
| file (available since SLES10 SP1 and SL 10.2) |
You can store the answer to a question in a file, to use it in one of your scripts later. If you ask during stage=inital and you want to use the answer in stage2, then you have to copy the answer-file in a chroot script that is running as chrooted=false. Use the commnad: "cp /tmp/my_answer /mnt/tmp/". The reason is that /tmp in stage1 is just in the RAM disk and will get lost after the reboot, but the installed system is already mounted at /mnt/. <file>/tmp/answer_hostname</file> |
This information is optional, but you should at least provide path or file |
| password |
If this boolean is set to "true", a password dialog pops up instead of a simple text entry. Setting this to "true" makes only sense if "type" is string. <password config:type="boolean">true</password> |
Optional. The default is "false". |
| stage |
Stage configures the installation stage in which the question pops up. You can set this value to "cont" or "initial". "initial" means the popup comes up very early in the installation, shortly after the pre-script has run. "cont" means, that the dialog with the question comes after the first reboot when the system boots for the very first time. Questions you answer during the "inital" stage, will write their answer into the profile on the harddisk. You should know that if you enter cleartext passwords during "initial". Of course it does not make sense to ask for the filesystem to use during the "cont" phase. The harddisk is already partitioned at that stage and the question will have no effect. <stage>cont</stage> |
Optional. The default is "initial". |
| selection |
The selection element contains a list of <entry> elements. Each entry represents a possible option for the user to choose. The user cannot enter a value in a textfield, but he can choose from a list of values. <selection config:type="list">
<entry>
<value>
reiser
</value>
<label>
Reiser Filesystem
</label>
</entry>
<entry>
<value>
ext3
</value>
<label>
Extended3 Filesystem
</label>
</entry>
</selection> |
Optional for type=string, not possible for type=boolean and mandatory for type=symbol. |
| dialog (available since SL 10.3 and SLES10 SP2) |
you can ask more than one question per dialog. To do so, specifiy the dialog-id with an integer. All questions with the same dialog-id belong to the same dialog. The dialogs are sorted by the id too. <dialog config:type="integer">3</dialog> |
Optional. |
| element (available since SL 10.3 and SLES10 SP2) |
you can have more than one question per dialog. To make that possible you have to specifiy the element-id with an integer. The questions in a dialog are sorted by id. <element config:type="integer">1</element> |
Optional (see dialog>. |
| frametitle (available since SL 10.3 and SLES10 SP2) |
you can have more than one question per dialog. Each question on a dialog has a frame that can have a frame title, a small caption for each question. You can put multiple elements into one frame. They have to have the same frame title. <frametitle>User data</frametitle> |
Optional. Default is no frame title. |
| script (available since SL 10.3, not in SLES10 SP1) |
Since 10.3, you can run scripts after a question has been answered (see the table below for detailed instructions about scripts). <script>...</script> |
optional (default is no script) |
| ok_label (available since openSUSE 11.2 and SLES11 SP2 |
You can change the label on the "Ok" button. The last element that specifies the label for a dialog wins. <ok_label>Finish</ok_label> |
Optional. |
| back_label (available since openSUSE 11.2 and SLES11 SP2 |
You can change the label on the "Back" button. The last element that specifies the label for a dialog wins. <back_label>change values</back_label> |
Optional. |
| timeout (available since openSUSE 11.2 and SLES11-SP2 |
You can specify an integer here that is used as timeout in seconds. If the user does not answer the question before the timeout, the default value is taken as answer. When the user touches or changes any widget in the dialog, the timeout is turned off and the dialog has to be confirmed via the ok-button. <timeout config:type="integer">30</timeout> |
Optional. A missing value is interpreted as 0, which means that there is no timeout. |
| default_value_script (available since openSUSE 11.2 and SLES11-SP2) |
You can run scripts to set the default value for a question (see the table below for detailed instructions about default value scripts). This feature is useful if you can "calculate" a useful default value, especially in combination with the "timeout" option. <default_value_script>...</default_value_script> |
Optional. Default is no script. |
The following elements must be between the <ask-list config:type="list"><ask><default_value_script>...</default_value_script>...</ask></ask-list> tags in the <general> section. This is available since 11.2 and SLES11-SP2.
Table 4.7. XML representation
| Element |
Description |
Comment |
|---|---|---|
| source |
The source code of the script. Whatever you echo to STDOUT will be used as default value for the ask-dialog. If your script has an exit code other than 0, the normal default element is used. Take care you use echo -n to suppress the <source>...</source> |
This value is required, otherwise nothing would be executed. |
| interpreter |
The interpreter to use. <interpreter>perl</interpreter> |
The default is shell. You can also set "/bin/myinterpreter" as value. |
The following elements must be between the <ask-list config:type="list"><ask><script>...</script>...</ask></ask-list> tags in the <general> section. Available since 10.3 (not SLES10 SP1).
Table 4.8. XML representation
| Element |
Description |
Comment |
|---|---|---|
| filename |
The filename of the script. <filename>my_ask_script.sh</filename> |
The default is ask_script.sh |
| source |
The source code of the script. Together with "rerun_on_error" activated, you check the value that was entered for sanity (since 11.0 only). Your script can create a file "/tmp/next_dialog" with a dialog id specifying the next dialog AutoYaST will raise. A value of -1 terminates the ask sequence. If that file is not created, AutoYaST will run the dialogs in the normal order (since 11.0 only). <source>...</source> |
This value is required, otherwise nothing would be executed. |
| environment |
A boolean that passes the "value" of the answer to the question as an environment variable to the script. The variable is named "VAL". <environment config:type="boolean">true</environment> |
Optional. Default is "false". |
| feedback |
A boolean that turns on feedback for the script execution. STDOUT will be displayed in a popup window that must be confirmed after the script execution. <feedback config:type="boolean">true</feedback> |
Optional, default is "false". |
| debug |
A boolean that turns on debugging for the script execution. <debug config:type="boolean">true</debug> |
Optional, default is "true". This value needs "feedback" to be turned on too. |
| rerun_on_error |
A boolean that keeps the dialog open until the script has an exit code of 0 (zero). So you can parse and check the answers the user gave in the script and display an error with the "feedback" option. <rerun_on_error config:type="boolean">true</rerun_on_error> |
Optional, default is "false". This value should be used together with the feedback option. |
Below you can see an example of the usage of the "ask" feature.
<general>
  <ask-list config:type="list">
      <ask>
          <!-- deprecated since openSUSE 11.0; use pathlist instead
          <path>ldap,ldap_server</path>
          -->
          <pathlist config:type="list">
              <path>ldap,ldap_server</path>
          </pathlist>
          <stage>cont</stage>
          <help>choose your server depending on your department</help>
          <selection config:type="list">
              <entry>
                      <value>ldap1.mydom.de</value>
                      <label>LDAP for development</label>
              </entry>
              <entry>
                      <value>ldap2.mydom.de</value>
                      <label>LDAP for sales</label>
              </entry>
          </selection>
          <default>ldap2.mydom.de</default>
          <default_value_script>
              <source> <![CDATA[
echo -n "ldap1.mydom.de"
]]>
              </source>
          </default_value_script>
      </ask>
      <ask>
          <!-- deprecated since openSUSE 11.0; use pathlist instead
          <path>networking,dns,hostname</path>
          -->
          <pathlist config:type="list">
              <path>networking,dns,hostname</path>
          </pathlist>
          <question>Enter Hostname</question>
          <stage>initial</stage>
          <default>enter your hostname here</default>
      </ask>
      <ask>
          <!-- deprecated since openSUSE 11.0; use pathlist instead
          <path>partitioning,0,partitions,0,filesystem</path>
          -->
          <pathlist config:type="list">
              <path>partitioning,0,partitions,0,filesystem</path>
          </pathlist>
          <question>Filesystem</question>
          <type>symbol</type>
          <selection config:type="list">
              <entry>
                      <value config:type="symbol">reiser</value>
                      <label>default Filesystem (recommended)</label>
              </entry>
              <entry>
                      <value config:type="symbol">ext3</value>
                      <label>Fallback Filesystem</label>
              </entry>
          </selection>

      </ask>
  </ask-list>
  ...
</general>
The following example is a nice way to choose between AutoYaST profiles. AutoYaST will read the modified.xml file again after the ask-dialogs are done. This way you can fetch a complete new profile.
<ask>
        <selection config:type="list">
            <entry>
                    <value>part1.xml</value>
                    <label>Simple partitioning</label>
            </entry>
            <entry>
                    <value>part2.xml</value>
                    <label>encrypted /tmp</label>
            </entry>
            <entry>
                    <value>part3.xml</value>
                    <label>LVM</label>
            </entry>
        </selection>
        <title>XML Profile</title>
        <question>Choose a profile</question>
        <stage>initial</stage>
        <default>part1.xml</default>
        <script>
            <filename>fetch.sh</filename>
            <environment config:type="boolean">true</environment>
            <source><![CDATA[
wget http://10.10.0.162/$VAL -O /tmp/profile/modified.xml 2>/dev/null
]]>
            </source>
            <debug config:type="boolean">false</debug>
            <feedback config:type="boolean">false</feedback>
        </script>
      </ask>
you can verify the answer of a question with a script like this:
<ask>
          <script>
            <filename>my.sh</filename>
            <rerun_on_error config:type="boolean">true</rerun_on_error>
            <environment config:type="boolean">true</environment>
            <source><![CDATA[
if [ "$VAL" = "myhost" ]; then
    echo "Illegal Hostname!";
    exit 1;
fi
exit 0
]]>
            </source>
            <debug config:type="boolean">false</debug>
            <feedback config:type="boolean">true</feedback>
          </script>
          <dialog config:type="integer">0</dialog>
          <element config:type="integer">0</element>
          <!-- deprecated since openSUSE 11.0; use pathlist instead
          <path>networking,dns,hostname</path>
          -->
          <pathlist config:type="list">
              <path>networking,dns,hostname</path>
          </pathlist>
          <question>Enter Hostname</question>
          <default>enter your hostname here</default>
      </ask>
4.20. Kernel dumps 
| Availability | |
|---|---|
| This feature is only available since SLES 11 (not openSUSE 11.1). It is not available on the zSeries (s390x) architecture. |
|
With kdump the system is able to create crashdump files if the whole system (i.e., the kernel) crashes. Crash dump files contain the memory contents while the system crashed. Such core files can be analyzed later by support or a (kernel) developer to find the reason for the system crash. Kdump is mostly useful for servers where you cannot easily reproduce such crashes but it is important to get the problem fixed.
The only downside: enabling kdump costs you between 64 MiB and 128 MiB of system RAM (on "normal" sized systems), reserved for kdump in case the system crashes and the dump needs to be generated.
This section only describes how to set up kdump with AutoYaST. It does not describe how kdump works. For details, refer to the kdump(7) manual page, contained in the kdump package, or to openSUSE Kdump documentation.
The following example shows a general kdump configuration.
Example 4.36. Kdump configuration
<kdump>
  <!-- memory reservation -->
  <add_crash_kernel config:type="boolean">true</add_crash_kernel>
  <crash_kernel>256M-:64M</crash_kernel>

  <general>
    <!-- dump target settings -->
    <KDUMP_SAVEDIR>ftp://stravinsky.suse.de/incoming/dumps</KDUMP_SAVEDIR>
    <KDUMP_COPY_KERNEL>true</KDUMP_COPY_KERNEL>
    <KDUMP_FREE_DISK_SIZE>64</KDUMP_FREE_DISK_SIZE>
    <KDUMP_KEEP_OLD_DUMPS>5</KDUMP_KEEP_OLD_DUMPS>

    <!-- filtering and compression -->
    <KDUMP_DUMPFORMAT>compressed</KDUMP_DUMPFORMAT>
    <KDUMP_DUMPLEVEL>1</KDUMP_DUMPLEVEL>

    <!-- notification -->
    <KDUMP_NOTIFICATION_TO>[email protected]</KDUMP_NOTIFICATION_TO>
    <KDUMP_NOTIFICATION_CC></KDUMP_NOTIFICATION_CC>
    <KDUMP_SMTP_SERVER>mail.suse.de</KDUMP_SMTP_SERVER>
    <KDUMP_SMTP_USER></KDUMP_SMTP_USER>
    <KDUMP_SMTP_PASSWORD></KDUMP_SMTP_PASSWORD>

    <!-- kdump kernel -->
    <KDUMP_KERNELVER></KDUMP_KERNELVER>
    <KDUMP_COMMANDLINE></KDUMP_COMMANDLINE>
    <KDUMP_COMMANDLINE_APPEND></KDUMP_COMMANDLINE_APPEND>

    <!-- expert settings -->
    <KDUMP_IMMEDIATE_REBOOT>yes</KDUMP_IMMEDIATE_REBOOT>
    <KDUMP_VERBOSE>15</KDUMP_VERBOSE>
    <KEXEC_OPTIONS></KEXEC_OPTIONS>
  </general>
</kdump>
4.20.1. Memory Reservation
The first step is to reserve memory for kdump at boot-up. Because the memory must be reserved very early during the boot process, the configuration is done via a kernel command line parameter called crashkernel. The reserved memory will be used to load a second kernel which will be executed without rebooting if the first kernel crashes. This second kernel has a special initrd, which contains all programs necessary to save the dump over the network or to disk, send a notification e-mail, and finally reboot.
Enable or disable that the crashkernel parameter is written for the default boot kernel with the add_crash_kernel tag. You can specify the value of the crashkernel parameter using the crash_kernel tag.
To reserve memory for kdump, specify the amount (such as 64M to reserve 64 MiB of memory from the RAM) and the offset. The syntax is crashkernel=AMOUNT@OFFSET. The kernel can auto-detect the right offset (with the exception of the Xen hypervisor, where you have to specify 16M as offset). Simply specify <crash_kernel>crashkernel=64M</crash_kernel> and the right thing will happen.
For the amount of memory, the following values are recommended:
Table 4.9. Recommended values for the reserved memory amount
| Platform |
Recommended values |
|---|---|
| i386 and x86-64 |
|
| PPC64 |
|
| IA64 |
|
You can also use the extended command line syntax to specify the amount of reserved memory depending on the System RAM. That is useful if you share one AutoYaST profile for multiple installations or if you often remove or install memory on one machine. The syntax is:
BEGIN_RANGE_1-END_RANGE_1:AMOUNT_1,BEGIN_RANGE_2-END_RANGE_2:AMOUNT_2@OFFSET
BEGIN_RANGE_1 is the start of the first memory range (for example: 0M) and END_RANGE_1 is the end of the first memory range (can be empty in case "infinity" should be assumed) and so on. For example 256M-2G:64M,2G-:128M means to reserve 64 MiB of crashkernel memory if the system has between 256 MiB and 2 GiB RAM and to reserve 128 MiB of crashkernel memory if the system has more than 2 GiB RAM.
The following table shows the settings necessary to reserve memory:
Table 4.10. XML Representation of the Memory Reservation Settings
| Element |
Description |
Comment |
|---|---|---|
| add_crash_kernel |
Set to "true" if memory should be reserved and kdump enabled. <add_crash_kernel config:type="boolean">true</add_crash_kernel> |
required |
| crash_kernel |
Use the syntax of the crashkernel command line as discussed above. <crash_kernel>256M:64M</crash_kernel> |
required |
4.20.2. Dump Saving 
4.20.2.1. Target 
The element KDUMP_SAVEDIR specifies the URL to where the dump is saved. The following methods are possible:
-
fileto save to the local disk, -
ftpto save to an FTP server (without encryption), -
sftpto save to an SSH2 SFTP server, -
nfsto save to a NFS location and -
cifsto save the dump to a CIFS/SMP export from Samba or Microsoft Windows.
For details see the kdump(5) manual page. Two examples are: file:///var/crash (which is the default location according to FHS) and ftp://user:password@host:port/incoming/dumps. A subdirectory, with the time stamp contained in the name, will be created and the dumps saved there.
When the dump is saved to the local disk, KDUMP_KEEP_OLD_DUMPS can be used to delete old dumps automatically. Set it to the number of old dumps that should be kept. If the target partition would end up with less free disk space than specified in KDUMP_FREE_DISK_SIZE, the dump is not saved.
If you want to save the whole kernel and the debug information (if installed) to the same directory, set KDUMP_COPY_KERNEL to true. You'll have everything you need to analyze the dump in one directory (except kernel modules and their debugging information).
4.20.2.2. Filtering and Compression 
The kernel dump is uncompressed and unfiltered. It can get as large as your system RAM. To get smaller files, compress the dump file afterwards. The dump has to be decompressed before opening.
To use page compression, which compresses every page and allows dynamic decompression with the crash(8) debugging tool, set KDUMP_DUMPFORMAT to compressed (default).
You may not want to save all memory pages, for example those filled with zeroes. To filter the dump, set the KDUMP_DUMPLEVEL. 0 produces a full dump and 31 is the smallest dump. The manual pages kdump(5) and makedumpfile(8) list for each value which pages will be saved.
4.20.2.3. Summary 
Table 4.11. XML Representation of the Dump Target Settings
| Element |
Description |
Comment |
|---|---|---|
| KDUMP_SAVEDIR |
An URL that specifies the target to which the dump and related files will be saved. <KDUMP_SAVEDRIR >file:///var/crash/</KDUMP_SAVEDIR> |
required |
| KDUMP_COPY_KERNEL |
Set to "true", if not only the dump should be saved to <KDUMP_COPY_KERNEL >false</KDUMP_COPY_KERNEL> |
optional |
| KDUMP_FREE_DISK_SIZE |
Disk space in megabytes that must remain free after saving the dump. If not enough space is available to write the dump and keep the required disk space free, the dump will not be saved. <KDUMP_FREE_DISK_SIZE >64</KDUMP_FREE_DISK_SIZE> |
optional |
| KDUMP_KEEP_OLD_DUMPS |
The number of dumps that are kept (i.e., not deleted) if <KDUMP_KEEP_OLD_DUMPS >4</KDUMP_KEEP_OLD_DUMPS> |
optional |
4.20.3. Email Notification 
Configure email notification, if you want to be informed when a machine crashes and a dump is saved.
Because kdump runs in the initrd, a local mail server cannot send the notification email. An SMTP server needs to be specified (see below).
You have to provide exactly one address in KDUMP_NOTIFICATION_TO. More addresses can be specified in in KDUMP_NOTIFICATION_CC. Only use email addresses in both cases, not a real name.
Specify KDUMP_SMTP_SERVER and (if the server needs authentication) KDUMP_SMTP_USER and KDUMP_SMTP_PASSWORD. Support for TSL or SSL is not available but may be added in the future.
Table 4.12. XML Representation of the Email Notification Settings
| Element |
Description |
Comment |
|---|---|---|
| KDUMP_NOTIFICATION_TO |
Exactly one email address to which the email should be sent. Additional recipients can be specified in <KDUMP_NOTIFICATION_TO >[email protected]</KDUMP_NOTIFICATION_TO> |
optional (notification disabled if empty) |
| KDUMP_NOTIFICATION_CC |
Zero, one or more recipients that are in the cc line of the notification email. <KDUMP_NOTIFICATION_CC >[email protected] [email protected]</KDUMP_NOTIFICATION_CC> |
optional |
| KDUMP_SMTP_SERVER |
Host name of the SMTP server used for mail delivery. SMTP authentication is supported (see <KDUMP_SMTP_SERVER >email.suse.de</KDUMP_SMTP_SERVER> |
optional (notification disabled if empty) |
| KDUMP_SMTP_USER |
User name used together with <KDUMP_SMTP_USER >bwalle</KDUMP_SMTP_USER> |
optional |
| KDUMP_SMTP_PASSWORD |
Password used together with <KDUMP_SMTP_PASSWORD >geheim</KDUMP_SMTP_PASSWORD> |
optional |
4.20.4. Kdump Kernel Settings 
As already mentioned, a special kernel is booted to save the dump. If you don't want to use the auto-detection mechanism to find out which kernel is used (see the kdump(5) manual page that describes the algorithm which is used to find the kernel), you can specify the version of a custom kernel in KDUMP_KERNELVER. If you set it to foo, then the kernel located in /boot/vmlinuz-foo or /boot/vmlinux-foo (in that order on platforms that have a vmlinuz file) will be used.
You can specify the command line used to boot the kdump kernel. Normally the boot command line is used minus some settings that make no sense with kdump (like the crashkernel parameter) plus some settings needed by kdump (see the manual page kdump(5)). If you just want some additional parameters like a overwritten console setting then use KDUMP_COMMANDLINE_APPEND. If you know what you're doing and you want to specify the whole command line, set KDUMP_COMMANDLINE.
Table 4.13. XML Representation of the Kernel Settings
| Element |
Description |
Comment |
|---|---|---|
| KDUMP_KERNELVER |
Version string for the kernel used for kdump. Leave it empty to use the auto-detection mechanism (strongly recommended). <KDUMP_KERNELVER >2.6.27-default</KDUMP_KERNELVER> |
optional (auto-detection if empty) |
| KDUMP_COMMANDLINE_APPEND |
Additional command line parameters for the kdump kernel. <KDUMP_COMMANDLINE_APPEND >console=ttyS0,57600</KDUMP_COMMANDLINE_APPEND> |
optional |
| KDUMP_COMMANDLINE |
Overwrite the automatically generated kdump command line. Use with care. In most cases, <KDUMP_COMMANDLINE_APPEND >root=/dev/sda5 maxcpus=1 irqpoll</KDUMP_COMMANDLINE> |
optional |
4.20.5. Expert Settings 
Table 4.14. XML Representation of the Expert Settings
| Element |
Description |
Comment |
|---|---|---|
| KDUMP_IMMEDIATE_REBOOT |
<KDUMP_IMMEDIATE_REBOOT >true</KDUMP_IMMEDIATE_REBOOT> |
optional |
| KDUMP_VERBOSE |
Bitmask that specifies how verbose the kdump process should be. Read kdump(5) for details. <KDUMP_VERBOSE>3</KDUMP_VERBOSE> |
optional |
| KEXEC_OPTIONS |
Additional options that are passed to kexec when loading the kdump kernel. Normally empty. <KEXEC_OPTIONS>--noio</KEXEC_OPTIONS> |
optional |
4.21. Miscellaneous Hardware and System Components 
In addition to the core component configuration, like network authentication and security, AutoYaST offers a wide range of hardware and system configuration options, the same as available by default on any system installed manually and in an interactive way. For example, it is possible to configure printers, sound devices, TV cards and any other hardware components which have a module within YaST.
Any new configuration options added to YaST will be automatically available in AutoYaST.
4.21.1. Printer 
The YaST printer module has been rewritten from scratch for openSUSE 11.1 and SUSE Linux Enterprise Server/Desktop 11. Currently, AutoYaST support for printing is limited to basic settings for how the CUPS printing system is used on a client workstation to print via network.
There is no AutoYaST support for setting up local print queues. In particular, when a USB printer is connected to a client workstation, it is no longer possible to have a predefined configuration, because USB printers are no longer accessed via a generic USB device node like "/dev/usb/lp0" but via a model-specific device URI like "usb://ACME/FunPrinter?serial=1a2b3c". There is a serial number included so that a USB printer device URI works only for one particular device. Usually it is not possible to know the correct USB device URI in advance, because it is determined by the CUPS backend "usb" during runtime when the particular device is connected, depending on the actual values which the printer reports via the USB.
Intrinsic design of CUPS for printing in the network:
The CUPS daemon process (cupsd) of a CUPS network print server sends information about its print queues to a list of IP addresses (host addresses and/or broadcast addresses).
On client workstations (hosts that only send print jobs to servers) a cupsd also runs and listens to information from servers. There is a list of servers from which information is accepted. By default, information is accepted from all servers.
The queues of the server are available on the clients. Users on the clients can browse the queues on various servers. Therefore it is called "Browsing". A client workstation only needs to run cupsd to use CUPS in its default Browsing mode. The matching settings in the cupsd configuration file (/etc/cups/cupsd.conf) are "Browsing On" and "BrowseAllow all".
If you want to limit from which CUPS servers browsing information is accepted, use "BrowseAllow". For example, "BrowseAllow @LOCAL" accepts browsing information only from CUPS servers in the local network.
Multiple "BrowseAllow" entries like "BrowseAllow 192.168.100.1" and "BrowseAllow 192.168.200.0/255.255.255.0" can be used to accept browsing information only from particular hosts or networks.
CUPS browsing information is received via UDP port 631. You may have to check firewall settings accordingly.
Alternatively, if there is only one single CUPS server in the network, there is no need to use CUPS browsing and have a CUPS daemon running on each client workstation.
Instead it is simpler to specify the CUPS server and access it directly by an entry like "ServerName 192.168.100.99" in /etc/cups/client.conf (only one such entry can be set). A locally running cupsd on a client workstation is ignored. In this case it makes no sense to have it running.
The following is an example of a configuration section. The <cups_remote_server> entry contains the value of a ServerName entry in /etc/cups/client.conf. The <server_settings> section contains all values of the cupsd configuration file (/etc/cups/cupsd.conf). A complete <server_settings> section is required to get a reasonable cupsd configuration installed.
Example 4.37. Printer configuration
  <printer>
    <cups_remote_server>192.168.100.99</cups_remote_server>
    <server_settings>
      <Browsing config:type="list">
        <listentry>On</listentry>
      </Browsing>
      <BrowseAllow config:type="list">
        <listentry>@LOCAL</listentry>
        <listentry>192.168.100.1</listentry>
        <listentry>192.168.200.0/255.255.255.0</listentry>
      </BrowseAllow>
      <BrowseOrder config:type="list">
        <listentry>allow,deny</listentry>
      </BrowseOrder>
      <LogLevel config:type="list">
        <listentry>info</listentry>
      </LogLevel>
      <Listen config:type="list">
        <listentry>localhost:631</listentry>
        <listentry>/var/run/cups/cups.sock</listentry>
      </Listen>
      <DefaultAuthType config:type="list">
        <listentry>Basic</listentry>
      </DefaultAuthType>
      <SystemGroup config:type="list">
        <listentry>sys root</listentry>
      </SystemGroup>
      <sections config:type="list">
        <section>
          <Key>Location</Key>
          <Value>/</Value>
          <Allow config:type="list">
            <listentry>127.0.0.2</listentry>
          </Allow>
          <Order config:type="list">
            <listentry>allow,deny</listentry>
          </Order>
        </section>
        <section>
          <Key>Location</Key>
          <Value>/admin</Value>
          <Encryption config:type="list">
            <listentry>Required</listentry>
          </Encryption>
          <Order config:type="list">
            <listentry>allow,deny</listentry>
          </Order>
        </section>
        <section>
          <Key>Location</Key>
          <Value>/admin/conf</Value>
          <AuthType config:type="list">
            <listentry>Default</listentry>
          </AuthType>
          <Require config:type="list">
            <listentry>user @SYSTEM</listentry>
          </Require>
          <Order config:type="list">
            <listentry>allow,deny</listentry>
          </Order>
        </section>
        <section>
          <Key>Policy</Key>
          <Value>default</Value>
          <subsection config:type="list">
            <listentry>
              <Key>Limit</Key>
              <Value>Send-Document Send-URI Hold-Job Release-Job Restart-Job Purge-Jobs Set-Job-Attributes Create-Job-Subscription Renew-Subscription Cancel-Subscription Get-Notifications Reprocess-Job Cancel-Current-Job Suspend-Current-Job Resume-Job CUPS-Move-Job</Value>
              <Require config:type="list">
                <listentry>user @OWNER @SYSTEM</listentry>
              </Require>
              <Order config:type="list">
                <listentry>deny,allow</listentry>
              </Order>
            </listentry>
            <listentry>
              <Key>Limit</Key>
              <Value>CUPS-Add-Modify-Printer CUPS-Delete-Printer CUPS-Add-Modify-Class CUPS-Delete-Class CUPS-Set-Default</Value>
              <AuthType config:type="list">
                <listentry>Default</listentry>
              </AuthType>
              <Require config:type="list">
                <listentry>user @SYSTEM</listentry>
              </Require>
              <Order config:type="list">
                <listentry>deny,allow</listentry>
              </Order>
            </listentry>
            <listentry>
              <Key>Limit</Key>
              <Value>Pause-Printer Resume-Printer Enable-Printer Disable-Printer Pause-Printer-After-Current-Job Hold-New-Jobs Release-Held-New-Jobs Deactivate-Printer Activate-Printer Restart-Printer Shutdown-Printer Startup-Printer Promote-Job Schedule-Job-After CUPS-Accept-Jobs CUPS-Reject-Jobs</Value>
              <AuthType config:type="list">
                <listentry>Default</listentry>
              </AuthType>
              <Require config:type="list">
                <listentry>user @SYSTEM</listentry>
              </Require>
              <Order config:type="list">
                <listentry>deny,allow</listentry>
              </Order>
            </listentry>
            <listentry>
              <Key>Limit</Key>
              <Value>Cancel-Job CUPS-Authenticate-Job</Value>
              <Require config:type="list">
                <listentry>user @OWNER @SYSTEM</listentry>
              </Require>
              <Order config:type="list">
                <listentry>deny,allow</listentry>
              </Order>
            </listentry>
            <listentry>
              <Key>Limit</Key>
              <Value>All</Value>
              <Order config:type="list">
                <listentry>deny,allow</listentry>
              </Order>
            </listentry>
          </subsection>
        </section>
      </sections>
    </server_settings>
  </printer>
4.21.2. Sound devices 
An example of the sound configuration created using the configuration system is shown below.
Example 4.38. Sound configuration
....
    <sound>
      <autoinstall config:type="boolean">true</autoinstall>
      <modules_conf config:type="list">
        <module_conf>
          <alias>snd-card-0</alias>
          <model>M5451, ALI</model>
          <module>snd-ali5451</module>
          <options>
            <snd_enable>1</snd_enable>
            <snd_index>0</snd_index>
            <snd_pcm_channels>32</snd_pcm_channels>
          </options>
        </module_conf>
      </modules_conf>
      <volume_settings config:type="list">
        <listentry>
          <Master config:type="integer">75</Master>
        </listentry>
      </volume_settings>
    </sound>

....