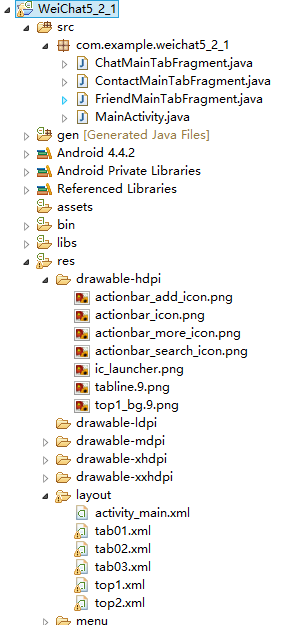
高仿微信5.2.1主界面及消息提醒功能
项目演示效果如下:
二、项目代码
package com.example.weichat5_2_1;

import android.os.Bundle;
import android.support.v4.app.Fragment;
import android.view.LayoutInflater;
import android.view.View;
import android.view.ViewGroup;

public class ChatMainTabFragment extends Fragment {
    @Override
    public View onCreateView(LayoutInflater inflater, ViewGroup container,
            Bundle savedInstanceState) {
        // 加载相应的布局layout
        return inflater.inflate(R.layout.tab01, container, false);
    }
}
package com.example.weichat5_2_1;

import android.os.Bundle;
import android.support.v4.app.Fragment;
import android.view.LayoutInflater;
import android.view.View;
import android.view.ViewGroup;

public class ContactMainTabFragment extends Fragment {
    @Override
    public View onCreateView(LayoutInflater inflater, ViewGroup container,
            Bundle savedInstanceState) {
        // 加载相应的布局layout
        return inflater.inflate(R.layout.tab03, container, false);
    }
}
package com.example.weichat5_2_1;

import android.os.Bundle;
import android.support.v4.app.Fragment;
import android.view.LayoutInflater;
import android.view.View;
import android.view.ViewGroup;

public class FriendMainTabFragment extends Fragment {
    @Override
    public View onCreateView(LayoutInflater inflater, ViewGroup container,
            Bundle savedInstanceState) {
        // 加载相应的布局layout
        return inflater.inflate(R.layout.tab02, container, false);
    }
}
package com.example.weichat5_2_1;

import java.util.ArrayList;
import java.util.List;

import android.graphics.Color;
import android.os.Bundle;
import android.support.v4.app.Fragment;
import android.support.v4.app.FragmentActivity;
import android.support.v4.app.FragmentPagerAdapter;
import android.support.v4.view.ViewPager;
import android.support.v4.view.ViewPager.OnPageChangeListener;
import android.util.DisplayMetrics;
import android.util.Log;
import android.view.Display;
import android.view.ViewGroup.LayoutParams;
import android.view.Window;
import android.widget.ImageView;
import android.widget.LinearLayout;
import android.widget.TextView;

import com.jauker.widget.BadgeView;

public class MainActivity extends FragmentActivity {

    private ViewPager mViewPager;
    private FragmentPagerAdapter mAdapter; // ViewPager中使用Fragment的适配器
    private List<Fragment> mDatas; // 在ViewPager中存放的三个Fragment

    // 导航栏的聊天、朋友、通讯录
    private TextView mChatTextView;
    private TextView mFriendTextView;
    private TextView mContactTextView;

    private LinearLayout mChatLinearLayout;
    private BadgeView mBadgeView;

    private ImageView mTabline;
    private int mScreen1_3;// 屏幕宽度的三分之一

    private int mCurrentPageIndex;

    @Override
    protected void onCreate(Bundle savedInstanceState) {
        super.onCreate(savedInstanceState);
        requestWindowFeature(Window.FEATURE_NO_TITLE);
        setContentView(R.layout.activity_main);

        initTabLine();
        initView();
    }

    private void initTabLine() {
        mTabline = (ImageView) findViewById(R.id.id_iv_tabline); // 导航栏底部的指示条

        // 获得手机屏幕的宽度
        Display display = getWindow().getWindowManager().getDefaultDisplay();
        DisplayMetrics outMetrics = new DisplayMetrics(); // outMetrics携带屏幕的宽度、高度等
        display.getMetrics(outMetrics);
        mScreen1_3 = outMetrics.widthPixels / 3;

        // 获得指示条的布局属性
        LayoutParams lp = mTabline.getLayoutParams();
        lp.width = mScreen1_3;
        mTabline.setLayoutParams(lp);
    }

    /** * 初始化方法,实现一系列findViewById * * mDatas中数值的添加 */
    private void initView() {
        mViewPager = (ViewPager) findViewById(R.id.id_viewpager);
        mChatTextView = (TextView) findViewById(R.id.id_tv_chat);
        mFriendTextView = (TextView) findViewById(R.id.id_tv_friend);
        mContactTextView = (TextView) findViewById(R.id.id_tv_contact);
        mChatLinearLayout = (LinearLayout) findViewById(R.id.id_ll_chat);

        mDatas = new ArrayList<Fragment>();

        ChatMainTabFragment tab01 = new ChatMainTabFragment();
        FriendMainTabFragment tab02 = new FriendMainTabFragment();
        ContactMainTabFragment tab03 = new ContactMainTabFragment();

        // 将Fragment加入存放Fragment的list
        mDatas.add(tab01);
        mDatas.add(tab02);
        mDatas.add(tab03);

        /* * 适配器的使用 */
        mAdapter = new FragmentPagerAdapter(getSupportFragmentManager()) {
            @Override
            public int getCount() {
                return mDatas.size();
            }

            @Override
            public Fragment getItem(int position) {
                return mDatas.get(position);
            }
        };

        // 为ViewPager设置适配器
        mViewPager.setAdapter(mAdapter);

        // 为ViewPager设置页面改变事件
        mViewPager.setOnPageChangeListener(new OnPageChangeListener() {

            /** * 当页面切换的时候改变顶部的字体颜色 */
            @Override
            public void onPageSelected(int position) {

                // 当从第二个页面进入第一个页面的时候清除第一个页面的字体等
                resetTextView();

                switch (position) {
                case 0:// 进入第1个页面

                    // 为聊天界面设置浮动的红色字体
                    // 《!--这里使用了github上的开源框架BadgeView--》
                    if (mBadgeView != null) { // 如果已经有了则清除
                        mChatLinearLayout.removeView(mBadgeView);
                    }
                    mBadgeView = new BadgeView(MainActivity.this);
                    mBadgeView.setBadgeCount(7); // 设置数字
                    mChatLinearLayout.addView(mBadgeView);// 把mBadgeView加入到聊天的框中

                    // 设置字体为绿色
                    mChatTextView.setTextColor(Color.parseColor("#008000"));
                    break;
                case 1:// 进入第2个页面
                    mFriendTextView.setTextColor(Color.parseColor("#008000"));
                    break;
                case 2:// 进入第3个页面
                    mContactTextView.setTextColor(Color.parseColor("#008000"));
                    break;

                }

                mCurrentPageIndex = position;

            }

            /** * 当页面改变的时候,让导航栏底部的绿色指示条随着滑动 */
            @Override
            public void onPageScrolled(int position, float positionOffset,
                    int positionOffsetPx) {

                // 打印日志,判断 position, positionOffset, positionOffsetPx的变化特点
                Log.e("TAG", position + " , " + positionOffset + " , "
                        + positionOffsetPx);

                LinearLayout.LayoutParams lp = (android.widget.LinearLayout.LayoutParams) mTabline
                        .getLayoutParams();

                if (mCurrentPageIndex == 0 && position == 0)// 0->1:第0页到第1页
                {
                    lp.leftMargin = (int) (positionOffset * mScreen1_3 + mCurrentPageIndex
                            * mScreen1_3);
                } else if (mCurrentPageIndex == 1 && position == 0)// 1->0:第1页到第0页
                {
                    lp.leftMargin = (int) (mCurrentPageIndex * mScreen1_3 + (positionOffset - 1)
                            * mScreen1_3);
                } else if (mCurrentPageIndex == 1 && position == 1) // 1->2:第1页到第2页
                {
                    lp.leftMargin = (int) (mCurrentPageIndex * mScreen1_3 + positionOffset
                            * mScreen1_3);
                } else if (mCurrentPageIndex == 2 && position == 1) // 2->1:第2页到第1页
                {
                    lp.leftMargin = (int) (mCurrentPageIndex * mScreen1_3 + (positionOffset - 1)
                            * mScreen1_3);
                }
                mTabline.setLayoutParams(lp);

            }

            @Override
            public void onPageScrollStateChanged(int arg0) {

            }
        });

    }

    /** * 初始化导航栏中的字体颜色为黑色 */
    protected void resetTextView() {
        mChatTextView.setTextColor(Color.BLACK);
        mFriendTextView.setTextColor(Color.BLACK);
        mContactTextView.setTextColor(Color.BLACK);
    }

}
三、布局文件
activity_main.xml
<LinearLayout xmlns:android="http://schemas.android.com/apk/res/android" xmlns:tools="http://schemas.android.com/tools" android:layout_width="match_parent" android:layout_height="match_parent" android:orientation="vertical" >

    <include layout="@layout/top1" />

    <include layout="@layout/top2" />

    <android.support.v4.view.ViewPager  android:id="@+id/id_viewpager" android:layout_width="match_parent" android:layout_height="0dp" android:layout_weight="1" />

</LinearLayout>
tab01.xml
<?xml version="1.0" encoding="utf-8"?>
<LinearLayout xmlns:android="http://schemas.android.com/apk/res/android" android:layout_width="match_parent" android:layout_height="match_parent" android:gravity="center" android:orientation="vertical" >

    <TextView  android:layout_width="wrap_content" android:layout_height="wrap_content" android:text="This is first Tab" android:textSize="22sp" android:textStyle="bold" />

</LinearLayout>
tab02.xml
<?xml version="1.0" encoding="utf-8"?>
<LinearLayout xmlns:android="http://schemas.android.com/apk/res/android" android:layout_width="match_parent" android:layout_height="match_parent" android:gravity="center" android:orientation="vertical" >

    <TextView  android:layout_width="wrap_content" android:layout_height="wrap_content" android:text="This is second Tab" android:textSize="22sp" android:textStyle="bold" />

</LinearLayout>
tab03.xml
<?xml version="1.0" encoding="utf-8"?>
<LinearLayout xmlns:android="http://schemas.android.com/apk/res/android" android:layout_width="match_parent" android:layout_height="match_parent" android:gravity="center" android:orientation="vertical" >

    <TextView  android:layout_width="wrap_content" android:layout_height="wrap_content" android:text="This is third Tab" android:textSize="22sp" android:textStyle="bold" />

</LinearLayout>
top1.xml
<?xml version="1.0" encoding="utf-8"?>
<RelativeLayout xmlns:android="http://schemas.android.com/apk/res/android" android:layout_width="match_parent" android:layout_height="50dp" android:background="@drawable/top1_bg" android:paddingLeft="12dp" android:paddingRight="12dp" >

    <LinearLayout  android:layout_width="wrap_content" android:layout_height="wrap_content" android:layout_centerVertical="true" android:gravity="center" android:orientation="horizontal" >

        <ImageView  android:layout_width="30dp" android:layout_height="30dp" android:src="@drawable/actionbar_icon" />

        <TextView  android:layout_width="wrap_content" android:layout_height="wrap_content" android:layout_marginLeft="12dp" android:text="微信" android:textColor="#d3d3d3" android:textSize="18sp" />
    </LinearLayout>

    <LinearLayout  android:layout_width="wrap_content" android:layout_height="wrap_content" android:layout_alignParentRight="true" android:layout_centerVertical="true" android:orientation="horizontal" >

        <ImageView  android:layout_width="30dp" android:layout_height="30dp" android:src="@drawable/actionbar_search_icon" />

        <ImageView  android:layout_width="30dp" android:layout_height="30dp" android:src="@drawable/actionbar_add_icon" />

        <ImageView  android:layout_width="30dp" android:layout_height="30dp" android:src="@drawable/actionbar_more_icon" />
    </LinearLayout>

</RelativeLayout>
top2.xml
<?xml version="1.0" encoding="utf-8"?>
<LinearLayout xmlns:android="http://schemas.android.com/apk/res/android" android:layout_width="match_parent" android:layout_height="40dp" android:background="#eee" android:orientation="vertical" >

    <LinearLayout  android:layout_width="fill_parent" android:layout_height="37dp" android:orientation="horizontal" >

        <LinearLayout  android:id="@+id/id_ll_chat" android:layout_width="3dp" android:orientation="horizontal" android:layout_height="fill_parent" android:layout_weight="1" android:gravity="center" >

            <TextView  android:id="@+id/id_tv_chat" android:layout_width="wrap_content" android:layout_height="wrap_content" android:text="聊天" android:textColor="#008000" />
        </LinearLayout>

        <LinearLayout  android:layout_width="3dp" android:layout_height="fill_parent" android:layout_weight="1" android:gravity="center" >

            <TextView  android:id="@+id/id_tv_friend" android:layout_width="wrap_content" android:layout_height="wrap_content" android:textColor="#000000" android:text="发现" />
        </LinearLayout>

        <LinearLayout  android:layout_width="3dp" android:layout_height="fill_parent" android:layout_weight="1" android:gravity="center" >

            <TextView  android:layout_width="wrap_content" android:layout_height="wrap_content" android:textColor="#000000" android:id="@+id/id_tv_contact" android:text="通讯录" />
        </LinearLayout>
    </LinearLayout>

    <ImageView  android:id="@+id/id_iv_tabline" android:layout_width="100dp" android:layout_height="3dp" android:background="@drawable/tabline" />

</LinearLayout>
AndroidManifest.xml
<?xml version="1.0" encoding="utf-8"?>
<manifest xmlns:android="http://schemas.android.com/apk/res/android" package="com.example.weichat5_2_1" android:versionCode="1" android:versionName="1.0" >

    <uses-sdk  android:minSdkVersion="8" android:targetSdkVersion="18" />

    <application  android:allowBackup="true" android:icon="@drawable/ic_launcher" android:label="@string/app_name" android:theme="@style/AppTheme" >
        <activity  android:name="com.example.weichat5_2_1.MainActivity" android:label="@string/app_name" >
            <intent-filter>
                <action android:name="android.intent.action.MAIN" />

                <category android:name="android.intent.category.LAUNCHER" />
            </intent-filter>
        </activity>
    </application>

</manifest>
四、技术难点解释
(1)在使用消息提示功能的时候,我们使用了github上的开源框架,下载地址为:https://github.com/stefanjauker/BadgeView
五、源码地址
http://download.csdn.net/detail/u010870518/8476951

