通过两种方法来实现:
一、通过动态数组NSMutableArray中的数据,来显示数据
1.新建Empty Application项目,新建ViewController,HomeViewController,在AppDelegate.m中导入该文件,并在方法- (BOOL)application:didFinishLaunchingWithOptions:中添加以下红色标记的代码。
| 1 | - (BOOL)application:(UIApplication*)application didFinishLaunchingWithOptions:(NSDictionary*)launchOptions |
| 2 | { |
| 3 | self.window=[[[UIWindowalloc]initWithFrame:[[UIScreenmainScreen]bounds]]autorelease]; |
| 4 | // Override point for customization after application launch. |
| 5 | self.window.backgroundColor=[UIColorwhiteColor]; |
| 6 | |
| 7 | HomeViewController*homeViewController=[[HomeViewControlleralloc]init]; |
| 8 | self.window.rootViewController= homeViewController; |
| 9 | [homeViewControllerrelease]; |
| 10 | |
| 11 | [self.windowmakeKeyAndVisible]; |
| 12 | returnYES |
| 13 | } |
2.在 HomeViewController.xib上添加Table View控件
将其Outlets的dataSource和delegate与File's Owner建立关联,目的:
(1) dataSource: 向HomeViewController添加UITableViewDataSource协议,从而可以在该类中使用相关的协议方法,在Table View中显示数据。
(2) delegate :向HomeViewController添加UITableViewDelegate协议,从而可以在该类中使用相关的协议方法,响应用户在Table View中的交互操作。
在HomeViewController.h中添加协议:
| 1 | #import <UIKit/UIKit.h> |
| 2 | @interfaceHomeViewController : UIViewController |
| 3 | <UITableViewDelegate,UITableViewDataSource>{ |
| 4 | } |
| 5 | @end |
目的:都添加协议,有备无患。提高代码编写的效率和可靠性。
3. 在HomeViewController.m中编写代码
| 1 | #import"HomeViewController.h" |
| 2 | @interfaceHomeViewController () |
| 3 | @end |
| 4 | @implementationHomeViewController |
| 5 | NSMutableArray*listOfContacts;//声明动态数组 |
| 6 | - (void)viewDidLoad |
| 7 | { |
| 8 | |
| 9 | listOfContacts=[[NSMutableArrayalloc]init];//分配内存并初始化 |
| 10 | |
| 11 | [listOfContactsaddObject:@"张三"]; |
| 12 | [listOfContactsaddObject:@"张1"]; |
| 13 | [listOfContactsaddObject:@"张2"]; |
| 14 | [listOfContactsaddObject:@"张3"]; |
| 15 | [listOfContactsaddObject:@"张4"]; |
| 16 | [listOfContactsaddObject:@"张5"]; |
| 17 | [listOfContactsaddObject:@"张6"]; |
| 18 | [listOfContactsaddObject:@"张7"]; |
| 19 | [listOfContactsaddObject:@"张8"]; |
| 20 | [listOfContactsaddObject:@"张9"]; |
| 21 | [listOfContactsaddObject:@"张11"]; |
| 22 | [listOfContactsaddObject:@"张12"]; |
| 23 | [listOfContactsaddObject:@"张13"]; |
| 24 | [listOfContactsaddObject:@"张14"]; |
| 25 | [listOfContactsaddObject:@"张15"]; |
| 26 | [listOfContactsaddObject:@"张16"]; |
| 27 | [listOfContactsaddObject:@"张17"]; |
| 28 | [listOfContactsaddObject:@"张18"]; |
| 29 | [listOfContactsaddObject:@"张19"]; |
| 30 | |
| 31 | [superviewDidLoad]; |
| 32 | } |
| 33 | //使用UITableViewDataSource协议的tableView:cellForRowAtIndexPath:方法 |
| 34 | //该方法用来将数据填充进Table View的单元格中 |
| 35 | /* |
| 36 | 在Table View中每填充一个单元格的数据就会触发一次该事件。 |
| 37 | 注意:如果我们的数据一共有200项,并不代表会连续触发200次这个事件,如果当前屏幕只能显示10行数据的话,就只会触发10次该事件,当用户滚动该Table View而产生新的单元格时,才会继续触发该事件。 |
| 38 | */ |
| 39 | - (UITableViewCell*)tableView:(UITableView*)tableViewcellForRowAtIndexPath:(NSIndexPath*)indexPath{ |
| 40 | |
| 41 | staticNSString*CellIndentifier=@"Contact"; |
| 42 | |
| 43 | UITableViewCell*cell=[tableViewdequeueReusableCellWithIdentifier:CellIndentifier]; |
| 44 | /* |
| 45 | dequeueReusableCellWithIdentifier方法,获取UITableViewCell类型的对象,而且获取的是一个已经在TableView中使用过并可以复用的对象。 |
| 46 | 想象一下: |
| 47 | 如果数组中有1000个元素,我们为每一个元素都实例化一个UITableViewCell对象的话,系统就会内存溢出甚至崩溃。其实每个用户在一个屏幕中能够看到的单元格数量也就十几个,他们通过上下滚动屏幕的操作可以让一些已显示的单元格消除,而这些单元格对象系统就会保留下来以备我们需要显示新单元格时可以复用它们,从而达到了节省系统资源的目的。这个方法包含一个参数CellIdentifier, 它用于指明你需要哪个标识的可复用单元格。在同一界面中如果有多个表格的情况时非常有用。 |
| 48 | 当然如果没有获取到可复用的单元格时,我们就需要使用UITableViewCell的initWithStyle:reuseIdentifier:方法直接实例化一个单元格。其中reuseIdentifier参数用于设置该表格的可复用标识。 |
| 49 | */ |
| 50 | |
| 51 | if (cell==nil) { |
| 52 | cell=[[[UITableViewCellalloc]initWithStyle:UITableViewCellStyleDefaultreuseIdentifier:CellIndentifier]autorelease]; |
| 53 | |
| 54 | } |
| 55 | |
| 56 | NSString*cellValue=[listOfContactsobjectAtIndex:indexPath.row]; |
| 57 | cell.textLabel.text= cellValue; |
| 58 | |
| 59 | //示意标志: Disclosure Indicator,Disclosure Button,Checkmark,默认为None |
| 60 | |
| 61 | //cell.accessoryType = UITableViewCellAccessoryDisclosureIndicator; |
| 62 | |
| 63 | //cell.accessoryType = UITableViewCellAccessoryDetailDisclosureButton; |
| 64 | //cell.accessoryType = UITableViewCellAccessoryCheckmark; |
| 65 | cell.accessoryType=UITableViewCellAccessoryNone; |
| 66 | |
| 67 | //单元格添加图片 |
| 68 | UIImage*image=[UIImageimageNamed:@"avatar.png"]; |
| 69 | cell.imageView.image= image; |
| 70 | |
| 71 | return cell; |
| 72 | } |
| 73 | //使用UITableViewDataSource协议的tableView:numberOfRowsInSection:方法 |
| 74 | //该方法用来设置Table View中要显示数据的行数 |
| 75 | - (NSInteger)tableView:(UITableView*)tableViewnumberOfRowsInSection:(NSInteger)section{ |
| 76 | return[listOfContactscount]; |
| 77 | } |
| 78 | //添加标题和脚本信息 |
| 79 | - (NSString*)tableView:(UITableView*)tableViewtitleForHeaderInSection:(NSInteger)section{ |
| 80 | |
| 81 | return@"联系人列表"; |
| 82 | |
| 83 | |
| 84 | } |
| 85 | - (NSString*)tableView:(UITableView*)tableViewtitleForFooterInSection:(NSInteger)section{ |
| 86 | return@"作者:what if"; |
| 87 | } |
| 88 | |
| 89 | |
| 90 | //UITableViewDelegate协议的方法,选择表格中的项目 |
| 91 | - (void)tableView:(UITableView*)tableViewdidSelectRowAtIndexPath:(NSIndexPath*)indexPath{ |
| 92 | NSString*contactSelected=[listOfContactsobjectAtIndex:[indexPathrow]]; |
| 93 | NSString*msg=[[NSStringalloc]initWithFormat:@"您选择的联系人:%@",contactSelected]; |
| 94 | UIAlertView*alert=[[UIAlertViewalloc]initWithTitle:@"选择联系人"message:msgdelegate:self cancelButtonTitle:@"OK"otherButtonTitles:nil]; |
| 95 | [alertshow]; |
| 96 | [alertrelease]; |
| 97 | [contactSelectedrelease]; |
| 98 | [msgrelease]; |
| 99 | } |
| 100 | //UITableViewDelegate协议的方法,表格中的缩进 |
| 101 | - (NSInteger)tableView:(UITableView*)tableViewindentationLevelForRowAtIndexPath:(NSIndexPath*)indexPath{ |
| 102 | return[indexPathrow]%9; |
| 103 | |
| 104 | |
| 105 | - (void)dealloc{ |
| 106 | |
| 107 | |
| 108 | [listOfContactsrelease]; |
| 109 | [superdealloc]; |
| 110 | |
| 111 | } |
| 112 | - (void)viewDidUnload |
| 113 | { |
| 114 | [superviewDidUnload]; |
| 115 | } |
| 116 | - (BOOL)shouldAutorotateToInterfaceOrientation:(UIInterfaceOrientation)interfaceOrientation |
| 117 | { |
| 118 | return (interfaceOrientation==UIInterfaceOrientationPortrait); |
| 119 | } |
| 120 | @end |
二、通过plist文件提供数据,来显示数据,方便分组
1.添加contacts.plist文件
2. HomeViewController.h中添加代码
| 1 | #import <UIKit/UIKit.h> |
| 2 | @interfaceHomeViewController : UIViewController |
| 3 | <UITableViewDelegate,UITableViewDataSource>{ |
| 4 | } |
| 5 | @property (nonatomic, retain)NSDictionary*contactTitles;//存储所有的联系人信息 |
| 6 | @property (nonatomic, retain)NSArray*groups;//所有分类名称存入数组中 |
| 7 | @end |
3. HomeViewController.m中添加代码
| 1 | #import"HomeViewController.h" |
| 2 | @interfaceHomeViewController () |
| 3 | @end |
| 4 | @implementationHomeViewController |
| 5 | @synthesize contactTitles; |
| 6 | @synthesize groups; |
| 7 | - (void)viewDidLoad |
| 8 | { |
| 9 | |
| 10 | NSString*path=[[NSBundlemainBundle]pathForResource:@"contacts"ofType:@"plist"];//plist文件路径 |
| 11 | NSDictionary*dict=[[NSDictionaryalloc]initWithContentsOfFile:path]; |
| 12 | self.contactTitles= dict; |
| 13 | [dictrelease]; |
| 14 | |
| 15 | NSArray*array=[[contactTitlesallKeys]sortedArrayUsingSelector:@selector(compare:)]; |
| 16 | |
| 17 | self.groups= array; |
| 18 | [superviewDidLoad]; |
| 19 | } |
| 20 | //使用UITableViewDataSource协议的tableView:cellForRowAtIndexPath:方法 |
| 21 | - (UITableViewCell*)tableView:(UITableView*)tableViewcellForRowAtIndexPath:(NSIndexPath*)indexPath{ |
| 22 | |
| 23 | staticNSString*CellIndentifier=@"Contact"; |
| 24 | |
| 25 | UITableViewCell*cell=[tableViewdequeueReusableCellWithIdentifier:CellIndentifier]; |
| 26 | |
| 27 | if (cell==nil) { |
| 28 | cell=[[[UITableViewCellalloc]initWithStyle:UITableViewCellStyleDefaultreuseIdentifier:CellIndentifier]autorelease]; |
| 29 | |
| 30 | } |
| 31 | |
| 32 | |
| 33 | NSString*group=[groupsobjectAtIndex:[indexPathsection]]; |
| 34 | NSArray* contactSection=[contactTitlesobjectForKey:group]; |
| 35 | cell.textLabel.text=[contactSectionobjectAtIndex:[indexPathrow]]; |
| 36 | |
| 37 | |
| 38 | //单元格添加图片 |
| 39 | UIImage*image=[UIImageimageNamed:@"avatar.png"]; |
| 40 | cell.imageView.image= image; |
| 41 | |
| 42 | |
| 43 | return cell; |
| 44 | } |
| 45 | - (NSInteger)numberOfSectionsInTableView:(UITableView*)tableView{ |
| 46 | return[groupscount]; |
| 47 | } |
| 48 | //使用UITableViewDataSource协议的tableView:numberOfRowsInSection:方法 |
| 49 | //该方法用来设置Table View中要显示数据的行数 |
| 50 | - (NSInteger)tableView:(UITableView*)tableViewnumberOfRowsInSection:(NSInteger)section{ |
| 51 | |
| 52 | NSString*group=[groupsobjectAtIndex:section]; |
| 53 | NSArray*contactSection=[contactTitlesobjectForKey:group]; |
| 54 | |
| 55 | return[contactSectioncount]; |
| 56 | } |
| 57 | //添加标题和脚本信息 |
| 58 | - (NSString*)tableView:(UITableView*)tableViewtitleForHeaderInSection:(NSInteger)section{ |
| 59 | NSString*group=[groupsobjectAtIndex:section]; |
| 60 | return group; |
| 61 | |
| 62 | } |
| 63 | - (NSString*)tableView:(UITableView*)tableViewtitleForFooterInSection:(NSInteger)section{ |
| 64 | return@"作者:what if"; |
| 65 | } |
| 66 | |
| 67 | |
| 68 | /*//UITableViewDelegate协议的方法,选择表格中的项目 |
| 69 | - (void)tableView:(UITableView *)tableView didSelectRowAtIndexPath:(NSIndexPath *)indexPath{ |
| 70 | NSString *contactSelected = [listOfContacts objectAtIndex:[indexPath row]]; |
| 71 | NSString *msg = [[NSString alloc] initWithFormat:@"您选择的联系人:%@", contactSelected]; |
| 72 | UIAlertView *alert = [[UIAlertView alloc] initWithTitle:@"选择联系人" message:msg delegate:self cancelButtonTitle:@"OK" otherButtonTitles:nil]; |
| 73 | [alert show]; |
| 74 | [alert release]; |
| 75 | [contactSelected release]; |
| 76 | [msg release]; |
| 77 | } */ |
| 78 | /* |
| 79 | //UITableViewDelegate协议的方法,表格中的缩进 |
| 80 | - (NSInteger) tableView:(UITableView *)tableView indentationLevelForRowAtIndexPath:(NSIndexPath *)indexPath{ |
| 81 | return [indexPath row] % 9; |
| 82 | |
| 83 | }*/ |
| 84 | //索引功能 |
| 85 | |
| 86 | - (NSArray*)sectionIndexTitlesForTableView:(UITableView*)tableView{ |
| 87 | return groups; |
| 88 | } |
| 89 | //用户点击标志后触发的事件,只有DetailDisclosure Button才有该事件 |
| 90 | - (void)tableView:(UITableView*)tableViewaccessoryButtonTappedForRowWithIndexPath:(NSIndexPath*)indexPath{ |
| 91 | //进入到该项目的详细信息页面 |
| 92 | } |
| 93 | |
| 94 | |
| 95 | - (void)dealloc{ |
| 96 | |
| 97 | [contactTitlesrelease]; |
| 98 | [groupsrelease]; |
| 99 | [superdealloc]; |
| 100 | |
| 101 | } |
| 102 | - (void)viewDidUnload |
| 103 | { |
| 104 | [superviewDidUnload]; |
| 105 | } |
| 106 | - (BOOL)shouldAutorotateToInterfaceOrientation:(UIInterfaceOrientation)interfaceOrientation |
| 107 | { |
| 108 | return (interfaceOrientation==UIInterfaceOrientationPortrait); |
| 109 | } |
| 110 | @end |
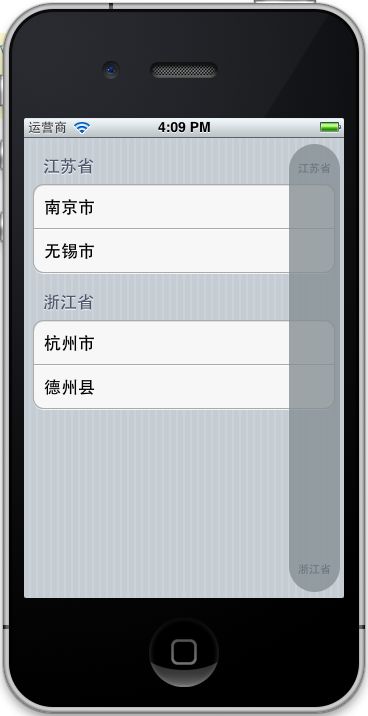
4.在xib文件中修改其Style为Grouped
显示效果:

开发多个Section的tableView。
首先应该考虑到数据源该如何得到
我们这里可以通过两种方式:第一种是读取plist文件。第二种是通过代码进行数据存储以及读取。
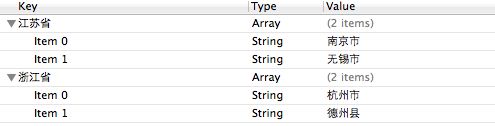
多个Section需要的数据源是一个字典,字典里的内容是一个数组。在plist文件中可以这样去创建
在.h文件中定义一个字典,一个数组

在.m文件的viewDidLoad函数中:
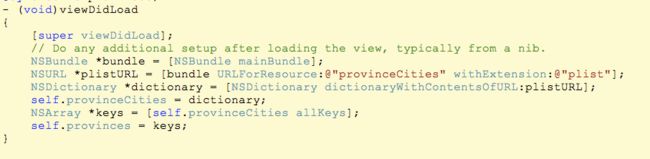
解释一下:通过bundle得到整个程序的沙盒,新建NSURL对象,读取到一个字典中,然后取所有的字典key存储到一个数组中。
接下来就是实现TableView的代理和数据源函数啦
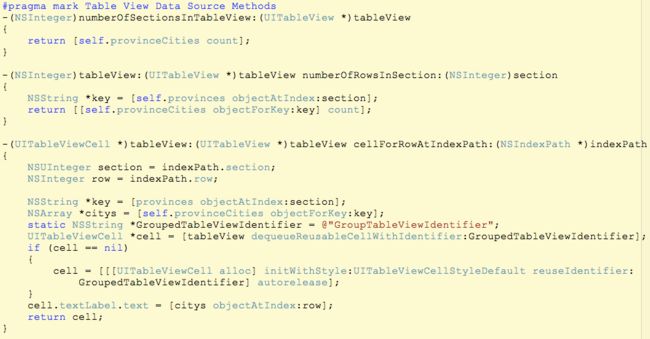
section数量取的是字典重元素的count值;
每个section的行数区的是相对应的字典元素数组的count值.
cellForRowAtIndexPath中的内容就直接取值显示。
下面要对tableView每个section加标题:

下面是要增加tableview右侧的索引栏:

效果也就完成啦:
看看效果吧
右面是拉动索引栏时的效果图。