建立crud.student数据库表:
图1 数据库表
你可以使用如下语句创建该库表:
- create database if not exists `crud`;
- USE `crud`;
- DROP TABLE IF EXISTS `student`;
- CREATE TABLE `student` (
- `id` int(4) NOT NULL auto_increment,
- `name` varchar(20) default NULL,
- `age` int(4) default NULL,
- `score` int(4) default NULL,
- PRIMARY KEY (`id`)
- ) ENGINE=InnoDB DEFAULT CHARSET=utf8;<FONT size=3><FONT size=+0>
create database if not exists `crud`;USE `crud`;DROP TABLE IF EXISTS `student`;CREATE TABLE `student` ( `id` int(4) NOT NULL auto_increment, `name` varchar(20) default NULL, `age` int(4) default NULL, `score` int(4) default NULL, PRIMARY KEY (`id`)) ENGINE=InnoDB DEFAULT CHARSET=utf8;
在这里我使用的是MySQL,当然你也可以选择别的数据库,只是在选择之前请准备好相应的jar包即可。
2、 程序编写:
第一步:配置数据源
1、打开MyEclipse,新建一个web工程,这里命名为hibernate_demo
2、打开数据库设置器:依次单击【window】-->【Show View】-->【Other…】 如下图所示:
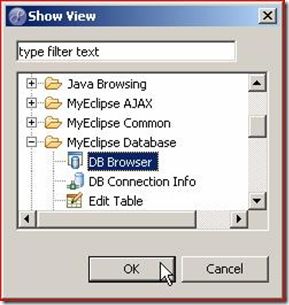
3、在弹出的窗口ShowView中选择DB Browser,如下图所示:
4、在DB Browser窗口中,选择显示的图标,单击右键执行新建命令,如下图示
5、弹出Database Driver对话框,在此会要求我们配置数据库的相关信息,具体设置如下图所示,设置完成,单击Finish.
【第二步】引入hibernate配置文件
1、 添加hibernate包:
选中我们的Web工程,依次单击鼠标右键-->MyEclipse-->Add Hibernate Capabilities… 如下图所示:
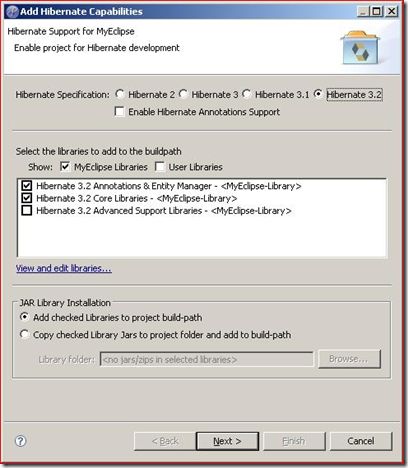
2、 在弹出的窗口中做如下设置:
【Next】
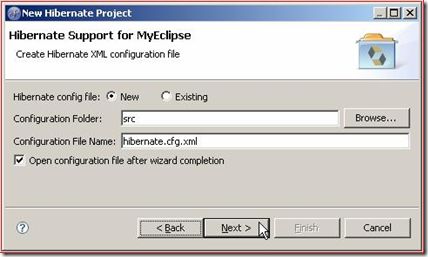
【Next】
单击Next,把要创建的SessionFactory放置于相应的包中,如果前面没有设置包名,这里要先单击New创建新的包。
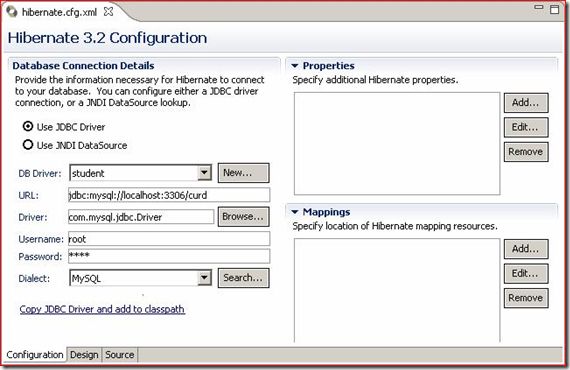
单击【Finish】按钮,页面效果如下图所示:
接下来要给hibernate.cfg.xml文件添加属性:在properties处选择Add…,如下图所示:
单击【Add…】,在Hibernate Properties Wizard页面填入如下图所示信息,最后单击Ok。
show_sql:默认为false,如果为true,表示在程序运行时,会在控制台输出SQL语句,这有利于跟中Hibernate的运行状态。在开发和测试阶段,可以将该属性设置为true,以便跟踪、调试程序,在应用发布以后 ,应将该属性值设置为false,以减少应用的输出信息,提高运行性能。
【第三步】添加hibernate映射文件
1、新建org.njy.bean包
2、在前面设置的数据源上找到我们要操作的表:
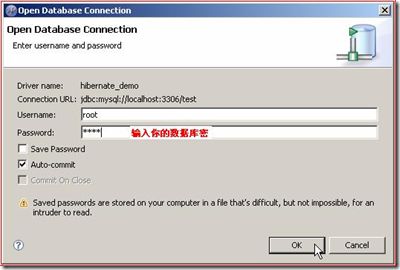
在DB Browser中选中新建的数据源,单击鼠标右键并选择open connection..
输入数据库的用户名和密码,以创建连接:
找到刚才新建的crud数据库,然后是TABLE,如下图所示:
生成POJO:
3、 修改Student.hbm.xml文件
- <?xml version="1.0" encoding="utf-8"?>
- <!DOCTYPE hibernate-mapping PUBLIC "-//Hibernate/Hibernate Mapping DTD 3.0//EN"
- "http://hibernate.sourceforge.net/hibernate-mapping-3.0.dtd">
- <!--
- Mapping file autogenerated by MyEclipse Persistence Tools
- -->
- <hibernate-mapping>
- <class name="org.njy.bean.Student" table="student">
- <!-- 必须先定义<id>元素,后定义<property>元素 -->
- <id name="id" type="java.lang.Integer">
- <column name="id" />
- <!-- 主键的生成方式 -->
- <generator class="increment" />
- </id>
- <!-- name属性,类型为String,对应的数据库中的列为name,长度为20 -->
- <property name="name" type="java.lang.String">
- <column name="name" length="20" />
- </property>
- <property name="age" type="java.lang.Integer">
- <column name="age" />
- </property>
- <property name="score" type="java.lang.Integer">
- <column name="score" />
- </property>
- </class>
- </hibernate-mapping>
<?xml version="1.0" encoding="utf-8"?><!DOCTYPE hibernate-mapping PUBLIC "-//Hibernate/Hibernate Mapping DTD 3.0//EN""http://hibernate.sourceforge.net/hibernate-mapping-3.0.dtd"><!-- Mapping file autogenerated by MyEclipse Persistence Tools--><hibernate-mapping> <class name="org.njy.bean.Student" table="student"> <!-- 必须先定义<id>元素,后定义<property>元素 --> <id name="id" type="java.lang.Integer"> <column name="id" /> <!-- 主键的生成方式 --> <generator class="increment" /> </id> <!-- name属性,类型为String,对应的数据库中的列为name,长度为20 --> <property name="name" type="java.lang.String"> <column name="name" length="20" /> </property> <property name="age" type="java.lang.Integer"> <column name="age" /> </property> <property name="score" type="java.lang.Integer"> <column name="score" /> </property> </class></hibernate-mapping>
提示:建议删除catalog=”crud”,当修改了数据库名的时候程序会出现错误(找不到对应的库)。
4、 hibernate.cfg.xml文件
- <?xml version='1.0' encoding='UTF-8'?>
- <!DOCTYPE hibernate-configuration PUBLIC
- "-//Hibernate/Hibernate Configuration DTD 3.0//EN"
- "http://hibernate.sourceforge.net/hibernate-configuration-3.0.dtd">
- <hibernate-configuration>
- <session-factory>
- <!-- dialect指定数据库使用的方言 -->
- <property name="dialect">org.hibernate.dialect.MySQLDialect</property>
- <!-- connection.dirver_class指定数据库的驱动程序 -->
- <property name="connection.driver_class">com.mysql.jdbc.Driver</property>
- <!-- connection.url指定连接数据库的URL -->
- <property name="connection.url">jdbc:mysql://localhost:3306/crud</property>
- <!-- connection.username指定连接数据库的用户名 -->
- <property name="connection.username">root</property>
- <!-- connection.password指定连接数据库的密码 -->
- <property name="connection.password">root</property>
- <!-- show_sql指定是否打印SQL语句 -->
- <property name="show_sql">true</property>
- <!-- 指定POJO的映射文件 -->
- <mapping resource="org/njy/bean/Student.hbm.xml" />
- </session-factory>
- </hibernate-configuration>
<?xml version='1.0' encoding='UTF-8'?><!DOCTYPE hibernate-configuration PUBLIC "-//Hibernate/Hibernate Configuration DTD 3.0//EN" "http://hibernate.sourceforge.net/hibernate-configuration-3.0.dtd"><hibernate-configuration> <session-factory> <!-- dialect指定数据库使用的方言 --> <property name="dialect">org.hibernate.dialect.MySQLDialect</property> <!-- connection.dirver_class指定数据库的驱动程序 --> <property name="connection.driver_class">com.mysql.jdbc.Driver</property> <!-- connection.url指定连接数据库的URL --> <property name="connection.url">jdbc:mysql://localhost:3306/crud</property> <!-- connection.username指定连接数据库的用户名 --> <property name="connection.username">root</property> <!-- connection.password指定连接数据库的密码 --> <property name="connection.password">root</property> <!-- show_sql指定是否打印SQL语句 --> <property name="show_sql">true</property> <!-- 指定POJO的映射文件 --> <mapping resource="org/njy/bean/Student.hbm.xml" /> </session-factory></hibernate-configuration>
5、 新建一个包org.njy.test,再新建TestHibernate.java用来测试一下我们的Hibernate。
【添加】
- public static void main(String[] args) {
- Session session = HibernateSessionFactory.getSession();
- Transaction tx = session.beginTransaction();
- Student stu = new Student("聂靖宇", 22, 98);
- try {
- session.save(stu);
- tx.commit();
- } catch (Exception e) {
- tx.rollback();
- e.printStackTrace();
- }finally{
- session.close();
- }
- }
public static void main(String[] args) { Session session = HibernateSessionFactory.getSession(); Transaction tx = session.beginTransaction(); Student stu = new Student("聂靖宇", 22, 98); try { session.save(stu); tx.commit(); } catch (Exception e) { tx.rollback(); e.printStackTrace(); }finally{ session.close(); }}
在执行添加的时候控制台打印出如下两条sql语句:
Hibernate: select max(id) from student
Hibernate: insert into student (name, age, score, id) values (?, ?, ?, ?)
【修改】
- public static void main(String[] args) {
- Session session = HibernateSessionFactory.getSession();
- Transaction tx = session.beginTransaction();
- Student stu = new Student("test", 22, 98);
- stu.setId(1);
- try {
- session.update(stu);
- tx.commit();
- } catch (Exception e) {
- tx.rollback();
- e.printStackTrace();
- }finally{
- session.close();
- }
- }<FONT size=3><FONT size=+0><SPAN>
public static void main(String[] args) { Session session = HibernateSessionFactory.getSession(); Transaction tx = session.beginTransaction(); Student stu = new Student("test", 22, 98); stu.setId(1); try { session.update(stu); tx.commit(); } catch (Exception e) { tx.rollback(); e.printStackTrace(); }finally{ session.close(); }}
在修改信息的时候要保证主键Id存在,这样程序才知道修改的是那条记录的信息。
在修改信息的时候要保证主键Id存在,这样程序才知道修改的是那条记录的信息。
【删除】
- public static void main(String[] args) {
- Session session = HibernateSessionFactory.getSession();
- Transaction tx = session.beginTransaction();
- Student stu = new Student();
- stu.setId(1);
- try {
- session.delete(stu);
- tx.commit();
- } catch (Exception e) {
- tx.rollback();
- e.printStackTrace();
- }finally{
- session.close();
- }
- }
public static void main(String[] args) { Session session = HibernateSessionFactory.getSession(); Transaction tx = session.beginTransaction(); Student stu = new Student(); stu.setId(1); try { session.delete(stu); tx.commit(); } catch (Exception e) { tx.rollback(); e.printStackTrace(); }finally{ session.close(); }}

