本文主要教你如何使用iOS 7 SDK多任务处理API--Background Fetch。我们生活在一个社交化的世界中,大部分用户都安装了几个社交类app,但是每次用户打开app,他们必须要等待app加载更新才能看到跟更多最新的内容,对于越来越没耐心的用户来说这一点无疑令人非常痛苦。现在,iOS 7的后台获取(Background Fetch)可以很好地解决这个问题,在用户打开应用之前,app就能自动更新获取内容。
以检测流量的app为例来说明Background Fetch如何工作。如果你会在每天早上查看应用,我们假设在8:20 AM,,你的iOS app必须在当时获得信息。现在如果操作系统知道你将会在8:20 AM左右使用app,那么它可以提前获得数据,从而提供更好的用户体验。
关于iOS 7多任务执行更全面的概览可参看我们的主题“
iOS 7 SDK: Multitasking Enhancements”。以下我们将会以一个实例工程来演示如何使用后台获取(Background Fetch)。
1.项目安装
第一步是创建一个iOS 7项目,并选择单视图app,接着添加一些有用的属性:
1 |
@property (nonatomic) NSMutableArray *objects; |
2 |
@property (nonatomic) NSArray *possibleTableData; |
3 |
@property (nonatomic) int numberOfnewPosts; |
4 |
@property (nonatomic) UIRefreshControl *refreshControl; |
NSMutablearray对象将会被用来在TableView中保存对象列表。在这个教程中,你将不能调用任何服务来获得数据。相反,你将使用possibleTableData数组,并随机从中选择几个对象。整个numberOfnewPosts代表新发布的内容--每次进行请求或者接收后台获取时可用。refrestControl是一个在更新任务时使用的控件。由于不在教程之内,所以本文不会在此展开。
在Main.storyboard中,把ViewController改为UITableViewController,下一步,点击UITableViewController,转到Editor > Embed in > Navigation Controller。记得把自定义类设置为ViewController。然后转至ViewController.m,第一步加载一些数据。以下代码将会申请内存并创建数据对象,创建一个标题以及初始化refreshControl:
1 |
self.possibleTableData = [NSArray arrayWithObjects:@"Spicy garlic Lime Chicken",@"Apple Crisp II",@"Eggplant Parmesan II",@"Pumpkin Ginger Cupcakes",@"Easy Lasagna", @"Puttanesca", @"Alfredo Sauce", nil]; |
2 |
self.navigationItem.title = @"Delicious Dishes"; |
3 |
self.refreshControl = [[UIRefreshControl alloc] init]; |
4 |
[self.refreshControl addTarget:self action:@selector(insertNewObject:) forControlEvents:UIControlEventValueChanged]; |
5 |
[self.tableView addSubview:self.refreshControl]; |
以上代码将会产生一个提醒,因为我们丢失了insertNewObject method。让我们来解决它。该方法将会产生一个随机数,并且将从日期数组获得对象相同的数据,然后它将会通过新值来更新tableview。
01 |
- (void)insertNewObject:(id)sender |
03 |
self.numberOfnewPosts = [self getRandomNumberBetween:0 to:4]; |
04 |
NSLog(@"%d new fetched objects",self.numberOfnewPosts); |
05 |
for(int i = 0; i < self.numberOfnewPosts; i++){ |
06 |
int addPost = [self getRandomNumberBetween:0 to:(int)([self.possibleTableData count]-1)]; |
07 |
[self insertObject:[self.possibleTableData objectAtIndex:addPost]]; |
09 |
[self.refreshControl endRefreshing]; |
当你添加以下方法时,getRandomNumberBetween提醒将会被禁止:
1 |
-(int)getRandomNumberBetween:(int)from to:(int)to { |
2 |
return (int)from + arc4random() % (to-from+1); |
为了在 NSArray object上加载对象,我们需要执行TableView委托函数。
01 |
- (NSInteger)numberOfSectionsInTableView:(UITableView *)tableView { |
04 |
- (NSInteger)tableView:(UITableView *)tableView numberOfRowsInSection:(NSInteger)section { |
05 |
return self.objects.count; |
07 |
- (UITableViewCell *)tableView:(UITableView *)tableView cellForRowAtIndexPath:(NSIndexPath *)indexPath { |
08 |
UITableViewCell *cell = [tableView dequeueReusableCellWithIdentifier:@"Cell" forIndexPath:indexPath]; |
09 |
cell.textLabel.text = self.objects[indexPath.row]; |
10 |
if(indexPath.row < self.numberOfnewPosts){ |
11 |
cell.backgroundColor = [UIColor yellowColor]; |
14 |
cell.backgroundColor = [UIColor whiteColor]; |
非常简单吧?如果运行项目,你会看到一个类似下图的界面:
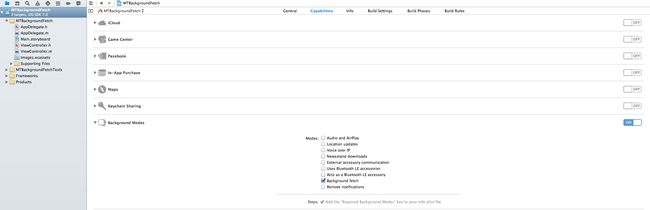
2. Background Fetch
现在开始创建Background Fetch功能,首先从Project开始,接着是Capabilities,然后Put Background Modes ON,再选择Background Fetch,如下图所示:
但仅仅做这个是不够的。默认地,app不会调用后台API,所以你需要在AppDelegate.m文件中把以下代码添加至-(BOOL)application:(UIApplication *)application didFinishLaunchingWithOptions:(NSDictionary *)launchOptions method.
1 |
[[UIApplication sharedApplication] setMinimumBackgroundFetchInterval:UIApplicationBackgroundFetchIntervalMinimum]; |
这个可以让系统决定何时应该展示新内容。现在你的app已经知道启动ackground fetch,让我们告诉它要做些什么。方法-(void)application:(UIApplication *)application performFetchWithCompletionHandler:(void (^)(UIBackgroundFetchResult))completionHandler将会对你有所帮助。每当执行后台获取时该方法都会被调用,并且应该被包含在AppDelegate.m文件中。以下是完整版本:
01 |
-(void)application:(UIApplication *)application performFetchWithCompletionHandler:(void (^)(UIBackgroundFetchResult))completionHandler { |
02 |
UINavigationController *navigationController = (UINavigationController*)self.window.rootViewController; |
03 |
id topViewController = navigationController.topViewController; |
04 |
if ([topViewController isKindOfClass:[ViewController class]]) { |
05 |
[(ViewController*)topViewController insertNewObjectForFetchWithCompletionHandler:completionHandler]; |
07 |
NSLog(@"Not the right class %@.", [topViewController class]); |
08 |
completionHandler(UIBackgroundFetchResultFailed); |
下一步你应该也把ViewController头文件放进AppDelegate.m类。
#import "ViewController.h"
注意insertNewObjectForFetchWithCompletionHandler并没有被创建,所以还需要在ViewController.h中声明它。
- (void)insertNewObjectForFetchWithCompletionHandler:(void (^)(UIBackgroundFetchResult))completionHandler;
现在关注执行文件,类似于之前insertNewObject调用的添加。我们使用completionHandler来和系统“交流”,并让它告诉我们app是否现在获取数据,或者当前是否有有效数据。
01 |
- (void)insertNewObjectForFetchWithCompletionHandler:(void (^)(UIBackgroundFetchResult))completionHandler { |
02 |
NSLog(@"Update the tableview."); |
03 |
self.numberOfnewPosts = [self getRandomNumberBetween:0 to:4]; |
04 |
NSLog(@"%d new fetched objects",self.numberOfnewPosts); |
05 |
for(int i = 0; i < self.numberOfnewPosts; i++){ |
06 |
int addPost = [self getRandomNumberBetween:0 to:(int)([self.possibleTableData count]-1)]; |
07 |
[self insertObject:[self.possibleTableData objectAtIndex:addPost]]; |
12 |
completionHandler(UIBackgroundFetchResultNewData); |
完成代码,现在我们模拟一个测试,并验证所有项目都能启动和运行。
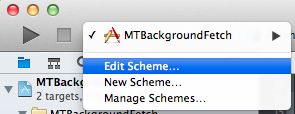
3. Simulated Background Fetch
如果想确定是否每件事都已经配置好了,你需要编辑Schemes,在Schemes列表点击Manage Schemes选项,如下:
在Schemes管理区你可以复制app的scheme:
复制后scheme会在新窗口展示。你可在Options标签下更改它的名称。选择“Launch due to a background fetch event”框,并在所有窗口中点击“OK”。
接着,使用复制的scheme运行app。注意app不会在前台打开,但是它应该已经获得了一些内容。如果打开app,并且几个recipe已生效,那就说明操作已经成功了。为了使用后台获取功能,你也可以从Xcode菜单的Debug > Simulate Background Fetch开始。