Nexus创建本地Maven仓库(Maven私服)
0.安装环境
windows 7 x86-64
jdk1.6.0_27 32-bit(假定该环境中已经设置了jdk的环境变量)
maven 3.1.1
nexus-2.9.1-02-bundle
1.安装maven3.1.1
1)下载maven
访问maven官方网站http://maven.apache.org/,下载maven包。下载链接为:http://apache.fayea.com/apache-mirror/maven/maven-3/3.1.1/binaries/apache-maven-3.1.1-bin.zip
2)解压下载到的apache-maven-3.1.1-bin.zip到某个目录。(如E:\Eb\Apache Software Foundation\apache-maven-3.1.1)
3)设置环境变量。
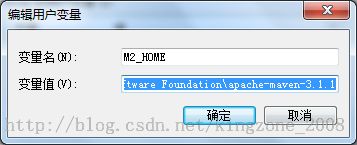
第一,添加用户变量M2_HOME(实际应为M3_HOME,懒得改了,下面都用M2_吧),M2_HOME=E:\Eb\Apache Software Foundation\apache-maven-3.1.1
第二,添加用户变量M2,M2=%M2_HOME%\bin
第三,修改用户变量PATH(若没有此变量,则添加一个),PATH=%M2%;%PATH%
4)验证maven是否安装成功。打开命令行,输入mvn -v,显示如下信息即为安装成功。
2.安装nexus
1)下载nexus
访问nexus官方网站http://www.sonatype.org/nexus/,下载nexus-2.9.1-02-bundle.zip。 http://www.sonatype.org/nexus/archived
2)解压至某个目录(如E:\Eb\nexus-2.9.1-02-bundle)
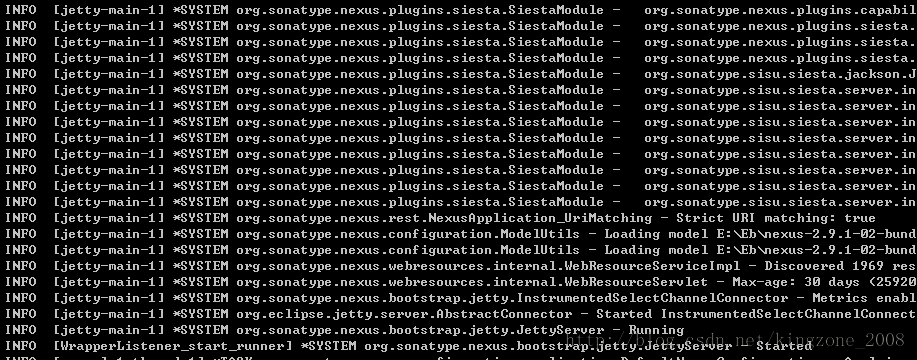
3)开启jetty服务器。找到E:\Eb\nexus-2.9.1-02-bundle\nexus-2.9.1-02\bin\jsw\windows-x86-32(由于jdk安装的是32位版本,因此执行此目录下的文件)目录,执行console-nexus.bat批处理文件,等待命令行执行到如下情况:
不要关闭命令行窗口。
4)访问nexus管理页面。
打开浏览器,输入http://localhost:8081/nexus/,点击页面右上方的Log in超链接,输入默认用户名密码admin/admin123,登录nexus管理页面。
3.配置nexus
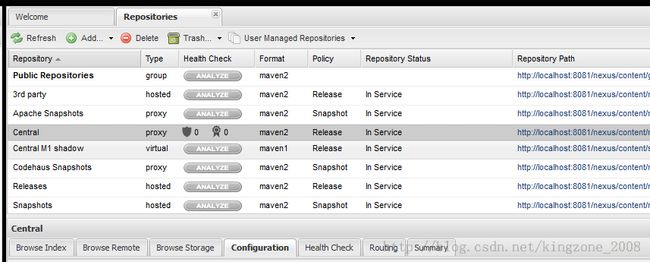
1)登录nexus管理页面,点击左侧的Repositories,显示相关的仓库信息,各个仓库的含义可自行百度之。
2)修改默认的存储路径。
安装nexus后,本地仓库默认的jar包存储位置是file:/E:/Eb/nexus-2.9.1-02-bundle/sonatype-work/nexus/storage/central。由于Central仓库占用存储较大,我们可以单独设置其存储位置。
首先,将E:/Eb/nexus-2.9.1-02-bundle/sonatype-work/目录下的所有内容复制到H:/Eb/nexus-2.9.1-02-bundle/sonatype-work/目录下;
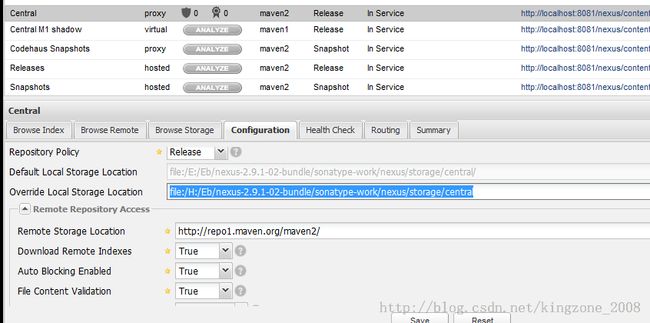
第二,选中Central,打开Configuration选项卡,修改Override Local Storage Location项的值为file:/H:/Eb/nexus-2.9.1-02-bundle/sonatype-work/nexus/storage/central,点击页面下方的save按钮。
3)同步索引。
首先,选中Central,点击下方的Configuration选项卡。修改Download Remote Indexes项的值为True。点击页面下方的save按钮。
第二,右键点击Central,弹出菜单中点击Repair Index。Repair Index过程可能较慢,等待一会儿,进度可以从命令行窗口的日志中看到。
(注意以下问题:
关于Apache Snapshots 仓库无法拉取的问题:
nexus默认配置的是如下路径:
http://repository.apache.org/snapshots/
然后更新索引的时候日志中会提示:
jvm 1 | 2013-11-02 19:23:34 INFO [pxpool-1-thread-3] admin org.sonatype.nexus.index.DefaultIndexerManager - Cannot fetch remote index for repository "Apache Snapshots" [id=apache-snapshots] as it does not publish indexes.
正确的地址是如下这个:
https://repository.apache.org/content/repositories/releases/ release版本
https://repository.apache.org/content/repositories/snapshots/ 非稳定版本
请在仓库配置中更新地址即可。--参照连接http://leeon.me/a/use-cubieboard-to-build-maven-repo)
修改完成后的配置如下图:
4)Apache Snapshots和Codehaus Snapshots两个仓库也按照上述1)2)3)步骤修改,只是Override Local Storage Location项分别为file:/H:/Eb/nexus-2.9.1-02-bundle/sonatype-work/nexus/storage/apache-snapshots和file:/H:/Eb/nexus-2.9.1-02-bundle/sonatype-work/nexus/storage/codehaus-snapshots
注:还有一个更彻底的方式,直接修改E:\Eb\nexus-2.9.1-02-bundle\nexus-2.9.1-02\conf\nexus.properties中的配置项nexus-work如下:
# Nexus section
#nexus-work=${bundleBasedir}/../sonatype-work/nexus
nexus-work=H:/Eb/nexus-2.9.1-02-bundle/sonatype-work/nexus
runtime=${bundleBasedir}/nexus/WEB-INF
4.配置maven使用nexus
1)在maven安装目录中找到maven的全局配置文件。E:\Eb\Apache Software Foundation\apache-maven-3.1.1\conf目录下的settings.xml文件。
2)将settings.xml修改为如下配置:
<?xml version="1.0" encoding="UTF-8"?>

<settings xmlns="http://maven.apache.org/SETTINGS/1.0.0"
          xmlns:xsi="http://www.w3.org/2001/XMLSchema-instance"
          xsi:schemaLocation="http://maven.apache.org/SETTINGS/1.0.0 http://maven.apache.org/xsd/settings-1.0.0.xsd">

  <localRepository>E:/.m2/repository</localRepository>

  <pluginGroups>

  </pluginGroups>

  <!-- proxies
   | This is a list of proxies which can be used on this machine to connect to the network.
   | Unless otherwise specified (by system property or command-line switch), the first proxy
   | specification in this list marked as active will be used.
   |-->
  <proxies>
    <!-- proxy
     | Specification for one proxy, to be used in connecting to the network.
     |
    <proxy>
      <id>optional</id>
      <active>true</active>
      <protocol>http</protocol>
      <username>proxyuser</username>
      <password>proxypass</password>
      <host>proxy.host.net</host>
      <port>80</port>
      <nonProxyHosts>local.net|some.host.com</nonProxyHosts>
    </proxy>
    -->

  </proxies>


  <!-- servers
   | This is a list of authentication profiles, keyed by the server-id used within the system.
   | Authentication profiles can be used whenever maven must make a connection to a remote server.
   |-->
  <servers>

  </servers>

  <!-- mirrors
   | This is a list of mirrors to be used in downloading artifacts from remote repositories.
   |
   | It works like this: a POM may declare a repository to use in resolving certain artifacts.
   | However, this repository may have problems with heavy traffic at times, so people have mirrored
   | it to several places.
   |
   | That repository definition will have a unique id, so we can create a mirror reference for that
   | repository, to be used as an alternate download site. The mirror site will be the preferred
   | server for that repository.
   |-->
  <mirrors>

    <mirror>
      <!--This is used to direct the public snapshots repo in the
          profile below over to a different nexus group -->
      <id>nexus-public-snapshots</id>
      <mirrorOf>public-snapshots</mirrorOf>
      <url>http://localhost:8081/nexus/content/groups/public-snapshots</url>
    </mirror>
    <mirror>
      <!--This sends everything else to /public -->
      <id>nexus</id>
      <mirrorOf>*</mirrorOf>
      <url>http://localhost:8081/nexus/content/groups/public</url>
    </mirror>
  </mirrors>

  <profiles>

    <profile>
      <id>development</id>
      <repositories>
        <repository>
          <id>central</id>
          <url>http://central</url>
          <releases><enabled>true</enabled></releases>
          <snapshots><enabled>true</enabled></snapshots>
        </repository>
      </repositories>
     <pluginRepositories>
        <pluginRepository>
          <id>central</id>
          <url>http://central</url>
          <releases><enabled>true</enabled></releases>
          <snapshots><enabled>true</enabled></snapshots>
        </pluginRepository>
      </pluginRepositories>
    </profile>
    <profile>
      <!--this profile will allow snapshots to be searched when activated-->
      <id>public-snapshots</id>
      <repositories>
        <repository>
          <id>public-snapshots</id>
          <url>http://public-snapshots</url>
          <releases><enabled>false</enabled></releases>
          <snapshots><enabled>true</enabled></snapshots>
        </repository>
      </repositories>
     <pluginRepositories>
        <pluginRepository>
          <id>public-snapshots</id>
          <url>http://public-snapshots</url>
          <releases><enabled>false</enabled></releases>
          <snapshots><enabled>true</enabled></snapshots>
        </pluginRepository>
      </pluginRepositories>
    </profile>
  </profiles>

  <!-- activeProfiles
   | List of profiles that are active for all builds.
   |
  <activeProfiles>
    <activeProfile>alwaysActiveProfile</activeProfile>
    <activeProfile>anotherAlwaysActiveProfile</activeProfile>
  </activeProfiles>
  -->
  <activeProfiles>
    <activeProfile>development</activeProfile>
  </activeProfiles>
</settings>
3)验证是否设置成功。
打开命令行,执行如下语句:
mvn help:system
之后,查看E:/.m2/repository(<localRepository>E:/.m2/repository</localRepository>将maven的默认配置改为该目录,默认配置为C:\Users\<用户名>\.m2\repository)和file:/H:/Eb/nexus-2.9.1-02-bundle/sonatype-work/nexus/storage/central两个目录下都有了新下载到的jar包。则表示配置成功。
5.nexus对archetype的支持
参考:http://seanzhou.iteye.com/blog/1420634


